SHARE ON SOCIAL NETWORKS
FacebookTwitterOkGoogle+PinterestVk
The dowel is the most popular fastener, which is used for reliable fixation of any structure or element to a solid surface. The principle of its operation is based on the emergence of a friction force, which arises as a result of its expansion in the thickness of the base under the influence of a screw or screw that is screwed into it. The solution to the question of how to install a dowel in the wall will depend on the type of fastener and type of surface.
Dowels are necessary to firmly hold screws and self-tapping screws inside the hole
Selection rules
Before purchasing dowel fasteners, you need to find out what surface it will be mounted on.
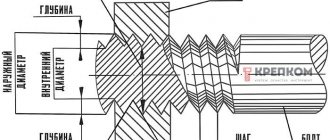
An important parameter when choosing is the diameter and length of the fastener. The larger they are, the greater the load it can withstand. It also takes into account the thickness, surface density and the presence of voids. For example, for a plinth, the most popular universal dowels with a diameter of 0.6 centimeters and a length of up to 8 centimeters are suitable. This is one of the reliable mounts, but if the structure needs to be dismantled, problems may arise. It must be remembered that before installation, all the necessary markings are applied for mounting on the wall and under the holes on the baseboard, which will later be drilled in advance. The diameter of the holes must be equal to the diameter of the dowel.
For a toilet with small dimensions, installation using dowels will be the most practical option. Rubber washers or gaskets should be included with the hardware. Here you also need to measure the surface and mark where the fasteners will be inserted. Next, a hole is drilled in the tile with a drill, and then in the concrete with a construction hammer. Façade specimens are suitable for insulation and polystyrene foam; at their base there is a special serrated groove, thanks to which the dowel-nail is securely attached to the base.
As a fastener for a TV, for a wall-mounted hallway, for hanging a kitchen, shelves and other furniture that will be installed in a vertical plane, it is better to use metal nails for aerated concrete or frame ones.
In the next video you will learn about the types, characteristics and features of installing dowel-nails.
Characteristics and types of dowel fasteners for concrete
The classic type of dowel for concrete is a cylindrical plastic sleeve with notches along the entire length and protrusions that prevent the fastener from turning and falling out. It is usually supplemented with a self-tapping screw or nail.
Design of a standard dowel for concrete
In addition to standard dowels, you can now find special chemical fasteners for porous concrete on the construction market. They are fixed in the finished hole by using an adhesive composition that fills all the pores. For their final fixation, it is necessary to wait until the composition hardens. This takes from two hours to a day.
You can also distinguish some other types of dowel elements for concrete:
- Spacer. It is distinguished from the rest by the size of the screws and the execution of the latter in the form of slate.
- A dowel-nail made of metal, driven into concrete with a hammer or a special gun.
- Facade - dowel used for mounting the frame on concrete walls. This fastener is slightly longer than the expansion fastener, and its screw has a larger head. Resistant to material impacts.
- KVT is a dowel with a wide thread, which allows it to be secured as securely as possible in a wall made of aerated concrete.
- GB – fasteners for walls made of polystyrene concrete. Its sleeve is similar to a spacer sleeve, but has a spiral structure. Such fasteners will withstand maximum loads.
Variety of dowels for concrete
A dowel for concrete has a lot of differences from a similar one for brick. It is important to choose the right fasteners, as this affects the installation result. In most cases, a dowel-nail is used for concrete. Self-tapping screws or studs are not suitable here, as when working with brickwork. Thanks to the ability to easily hammer a nail into a concrete base, you can quickly and efficiently complete the job.
Dowel fastening for concrete is such a universal option that it is sometimes difficult to describe all areas of its application. It is used during repairs for attaching wall cabinets, hoods, curtain rods, TV brackets, household appliances and for solving other problems.
Tools
This may seem strange, but the tools used to drive nails into concrete are exactly the same as when working with other materials.
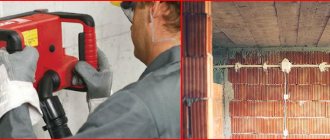
Most often, a construction hammer is used, with a head weighing at least a kilogram and a fairly long handle. Using a lighter tool, you are unlikely to achieve success, because in our work we will need a large supply of energy, and a long handle will serve as an excellent lever. The easiest way to secure a nail in a concrete wall is to use a pneumatic, electric or powder nailer gun. By properly setting up the equipment, you can quickly complete a fairly large amount of work without much effort. Before using a powerful tool, be sure to read the user manual - not all nail driving devices allow you to work with concrete. If the manufacturer allows such use of its product, it is worth clarifying the necessary settings and requirements for fasteners in the passport.
How to drive a dowel nail into a concrete wall
The need to hammer a nail into a wall appears not only where repairs are being carried out. You may need to drive a nail to attach mirrors, paintings, framed photos, hanging furniture, electrical appliances, appliances, etc.
Any standard fastening requires the presence of two elements: a plastic dowel and a metal screw. Regardless of the purpose of the fastener, both elements are important because they complement each other well: there is no point in a dowel without a screw, and a self-tapping screw without a dowel will simply easily fly out of a solid base, since nothing will hold it there. The self-tapping screw is screwed into soft plastic and such fasteners are reliable and durable.
Before driving a nail into a concrete wall without a drill or using a special tool, you need to accurately mark the wall. To do this, choose a suitable place and make a cross with a pencil. You need to make a bag from a sheet of thick paper, attach it to the wall a few centimeters below the mark with masking tape - such a simple design will protect against the spread of dust throughout the room.
Next, you need to drill a hole in the wall with a hammer drill and a drill of the required size. For a brick wall, it is better to choose a powerful drill. The tool is installed strictly perpendicular to the base, a hole of the required depth is drilled so that the dowel can be completely buried in the material. If you don't drill enough, the dowel will stick out; if you drill too much, the plastic stopper may tear or fall through when driven in.
Having received a hole of the required diameter, you should carefully drive the dowel into the wall flush with the surface, then screw in the self-tapping screw, leaving the required length so that the fasteners can be used.
What can replace a nail?
Dowel instead of nail
When it comes to concrete, a nail is considered a poor solution.
You can replace it with a dowel.
It is sold in construction stores and is relatively inexpensive.
The buyer has a wide selection of products to choose from: plastic, metal, nylon.
If you need to hang a picture or a shelf, when hammering it in, you need to hold it at an angle from top to bottom.
Thus, the mount will become more reliable and will last for many years. In case of unexpected impact on the walls due to time or climate conditions, the interior part will not fall and will hold securely.
Special dowel-nails would also be an ideal option. They are designed to be driven directly into concrete. Concrete nails have thicker walls, so they won't break while working with them.
The material and design make them easy to use, just use a heavy hammer for greater efficiency. They will fit perfectly into the wall.
If it is possible to replace the nail with a more suitable solution, you should pay special attention to this.
Peculiarities
The dowel for concrete differs from the brick version. It is not used on hollow brick masonry blocks, since in this case the dowel structure cannot provide reliable fastening. The concrete dowel is used for both external and internal work. It is used for fastening small shelves and large-sized structures, used for mounting a suspended frame for the ceiling, mounting for a chandelier, and so on. As a working surface, the dowel can be used for reinforced concrete, polystyrene concrete, and also for cellular foam concrete.
Externally, the mount looks like a plastic sleeve made in the shape of a cylinder, on the surface of which special retaining notches and protrusions are evenly distributed. With their help, the fastener is held within the boundaries of a hole prepared in advance in the material, and does not become loose or fall out. A long self-tapping screw or a special nail made of a durable steel alloy with alloy is inserted inside the cylinder.
Some models of concrete dowels may have a special steel collar or it is made of polymer materials - it protects the working surface of the wall, as well as the prepared hole and increases the strength of the fastening joint. Plastic polymer fasteners are good because they are not subject to corrosion, they do not conduct electric current through themselves, but at the same time they guarantee reliable adhesion to concrete, thanks to the features of their design.
Dowel fastening materials used for concrete surfaces can be completely metallic in composition and are not much different from fasteners made from polymer plastics. However, it is worth noting that the choice of metal fasteners is much smaller than that of their plastic counterparts. In addition, the metal material is considered too rigid, non-plastic and difficult to install, and during installation work this option is often subject to deformation due to improper handling and becomes unusable.
Types of dowels
Today there are many types of dowels for concrete, the list of which would take a very long time.
Therefore, we will highlight the most common ones:
- Conventional spacers;
- Butterfly;
- Universal;
- Dowels-nails;
- Facade (umbrellas);
- Chemical;
- KVT;
- G.B.
Now let's take a closer look at their features and purpose.
Conventional spacer fastener
Spacer
The expansion dowel for concrete walls allows for the installation of various rigid structures. This type of fastener may differ in the type of screw heads. Most often they are made “sunk” and for a Phillips screwdriver.
However, screws of large diameters are sometimes found with a hex head. As a rule, they have a slate-shaped thread, due to which the dowel is driven into the concrete with a hammer during installation.
In case of dismantling, before pulling the dowel out of the concrete wall, you just need to unscrew the screw. After this, the sleeve can be easily removed from the hole.
It must be said that the sleeves themselves may differ. They come in two or three spacers. They often have spikes and locking tabs that help securely lock the fastener into the hole.
The sizes of dowels for concrete can be very different. Therefore, you should choose depending on the type of structure that will be installed.
In the photo - “Butterfly” fastener
Butterfly
Used for hollow or thin-walled structures. The sleeve of such fastening is inserted into the through hole. After screwing in the screw, its reverse side folds, resulting in fixation.
Universal fastener
Universal
This fastener in solid walls is identical to the spacer fastener. In hollow walls, when a screw is screwed in, the sleeve is wrapped into a knot, resulting in fixation using the “Butterfly” principle. Thus, the same fastener can be used for different surfaces.
Dowel nail
Nail
This fastener is a metal dowel for concrete, designed for permanent fastening of various thin-sheet materials and profiles to concrete. It can be used for through fastening of a profile.
The “nail” is designed in such a way that it is fastened to the wall by hammering it in. As a rule, for installation, a gun is used to drive dowels into concrete, however, this procedure can also be performed with a hammer.
"Umbrella" with a metal rod
Facade
Facade fasteners can be classified as a separate group.
It is intended for installation of thermal insulation:
- Expanded polystyrene;
- Fiber boards;
- Mineral mats.
In essence, this is the same expansion dowel, but elongated and with an enlarged head. The sleeve itself is made of impact-resistant polypropylene, and the rod is made of glass fiber reinforced polyamide. Sometimes there are “umbrellas” with a metal rod. (See also the article Self-tapping screws for concrete: features.)
Chemical dowel
Chemical
Another unusual type of fastener is a chemical dowel for foam concrete.
It consists of two elements:
- Capsules with chemical composition;
- Metal screw.
The installation instructions for such a dowel are as follows:
- First of all, a hole of the required length is drilled in the foam concrete.
- Then a capsule with a chemical composition is inserted into the hole.
- Next, the screw is screwed in. In this case, the capsule breaks and the chemical composition penetrates into the pores of the foam concrete.
- After this, you need to wait until the substance hardens. Depending on the type of composition, this may take from several hours to a day.
KVT fasteners
KVT
KVT was created specifically for installation in aerated concrete. Its feature is a wide thread located on the outside of the sleeve. Thanks to it, reliable adhesion to the porous base material is obtained. (See also the article Grinding concrete: how to do it.)
When screwing the sleeve into aerated concrete, it does not destroy its structure, but cuts a thread in it. Depending on the type of material, the KVT dowel for lightweight concrete can withstand 400-600 kg.
GB fastener
G.B.
The GB fastener is a dowel for polystyrene concrete blocks. Essentially, it is a spacer sleeve with spiral blades.
Thanks to this design, the dowel for polystyrene concrete GB is able to withstand heavy loads, so it is used when installing wall cabinets, heating radiators, shelves for household appliances, etc.
Types of fasteners
Construction stores offer a wide range of dowels. Photos of products clearly demonstrate the diversity of their designs, materials of manufacture and purpose.
The most common product is the universal polypropylene dowel. It has a traditional design in the form of a sleeve, into the cavity of which a self-tapping screw is screwed. This element is suitable for concrete, brick and stone foundations. The design of the product is equipped with special spacers, with the help of which the element is securely fixed in the hole.
To perform complex external work, a spacer construction dowel with a locking edge is used, which eliminates the possibility of fasteners falling into the hole.
Nylon dowels are equipped with fastening antennae, thanks to which the products are securely fixed in the holes. They can be used on any surface.
Drywall dowels are used for mounting them into porous concrete and sheets of gypsum fiber and plasterboard. They can be made of plastic or metal. The last option is called dowel molly. Before hammering in a dowel of this type, there is no need to first prepare the hole, since its tip has the appearance of a sharpened drill.
Dowel for plasterboard walls
Facade dowels are made of polypropylene or nylon. They have directional antennae for secure fixation at the base. Such fasteners can be used for any surface. They are produced without sides, which eliminates the possibility of shedding or cracking of the facing plaster.
The frame dowel is intended for installation of door and window frames, cladding through layers of thermal insulation and plaster. The products are made of metal. They are often called thermal insulation dowels, which can be of two types: for working with hard and soft materials.
Types of dowels with special design
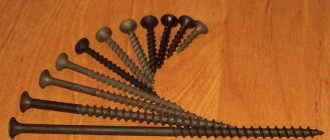
Dowel nails are made of polypropylene, nylon or stainless steel. Thanks to the presence of knurling in the form of reverse cones, reliable retention of the product in the base is ensured. They are widely used for quick and extensive installation of skirting boards, sheathing, windows, timber, metal profiles, cable ducts, plywood to concrete, brick or stone surfaces.
Helpful advice! When deciding whether to hammer or tighten a dowel-nail, preference is given to the first installation option.
Butterfly dowel for hollow structures
The butterfly dowel is characterized by increased wear resistance and the ability to withstand high loads even in hollow surfaces. Such products are made of metal.
The adjusting dowel is used to install the sheathing under the sheathing. It has a special design containing a certain element that allows you to adjust the position of the product relative to the surface to which it is attached.
Helpful advice! To carry out large volumes of installation work, it is advisable to use dowels-screws designed for mounting guns.
The dowel-clamp has the shape of a loop with characteristic tendrils for fastening along the edges of the product. Such elements are designed for mounting electrical wiring to the base. The wire is inserted into the clamp, and its edges, in turn, are inserted into holes previously created in the wall and fixed with tendrils.
A special type of fastening element is an umbrella dowel, which is designed for installing thermal insulation made of polystyrene or mineral wool. This product has a wide round cap that holds the insulation. They produce plastic and metal dowels.
An umbrella dowel is often used to hang ceiling chandeliers
Helpful advice! The best option for loose foundations would be liquid dowels, or chemical anchors, which provide a strong and reliable connection and are at the same time able to withstand heavy loads.
The Molly umbrella dowel is a nail with metal arms that provide reliable fastening of structures to hollow surfaces with uniform load distribution.
Helpful advice! To attach the chandelier to a suspended ceiling, you should use Molly umbrella dowels.
When choosing fastenings for aerated concrete walls, take into account such features
When choosing hardware, take into account the strength of the working surface, the dimensions of the parts and their resistance to corrosion.
The higher the density of the material, the stronger the aerated concrete. This indicator sets the load limits on the fastener. Technical characteristics in digital terms are indicated on the packaging of building blocks after the letter D.
The strength of the connection is affected by the size of the dowels. Thus, when fixing massive structures, products of large diameters and lengths are used.
The resistance of fasteners to corrosion ensures the possibility of their use when installing external structures and arranging unheated premises.
The process of driving a dowel
During construction and repair, the dowel with a self-tapping screw or dowel-nail is most in demand; they can be fastened in different materials. In order to properly fix them in the wall, ensuring high-quality fastening, certain conditions must be observed. Only at first glance it seems that driving dowels into the wall is very simple. In order not to damage the material, you must follow the rule that the dowel body should not protrude beyond the edge of the wall surface.
A hole is drilled
A hole is made in the wall with a puncher, and the diameter of the drill must match the size of the dowel sleeve in the cross-section
It is important that the depth of the hole is 0.5 cm greater than the length of the dowel. After the hole is made, it must be cleaned with a long object at hand. To get rid of dust, the hole can be blown out with air or, for example, cleaned with a vacuum cleaner. Then you need to insert the dowel body into the hole and hammer it in until the edge of the part coincides with the surface of the wall. After this, the self-tapping screw is screwed into the plastic base almost all the way
In the version with a nail, the latter is driven in with a hammer. The core, after entering the body of the outer shell of the part, will have a bursting effect on the base in the hole, and it will be almost impossible to pull out the dowel. To install the dowel efficiently, you need to follow all the necessary rules.
Dowel in the hole
It must be taken into account that the core must be twisted and not driven in with a hammer. Otherwise, the bushing may rupture and lose its fastening properties. This statement is only suitable for dowels whose core is a self-tapping screw. The nail must be driven in with a hammer until it stops.
Watch an illustrative video on installing a dowel-nail:
Remember the life hacks of the masters
If the dowel does not hold, you already know how to secure it. Choose the method that suits you best, or better yet, test several options on an inconspicuous area of the wall. Finally, we have prepared lifehacks from experts for you that will help you achieve better results. Take note!
It is better to drill loose materials in a non-impact mode or in a soft impact mode - if your hammer drill has one. The hole will be more accurate, without chips and the required diameter. As a tool, craftsmen recommend a drill with a pobedit tip. If there is a risk that the fastener cannot be secured in a large hole, it is better to take a drill 0.5 mm smaller than the diameter of the dowel.
After preparing the hole, remove dust from it . You can take a special brush or use a construction vacuum cleaner. It is especially important to do this with materials that crumble a lot. Otherwise, it will not be possible to strengthen the dowel well. For greater reliability, craftsmen suggest priming the hole. Apply primer using a cotton swab and let dry. This will prevent dust from forming inside and improve grip.
We hope our tips will help you choose the best way to fasten dowels in loose materials. May your renovation go smoothly! And you can buy fasteners on our website.
How to pull a chopstick out of the wall?
Nowadays, plastic dowels are widely used, which are considered stronger, more durable and reliable. However, some people still use wooden dowels instead of plastic dowels the old fashioned way.
The difference in dismantling plastic and wooden dowels is not so great. You can also try screwing a self-tapping screw into it and pulling it out with pliers, a nail puller, or another suitable tool at hand.
Another popular way to get rid of a wooden dowel is to break it apart and pull it out piece by piece. Using a chisel and hammer, divide the dowel along the grain into several parts, then pick out the fragments using a knife or screwdriver.
You can also try drilling out the cap using a drill. However, if the chopik was made of hard wood, this process will take quite a long time. Instead of a drill, you can use a hammer drill if you have one. However, do not overdo it, otherwise you will end up with holes in the wall that are much larger in diameter than you would like.
How to strengthen the fastening?
If you determine that the connection is not secure enough and the base is quite loose, measures to strengthen the connection may be necessary. To do this, you can take electrical tape and screw it onto the dowel. After this, you can safely attach large items. On the Internet you can find recommendations for using cellophane for these purposes. However, immediately exclude this option, since in this case you will not have to count on fixing large loads.
If you intend to install large structures, you can use a plaster bandage. Be sure to wet it with water for a strong bond. Seals are especially useful if you accidentally end up with a hole that is too large. Additional sealants can be wooden blocks or matches. They are inserted into the hole for the dowels.
Installation recommendations
For materials other than dowels, you will need electrical tape and a sharp nail. As for the tools, you need to prepare:
- drill;
- hammer.
It is better to use a victorious drill.
Sequencing:
Mark the location of the future hole on the wall with a marker and make a small indentation using a nail. Let's drill a hole. First, using electrical tape, mark the required depth on the drill. The tool must be held strictly perpendicular to the wall. We clean the hole made, remove debris and dust. We insert a dowel into it
This must be done all the way, and with maximum care and caution, otherwise there is a risk of damaging the fasteners. We screw a self-tapping screw or screw into the dowel. Here you can use a screwdriver or a screwdriver - whichever is more convenient for you.
Buying dowels, although it seems not such a difficult matter, still requires a responsible approach
It is necessary to remember the importance of choosing the right type and size of such fasteners, because the reliability of the fastening will depend on this. It would be a good idea to consult with experienced craftsmen - they will be happy to give you advice.
Nuances of installation and removal
By carefully studying the installation technology, you can independently perform high-quality fasteners at home. To carry out the work, it is necessary to prepare the tools that will be needed for the work. This:
- impact drill or hammer drill with a pobedit drill bit;
- dowel nail;
- insulating tape;
- hammer.
Fixing the dowel in the wall does not require many tools
Installation algorithm
After preparing everything you need, you can start working according to the following algorithm:
- Marking the location of the dowel on the wall using a pen or pencil.
- Creating a small indentation with a nail so that later it will be possible to properly align the drill.
- Making a mark on the drill to control the depth of the hole. To do this, a dowel is applied to the drill and electrical tape is wound in the right place. It is worth remembering that the hole is always slightly deeper than the length of the dowel itself.
- Position the drill strictly perpendicular to the base surface and drill.
- Removing cement chips and dust from the hole made. It is convenient to do this with a vacuum cleaner.
- Drive the dowel into the hole with a hammer until it stops. This is done carefully.
- Screwing a screw into a dowel or driving a nail, if provided.
The process of installing dowels in a concrete base
Removing the dowel
There are often situations when an existing dowel needs to be removed from the wall. Most often this happens when it is necessary to level the walls before gluing or other decorative treatment. Removing a dowel from a concrete wall is not that difficult.
To do this you will need a knife, a corkscrew, a punch, a hammer, a self-tapping screw, an awl, a soldering iron, a grinder, and a nail puller. Not all of the tools listed will be needed; as a rule, one or more are used.
Here are the removal methods:
- In order to remove the plastic dowel, screw a screw of a suitable size into it 2/3 of the way. After this, the screw head is securely fixed with pliers and pulled out along with the dowel. The hat can also be hooked with a nail puller. This method is even more effective than the previous one.
- If a concrete dowel “sits” in the wall as tightly as possible, then there is not always a need to pull it out. You can simply cut off the protruding edges and seal the hole with putty.
Removing a dowel from a wall using pliers
- To remove a dowel in which there is a metal fragment of a self-tapping screw or screw, it is necessary to melt the plastic base of the fastening, pick up the element with pliers or wire cutters and pull it out of the socket.
- A dowel-nail, for the installation of which you need a gun, can be pulled out if you treat it from different sides with frequent and strong blows of a hammer. This will cause it to loosen and be quickly removed with a nail puller. If it does not loosen, then a hole must be made next to it with a drill having a carbide tip. This will significantly reduce the adhesion of the fastener to the base and the dowel will come out better.
To be sure of the quality of the concrete fastening, it is important to choose the right dowel and mount it into the base. Only if you strictly follow the instructions you will get the desired result.
Drive a nail using a cork
Wooden plugs - chopiki
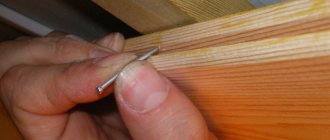
In cases where replacing a nail is not permissible, they resort to using a wooden plug, called by many a chopik.
It is cut out of wood and adjusted to the required dimensions.
The length corresponds to the depth of the hole; one tip is made in the shape of a cone for better fit.
The width of the other edge is left 2-3 mm larger than the hole. If you don’t want or have the opportunity to make a chop yourself, you can buy it in a store by choosing the appropriate size.
You can make a cut in the sharp tip of the chopik and insert a small wedge. By reaching the bottom of the hole, it will increase the strength of the connection between the chop and the wall.
So, hammering a nail into a concrete wall without a drill will be much easier. The soft, wooden surface of the chopik will replace the hard material of the wall. You just need to carefully, slowly hammer in the nail and you're done.
You can easily screw a self-tapping screw or screw into a clogged recess. This can be made more convenient with the help of special plastic plugs, which are sold in stores. Then, you don’t have to take the chopik into account. By inserting the dowel into the recess made by the skewer, the self-tapping screw is easily screwed in.
The use of wooden plugs is also not necessary. It is enough to fill the hole with a solution consisting of cement or alabaster, then insert a screw, the screws of which are pre-wrapped with wire and blotted with a raster.
A hole in the wall without drilling, dust and dirt - on video:
Related article: What can be done with walls instead of wallpaper
Noticed a mistake? Select it and press Ctrl+Enter to let us know.
Dowel
The part is a spiral-shaped bushing with ribs on the surface. At the moment the screw is screwed in, they expand, due to which they firmly fit into the soft surface of the base. Such fasteners can be made of galvanized steel or plastic.
The first option is the most common and is considered the most expensive. It is used when installing profiles, installing attachments and furniture, and fixing various pipelines. Such fasteners have become widespread in fire-hazardous spaces.
Metal dowels for aerated concrete are produced in 2 modifications, which differ in design features and installation methods. The parts can either be screwed into the base or driven into it. The latter option is used if the aerated concrete floor is planned to be equipped with a collet.
Based on the shape of the fixation ribs, fasteners with a classic helical spiral and dowels in the form of a cone, equipped with spiral blades, are distinguished. The design of metal elements also provides for the presence of a locking flange or cuff, thanks to which the part will not rotate.
Corrosion resistance is the main advantage of plastic products. The materials used for them are polypropylene and polyethylene. The positive characteristics of the parts include their efficiency, environmental friendliness, and immunity to aggressive environments. Such dowels are not intended for outdoor work, since with the onset of cold weather the plastic may burst.
A separate group consists of fasteners for aerated concrete made of nylon. They are more wear-resistant, so they can be used for cladding facades. Together with them, galvanized screw elements with 2 types of heads are used - countersunk or hexagonal. The disadvantage of this type of fastening is the high price.
Depending on the scope of application, there are several types of dowels:
- Universal. It can be mounted in any concrete surface. In a solid base, fixation occurs in a standard way. In a cellular coating, the product is rolled into a persistent knot. However, the load-bearing capacity of universal dowels is lower than that of spacer elements.
- A dowel-nail that has a wide range of applications. At the moment of fixation, a nail is inserted into the fastener, rather than a screw being screwed in. In order to avoid turning the part, use a sleeve.
- The “pancake-like” structure of the frame dowels allows you to reduce the load on the porous surface of the block.
Types of dowels
Before driving a dowel-nail into a concrete wall, you need to carefully study the designs and features of all existing fasteners in order to choose the only correct option. The most effective and popular are: spacer, chemical, facade, nail, butterfly, KVT, universal, GB, etc. Available without dowels.
Classic
This design consists of a plastic sleeve with notches along the entire length and antennae, as well as a special rod inserted into it, which guarantees the strength and reliability of the fastener. When the rod is driven into the sleeve, the plastic expands in the hole, ensuring high-quality fastening.
Self-tapping screw in concrete without dowel
The self-tapping dowel for concrete is made with a variable thread that is screwed directly into the monolith. First, as usual, a hole of a smaller diameter is drilled, then the dowel is tightened, during which the variable notch expands the cavity, and the thread secures the self-tapping screw.
The fasteners are distinguished by high load-bearing capacity, strength, and are very difficult to dismantle, and therefore belong to the type of stationary fasteners.
Spacer
This dowel is suitable for fastening rigid structures - usually made in the form of slate, driven into the monolith with a hammer. The fasteners may also be different (in the form of a cylinder or tubular shape), there may be 2-3 spacers, with spikes. The connection is strong, suitable for loose materials with voids.
Butterfly
This option is suitable when fastening with dowels and nails to a concrete wall that is very thin. The sleeve is attached to the hole, and its back side is folded during insertion, which securely fixes the dowel.
Universal
Universal metal dowels for concrete resemble spacer dowels. In hollow walls, during the process of screwing in the nail, the sleeve is wrapped into a knot, securing the fastener in a “butterfly” fashion. The same fastening can be used for a variety of types of monolith.
Regular fasteners are simply driven into the wall with a hammer or a special gun.
Facade
Used for installation of various thermal insulation structures. Similar to a spacer, but has a longer length and a larger cap. The rod and sleeve are made of impact-resistant materials.
Chemical
This type of fastener is different from all others. The structure contains a capsule with glue and a metal screw. Usually they use this one.
First, a capsule corresponding to its size is inserted into the hole, broken, an adhesive substance comes out of it, and a metal rod is inserted into it.
KVT
Relevant only for aerated concrete monoliths. It has a wide thread, which guarantees high-quality fastening in porous structures.
G.B.
Typically, such products are used when working with polystyrene concrete blocks. The sleeve is somewhat reminiscent of a spacer sleeve, but is made in the form of a spiral. The dowel is capable of withstanding heavy loads, so it can be used for fastening hoods, hanging cabinets, various types of shelves and household items with heavy weight, and equipment.
Actions with the cord
If you need to stretch a cord between the corners (during construction and repair work, for example), then follow a certain sequence of actions. First, tie nails and scraps of wire to a nylon thread, then insert them into the mortar seam (if it is soft, they will go in easily, if not, use a pick). You should not hammer the parts deep, as they will then have to be pulled out constantly.
The rod is chosen so that it can withstand the load of the cord. The element in the seam should not sit very firmly, which is why it is loosened.
Nuances of installation and removal
By carefully studying the installation technology, you can independently perform high-quality fasteners at home. To carry out the work, it is necessary to prepare the tools that will be needed for the work. This:
- impact drill or hammer drill with a pobedit drill bit;
- dowel nail;
- insulating tape;
- hammer.
Fixing the dowel in the wall does not require many tools
Installation algorithm
After preparing everything you need, you can start working according to the following algorithm:
- Marking the location of the dowel on the wall using a pen or pencil.
- Creating a small indentation with a nail so that later it will be possible to properly align the drill.
- Making a mark on the drill to control the depth of the hole. To do this, a dowel is applied to the drill and electrical tape is wound in the right place. It is worth remembering that the hole is always slightly deeper than the length of the dowel itself.
- Position the drill strictly perpendicular to the base surface and drill.
- Removing cement chips and dust from the hole made. It is convenient to do this with a vacuum cleaner.
- Drive the dowel into the hole with a hammer until it stops. This is done carefully.
- Screwing a screw into a dowel or driving a nail, if provided.
The process of installing dowels in a concrete base
Removing the dowel
There are often situations when an existing dowel needs to be removed from the wall. Most often this happens when it is necessary to level the walls before gluing or other decorative treatment. Removing a dowel from a concrete wall is not that difficult.
To do this you will need a knife, a corkscrew, a punch, a hammer, a self-tapping screw, an awl, a soldering iron, a grinder, and a nail puller. Not all of the tools listed will be needed; as a rule, one or more are used.
Here are the removal methods:
- In order to remove the plastic dowel, screw a screw of a suitable size into it 2/3 of the way. After this, the screw head is securely fixed with pliers and pulled out along with the dowel. The hat can also be hooked with a nail puller. This method is even more effective than the previous one.
- If a concrete dowel “sits” in the wall as tightly as possible, then there is not always a need to pull it out. You can simply cut off the protruding edges and seal the hole with putty.
Removing a dowel from a wall using pliers
- To remove a dowel in which there is a metal fragment of a self-tapping screw or screw, it is necessary to melt the plastic base of the fastening, pick up the element with pliers or wire cutters and pull it out of the socket.
- A dowel-nail, for the installation of which you need a gun, can be pulled out if you treat it from different sides with frequent and strong blows of a hammer. This will cause it to loosen and be quickly removed with a nail puller. If it does not loosen, then a hole must be made next to it with a drill having a carbide tip. This will significantly reduce the adhesion of the fastener to the base and the dowel will come out better.
https://youtube.com/watch?v=kdW62uNlPdQ
To be sure of the quality of the concrete fastening, it is important to choose the right dowel and mount it into the base. Only if you strictly follow the instructions you will get the desired result.
How to choose a dowel
When choosing dowels, it is important to consider the surface material. So, for fastening to drywall, Molly dowels are best suited, and for concrete walls, metal anchors
It goes without saying that when insulating a house you cannot do without umbrella dowels, and when attaching a plaster mesh to a wall, you cannot do without dowel nails (quick installation).
Also, when choosing dowels, it is important to consider whether their surface is galvanized or not. Galvanized dowels will last much longer than usual, they will not rust during operation
It is also important to consider the length of the dowels; it plays an important role when choosing them. However, here you should know not only the thickness of the wall, but also the materials used to make it, how strong and reliable they are, and whether they have voids inside.
Weight and dimensions
Nails for metal and brick are most often produced to order, so their sizes are regulated not by GOST, but by TU. The table shows the most common parameters of concrete and metal nails for mounting guns.
| Name | Rod diameter, mm | Rod length, mm |
| 2,7*16 | 2,7 | 16 |
| 2,7*19 | 2,7 | 19 |
| 2,7*22 | 2,7 | 22 |
| 2,7*25 | 2,7 | 25 |
| 2,7*32 | 2,7 | 32 |
| 2,7*3 | 2,7 | 38 |
| 3,05*16 | 3,05 | 16 |
| 3,05*19 | 3,05 | 19 |
| 3,05*22 | 3,05 | 22 |
| 3,05*25 | 3,05 | 25 |
| 3,05*32 | 3,05 | 32 |
| 3,05*38 | 3,05 | 38 |
| 3,68*50 | 3,68 | 50 |
| 3,68*60 | 3,68 | 60 |
| 3,68*65 | 3,68 | 65 |
Features of adhesive mixtures based on epoxy resin
The compositions are among the most popular means of fixing anchor rods. They are used in the installation of complex technical structures, for securing concrete elements and noise-reducing screens. This substance was specially developed for blocks of class above C20-25.
The features of the material that determined its demand include:
- Ability to operate fastenings in wet environments and under water.
- No toxic substances.
- Acceptability of use during outdoor work.
- Versatility. During installation, you can use smooth and threaded fastening systems.
- This technique does not create tension inside the element.