Perhaps you need:
Electrical cable clamp 6 round (50 pcs)
More details
Bracket for electrical cable 6 flat (50 pcs)
More details
Bandage for cable 3.0x150 mm (100 pcs)
Read more
They are cut with a power tool called a wall chaser. A cable or group of wires is inserted into the channel and secured in different ways:
- metal brackets with single or double fastening;
- alabaster (quick-setting plaster);
- dowel clamps.
After this, the channel is finally plastered, the walls are painted or wallpapered, and the wires are routed to junction boxes, switches and sockets. If the wall is not yet plastered, then gating is not required. In this case, the height of the protrusion of the wiring elements is made such that it is covered with a margin by the plaster layer.
Installation of hidden wiring with grooves is a rather labor-intensive process. It requires special tools, as well as manual operations, which generate a lot of dust and debris.
With the open installation method, all wires remain visible. However, using different methods, you can make them aesthetic, unnoticeable, and fit well into the design of the room. This is quite achievable if the work is carried out carefully and high-quality fasteners are used.
Thus, the use of various systems of suspended, plasterboard and stretch ceilings completely hides the “open” wiring made on the ceiling. The same effect can be achieved on walls when covering them.
Cable wiring made in plastic or metal cable ducts becomes invisible and organic, especially if the entire set of fittings is used - horizontal and vertical rotating elements, bends, built-in sockets, switches, boxes and other parts.
Fastening exposed wiring
In wooden buildings without additional interior finishing, wires are laid openly. You have to do the same in cases where no repairs are expected, but you need to install an additional socket or lamp. If it is not possible to run the cable through the baseboard, use cable ducts, insulators or plastic staples with nails.
- Cable channels are 2-meter plastic boxes of different sections with snap-on lids. The box is attached to the surface with self-tapping screws screwed into the inner surface of the rear wall; conductors are placed in it and closed with a lid.
Products come in different colors, including wood patterns, which allows you not to disturb the aesthetics of the premises. Source cable.ru
Porcelain insulators allow you to attach the wire to the wall or ceiling, imitating the retro style in the interior. They are made in the form of small barrels with a through hole, through which they are fixed with nails or screws, and wires twisted into a twisted bundle are pulled between them.
Against the background of wooden walls, insulators look more organic than cable channels
Plastic brackets with a hole for a nail, which is usually included, are fixed to surfaces made of wood, plastic and other non-solid materials. With their help, single cables can also be attached to furniture, for example, to organize computer wires under the desktop. They are often used to run telephone or internet cables above baseboards.
Nail clips for exposed mounting Source www.elektrikaup.ee
The only tools you need for electrical installation on wooden and similar surfaces are a hammer or a screwdriver, which can easily be replaced with a regular screwdriver.
Differences in fasteners
Fasteners for mounting wires differ in type from each other in their design purpose, different sizes in relation to the wires being fixed, and base materials. So, in order to prevent sagging of the route, plastic brackets for single cables should be selected according to its shape and diameter. The same is required when using dowel clamps.
The ties differ in the width and length of the strip. To save money, you should decide on the standard size in advance. For significant loads, metal brackets with one or two fastening points are used instead of plastic brackets. Particular attention must be paid to the strength of the dowels in the wall.
Fastening hidden wiring
The cable fasteners described below can also be used for installing open wiring in rooms with increased fire safety requirements. For example, in a garage or in a bathhouse. But more often it is used for fixing wires on surfaces that are subsequently planned to be covered with a layer of plaster or decorative finishing - suspended or stretch ceilings, plasterboard, wall panels on a frame, etc.
For plaster, grooves are cut out for wires, but for suspended structures they are not needed Source avatars.mds.yandex.net
For reference! When laying the cable in a groove, you can secure it with gypsum or alabaster mortar. But for large-scale work this method is inconvenient, since such solutions harden very quickly and have to be mixed often in small portions.
Most often, during electrical installation work, you have to deal with surfaces made of various types of concrete and brick, into which nails and screws cannot be driven. Therefore, they select a different fastening for the wires, and as a tool they use a hammer drill for installing dowels or a mounting gun with special nails and fixing elements.
Using a hammer drill
Almost all fasteners for wires and cables are designed for fastening with dowels with a diameter of 6 mm. Therefore, you need to have a corresponding drill for the hammer drill for making holes in brick or concrete.
It is better to drill walls made of foam and aerated concrete with a conventional drill Source bitu.ru
See also: Catalog of low-cost house projects
Installation is carried out using the following elements:
- dowel-clamp - a plastic loop with legs that have spikes on the sides. Depending on the size and shape of the loop, a round or flat cable can be placed in it. To do this, it is pulled through the head of the loop, and the legs folded together are hammered into a hole drilled with a hammer drill. The angled spikes rest against the walls of the hole and securely hold the fastener in it;
Dowel clamp for round cable Source keltos.ru
- nylon cable ties with a dowel hole are a simple and cheap fastening for wires. After drilling a hole in the wall or ceiling, hammer a dowel into it and secure the screed with a self-tapping screw. Or, if the base is wooden, install it immediately with a self-tapping screw. Then the wire or bundle of wires is tied to the base, tightening the tie. The big disadvantage of this method is the impossibility of altering or dismantling the wiring without breaking the tie, since it can only be tightened once;
Cable tie for a screw Source www.officemag.ru
A dowel for a nylon tie is a plastic product with a thread or spikes on the leg and a large head with a flat through slot into which a regular tie is threaded after driving the dowel into the hole;
Dowel holder for screed Source kilovolt.by
See also: Catalog of companies that specialize in electrical work
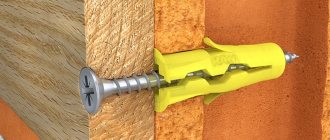
- The dowel tie is a whole device assembled from a tie clamp, a plastic dowel consisting of two halves, and a fixing peg. Therefore, you won’t have to buy additional clamps for this fastener, they are already there. During installation, the two halves of the dowel are folded together and locked with a latch located at the ends, forming a leg with spikes. It is inserted into the hole and secured by driving a spacer peg into the dowel. Only the tie itself remains on the surface, which is used to tie up the cables;
Universal dowel-screed Source avatars.mds.yandex.net
- Square or rectangular mounting pads are flat plastic products with a mounting hole and “ears” or slots into which the tie is threaded. As in previous examples, first a 6 mm hole is drilled in the base into which a plastic dowel is inserted. Then the platform is secured to it with a self-tapping screw. There are pads without a mounting hole, but with a sticky layer on the back side, covered with a protective film. They stick to any smooth surface - furniture walls, plastic, tiles. After installing the platform, a nylon tie is threaded through the slot and the cable is secured to the wall or other surface. Moreover, several wires can be fixed simultaneously on one site.
Note! Nylon zip ties are an indispensable consumable for electrical installation work. They are used not only together with the listed fasteners, but also separately, for fastening cables to pipes or already laid electric mains.
Tips for choosing
It is necessary to select types of wire fastening based on the load created by the weight of the cable bundle. It is important to prevent possible breakdowns or ruptures of elements over time, that is, it is better to play it safe and use a more powerful and reliable type of fastening than a weak and cheap one.
The dowels and screws for fastening must match each other and the diameter of the hole, otherwise the fastening may fall out and the self-tapping screw may not be screwed into the dowel.
Despite the apparent simplicity of attaching cables, before purchasing parts, it is worth thoroughly deciding on their choice and, if necessary, conducting a test test. This will save you money and ensure high quality work.
Cable on the fence: what do PUEs say about this?
Actually, there is no such concept as a “fence” in the Electrical Installation Rules. There is a definition: “...cables laid along structures and walls...”. For such cases, there are many rules and restrictions. At least one thing is clear: this will be an open gasket, with all the ensuing consequences.
For example, geometry: depending on the height of the power wire route, it should have different degrees of protection. The material of the base of the wall (structure) also affects the laying conditions.
We will not try to find special privileges or restrictions for fence power networks. Let's look at the rules related to the definition of “construction...”.
Cable channels of various sizes
This option is considered a common method for open type strengthening of wires and is characterized by increased convenience. The cable channel is made of galvanized steel, non-flammable plastic or aluminum base. Visually it looks like a U-shaped structure.
The technical box is used for laying wires; it is closed on top with a one-sided or double-sided lid. There are many varieties of products that differ in color, material, size, and moisture protection.
There is also a division according to execution, the devices are:
- floor;
- mainline;
- baseboard;
- parapet subspecies.
Installation of a cable channel requires preliminary wall marking and further fastening to the surface with self-tapping screws and dowels (it can be glued with liquid nails). Correct installation requires experience.
Trunk cable channel
corrugated 20 mm, 16 mm, 25 mm
Every repair involves problems associated with hiding electrical wires. Several decades ago, such cables were hidden in an electrical tube with thin walls. This solution was especially relevant when laying electrical cables from the outer walls of buildings and houses. The use of a steel pipe has many advantages, however, the main disadvantage in the form of a high market cost significantly reduces the popularity of this method.
Fastening clip
Installation work requires the presence of a welding machine, because without welding it is impossible to tightly and efficiently connect two pipes, while ensuring the tightness of the seam. This also increases the budget for the installation process.
Financially expensive thin-walled steel tubes have been replaced by inexpensive, but no less reliable, plastic corrugated tubes. They are much lighter in weight and therefore easier to install. Also, these accessories do not require annual painting, reducing the cost of maintaining such an installation to zero. The products are flexible and durable, which ensures their current popularity in the construction industry. However, the question of fastening still remains open. The optimal solution here is the use of fastening clips.
What is a fastener clip?
Installation clips are a must-have for any builder today. This element is designed specifically for fastening pipes for a wide variety of purposes. Visually, this unit looks like a square base with a hole in the middle for screwing in a screw, as well as two semicircular brackets on the sides of the base. With the correct selection of the diameter of the ribs, they provide reliable grip on the pipe, as well as a long service life.
Fastener clips can be attached to such surfaces as:
- concrete;
- brickwork;
- foam concrete and reinforced concrete;
- wooden crossbars.
Installation of this tool occurs using a dowel or screw, which is screwed into a special hole in the middle of the base of the clip. The material used to make this product is high quality plastic. Its features are resistance to any temperature changes.
Fastening a plastic pipe
Thanks to this property, the fastening clip can be used to secure corrugated pipes outdoors, withstanding both winter frosts and scorching summer heat.
Another significant advantage of the clip is its resistance to such external factors as:
- ultraviolet radiation;
- acids and alkalines;
- salt exposure.
Fastening clip
Can be used for floor, wall, and ceiling mounting of pipes.
Homemade sliding suspension
Construction stores sell a variety of hangers for cable wiring. However, with a small amount of work, you can do it on your own by creating a homemade fastener.
For this you will need:
- wire cutters;
- round nose pliers;
- galvanized steel wire (preferably more flexible);
- a rod whose diameter is higher than the given value of the cable being installed.
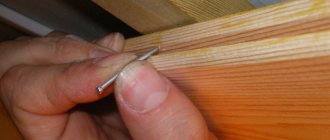
Using wire cutters, create several pieces of wire 25-30 cm long. Take the pliers and make an air loop in the middle of each of them. Its diameter should be equal to the size of the cable being laid, since the next step is to thread it through the “rings”.
Wrap the wire around the rod to create the components to secure the cable to the cable. First, wind one end, then the other end. The pitch of the resulting spiral should be about 20 mm. With these steps you will create a homemade cable hanger.
To lay the cable through the air, secure the cable, then place the hangers at intervals of 50-80 cm and thread the cable through them. After this, the free end of the cable is fixed to the second building.
Installation
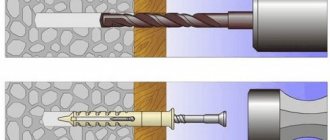
The work of creating channels for wiring begins with a special tool - a pipe cutter. He makes special holes for electrical wires.
- They are secured with metal staples, plaster and dowel clamps.
- Next, the walls undergo further finishing to close the necessary spaces; they are painted or covered with wallpaper.
- The wires lead to power boxes, sockets and switches.
Important! If the walls have not been plastered, then there is no need to create channels with a pipe cutter. Also, the wiring elements must be positioned so that the installation of the surface removes all unnecessary protrusions from the wires.
Creating hidden wiring differs significantly from open installation. After all, creating the first option requires special equipment, as well as a lot of time and painstaking manual labor. After this process, a lot of dust and dirt remains.
Securing exposed wires is a less labor-intensive operation where the wires remain on the surface. In order for these devices to fit perfectly into the room, design tricks are used.
For example, they purchase boxes to cover electrical wires. These containers are striking in their variety of colors and are suitable for any interior.
What is a wire fastener?
Wire fasteners are made from various materials, having one function - to prevent the cable from sagging above the surface where it passes. Fastening the cable from the inside of the room ensures open or closed passage of single wires or a group of cables.
Such devices are placed on the walls, which are a kind of springboard for placing electrical wires. How the cable will be attached to the wall surface depends on the choice of fastening equipment. And also from installing an element for fastening wires.
Plastic and metal staples
Products made of plastic and metal are common means for openly fixing wires.
Visually, the mount looks like an arc with a recess for a round cord and an additional hole for a self-tapping screw. In plastic varieties, the nails are placed at the manufacturing stage. Fastening components come in different sizes.
Plastic is used for work in residential premises; metal ones are more suitable for firmly securing cables. The latest products have 1 or 2 legs.
Plastic staples
Preliminary measures before installation
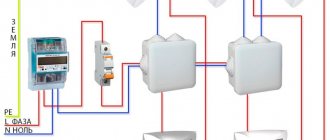
At the first stage, it is necessary to determine how much power will be consumed by electrical appliances in the structures that are planned to be provided with electricity. Based on the power consumption, the cross-section of the cable wires is calculated, its length and weight are taken into account. These parameters determine which fasteners to use, the diameter and material of the cable. To calculate power consumption and cable cross-section, a more detailed study of a separate topic is required. In simplified form it looks like this:
The power of all electrical appliances that are supposed to be used in the calculated network is summed up. The power of each device is indicated in product passports or nameplates on the housing. The simplest example of a lighting lamp is always written 40 on them; 60; 75 or 100 or more watts.
∑Р = P1 + P2 +…Pn = 3.7 kW. (3700 W) – Total power.
Determine the maximum possible current in the circuit
I = ∑Р/ U=3700 W/220 V = 16.8 A. – Maximum current.
U – network voltage.
To determine the cross-section of wires in a cable, use the table
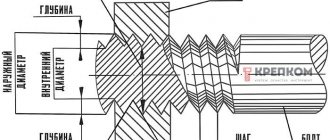
In our case, we choose a maximum current value slightly greater than 19A, taking into account that additional household appliances may be used in the future. According to the table, we obtain a power of 4.1 kW, which corresponds to a copper wire cross-section of 1.5 mm. You need to understand that the cross section is not the diameter, it is calculated using the formula:
Formula for calculating wire cross-section
Experienced electricians are well aware of the standards of cables and wires and determine the cross-section by eye. For ordinary consumers, there are tables for determining the cross-section by diameter; it is enough to measure the diameter of the wire with a micrometer or caliper and determine its cross-section using the table.
Determining wire cross-section by diameter
The next stage of preliminary work is measuring the length of the cable from the distribution board in the house to the switchgear (switchgear) on the building to which the cable structure is stretched. This can be done with a regular tape measure,
General rules
When installing cables hidden or open, indoors or outdoors, there are several general rules:
- The optimal distance between fasteners is 40-50 cm.
- If self-tapping screws, screws, or dowels are used, they are tightened all the way so that the protruding cap does not damage the insulation.
- The cable is laid evenly, without humps. If a reserve is needed, it is placed in the least visible place.
It is advisable to lay the cable in a straight line - vertically or horizontally
Basically, that's all the recommendations. They are versatile and uncomplicated. The distance can be reduced if necessary. For example, at turns of the route, the fasteners are installed at a short distance from the bend point - 5-10 cm. The task is to ensure reliable fixation and prevent sagging.
Input of electricity into the building
As mentioned above, laying the input cable is the prerogative of the employees of the energy sales organization.
Connecting a house to a power line can be done in three ways:
- Overhead line from pole to building. Aluminum wires without insulation are used. The method is unsafe; in recent years, they have been trying not to use it.
- Input from the overhead line using SIP. Due to the reliability of the line and operational safety, this method of delivering electricity is considered a priority.
- Armored underground cable. The method is considered the safest (especially for wooden buildings), but its disadvantage is its high cost. Rarely used.
Despite the advantages of SIP described above, there are many opponents of this technology when it comes to residential buildings (even if they are houses made of brick or stone). Many experts consider the SIP insulation layer to be not reliable enough for residential buildings.
To prevent undesirable consequences in the event of an insulation rupture, cables must be positioned at a certain distance from building structures.
The fact is that overhead lines are protected from short circuits by an automatic device that operates under conditions of high currents, and shutdown, if necessary, occurs with some delay. Even in a short period of time, the resulting electric arc can ignite building structures, especially if they are wooden.
However, most specialists prefer SIP. The numerous advantages of this type of cable cancel out the disadvantages, especially since safety can be ensured using a special thick-walled metal pipe into which the cable is laid.
The pipe allows you to neutralize the effects of an electric arc
It is recommended to pay close attention to the inlet and outlet holes of the pipe: they should be covered with corrugated material to prevent the wire from chafing on the metal
One of the ways to organize the input is to switch from aluminum SIP cores to an internal cable, which is used for wiring throughout the building. The main requirement for such a cable is fire resistance. In addition, the area up to the switchboard must be additionally protected with a circuit breaker. An automatic device is all the more necessary if wires without insulation are used, connected to a piece of cable.
Note! The rating of the machine must be one value higher than the value of the input panel