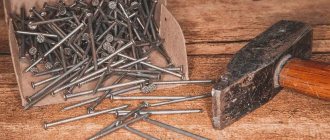
The quality of clapboard finishing largely depends on the method of fastening. Fasteners must securely hold the material, and at the same time be completely invisible. To fix the panels to the sheathing, self-tapping screws, clamps, and screws are used, but the most practical option is nails. But the nails for the lining are not ordinary, but finishing nails, differing in the shape of the head and some characteristics.
Nails for lining
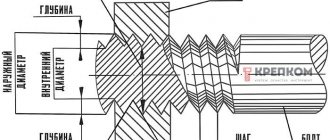
Scheme of fixing the lining
General description and types of nails
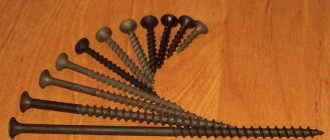
Finish nails are fasteners that have a small cylindrical head instead of a wide head. Thanks to this, they practically do not damage the surface of the finishing material and are invisible even when they are not hidden after work.
Depending on the coating, products are divided into several types:
- Black finishing. Such products do not have additional coating or are not protected from moisture, so they are not used when securing materials outdoors.
- Galvanized finishing nails. Such products are the most popular because they are quite cheap. The zinc layer prevents corrosion on the products, so they can be used in rooms with high humidity.
- Copper-plated. Due to their corrosion protection, such products can even be used when lining baths or when securing materials outdoors.
- Products coated with bronze. The disadvantage is more weight. It is also worth noting that nails are more expensive than, for example, galvanized ones.
- Finishing nails are brass-plated. Such products are used in rooms with high levels of humidity. They are less popular than other types of such products, as they have a high cost.
- Chrome plated. Such products are often used to create furniture. They are smaller in size.
When driven into wood, these fasteners are completely immersed in the wood and become invisible. If necessary, you can cover them with a composition that resembles wood in color.
The minimum length of finishing nails is approximately 35 mm. If desired, you can purchase fasteners up to 100 mm long. The heads of such products are not much wider than the rod, so after they are sunk into the wood, the fastening element is practically invisible.
Product prices
The cost of hardware depends on the coating and size. For example, one kilogram of galvanized finishing nails will cost 150 rubles. Copper-plated nails in the same quantity cost about 300 rubles.
Nails coated with bronze will be cheaper, on average 250 rubles. Brass-plated nails in the amount of 170 pieces will cost at least 600 rubles.
Finishing nails are considered the most practical and convenient fastening of interior finishing material. They reliably connect the elements and are practically invisible, which significantly improves the aesthetic appearance of the room.
Features of installation using finishing nails
Using finishing nails does not cause any difficulties even for an inexperienced person. This is due to the fact that a light hammer is used to secure the materials, and driving is done almost effortlessly.
Before starting work on securing platbands or other finishing nails, it is necessary to take into account the following features of the process:
- In order not to damage the surface when driving the fastener, you need to drill a blind hole in it with a drill with a diameter of no more than 1.5 mm. This should be done when attaching MDF or veneered MDF.
- It is better to hammer the product into the edge of the casing or into the groove, since when located in the middle it is more noticeable.
- In order not to spoil the surface, you need to recess the caps using a metal hammer. This device looks like a steel rod and has a small indentation at the narrow end that prevents it from coming off the nail.
- To speed up the work process, you can use a pneumatic gun, which also helps maintain the integrity of the surface.
An alternative to nails - clamps
Not only clapboard nails can be used during installation. There is also such a fastener as a clamp.
Kleimers are metal plates that have holes for nails/staples, as well as a tongue of a given shape. The latter allows you to hold the lining by its groove.
Clamps or clamps are suitable for installing lining and ventilated facade systems, including PVC panels, MDF panels, chipboards, wooden block houses, etc. The fasteners are reliable, ensuring hidden installation of finishing.
Claimers are good because high-carbon steel is used for their production. Then comes the galvanized coating on top. This allows you to withstand severe loads from water, moisture, temperature, etc. Plus, due to the special design, the fasteners are invisible, but at the same time strong and reliable. Here it is important to choose the correct size of the clamp.
How to hide hats
Despite the small diameter of the heads, finishing nails can be quite noticeable if they are located at eye level. To completely hide the fasteners, you can use:
- Furniture wax. It is enough to drown the fasteners in the wood using a hammer and cover the recess with wax.
- Circles. To close the caps, many people use special circles that are glued to the surface of the wood. Among the presented products, you can choose exactly those that match the color and structure of the wood.
- Putty of a suitable color. This material also effectively hides the caps and does not stand out against the background of the wood.
In most cases, it is enough to just recess the cap deeper into the material so that it is not noticeable.
Special tools
To recess the fastener heads without damaging the finishing material, you can use a hammer - a cone-shaped metal rod with a thinned end (the one that will come into contact with the hardware). There are two types:
- With a recess for the heads - to prevent the hammer from slipping;
- With grooved depth - for secure fixation of nails with grooves.
The second side of the tool must be struck with a hammer. They don't require much experience to use. Just bring it to the head and drive it a couple of millimeters into the finishing materials.
A pneumatic nail gun is convenient and effective for fixing finishing nails. Nailers (nailers) are selected according to the size of the hardware.
Different Ways to Use Nails
Finish nails are driven in several ways, depending on the type of material being fastened and its location. If, for example, the lining is being secured, the products are hammered in so that they are not visible. This is possible due to the structure of the finishing material. The finishing nails are driven at a 45-degree angle into the groove, which is then hidden by the lip of the next trim piece.
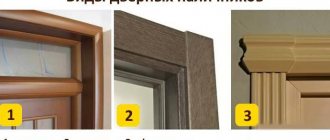
If door slopes are secured, the products are driven into the edge of the finishing material or into a recess, if there is one on it. In most cases, the nails are not visible, even if you hammer them in without a hammer. But it is better to use this tool so that the caps of the fasteners are completely immersed in the material.
When fixing parquet to the floor, the finishing nails are driven into the groove, so they are not visible after the work has been done. It is necessary to hide these fastening materials only when attaching slats to wooden frames or when finishing doorways.
Advantages and disadvantages
When choosing nails for lining, you should consider what strengths and weaknesses this fastening material has.
Let's start with the plus:
- Light weight
. The fasteners will not load the structure. The weight of 1 thousand fasteners with a length of 20-50 mm is 350-800 grams; - Decorative effect.
Due to the fact that the cap is driven into the material, it remains almost invisible. This allows you not to disturb the appearance of the lining; - Corrosion resistance
. Relevant for all types except black nails.
But there are also certain disadvantages.
To be more precise, clapboard nails have two disadvantages:
- Dismantling without damage is impossible
. It is impossible to pick up the recessed small head with anything. The panel will probably be damaged; - Use of a puncher
. Without using a hammer, you won't be able to drown the head. An ordinary hammer or air gun is not enough. A combined approach is needed. Using 2 tools requires more time and care.
But judge for yourself how significant these shortcomings are. I think if you know how to nail it correctly, these disadvantages can be avoided in practice.
How to determine the required length
When choosing finishing nails, you should think not only about making the fasteners invisible, but also about their reliability. If they are not long enough, they may not support the weight of the finishing material.
The length of the fastener should be twice the width of the material being nailed. If it is smaller, the finishing element will not be secured securely. If nails are needed for assembling furniture, as a rule, products no longer than 3 cm are purchased. Typically, these fasteners are included in the kit.
Installation of eurolining on walls or ceilings
Leading product manufacturers usually indicate how to fasten eurolining in the instructions included with the packaging. The sequence of work is as follows:
- A preliminary division of the sheathed surface into rectangular zones is carried out. This allows the boards to be optimally laid during the sheathing process.
- The required number of fastening brackets - clasps - is prepared. It is believed that 20 pieces are required per square meter of eurolining, but it makes sense to purchase clamps with a margin of 5-10%.
- Eurolining is installed from the bottom corner of the room, where there are no door or window openings. At the same time, horizontal placement of boards visually lengthens the room, and vertical placement makes it taller.
- The direction of laying the material is determined by the method of finishing the ceiling and floor: when subsequently installing skirting boards, it makes sense to move from top to bottom, and in the case of finishing with eurolining and the ceiling - from bottom to top.
When purchasing clamps, pay special attention to their quality: the clamps should not have traces of mechanical surface damage, dimensional instability, uneven thickness, etc.
It is important that when installing eurolining, clamps with a thickness of no more than 1 mm are used. The fact is that the panels of this material are thicker, and the reduction in the area of the room after covering will be more significant
It is unacceptable to use clamps that do not have a protective anti-corrosion coating.
The fact is that the panels of this material are thicker, and the reduction in the area of the room after covering will be more significant. It is unacceptable to use clamps that do not have a protective anti-corrosion coating.
What steel are nails made from?
Basically, nails are made from low-carbon, thermally untreated general-purpose wire (popularly called black steel). The fasteners themselves come in two types: without additional processing and with a thin layer of zinc coating applied to the surface.
When unprotected, black steel is vulnerable to corrosion, so for structures used outdoors, it is better to select nails with a protective coating. This is especially true for nails of small sizes, because... they lose their holding power more quickly when they rust. We will talk in more detail about steel grades for different types of fasteners as we go along.
How to make sheathing for lining
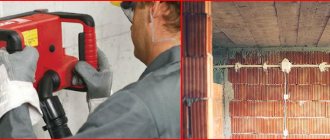
Using a screwdriver, we install slats with a cross section of 20×40 mm horizontally in increments of 40-50 cm, regularly checking with a level whether they are installed correctly. Using slats allows you to level the wall (so that the boards fit comfortably), as well as create a gap between the wall and the lining, which is needed to create ventilation.
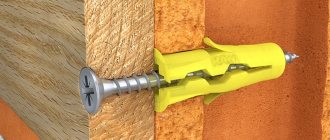
If the wall is uneven, then you need to put something under the sheathing (or take a thicker sheathing). A mounting wedge, a piece of wooden beam or plywood is usually used as a lining. The sheathing is secured with long-length self-tapping screws and dowel nails. The lower slats are 5 cm from the floor, since the floor plinth will be attached below, and the upper ones are the same amount from the ceiling.
.
Installation of the sheathing should also be done around openings, windows and doors. It is worth noting that the battens are made of plastic and metal. More information about installing the sheathing can be found here:
Creation of sheathing for lining
Lathing under the lining with your own hands is impossible without preliminary marking.
To do this, use a building level and a pencil. You need to decide on the direction of the lining in advance.
It can be placed vertically - this visually increases the height of the room, or horizontally - it expands the space.
As an option, you can use a mixed finish or diagonally. In any case, the bars must be perpendicular to the chosen direction.
Video - how to attach timber to concrete:
The choice of lathing step width depends on your goals. Of course, the smaller it is, the stronger the structure, but the higher the price. Typically used from 40 to 60 cm.
If you will also insulate the room, take into account, first of all, the size of this material.
In this case, the pitch of the sheathing should be slightly smaller than the insulation so that it fits more tightly.
To make the frame even, we will use a fishing line and a plumb line. Using the building level, we will use the tools described above to create a visualization. We will install bars along these edges.
The fishing line will serve as a guide. Depending on the chosen direction, it is pulled either horizontally or vertically. The bars are fixed close to these guides. If necessary, add wedges or wood chips, or, conversely, grind down the surface of the wood.
You can use a laser level in place of the fishing line.
If there are window or door openings around the perimeter, it is mandatory to secure the bars around them.
When you secure the structure, do not forget to check the level.
Installation of the frame on the ceiling is carried out in the same way as on the walls. The only thing is that a beam of slightly larger diameter can be used. This is due to the difference in the thickness of the insulation used.
If you are going to sheathe semicircular or oval rooms, do not use solid timber. In this case, carefully monitor the proportions.
Video - how to install correctly:
https://youtube.com/watch?v=-qXMF7ZpSSs
Features of installation of cladding in steam rooms under lining
The lathing for the lining in the steam room is done according to special rules.
First you need to attach foil to the walls.
It traps steam. It also implies the use of larger rack bars.
In order to install slats of a smaller diameter, recesses are cut out in the larger ones, where they are placed
This method allows you to create greater rigidity, which is especially important in such conditions.
Due to the harsh conditions this frame will be exposed to, the wood may become warped. By using this design, the likelihood that the finish will float is practically eliminated.
Features of installing lathing on the walls of log houses for lining
How to make lathing for lining on the walls of log houses?
The complexity of the design lies in the significant differences in the walls. It is more difficult to level such a surface. What to do in this case?
The frame in this case is installed on the basis of beacons.
They involve the use of pads
It is important to maintain the level when installing them. If the surface has strong protrusions, they can be cut off with an ax or plane
To summarize, let's focus on the important points. During installation, the choice of fastening depends on the surface. They are different for wood and brick. Do not forget to treat the surface with compounds against fungus, mold and rot.
How long should the nails be?
When it is necessary to knock down a wooden structure, few people dive into strength materials and engage in “engineering” calculations. This is not necessary. A simple diagram helps you avoid making mistakes when choosing nails for structures with different loads.
- For optimal peel resistance, the length of the nail should be three times the thickness of the board being nailed.
- For acceptable shear strength, the nail needs to penetrate the part being driven to a length of at least six times its diameter.
What sizes of nails are there?
We don’t want to disturb anyone’s patriotic feelings, but in the Western system, the gradation of fastener sizes is simpler and more logical. The starting point is an inch nail (designated 2d). Then each step of dimension (3d, 4d, etc.) is an increase in length by a quarter of an inch. Naturally, they also have nails smaller than one inch.
The GOST system is less logical. For example, a construction nail* (the most popular type of fastener) has the following gradation of sizes:
Length: 16, 20, 25, 32, 40, 50, 60, 70, 80, 90, 100, 120, 150, 200, 250, 260, 300, 310 mm
Diameter: 1.2, 1.4, 1.6, 1.8, 2.0, 2.5, 3.0, 3.5, 4.0, 5.0, 6.0, 7.6, 8.0 and 8.8 mm
As you can see, the gradation of diameters is narrower, so nails of different lengths can have the same thickness.
*GOST 4028-63
Horizontal cladding
Horizontal cladding
First step
Proceed to attaching the lining. Start sheathing the walls from the ceiling to the floor. At the same time, try to direct the grooves downward - thanks to this, various debris will not get into them in the future, which will help to significantly increase the service life of the skin.
Horizontal cladding
Second step
Fix the clapboard sheet onto the sheathing bars. Use convenient fasteners. Insert the tenon of the next sheathing element into the groove of the fixed board. Secure it. Cover the entire planned space in this order.
Every 5-10 sheathing elements, be sure to check the evenness of the surface using a plumb line or level.
Cladding
Third step
Having reached the last board of the lining, adjust it to the width with a regular hacksaw or other suitable tool. Nail the board and hide the gap under the decorative baseboard.
Fourth step
Clean the finishing surface from dust using a damp sponge. If you wish, you can finish painting the lining, but this is not necessary - the wood already has an attractive appearance and a beautiful shade.
If a special lining will be used for the cladding, which outwardly imitates a rounded log, start finishing with the groove facing up - this way you will hide the joints.
Horizontal cladding
Additionally, the panels can be adjusted using a hammer, placing a piece of board under it - this way the finish will be fixed without gaps.
To fasten the “rounded” lining, use self-tapping screws. Twist the fasteners at 45 degrees. Place treated timber between the panels of such sheathing. This will create a beautiful finish without gaps.
Installing the first ceiling strip