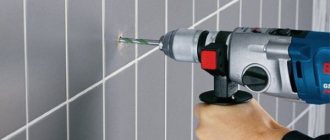
When there is a need to drill a hole in a tile or material that is different, on the one hand, in hardness, on the other, in fragility, the question arises about choosing a tool. Conventional drills, even with a pobedit cutting edge, are unsuitable for this: the configuration of their tips, sharpening angles and other parameters can only damage the material being drilled. In this case, a drill for ceramic tiles will help us; it will not be difficult to drill through the material.
Types of drills for ceramics
Spear-shaped and especially sharpened
To drill ceramic tiles, as well as porcelain stoneware, you need special drills. In everyday life, most often it is necessary to drill small holes (no more than 12 mm in diameter) in a tiled wall: for dowels for hanging wall furniture, hangers, shelves, mirrors, etc. These tasks are performed using two types of drills: spear-shaped and with one-sided sharpening at an acute angle.
Spear drill bits for ceramic tiles
Drill for ceramics with one-sided sharpening
The first is a rod with a thickened end, sharpened, indeed, in the form of a spear tip. The material used for it is very durable, the one that will “win”, that is, VK8 steel. For drilling, you should use an electric drill with a power of 300-500 W or a screwdriver for small diameter holes. When choosing a drill, you need to make sure that the shank configuration (they are round, square, triangular) fits the clamp of the drill (screwdriver). Drill a hole in ceramic tiles at low speeds, having first turned off the impact function, if provided by the drill model. However, this rule applies to working with all types of drills.
Spear drill bit for tiles
How to drill into tiles with a spear drill? Drilling is carried out at low speeds. The processing is carried out with high quality, insured against cracks.
Indispensable when creating holes for dowels and finishing porcelain stoneware surfaces. Thanks to the spear-shaped sharpening, it has high efficiency and productivity. With proper use, a long service life is guaranteed.
Drills with single-sided sharpening
The advantages of spear-shaped ones include their low price and fairly large resource. One drill will be enough for a cycle of work in the kitchen and bathroom, provided that the surface is ceramic and, say, not porcelain stoneware. In the latter case, one spear-shaped one will be able to drill no more than four to five holes, after which the tool will have to be replaced.
For such work, special drills with an even stronger cutting part are used. True, they cost five times more than spear-shaped ones.
Prices for some spear drills
| Model | Manufacturer country | Diameter (mm) | Price (rubles) | Notes |
| Biber 7705 | Germany | 5 | 125 | |
| Bosch CYL-9 | Germany | 16 | 429 | |
| Bosch CYL-9 | Germany | 4/5/6/8/10 | 1498 | Set in a plastic box |
| Irwin | USA | 4-10 | 244-383 | |
| Stayer | Germany | 3-14 | 142-286 | |
| Makita | Japan | 3-10 | 129-226 | |
| "Bison" | Russia | 3-14 | 249-499 | with 4 cutting blades |
The tip of so-called carbide drills with one-sided sharpening looks like a flattened metal surface with a perpendicularly set “tip” - the actual cutting part. It enters solid material, figuratively speaking, like soap. True, in compliance with the requirements for the operation of a spear-shaped drill, in particular, low drill speeds: no more than 500 rpm.
Spear drill bit for tiles
And one more thing to consider when working with spear-shaped and single-sided drills. Their tips are sharp enough not to “crawl” on smooth tiles at the beginning of drilling. Still, to be on the safe side, you can stick tape or adhesive tape to the marked area and drill a hole through this layer. True, experienced specialists for some reason reject this option. Well, you don’t need to listen to advisers who recommend “coring” the surface in the place where you are supposed to drill, and it’s even harmful: the advice to scrape off the layer of glaze so that the drill doesn’t slip is no good. This procedure can simply crack the tile.
Place tape on the tile to prevent the drill bit from coming off.
It is better to use carbide products
Device Features
The ballerina got its name due to its external similarity, because it consists of a central stabilizer and a drill that passes through the stabilizer on the side and exits through the other side. The device looks like a compass and actually works the same.
However, the ballerina alone will not be able to make the required hole of a certain diameter in the tile. To do this, you will need a regular drill and suitable tile drills.
To prevent the tiles from cracking
When drilling holes of small diameters, for which drills of the described types are used, there is a risk that the ceramic tiles will crack for another reason: due to vibration of the drill. This can happen at the moment when the tip overcomes the thickness of the tile and begins to bite into the wall material, brick or concrete. In this case, the “rod” of the drill will rub against the edges of the hole in the tile. If its density turns out to be significantly higher than the properties of the wall material, the drill may receive vibration, which will crack the ceramic.
To prevent this from happening, you should stop drilling after exceeding the thickness of the tile and replace the drill.
Ceramic tiles are drilled at low speeds.
You can use the same one, or a brand designed for drilling under-tile material. But the main thing is that it should be of a smaller diameter, say, not the “eight” with which the tiles were drilled, but the “six”. It is precisely under the “six” that the polymer dowel that will be driven into the hole should be selected.
There is an opinion that it is safer and easier to drill into the tiles at the seams. But you need to make sure that the hole is exactly in the middle between the tiles. How hard to press the drill when drilling is a question of experience; the theoretical answer will not clarify anything: not too much (there is a risk that the tile will crack), but not at all gently (at the beginning of the process the “sting” will begin to “walk”, but at the end you can simply can't wait).
It's better to create a hole in the seams
Don't press the drill too hard
Recommendations for drilling tiles
Let's look at what types of drills for tiles there are, which ones are best used in a given situation and, of course, what techniques allow you to do this work with the highest quality.
In order to prevent the destruction of this fragile material, strong pressure on it during the drilling process should not be allowed. In addition, it is advisable to carry out this operation at a low rotation speed of the tool - this minimizes vibration and play of the drill. Sometimes even power tools are replaced with hand tools for reliability. It is also convenient to use screwdrivers for this purpose.
Hand screwdriver
The cause of destruction of the tile can also be overheating of the tool. To prevent this, it is advisable to periodically moisten the surface of the tile and cool the drill in water, first turning off the power tool. The quality of drilling and the cooling conditions of the drill are improved if you soak the tiles in water half an hour before starting work.
Although it is recommended to start drilling from the back of the tile, this is not always feasible. The smoothness and hardness of the glaze layer makes it particularly difficult for a drill to penetrate. In addition, it often slides down this smooth surface. Therefore, it is advisable in such cases to adhere to the following recommendations:
- Scratch a small cone-shaped depression in the center of the future hole. This can be done using a heated screw or a sharpened edge of a file.
- Apply masking tape or a piece of fabric adhesive tape to the surface of the tile.
- Apply marks using a clerical pencil for correction. The surface of the tile will become rough, making it easier to hold the drill at the desired point.
- When drilling, it is advisable to use a jig - a thick plate with holes corresponding to the diameter of the drills.
- The drill must have its impact mode turned off.
Crown for large diameters
In order to drill a large diameter hole for an electrical outlet, plumbing pipe or faucet, other types of drills are used: crowns and circular drills adjustable in diameter, commonly called “ballerina drills”.
Circular drill bit "ballerina"
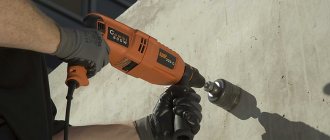
The crown is a cylinder, the cutting edges of which are treated with ultra-resistant abrasive, artificial diamond chips, or a tungsten carbide (silicon carbide) layer. When choosing, you should pay attention to the presence of a centering drill (usually a spear-type) installed in the center of the cylinder.
Core bit with center drill
If the crown does not have a centering drill, then drilling a tile glued to the wall will not work: the drill will not fix the drill in a stable position.
Such crowns should only be used in stationary drilling machines. In this case, it is advisable to soak the ceramic tiles in water before drilling.
Table - examples of prices for core drills.
| Model | Manufacturer country | Diameter (mm) | Price (rubles) | Notes |
| DeWALT DT 6043 | USA | 15 | 1270 | Diamond coated cutting edge |
| Matrix | China | 40 | 499 | Triangular shank |
| “Bison”, series “Expert” | Russia | 18-120 | 665-3005 | |
| “Bison” series “Expert” | Russia | 19-65 | 5710 | Set of 11 drills in a plastic box |
If you have a centering drill with a cylinder, you can work with a drill in any plane. The drilling technology is similar to that described above, low drill speeds, balanced pressure force.
It is necessary to periodically cool the bit with water and also wet the tile so that it does not crack if it overheats. Under gentle conditions, cylindrical core drills are capable of not losing their properties when drilling up to fifty holes, moreover, in porcelain stoneware.
What drills to use
The central stabilizer can be replaced, this is due to the different characteristics of the materials for which it can be used. It is worth noting that conical drills are not allowed for use on tiles.
This is due to the fact that, due to the peculiarities of their design, they can slide off the intended, pre-deepened point and scratch the front surface of the tile.
For this reason, it is recommended to use auger or type 1 drills for these purposes. They are ideal for these tasks. It is worth noting that it is not always necessary to drill with a ballerina until the inner circle is completely separated from the tile, thus forming a hole.
- Some tiles have an extra layer at the back that is not tile, a hard material designed to improve the tile's adhesion to the stucco wall surface.
- In such cases, it is enough to drill with a ballerina to a depth of no more than 2/3 of the total thickness. After this, you can carefully knock out the resulting circle. The disadvantage of this method is that on the reverse side, when knocking out, chips form on the material.
However, you shouldn’t worry about this, because the back side of the tile will be attached to the wall using a primer, so the chips will be hidden from view. In addition, they will not affect the quality of adhesion between the surface of the slab and the wall, because the vast majority of the area's materials remain intact.
Circular "ballerina"
Disadvantage of crowns: inability to change the diameter. True, some, for example, tungsten carbide, are sold in sets of the most popular diameters (for sockets, switches, and so on).
You can change the size of the hole using a diameter-adjustable circular drill (“ballerina”), the principle of which vaguely resembles a compass. The mechanism makes it possible to vary the hole size in the range from 30 to 90 mm. To the main central spear-shaped drill on a transverse “bar”, on which a millimeter radius length scale is sometimes applied, another tip is bolted, which cuts the ceramic surface along the circumference during operation of the drill. The central drill serves as the axis of rotation of the side drill.
The principle of operation of a ballerina is similar to a compass
The operating conditions are no different from those described above. True, there is one significant drawback: the resulting hole will have rather rough, uneven edges. You should use a “ballerina” based on the fact that the hole will be covered with decorative trim or, say, a sink.
By and large, this type of drill for ceramic tiles justifies its gentle name by the fact that it is very capricious. In the sense that working with it requires a certain skill. Therefore, beginners should not start their practice with a “ballerina”. It is easier (although more expensive) to use a crown.
Table - examples of prices for ballerina drills.
| Model | Manufacturer country | Diameter (mm) | Price (rubles) | Notes |
| Stayer Profi | Germany | 30-90 | 584 | |
| Matrix | China | 20-94 | 628 | With protective grille |
| FIT | China | 20-90 | 636 | With protective grille |
| Santool | China | 20-90 | 367 |
Stayer Profi
FIT
Santool
Matrix
Application of core drills with diamond coating
This type of drill is used when you need to drill tiles in the wall in order to obtain holes for installing pipes or sockets.
Select a crown of the required size and attach it to the drill.
The drill is set in mode up to 500 rpm. Drill with a diamond core with mandatory water cooling. Proper use of the bit allows you to drill up to 50 holes.
For more efficient work and to avoid mistakes, it is recommended to use a small crown without a centering drill together with a jig. You can make it yourself in a few minutes. All you have to do is find a piece of board or plywood and make a hole of the required size in it. The sheet is pressed by hand and drilling is carried out through the hole in it.
Drilling by ballerina
The big advantage of this type of drill is that it can be used to perform a significant amount of work on making holes of any size.
- The ballerina is secured into the drill chuck using a rod.
- Set the required drilling size. We must not make a mistake here. First, the radius of the future opening is calculated, and then the result obtained is set between the core and side drills.
- Tighten the locking screw firmly so that the movable cutter does not move under the influence of vibration.
- Markings are made on the tile by determining the center of the hole.
When using the “ballerina” at the very beginning, it is recommended to drill through the tile with a small-diameter drill - this will make working with the tool much easier
Drilling is carried out at low speeds, holding the drill firmly in your hands.
- Make sure that the depth of cut is the same around the entire perimeter of the circle.
- The edges of the hole may require some minor work after drilling. It is done with pliers and then with sanding paper.
- The drilling process with a ballerina is often accompanied by increased vibration, which is why it is not popular among users.
- To increase safety, the “ballerina” can be used with a special plastic cover that protects against ceramic fragments.
Option for the largest holes
Well, if you need to drill a hole in ceramic tiles, the diameter of which is larger than all existing drill sizes, you will have to use the only way out. The process, however, is labor-intensive, and the result is rough, but there is nothing to choose from.
The process looks like this. The soaked tile (of course, it is not yet glued to the wall) is placed on a wooden surface, a circle of the required diameter is drawn on it and a hole is patiently drilled around the circumference tightly together with a drill, for example, 8 mm. When the circle is closed, its inside is broken out by carefully tapping it with a mallet or the handle of a hammer, and the uneven edges are smoothed out with a file. Whatever you say, a thoughtful process.
Drilling multiple holes to create one large diameter
How to drill tiles
Having a set of drilling tools in your arsenal is not all the conditions for obtaining beautiful holes. It is also very important to learn how to drill materials correctly. To do this, you should know well and take into account some of the features of each material. Ceramics and glass are very fragile materials. To drill them, you need a device with several operating modes. A familiar screwdriver operating at low speeds is quite suitable for this work. A hole in glass or ceramic tiles is formed as a result of friction between elements containing abrasive substances. During work, the surfaces become quite hot, which can cause their destruction. It is recommended to cool them with water.
The minimum pressure on the drill is needed so that the material does not collapse. But too little pressure can be completely useless. Reverse cannot be turned on when drilling either. If the tiles are already on the wall, it is better to choose tile joints for the holes. If the material is not yet glued, it can be soaked in water for 20-30 minutes, then marked with a felt-tip pen. It is good to glue masking tape or a medical plaster to the place of the future hole. It will not allow the drill to move to the side.
Drilling is usually carried out at a speed of about 180 revolutions of the working shaft. The drill or screwdriver is held in a perpendicular position relative to the plane of the tile. As soon as the surface layer of the tile is destroyed, the number of revolutions can be slightly increased. Periodically, the tool needs to be stopped and placed in water to cool. After this, the drill is wiped off and the drilling process continues. Chips and dust must be removed from the work site in a timely manner. A vacuum cleaner works well for this. Wearing safety glasses is recommended to protect your eyes from particles of material.
Other methods for drilling ceramic tiles
Drilling with a string
Tungsten wire for cutting ceramics can be purchased over the counter. It is used either with hacksaws for metal or with a regular jigsaw. Price from 150 rubles.
The string is used in cases where it is necessary to change the direction of the cut, to cut a hole from the end of the tile. A string can be used to cut almost any shape into a tile.
If the opening should be located inside the surface of the tile according to the markings, then you will have to first make a hole in it. Next, the string is threaded through the hole, secured into a hacksaw or jigsaw, and a cut is made along the marked line. The result is an opening with smooth and clean edges.
The advantage of this method is the almost complete absence of risk of damage to the tiles.
- The disadvantage of this method is unnecessary labor costs.
- If you need to make a large opening in a tile that is not on the wall, but you don’t have a ballerina or a crown at hand, you can use the following technique.
- Lay the tiles on a prepared, clean and smooth surface.
- Make markings and mark the center of the future circle. Using an ordinary compass, draw a line on a circle of the required diameter.
Using a tile drill (if you don’t have one, you can use a Pobedit concrete drill), make holes along the entire line inside the circle. The closer they are to each other, the better.
- The drilled part is either carefully knocked out with light blows of a hammer, or removed using pliers or wire cutters.
- Irregularities along the edges are removed with nippers.
- Finally, the cut area is sanded with sandpaper.
- Hole using glass cutter and wire cutters
- A large hole can be made using the old and proven method: wire cutters and a glass cutter.
- A circle is marked on the tile.
- Then it is divided into at least eight equal parts. Precision is not required.
- Cuts are made along the marked lines inside the circle using a glass cutter.
- Next, use a drill to make a hole in the center and carefully break out the first piece. Instead of a glass cutter, extreme sports enthusiasts use a grinder with a small disk.
Enough cuts must be made; if only two cuts are made, then when breaking out the pieces, most likely the tile will break in half. You should bite off the edges from the reverse side of the product, otherwise chips will be visible.
After receiving the hole, the edges of the opening are processed.
Types of drills
Today you can purchase the following types of tile drills:
Spear-shaped
With their help, you can simply make holes for dowels, which serve as fastenings for installing various objects. Drills can be used to work with porcelain stoneware, but they wear out quickly. Since their cost is quite low, they are well suited for small jobs.
Characteristic features of such drills:
- high efficiency;
- wear resistance;
- hole depth - up to 12 mm;
- affordable price.
Carbide
Such products are used to work with simple tiles and porcelain stoneware. The main difference is 1-sided sharpening with an acute angle. This allows you to work quite quickly and efficiently.
Circular
They are also called “ballerina”, because during operation they spin and resemble the movements of a ballerina. They are used to work with different types of tiles, and the diameter of the holes can be 30-90 mm. The product consists of a main and additional drill and a cutting plate. You need to work with it at low speeds without strong pressure. This way it will last much longer.
Measures to protect the material from chips and cracks
When dealing with questions of how to drill tiles, we must not forget about precautions during work, thanks to which it will be possible to avoid deformation and complete destruction of the finishing material. First of all, to prevent the tile from cracking, it must first be soaked in plain water for 1 hour. If there is not enough time for such a solution, you can moisten the area where the holes are being drilled with a spray bottle.
To make it easier to start drilling large holes, you can cut out a stencil from fiberboard or plywood, then press it tightly against the tile to start drilling.
It is quite possible to reduce the likelihood of cracks if you step back at least 15 mm from the edge of the ceramic tile to the cutout. It’s better to calculate the installation point of the socket/shelf so that the hole for the fastening element is located on the connecting seam.