Ceramic tiles are one of the most practical facing materials for the bathroom. Its advantages include ease of cleaning, protection from mold, resistance to wear and chemicals, while its disadvantages include difficulties in installation, dismantling and drilling holes for shelves, pipes and plumbing fixtures.
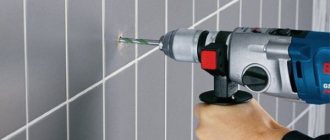
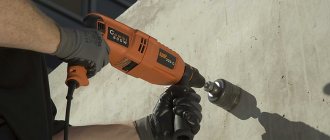
Before drilling tiles on the bathroom wall, you need to prepare the surface and firmly fix the drill: this will avoid accidental impacts and increase work efficiency.
Narrow holes for installing dowels
When an apartment owner decides to equip a bathroom with wall-mounted devices, he has to fix them on tiles that have long been firmly attached to the surfaces of the bathroom. In this case, the grooves required are not very large, sufficient to accommodate dowels with a diameter of 4 to 12 mm.
If the homeowner decides to equip the bathroom with a rosette, then the corresponding grooves are made before the cladding begins.
In such cases, a pipe comes out of the architectural elements of the room for supplying cold or hot water, draining sewage, and there is also a ventilation duct there.
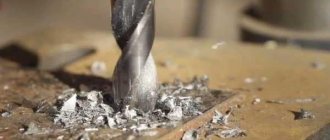
What drill bits are suitable for drilling tiles?
Drilling can be done correctly only if the tool is selected correctly. To drill tiles, standard screwdrivers or drills operating from the mains are most often used.
Tile drill bits
Note! It is not recommended to use rotary hammers for this type of work, as they have too much power and put strong pressure on the tiles. If everything is quite simple with the tool, then when choosing drills you need to be very careful.
There is a rule that makes choosing a drill easier. The edge of the nozzle must be harder than the surface of the tile. Based on this rule, the circle of suitable tips is narrowed to three positions. Let's look at them in more detail:
- with diamond coating;
- with a pobedite tip;
- specialized;
The nozzle with diamond coating on its surface is the most effective. However, it has one significant drawback - high cost. Purchasing a diamond tip to make multiple holes is not a practical solution.
A drill with a pobedite tip also copes quite effectively with the tasks assigned to it. The price of such attachments is much lower, which makes them more accessible to a wide audience of consumers. Using a pobedit drill allows you to get smooth, neat holes.
And finally, specialized products can be used to make holes in the tiles. They are cheap and readily available and also fit standard screwdrivers. But in some cases they can damage the tile surface.
Interesting: 6 ways to disguise pipes in the bathroom
Drilling methods used in the bathroom
If the equipment being mounted is massive or large-sized, then wide holes will be required for it. In this case, the following drilling methods are used:
- Through crowns;
- Using a diamond blade.
Common mistakes when drilling tiles
Damage to the tile material is caused by various errors that are made during drilling. They are a consequence of the inexperience of home craftsmen. In order to do the job correctly, it is recommended that you familiarize yourself with the most common mistakes.
For example, an error may be made at the tile marking stage. Under no circumstances should files or glass cutters be used for this purpose. Also, this operation cannot be performed using a nail. All these methods lead to damage to the tiles. For proper marking, it is best to use a marker.
Another common cause of chips and cracks is improper use of equipment. Beginners often do not monitor the speed of the drill, which leads to damage to the ceramic tiles.
Marker
Important! It is recommended to drill in those areas under which the solution is located. When the drill gets into an empty cavity, the tile is pushed through and destroyed.
The last common cause of cracks in tiles is the wrong choice of drill bits. For such work it is necessary to use special tips that have a special shape and size.
Hole for mirrors and shelves
To drill grooves with a diameter of about 10 mm, only narrow working nozzles are used. However, they can differ significantly in design.
When carrying out such work you will need:
- Household or professional construction drill;
- At least the simplest hammer drill;
- Portable screw driver with variable chuck speed.
Working with a ballerina
The sequence of actions is similar to the previous point, but to reduce vibration, it is better to reduce the speed to 400 per minute.
IMPORTANT: the drill must be held strictly at an angle of 90˚ . You can determine whether you are maintaining the correct angle at the moment the cutter touches the surface of the tile. If the cutter strikes only along one edge of the circle, then there is an inclination. And an incorrect angle increases vibration.
Please note that the larger the diameter of the hole drilled by the ballerina, the stronger the vibration will be!
Features of markings on glossy tiles
The installation procedure for making grooves is divided into several stages. First, at low speed, a hole is drilled in the ceramic decorative material. Then a groove is made in the wall or floor covering. Regardless of the design of the drill, you should check how carefully the cutting edges are sharpened.
It is almost impossible to mark carefully polished tiles with a lead pencil or felt-tip pen, so this operation is carried out using strips of adhesive tape or narrow tape.
Large diameter holes
Large holes are made into the tiles before they are installed on the wall or laid on the floor. They are necessary for bringing engineering systems outside - water sockets, sewer pipes, socket boxes, ventilation system duct.
There is no point in drilling them on the wall, since electrical wiring and pipes are installed in the concrete of the wall or behind the false plasterboard panel. There are two types of special tools that allow you to make holes in the cladding very carefully. In the absence of such equipment, you can use a small-diameter drill, a grinder with a diamond blade, or a multifunctional tool.
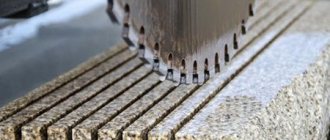
Crowns
Ceramic crowns for making through holes in tiles are classified according to several criteria:
- presence of a guide element - with and without a central drill; Crown with and without a guide drill.
- type of abrasive – diamond for porcelain tiles, tungsten carbide for ceramic tiles.
Crowns with tungsten carbide.
Tungsten carbide bits are used to cut holes in ceramics. With the same diameter as diamond equipment, their cost is 2–3 times lower. However, the abrasive layer begins to fall off when you try to drill porcelain stoneware.
Tools with a cylindrical shank are considered the cheapest; a hexagonal tip raises the price, but not by much. Drill bits with a shank have the highest price. In addition to ceramics and porcelain stoneware, diamonds confidently and evenly cut glass and mirrors.
Crowns are sold individually and in sets. A tool coated with tungsten carbide Ø33 mm costs 420 rubles, a set of 4 bits (33 mm, 53 mm, 67 mm, 83 mm) with an adapter costs 1600 rubles.
The cost of diamond crowns from domestic and foreign manufacturers starts from 700 rubles. or 1000 rubles, respectively. Depends on the type of shank (SDS+, cylindrical), diameter, shape of the cutting edge (tubular, with cuts), the presence of a centering drill, brand and other factors.
In a set, crowns are cheaper; special devices and accessories are added to them. However, the required tool diameters are rarely available there; you have to buy them individually.
Angle grinder with diamond blade
With a limited budget, a confident angle grinder user will always be able to carefully cut a large-format hole with a diameter of 50 mm or more (a sewer pipe connection) in a tile with a diamond disc.
To do this, use a Ø115 mm disc. The work is performed at an angle to the surface of 45° from the front side of the cladding.
You can partially remove the tiles inside the marked hole using straight cuts. For example, crosswise in the middle, then a square inscribed in a circle.
Then the remnants of the tiles inside the circle are removed with pliers with side jaws.
Angle grinder work can be done from the reverse side of the finishing material. In this case, the markings should be applied symmetrically on both sides of the tile. The tool with the diamond blade rotates evenly in a circle relative to its center. The tiles must be secured with a clamp with a soft pad.
When marking the hole, the gap between the tiles should be taken into account to ensure a standard joint thickness. If you have insufficient experience in using an angle grinder, it is recommended to use a special holder, with the help of which the required offset of the disk relative to the sole of the device is set.
If the hole is not hidden under the ventilation grille or decorative washers of the mixer, the edges must be additionally processed with an abrasive tool - a rasp, a file, or sandpaper attached to a piece of handle.
Multifunctional tool
For particularly precise, critical work with almost any structural and finishing materials, a separate category of power tools has been created. Different manufacturers (or different stores) have different names for them:
- MFI is a multifunctional tool;
- renovator - universal cutter, electric chisel;
- multitool – vibration cutter, multimaster, oscillating tool.
The principle of operation is similar to a delta grinder, the dimensions are much more compact:
- the renovator spindle fluctuates within 3 – 4° relative to the central axis;
- vibration frequency is 10,000 – 25,000 min-1;
- Several types of attachments are used for wood, ceramics, metal, and plastic.
There are network and battery-powered versions of MFIs that allow you to make holes of any size and shape in the tile before and after gluing it to the wall. With equal success, the renovator connects a heated towel rail or attaches a wall shelf.
Diamond disc for renovator.
For tiles and porcelain tiles, diamond-coated segment saw blades are used. Or hammer-shaped, teardrop-shaped attachments.
Engraver
Another highly specialized tool for precision work, often found in the arsenal of a home craftsman, is a miniature drill - an engraver.
This power tool can be used independently - the equipment is mounted in a collet clamp, or with a flexible shaft.
Moreover, flexible shafts for drills and sharpening machines with emery wheels are available for sale.
By analogy with MFIs, the industry produces a huge number of attachments for engravers. However, they cut material due to rotation, not vibration. To make holes with an engraver, it is most convenient to use a device that turns this power tool into a miniature analogue of a router.
Engraver with a device for milling holes.
Use a tile bit (Dremel part number 562) or a diamond blade (DSM part number 540).
Due to the high strength of the hardened porcelain stoneware layer, the tool life is reduced compared to drilling ceramic tiles.
Drilling around the perimeter
When installing an electrical or water outlet in the absence of an angle grinder, crowns, engraver and other special tools, you can use a drill with a spear-shaped, tubular, small-diameter Pobedit drill:
- after marking the circle, a large number of holes are drilled from the inside of the line close to each other;
Making holes with a drill around the perimeter. - the inside of the tile is knocked out;
Removing the inside of the tile. - after which, all that remains is to break off large irregularities with pliers;
Removing large irregularities with pliers. - at the last stage, the edge is processed with an abrasive tool or file.
Sanding the edge with sandpaper.
Attention: This method is not recommended for making holes close to the edge of the tile, as the lining may break off.
Ballerina
A special tool for making holes in ceramic tiles - a ballerina - is available as an attachment on some manual tile cutters or is sold separately as an accessory for an electric drill.
In any case, destruction of the facing material occurs when the cutter rotates around the central guide. The process is long, dusty, and the resulting material may crack.
Recommended drill speed is 200 - 500 min-1, the tile is attached to the sheet material with a clamp, water is added to the groove.
The main differences between spear-shaped attachments
A nozzle with two blades must be sharpened when the working edges wear down to a certain level, which significantly reduces productivity.
Such equipment is quite affordable, since the 6 mm version costs about sixty rubles. The work is progressing at high speed.
- As for the four-blade version, it will no longer be possible to sharpen it as easily and quickly as its two-blade counterpart.
- The cost in this case will be much higher, because a drill with a diameter of 5 millimeters will cost one hundred and seventy rubles.
It is easy to conclude that it is a disposable nozzle, but not cheap at all.
How to drill through tiles?
What tasks are most often pursued when drilling ceramic finishes:
- laying water pipes or other communications;
- installation of an electrical outlet;
- hanging shelves, mirrors, hooks and holders;
- heated towel rail insert;
- installation of a clothes dryer.
Before starting drilling, determine the type and quality of the tile. Density, strength, fragility, glaze characteristics and porosity of the tile - all these factors influence the outcome of the drilling process and the choice of tool.
But almost all types of tiles are characterized by one feature - a slippery surface from which the drill will constantly slide. Solving the problem is simple - just cover the working area of the drill with masking tape and get to work.
Another nuance is assessing the density of the tiles. Tap lightly on the facing surface. A dull sound will indicate the absence of voids in the coating - it can be drilled. If the sound is ringing, there are cavities in the tile, which, when drilled, can lead to breaks and chips.
Accurate hole marking without core
None of these drill bits are suitable for drilling into brick or concrete masonry. That is why, after these attachments pass through the tiles, it will be necessary to install a hammer drill in the drill.
A similar attachment for a drill equipped with an impact function is also quite suitable.
- Due to the fact that the final part of the spear is not much inferior in sharpness to the core, in this case marking the hole with a core will not be necessary.
- You just need to accurately position the drill at the site of the future hole, lightly hit its body, and it will make a deepening sufficient to continue the operation.
Tool selection
An important point in preparing for work is the choice of tool. You need to know in advance which drill bit for bathroom tiles is best to use in a particular case. Construction and finishing materials stores have a wide selection of equipment and devices for processing tiles. For single jobs, you don’t always need to buy expensive coated crowns. There is a way to cut holes using a grinder, wire cutters and a stone disc.
Selecting a drill and auger
In order to drill tiles on the wall, you will need a drill with pobedit coating. A tool such as a template or jig will help you correctly determine the diameter of the required hole. This is a plate into which circles of different sizes are cut. By applying the template to the tile and inserting the selected fasteners into it, you can accurately determine the desired drill section.
A drill will be needed to install dowels or anchors necessary for the installation of heavy equipment such as boilers. They require supports installed at great depth. Before drilling into ceramic tiles with a drill, a hole is made in it using a drill. This reduces the risk of cracks or breakage in the ceramic.
There is a special category of drills: for tiles. Many manufacturers offer their products of this type. The most popular brands are:
- Bosch Multiconstruction;
- Irwin;
- Projahr.
Any drill must be installed in a drill or screwdriver. Choose a tool with two or more speed settings. This will allow you to easily control the rotation speed. You can also use the hammer drill in non-impact mode. The technique for drilling tiles is as follows:
- the drill is placed in the desired place on the tile;
- drill into glaze and ceramics with gentle pressure.
For ceramic tiles
To avoid cracking the tiles, you need to drill at low speeds. The tip of the drill should not slide on the surface of the tile. Therefore, a notch is made in the right place by lightly hitting the glaze with a nail and a hammer. You can also use the sharp tip of a chisel.
Drilling ceramic tiles in the bathroom should be done carefully and slowly. If the tile is on the wall, work with a drill, holding it strictly perpendicular to the plane. After passing through the ceramics, the tile drill is replaced with one that can be used to make a hole in the wall material. For brick and concrete, drills with pobedit coating will be required. For foam and gas blocks, metal ones are suitable.
Work technique:
- in the right place, stick a small piece of masking tape onto the tile, which will avoid the formation of small chips;
- Use a felt-tip pen or marker to mark the location of the future hole;
- in a convenient way, make a notch on the tile to the depth of the glaze layer;
- install the drill into the drill;
- drill at low speeds, pressing the tool with little force.
It is most convenient to work with feather or spear-shaped drills with pobedit coating. The sharpening of the tip can be one- or two-sided. They can make holes with a cross section of 6-12 mm. During operation, it is necessary to avoid overheating the metal. Therefore, they periodically stop and dip the drill into a previously prepared container of water.
Carbide for concrete
A hole in the tile can also be made using a concrete drill. This method is suitable for installing dowels, hooks or anchors. The technique for performing the work is the same as when using a drill. It is important to indent from the edge of the tile by at least 20 mm. Otherwise, there is a high risk of cracks forming. Drilling the tiles to the required depth is done as carefully as possible. After passing through the ceramics, you can increase the pressure with the tool on the wall.
Circular on tiles, or ballerina
Selecting a drill is not an easy task. There are craftsmen who prefer something specialized for working with tiles: ballerina. Other experts consider it the least convenient. The adjustable cutters of such a tool are made of carbide materials. The ballerina is suitable for making holes with a cross-section of 30-90 mm and consists of several parts:
- central stop;
- bracket with which the position of the incisors is adjusted.
The rotation speed when working with a ballerina should be low. But in any case, with the help of a ballerina it is impossible to obtain smooth edges of the cut. They will have to be further processed with wire cutters and, if necessary, sandpaper.
Using diamond-coated crowns
A crown is a special round device for making large-diameter holes in ceramic tiles. There are 2 ways of working:
- wet;
- dry.
The first is the most convenient, but requires frequent interruptions of work and cooling of the metal. With the dry method, they check slowly and carefully. Otherwise, the tile will get burned or break. Both sets of crowns of different diameters and individual products are available for sale. You can always choose the one that is needed in a given case. In addition to diamond, crowns can be coated with tungsten carbide. Both types are suitable for working with tiles and concrete.
Making large diameter holes
If you need to make a large diameter hole, you will need the following:
- drill for tiles or concrete with a cross section of 3-4 mm;
- wire cutters;
- drill;
- sandpaper or abrasive stone.
The tile must be placed on a flat surface. To draw a circle of the required section, you will need a compass or a suitable round object. Work technique:
- holes are drilled in a circle, placing them close to each other;
- carefully knock out the inner part of the circle;
- Use pliers to smooth out the edges of the cut;
- polish the ceramics with sandpaper or an abrasive stone.
Impactless drilling of tiles
Working attachments are made from a hard material called pobedit. At the same time, the configuration of the working area is designed so that it allows quick and error-free penetration into solid materials such as concrete walls and brickwork.
- To avoid damaging the fragile ceramic lining, you should not use the impact function when drilling it.
- The cartridge should rotate at a speed of eight hundred to nine hundred revolutions per minute.
- It is better if a new drill that has never been used before is used for this work.
It is important to be aware that this method is only applicable to ordinary tiles.
Useful tips
There are several recommendations that will help you drill through the tiles in the bathroom so that they do not crack or fall off. For example, when drilling, it is worth remembering that the optimal speed is approximately 100-200 rpm.
Under no circumstances should the drill tip be allowed to overheat. You can cool the drill using unused machine oil. In this case, it is necessary to wipe the drill after each cooling.
Ordinary plasticine, from which you need to make a tourniquet, will help you make even holes without chips. After this, a ring is made from a plastic material, the diameter of which is determined by the dimensions of the future hole. Next, you need to position the plasticine ring so that the mark made for the hole is located clearly in its center.
Then the tile is placed on a flat horizontal surface and coolant is poured into the ring. This simple measure allows you to avoid overheating of the drill tip.
To drill tiles on the floor, you need to select a special nozzle. In this case, the use of a hole saw allows you to do the job correctly. It must have a guide drill, without which it will not be possible to perform the operation correctly. The design feature of this nozzle prevents it from sliding off the smooth surface of the tile.
To understand how to drill through bathroom tiles without cracking, it is recommended to watch an instructional video on this topic. Attention is the main requirement for a craftsman who decides to make even holes in tiles installed on a wall or floor.
Write in the comments: What tips will help avoid cracks in tiles during drilling?
Impact drilling of porcelain tiles
If you have to deal with porcelain stoneware, it will be quite difficult to do without using the impact function, because the cutting ability of the drill alone will not be enough to achieve the goal.
Regardless of the width of the drill, its tip tends to slide off the selected location. This is the peculiarity of glossy tiles.
What is required for processing?
The best option for working with ceramic tiles would be a corded or cordless screwdriver. Its high rotation speed (800-1000 rpm) allows you to easily handle tile processing. An alternative to a screwdriver is an electric drill, or a manual modification if you have to drill a small hole.
Selecting a drill and auger
When the unit is prepared, all that remains is to choose the type of nozzle aimed at solving certain problems:
- Diamond coated drills. They give the best results for drilling even very hard tiles, but due to their high cost, it makes sense to use them only for a large volume of work.
- Drills with a tip made of pobedit. They work well with soft tiles and medium-hard tiles. It is recommended to drill ceramic tiles on the wall using so-called feather drills - they have a small sharpening angle that does not allow damage to the tile glaze.
- Spear drills. Suitable for laying dowels, they have a low price and an enviable service life.
- Single-sided sharpened carbide drills. These attachments reduce the risk of overheating and make working with very fragile and thin tiles easier.
- Core drills with tungsten carbide coating. Universal components that can easily cope not only with the most durable tiles, but also with marble, brick and porcelain stoneware.
Diamond core drills require periodic cooling with water, and work with them at low speeds - no higher than 500 per minute.
What else can I drill?
If you need to get a hole of a large diameter, a drill with adjustable teeth - the so-called ballerina - will come to the rescue.
The device can drill holes up to 9 cm in diameter, including non-standard shapes for which there are no suitable crowns. But due to the manually moving bracket, the edges of the hole are uneven. Therefore, it is advisable to use a ballerina in cases where the perforation will be covered with something.
Another option for work is a Pobedit concrete drill. Since the tip is not intended for working with tiles, its cutting part is sharpened as sharply as possible, and during the drilling process maximum care is taken so as not to damage the coating.
Marking the hole using improvised means
Often, to apply markings for drilling, it is quite enough to slightly destroy the enamel with a steel drawing pencil or a fairly sharp self-tapping screw. This operation will allow, even when using a low-power drill, to achieve accurate and error-free penetration into ceramics of any structure.
A drill equipped with a round shank will cost thirty to fifty rubles. A simple hammer drill will cost fifty to seventy rubles.
Drilling technique
The purposes of drilling tiles can be very different - from creating a small hole for a screw to drilling an entire circle for a pipe or socket.
Large holes
The best option for creating capacious perforation is to use a ballerina with a tip of the required diameter. It is recommended to first practice on waste tiles in order to “feel” the tool. If a ballerina is not at hand, a hole saw will come to the rescue, which even an owner inexperienced in construction can successfully handle.
Another method of drilling step by step:
- Mark the center of the planned hole and draw a circle of the required diameter.
- Using any tile drill, make several holes along the diameter of the circle, trying to place them close to each other.
- The drilled sectors are carefully pressed, and the remaining pieces are removed with wire cutters.
- The edges are sanded to give the correct shape.
Small holes
Step-by-step instruction:
- Marks are placed on the surface of the ceramic for the hole.
- To prevent the drill from slipping, stick masking tape or lightly chip off the enamel in the center of the future hole.
- Disable the impact mode function on the drill and connect the device to the network.
- Place the drill at an angle of 90° to the tile and start drilling at low speed.
- Gradually the speed is increased, punching the tile to the very base.
- Change the drill to a new one, suitable for the type of wall base (concrete, brick, wood) and continue drilling to the required depth.
The diameter of the second drill should not exceed the size of the first, otherwise the tile will be damaged.
Modifications of tubular drilling attachments
Cylindrical drill bits are divided into the following two types:
- Conventional, which is a tube equipped with a groove for shaking out drilled powder and diamond coating at the end;
- Sector, which is a cylinder in which a sector is cut out, inside of which there is a diamond coating.
An ordinary tubular drill is an analogue of a crown. The destruction of the medium is carried out along the contour of the outer ring, the central part is removed after completion of the working cycle.
The cost of a tubular drill is determined by the method of applying the working diamond layer and ranges from two hundred and fifty to three hundred and fifty rubles.
Option for the largest holes
Well, if you need to drill a hole in ceramic tiles, the diameter of which is larger than all existing drill sizes, you will have to use the only way out. The process, however, is labor-intensive, and the result is rough, but there is nothing to choose from.
The process looks like this. The soaked tile (of course, it is not yet glued to the wall) is placed on a wooden surface, a circle of the required diameter is drawn on it and a hole is patiently drilled around the circumference tightly together with a drill, for example, 8 mm. When the circle is closed, its inside is broken out by carefully tapping it with a mallet or the handle of a hammer, and the uneven edges are smoothed out with a file. Whatever you say, a thoughtful process.
Drilling multiple holes to create one large diameter
Photo instructions on how to drill tiles in the bathroom
Drilling technology
First, before drilling, you need to check how tightly the tile is glued to the wall. Masters determine quality by ear. If the sound is dull when you tap on the tile, it means that the tile is glued tightly and you can drill it. If you hear a slight ringing sound, it means there are voids under the tiles. In this case, there is a high probability of cracks appearing.
The common thing that always exists when drilling into tiles is that they are slippery. And it is difficult to keep the drill at the desired point. To avoid slipping, you can stick a piece of masking tape in the drilling area or carefully manually scratch a cross on the surface of the tile, scratching the hard layer of cladding. And place the drill exactly in the scratched cross. You can use a “conductor” - this is a piece of wood with a hole. But during operation it must be pressed tightly against the wall, not allowing it to move. You only need to drill the tiles from the tiled side.
What tool will you need?
For drilling ceramic tiles, the best option is to use an electric drill with speed and operating mode switches. Power is not so important, so even the weakest Chinese drills should be enough to produce holes for dowels.
Tile tiles are drilled at speeds ranging from 200 to 800 rpm. It may not be possible to set 200 rpm on a household drill. Therefore, it is better to sometimes use a screwdriver.
A screwdriver may be suitable, either a battery-powered one with a sufficiently strong autonomous power source and set speeds of up to 800, or a mains-powered one with adjusted low speeds. In extreme cases, if these tools are not available, a hand drill will do. With it, the necessary speed of rotation and pressure will be guaranteed. The only thing is that it is difficult to do a large amount of work with a hand drill.
To deepen a hole in a concrete or brick wall behind a tile, it is better to use a hammer drill. If it is missing, then the drill must be powerful enough to drill through the wall to the length of the self-tapping screw. It is not recommended to use a hammer drill for drilling tiles. Only a professional master with the appropriate experience and skill can afford this.
Along with these basic tools you will need:
- a construction pencil, you can get by with a felt-tip pen or marker;
- masking tape or adhesive tape;
- ruler;
- level;
- conductor - in case of production of several different holes. It is a kind of stencil in the form of a plate with holes of the required diameter.
Crowns
A crown or cutter is a cylinder-shaped drill for making large-diameter holes. Base material: tool steel. At one end the cutting elements are fixed (various materials are used), at the other there is a shank for fastening in the drill chuck.
Based on their design, crowns are divided into two types:
- with centering drill: used for working with hand tools;
- without center drill: for permanent installations.
A crown without a centering drill, attached to a hand drill, “walks” on the tile when trying to drill. For drilling tiles, only sprayed cutters are used.
The toothed (carbide) varieties are designed for impact drilling and are therefore not suitable for fragile ceramics. Based on the coating material, cutters are divided into two types: diamond-coated and tungsten carbide.
The advantage of crowns is the high quality of drilling. The edge of the hole does not need to be trimmed, as after the “ballerina”.
Diamond coated
Like a diamond drill, this tool is more often used by professionals. It has a significant resource, but is expensive.
Crowns get hotter than drills, which is why diamond-coated tools are divided into two types:
- for wet drilling . Here the diamond chips are fixed in the least reliable way - on solder. When heated, it softens and the crown loses its coating. To avoid this, water must be supplied to the work area. Wet drilling cutters have an important advantage: after their service life has expired, the cutting part can be replaced, so there is no need to purchase a new crown;
- for dry cutting. Expensive crowns with coating fixed by laser soldering, immune to overheating. The tool is divided into segments by slots for effective heat dissipation. The cutting part cannot be restored; after its service life is exhausted, you have to buy a new cutter.
Tungsten carbide
The cheapest, but also the least durable variety. Typically, a tungsten carbide cutter is purchased for one-time work.
Drilling tiles that are not glued to the wall
To carry out work with tiles that will only be laid on the wall, it is necessary to equip a workplace. The surface on which the work is carried out must be smooth; you can use a workbench, a wooden board, a sheet of thick plywood or plasterboard.
- Before carrying out work, the tiles are soaked by placing them in water for 30 minutes.
- The tiles are placed on a clean, smooth surface.
- Apply masking tape to the location of the intended hole.
- Markings are made, taking into account a distance from the edge of the tile of at least 15 mm. Make a mark with a construction pencil.
- It is better to fix the tiles with a clamp. Drilling begins with a drill at the lowest speed, without applying excessive pressure on the tool.
- Particular attention should be paid to holding the apparatus at a right angle to the plane of the ceramic tile.