Hi all! You can write a very long article about how to drill metal with a drill if you wish. But I see two main problems here:
- inability to drill accurately in the place where the hole is required
- rapid dulling of drills
Typically, inexperienced users encounter such problems. Experienced men know what to do in such cases. Well, considering myself an experienced person, I will take the liberty of telling you how to cope with these problems. Well, I’ll also give you some tips that will also come in handy.
At what speed should you drill into metal with a drill?
What speed should you set on a drill if you need to drill through metal?
Metal and metal are different, and for drilling each type of metal, its own speed is determined, so that when drilling, thin spiral-shaped chips are formed.
For example, when drilling, brass requires speeds of about 2000 - 2500 per minute because... This is a more viscous metal, but stainless steel, due to its hardness, ranges from 500 to 1000 revolutions.
Also, drills must be sharpened for a specific metal at their own angle of rotational penetration into the metal. Otherwise, more expensive drilling will be required. Naturally, for one-time work there is no need for such special sharpening of the drill, but in mass production, where every second counts, there is a need to pay attention to this.
Also, the speed of rotation of a drill for various metals depends on the diameter of the drill - for thin drills it can reach high speeds, and with an increase in the diameter of the drill, the rotation speed also decreases. I repeat, the rotation speed strongly depends on the type of metal - and the softer the metal, the higher the drilling speed, and conversely, the harder the metal, the lower the rotation speed. Otherwise, you will also burn the drill.
It is impossible to say exactly the number of revolutions, since it depends on many factors (which I will discuss below), and also, even knowing the number of revolutions, how do you install them on a drill, because it seems that no drill determines the number of revolutions, it turns out that you need to drill “at eye”, I will give recommendations at the end of the text.
What determines the speed of drilling metal?
Type of metal
Namely, what kind of metal will you drill, because there are a lot of them and they all have different physical parameters. For example, aluminum is softer than copper, and these two metals are softer than iron.
Metal type
Each type of metal also has its own type, it depends on the manufacturing method and the impurities of other metals in the alloy. For example, bronze and brass have different properties. And steel has many types from soft to hard.
Metal processing
Also an important factor, since metal processing can soften or harden the metal, so hardening the metal increases the strength so much that it is necessary to use special drills or temper the metal.
Drill quality
Drills are also made from different materials and have different tips; the drilling method largely depends on the quality.
Shape and type of drill sharpening
Each type and type of metal has its own drill shapes and method of sharpening them; for example, for soft metals it is necessary to ensure free flow of chips.
The selected drilling speed largely depends on this parameter, even for average values; if the speed is incorrectly selected, the drill will either break or “burn.”
________________ _______
Each drill has its own drilling speed table, for example in this format:
The table shows that the smaller the diameter of the drill and the softer the metal, the higher the drilling speed, and vice versa, the larger the diameter of the drill, and accordingly the size of the cut surface is also larger, and the harder the metal, the lower the drilling speed.
________________ _________
If you don’t know what type of metal you have, but have at least determined the type, and also don’t understand what kind of drill and what sharpening angle it has, then use the following recommendation.
When installing a drill with a diameter of 12-16 millimeters into a drill, start drilling at the lowest speeds and gradually increase them, at the moment when it is visually visible that the metal is cut best by the drill, and stop at approximately these speeds.
If the drill has a diameter of 6-10 millimeters, then start with medium speed, closer to 11 reduce it below average, and closer to 6 increase it. You also need to visually evaluate how the metal is drilled; if the drill burns or whistles, then reduce the speed, and if the drill does not produce chips, then increase it.
From 5 millimeters in diameter and below, set the speed closer to high, but do not start drilling at high speeds, as the drill may immediately become dull.
While drilling, water the area with water or a mixture of water and oil; I don’t recommend simply cooling the drill in water from time to time; you need to cool the drilling area.
Drill
The following types of drill bits are most commonly used:
- Spiral - are made of tool steel, coated with carbide, with a carbide insert and solid carbide. Used for all types of work on any materials.
- Spade bits can be used to drill wood, MDF and plastic. Allows you to drill holes of huge diameter. They are produced either in one piece or in the form of a set of a shank with a groove and several inserts of various diameters. This set is cheaper than a set of solid nibs, but is the least accurate.
Core bits (crowns) are used for excavating holes in hard brittle materials - stone, concrete and drilling wide holes in chipboard and fiberboard. Available with or without a centering twist drill. The second ones are cheaper, but are only applicable for stone and require strong working abilities.- A circular drill (centre drill, ballerina drill) is used to drill holes of huge diameter in thin, strong but fragile materials with a decorative front surface, such as, for example, tiles or polished decorative stone. The drilling diameter of the circular drill can be easily changed. Rotary impact drilling with a circular drill is unacceptable.
- Diamond drills are thin-walled tubes made of a special alloy coated with diamond. They can be used to drill glass, polished decorative stone, and glazed clay tiles. Roads require careful handling and strict adherence to drilling technology.
Drill sharpening
Self-sharpening of drills is acceptable for twist and feather drills. The first ones are sharpened with a diamond file - they are made of tool steel. Cheap sets can be made from ordinary carbon steel; their feathers can be edited with an ordinary needle file.
Spiral drills are sharpened with an emery wheel (carbide - diamond) using a device - a wedge with an angle of 180 degrees minus half the sharpening angle. So, with a sharpening angle of 120 degrees, the wedge angle is needed at 30 degrees. In the hypotenuse (oblique side) of the wedge, a longitudinal hollow or a blind hole is made, in which the drill is smoothly turned when sharpening. The best sharpening comes from using a small (“velvet”) hand sanding wheel, see fig. below. Different materials require different sharpening angles for the drill bit. In most cases, metal is drilled with drills with a sharpening angle of 116 degrees, concrete and stone - 90 degrees, wood - 60-90 degrees. Precise angles and methods for sharpening different types of drill bits for different materials can be found in reference manuals for materials processing.
About hard alloys
Carbide alloys for drills are made based on boron, tungsten or zirconium compounds. The cheapest ones are based on boron, but such a drill will take concrete with great difficulty and will quickly wear out. Such drills are marked “by stone”. You cannot drill decorative materials with them - the edges of the hole will chip. Tungsten and zirconium compounds differ primarily in their durability: zirconium compounds last longer. They cost more accordingly.
How to properly drill holes in metal
When working with metal, you cannot do without drilling holes. Working with metal is a complex operation. This is due to the fact that metal parts have high strength, for the processing of which special equipment and technologies must be used.
You may need to drill holes in any field and when performing work in the country, at home or in the garage. Even when repairing a car, you have to drill holes in the metal. If you are going to do the work away from the workplace, you will need an electric drill or hammer drill with an adapter chuck for the drill, as well as a core or tap to center the hole.
If you need to make holes in small parts, it is better to use a drill press. On it you will be sure of the correct direction of the drill and the drilling speed.
How to drill in the right place?
If you think about this question a little, the answer should come to your mind even without a hint. Well, at least it seems so to me. But if you don’t want to think, then read.
For this case you will need a core. This is a tool made of durable steel, having a cylindrical shape and a point at the end.
We place the tip at the desired drilling location and hit the roll on the other side with a hammer several times.
Now that you have finished drilling, place a drill on the surface of the roughness and start drilling - the tip will not run away anywhere.
Which drill to choose for drilling metal
One of the first questions that inexperienced craftsmen ask is which drill to drill into metal? In fact, answering correctly is not so easy. For metal processing, you need to use special drills made of high-speed tool steel. The cutting part in them is made with the addition of titanium nitride.
When choosing drills for drilling metals, the main and running ones are drills made of high-speed tool steel; they can be found in the store by the HSS .
When working with cast iron, stainless steel and other metals that are difficult to machine, you should use carbide drills. Their disadvantage is their very high price, which makes the work expensive.
If you choose drills with one of the best cutting properties, it will be a tool with the addition of cobalt, marked P6M5K5. This is the best value for money.
Is it possible to drill metal with a concrete drill?
There may be an urgent need to make a hole in metal, and only a concrete drill is at hand. On such a drill, the tip is made of pobedite, which makes it possible to drill concrete and brick with a hammer. You cannot use such a drill to drill a hole in metal. You may lick off the tip of the drill bit, especially if you try to use a large diameter drill bit or drill through thick metal. To sum it up, you won’t be able to drill through metal with a Pobedit drill.
However, if you sharpen it at the right angle, it is possible to drill into metal.
Tools required for work
On an industrial scale, special machines are used for drilling metal parts. In everyday life, a drill is used, both manual and electric. Moreover, the first is irrevocably a thing of the past, since such a tool is already inconvenient and unproductive.
Many home workshops are equipped with compact drilling machines. They differ from industrial designs not only in size, but also in performance. And the most practical option for the home is a special device in which an electric drill is attached.
Previously, such a stand could only be seen among folk craftsmen. Now it is sold in any hardware store. The convenience of the device is that it has a vice. The part is fixed motionless, and the cutting tool, clamped in the drill chuck, is fed to it strictly vertically.
They make holes in the metal using special drills. And most often they are called drills. They have a cutting part, a shank and a working surface that removes chips from the hole. Cutting tools differ from each other primarily in diameter, length and shape.
Types of drills for metal:
- Spiral, as a rule, have a cylindrical shape. Their diameter can reach up to 80 mm, and the cutting edge is sharpened at an angle of 118 degrees.
- Conical ones are made in the form of a cone with a stepped surface. In addition to drilling holes, they are good at correcting defective passes that have already been made.
- Crowns are often called annular cutters. A hollow serrated drill can make a neat hole in the thinnest metal. The cavity in the bit also helps with deep drilling by allowing chips to pass through.
- The feather ones have replaceable working plates. With their help you can get the perfect hole by penetrating to great depth. Moreover, in metals of any strength.
Good drills are made either from cobalt or high-strength alloys. Typically, tool steel is selected for the base, and the cutting edge is either alloyed with cobalt, or carbide alloy plates are fixed to it. Cobalt drills are not afraid of high temperatures and can drill metal with the highest viscosity. Carbide tools are capable of self-sharpening during operation.
Power and speed when working with metal
An important factor is the choice of tool, namely a hammer drill, drill or screwdriver, which will be used to make holes in the metal. If you use a drill with a power of up to 700W, you will not be able to make a large hole right away. A hand drill with a power of up to 700W is best used for drilling holes with a diameter of up to 10-13mm.
It is important to choose the correct speed of the drill or screwdriver. After all, at high speeds, your drill will simply burn out. This way you will ruin it.
You need to drill metal at low or medium speeds, not exceeding 500-1000 revolutions.
The larger the diameter of the drill you are working with, the lower the speed you need to choose.
Homemade drill
It is not necessary to buy an expensive drill for the job; in some cases it can be made at home. A cobalt-tungsten alloy rod is best suited for this - it wins. Such a rod is easy to recognize among other pieces of iron: it will not be cut with a metal blade. Then do the following:
- Place a diamond wheel on the emery.
- They trim one side of the rod and grind off slots on this side, like on a flat-head screwdriver.
- Next, grind down the sides to create a sharp cone.
Dear site visitors, please share in the comments your suggestions on how else you can drill a hole in steel that has been hardened.
How to drill metal products correctly
One of the most important parameters when drilling a hole is the sharpness of the drill. If you purchased one of the cheapest drills, it may turn out to be dull and made of soft metal, which will not allow you to make even a couple of holes.
How quickly the drill tip will shear and dull depends on the drilling speed, the hardness of the metal, the force applied to the drill, and cooling.
- When drilling large holes, you must first make holes of a smaller diameter. This way the process will be much faster, and the drills will not become dull so quickly.
- To accurately center the hole, you need to use a core punch and punch the center of the hole before drilling.
- To cool the working part of the drill, you need to use machine oil. Simply lower the working part of the drill into a container of oil. Repeat this operation periodically. You can use soapy water for cooling (by reducing friction).
- When drilling deep holes, periodically remove the drill and clear it of chips.
How to drill sheet metal
When working with sheet metal, there should not be any particular difficulties, even when drilling large-diameter holes. The only thing is that you need to place a wooden block under the drilling site, it will help remove the chips. When you feel like you've almost drilled through the metal sheet, reducing the pressure on the drill will also help reduce the likelihood of burrs.
How to make holes in pipes correctly
The main problem when drilling holes in round pipes is the difficulty of perpendicular drilling. This means that the hole from which drilling began does not correspond to the exit hole. To solve this problem, you need to use a drilling machine, or special guides, which you can make yourself or purchase ready-made.
How to drill aluminum
Anyone who has worked with aluminum parts knows that it is a soft metal. The main problem when drilling aluminum is excessive shavings wrapping around the drill bit. Because of this, the drill stops drilling and gets stuck in the metal. To avoid this, you need to remove the drill from the hole more often and remove the chips.
How to drill stainless steel (stainless steel)
Stainless steel is an alloy steel, which is not an easy task to drill. To make drilling comfortable, it is advisable to choose drills with a cobalt tip. You need to drill stainless steel at minimum speed, namely 100-200 rpm. Such speeds provide the required cutting speed for stainless steel and good quality. If your tool does not have a rotation speed control, you should press the button periodically for a second or two, which will prevent the drill from accelerating quickly.
If you need to make a hole of a large diameter, you need to use metal crowns, which make it possible to drill only along the outer diameter of the hole.
How to quickly drill through metal - Metalworker's Handbook
In the repair industry, the ability to drill correctly is one of the basic skills. In addition to the general rules, it is important to take into account all the nuances when working with a specific material: concrete, tile, metal, etc. All issues related to drilling will be covered in this article.
- Choosing an electric drill: which one is better?
- How to remove a drill from a hammer drill
As already mentioned, drilling is the most common activity for a repairman, and therefore it is important to immediately learn a few basic rules associated with this activity.
- Use of suitable tools. There are many drills, each of which is designed for a specific type of material. Therefore, you should not try to drill concrete with a wood drill and vice versa. It is also important to consider the conditions in which the tool will be used. For example, industrial drills cannot be used for interior repairs (this is simply unsafe). It is also important to take into account resistance to moisture: for outdoor work you will need a tool of class IP34 if the climate in the area is humid and IP32 if you have to work in good weather. IPX2/ can be used indoors
- Correct markup. Before starting any work, it is important to carefully and accurately mark the drilling locations with a marker. You can also put paper tape under the marker to prevent the drill from slipping on the material.
- Selecting the required drilling speed. Here everything depends equally on both the material and the diameter of the blade. If we are talking about very thin drills (with a diameter of less than 3 mm), then you need to work at low speeds, less than four hundred per minute. For other drills, the following rule applies: the thinner the drill, the higher the drilling speed required.
It is also important to ensure that the handle is securely attached to the shaft of the hand drill. The drill must also not be allowed to skew.
How to drill metal correctly + ()
The first thing to start with is the selection of drills. They are distinguished by a sharp edge designed to allow the drill to easily penetrate the metal. Regular metal drills are good for not too hard metals like copper or aluminum, but for something harder (for example, stainless steel) you need to take products made of titanium carbide or chrome-vanadium alloy.
We should also talk about optimal speeds. A common mistake beginners make is using too many turns. In fact, for hard metals, medium speeds are used: for example, brass one centimeter thick will be optimally drilled at a speed of 2000-2500 rpm.
There are a few more points to cover. So:
- If a thin iron plate needs to be drilled, it must be secured between two pieces of wood. This is done so that the sheet of metal does not tear off.
- It is necessary to use lubricating oil from time to time to cool the drill and facilitate the drilling process.
- If you need to make a hole in the pipe, it must be securely fastened. To prevent the pipe from being flattened by the drill, a piece of hard wood should be placed inside.
If you follow these simple rules, then even a beginner will be able to perform high-quality drilling.
How to drill concrete walls + ()
In everyday life, you have to drill into walls most often, because without this it is impossible to hang a shelf, a cabinet, or install a cornice. Of course, it is better to use a hammer drill or impact drill for this purpose.
These tools are powerful enough to handle hard materials like concrete or brick. However, if the wall thickness does not exceed 10-12 cm, then you can get by with a regular drill.
https://www.youtube.com/watch?v=ZjueKzIhTVs
But you shouldn’t take risks if you only have a low-power tool at your disposal - if it comes into contact with concrete, it can simply break. If the drill is selected correctly, then the following tips will be useful:
- Before starting work, you should make sure that there are no pipes or other communication systems in the drilling area.
- The drills used for such work must be made of hard metals or alloys. The best option would be diamond-coated drills.
- If during drilling you come across too dense areas of concrete, they need to be punched out using a small hammer and a pin (punch).
Although it is generally possible to drill through a concrete wall with a drill, it should still be done with caution. Otherwise, the damage can be quite serious. It is better to use specialized tools for this.
How to work with tiles using a drill + ()
Often people who do not have extensive experience in the field of repairs are afraid to drill into such a fragile material as tiles. However, this can become an urgent necessity, because you need something to attach various cabinets and shelves in the kitchen, bathroom or toilet.
Alas, in many respects the condition of the tile after drilling is determined not by the master who takes up the drill, but by the one who laid the tile. A competent tiler lays the tiles so that no voids form between the tiles and the wall. In this case, careful drilling will not harm the tile in any way.
If there are “air pockets” between the wall and the tile, then most likely the tile will crack.
In order to properly drill through the tiles, you need to take a drill, masking tape, or a hammer drill (or a powerful drill with drill bits for concrete). Next you will need to perform the following steps:
- The drilling location is marked with a piece of masking tape and a marker. The tape is here to prevent the nail from sliding on the surface of the tile.
- Drilling is carried out strictly perpendicular to the material. The number of revolutions should increase gradually: from the minimum possible to 150-200 revolutions per minute. This way you can avoid damage to both the material and the tool.
- It is important to ensure that the drill does not overheat. If smoke starts coming out, the drill needs to be cooled down immediately.
Once the holes are made, you can insert dowels into them. This is done with a hammer.
Drilling cast iron - how to do it correctly + ()
Cast iron is a fairly hard material, so drilling it is very, very difficult. In addition, cast iron products are fragile, so it is important not to crumble them. Like other materials, cast iron has its own subtleties when it comes to drilling.
- There's no rush. This is perhaps the most important rule when working with cast iron. Everything must be done slowly, with extreme care and attention.
- The drill must be made of a very hard and durable alloy, in addition, it must be perfectly sharpened. To prevent cast iron from crumbling, you need to take drills with an angle of 114-119 degrees.
- It is unacceptable for the drill to overheat. Sometimes they don’t pay attention to the fact that the instrument is overheated. And this can lead to poor quality work or even breakdown.
How to carefully drill through wood + ()
Wood is one of the “easiest” materials when working with a drill. However, there are some subtleties here too.
- The drilling speed directly depends on the type of wood. Loose, not too hard types of wood will be suitable even for a low-power device. Of course, the expected diameter of the hole also plays a role - the larger it is, the more powerful the drill is needed.
- In order to make large holes, you need to use special core drills. Their diameter can exceed 120 mm. As for depth, on average crowns are suitable for materials up to 20-22 mm thick, but there are also special models that can cope with thicknesses of more than 60 mm.
- If you need to make a blind hole rather than a through hole, then Forstner drills, which are available in diameters from 1 to 5 cm, are perfect for this.
We should also talk about drilling timber. Although it is convenient to fix it for further drilling, the large thickness of the material creates certain difficulties. Drilling timber for further fastening in the dowel holes. For a standard beam 18 cm thick, it would be best to take a drill with a diameter of 25 mm and a length of 36 cm.
You will need to drill slowly, at low speeds. In terms of power, a 1300-1500 W drill is perfect. If the beam is not very long, then two holes on each side will be enough. If the length of the beam for the dowels is long enough, then it will be necessary to make an additional hole in the center.
After the holes are made, you can drive the dowels into them using a hammer or small sledgehammer.
At what speed should you drill?
One of the important parameters when drilling is the number of revolutions per minute. The speed at which you need to drill depends on the type of material and the type of drill. There is a general rule: the harder the material and the thicker the joint, the lower the number of revolutions per minute should be. As for the specific numbers, they can be seen in the table below.
| drill diameter, mm | soft wood | solid wood | plastic (acrylic) | copper | aluminum | steel | Notes |
| 1.5-4.8 | 3000 | 3000 | 2500 | 3000 | 3000 | 3000 | When drilling metal thicker than 3 cm, lubricate the drill thoroughly with oil. |
| 6.4-9.5 | 3000 | 1500 | 2000 | 120 | 2500 | 1000 | |
| 11.1-15.9 | 1500 | 750 | 1500 | 750 | 1500 | 600 |
How to drill concrete, metal, tile and wood
Drilling a hole in the wall may seem like a piece of cake.
However, if you choose the wrong tool for a particular surface material, the drill may become dull or even break, and scratches and cracks may appear on the surface.
To prevent this from happening, you need to know certain nuances of doing the work. How to drill, how to properly prepare the surface and select a drill, we will consider further.
How to drill large diameter holes
When you need to make large diameter holes in metal, you need to use a tool suitable for this purpose.
- First you need to make a hole of a smaller diameter. You can use several drills, gradually increasing the diameter of the hole. In this way, it will be easier for drills to pass through metal, especially thick metal.
- Using a step drill. Such drills can be called conical drills.
- The use of special crowns for metal. Drilling large diameter holes with hole saws is very easy due to drilling only the outer diameter of the hole. The crown consists of a centering drill, which first drills through the metal in the center and then guides the crown. Drilling with a crown must be done at very low speeds.
One of the best ways is to use metal crowns. The disadvantage of this method is the non-adjustable diameter of the crown (adjustable crowns are also sold, but we do not recommend buying these because of their poor quality). For each hole diameter you need to have different crowns.
How to drill with a drill?
To figure out how to properly drill metal with a drill, you need to derive a number of basic rules from which it is not advisable to deviate:
- You will need a drill or screwdriver, a core with a hammer, protective equipment - glasses and a means for cooling the drill (most often machine oil).
- Before starting work, you need to mark the center of the hole
- Wear protective equipment. The chips can easily bounce into your eyes. After which it will be difficult to get out of there without specialized medical care.
- Punch the center of the hole.
- Start drilling at low speed
- Periodically remove the drill from the hole, clearing it of chips and cooling it in oil.
By following the above rules and sequence, you can make holes of any diameter without any problems. When performed, the shelf life of the drill will be maximum due to maintaining low speeds and cooling it in oil.
On a large number of drills, you can install a depth limiter, which allows you to adjust the drilling depth. You may need it when drilling blind holes.
Drilling metal
Selection of drills
When purchasing drills, you need to keep in mind that conventional drills made of high-speed tool steel (for example, P6M5) are designed for drilling metals that do not have high hardness. To drill through metal of increased hardness, you will need carbide drills. Such drills can be made entirely of carbide or have only a carbide tip.
Sometimes before starting drilling it is not known what hardness of the metal is to be drilled. Therefore, if you see at the first moment of drilling that the drill does not penetrate the metal, you must immediately stop drilling, otherwise the drill will be irretrievably damaged by overheating and losing hardness. Evidence of this will be the appearance of a dark blue color on it. Before drilling into metal whose hardness is unknown, you can run a file through it. If the latter does not leave marks on the metal, then the material has increased hardness.
How to drill metal
When drilling metal, the sharpness of the drill is very important, and the drill becomes dull very quickly. The rate of dulling of the drill depends, in particular, on the speed, feed force, cooling and other factors, but no matter how hard you try, if you are drilling a non-aluminum alloy, the time it takes for the drill to become unsatisfactory is measured in minutes.
Before drilling, you need to mark the hole by tapping it. To do this, you need to place the tip of the center punch (or dowel) in the expected center of the hole and hit it with a hammer. Punching is necessary to prevent the drill from slipping at the first moment of drilling. If the core mark is not large enough to hold a large-diameter drill, then first widen the hole with a small-diameter drill.
To create better drilling conditions, it is advisable to dip the tip of the drill in machine oil or drop it into the core site. Oil in the drilling area helps to better cool the drill and makes cutting metal easier. A drill used for drilling using oil becomes less dull, requires less sharpening and lasts longer. A special emulsion, soapy water, and kerosene are also used as a coolant. According to some craftsmen, lard is a good lubricant and cooling agent. Before drilling, a rotating drill is immersed in a piece of lard, which melts during drilling and has a lubricating and cooling effect. But still the simplest and most convenient remedy is soapy water. It doesn't get dirty, and every home has soap. It is enough to drop it once at the beginning of drilling and during the process. You can periodically dip the drill in a soapy solution.
When through drilling with a large feed, a burr (burr) is formed at the exit of the hole, to which the drill clings with its side cutters. As a result, a sharp blocking of the drill and its fracture or chipping of the incisor can occur, and even at this moment the drill dulls especially intensely. Such stops also have a negative impact on the condition of the drill. To avoid burr formation, you need to finish drilling holes in the metal with low feed. It is also advisable to place a wooden block under the part being drilled, which prevents the formation of a burr. The block and the workpiece must be pressed tightly against each other. For greater effect, you can place not a wooden block, but a plate of the same or less hard metal, which should be pressed tightly to the point where the drill exits.
Most often it is necessary to drill steel, but often it is necessary to drill other metals that have their own drilling characteristics. Aluminum, for example, envelops the drill, making it difficult for it to penetrate deeper and widening the resulting hole. If you need to drill a precise hole in aluminum (for example, for a thread), you must use coolant and remove the drill from the hole more often to clean it. Regular gray cast iron drills relatively easily and does not require coolant or lubricant. But drilling in cast iron can bring surprises. There are high-strength gray cast irons that must be drilled with a carbide drill. White cast iron, whose main structural constituent is cementite, is very hard and requires a high-strength drill.
Large diameter holes should be drilled in stages. First you need to drill the part with a thin drill, then drill the hole to a larger diameter. For example, it is better to drill a hole with a diameter of 12 mm in two or three steps - sequentially with drills of 5, 10 and 12 mm.
Dull drills need to be sharpened promptly. It is better to do this with a sharpening device, but you can do without it. In this case, you need to pay attention to the symmetry of the drill tip. If the sharpened edges do not meet exactly in the center, the hole drilled with such a drill will have a larger diameter, since one cutting edge will be longer than the other. The standard point angle (angle between cutting edges) is 118°. For drilling aluminum, the optimal angle is 130-140°, soft bronze and red copper 125-130°. However, all these metals can be drilled with a standard angle drill. Read more about drill sharpening here.
When drilling, you need to maintain the verticality of the drill relative to the metal surface (if you do not need to drill an inclined hole). When making holes in thin sheets, this requirement is not as important as for thick-walled or hollow parts. Drilling pipes, for example, often leads to the fact that the inlet and outlet holes are displaced relative to each other - the larger the diameter of the pipe, the more so. It is quite difficult to maintain the perpendicularity of the drill by eye, so you can use homemade or purchased drilling jigs or guides that ensure the perpendicularity of the drill.
Conductors are also needed for drilling two or more holes in mating parts. The best way to ensure the holes line up is to drill them together. When drilling holes for rivets, drilling the assembly is a must. Once you've drilled the first hole, you can use it to bolt the pieces together so you can drill the remaining holes without worrying about the pieces moving relative to each other. If drilling the mating parts in the assembly is impossible or inconvenient, then a jig or guide must be used. You should know that no matter how accurately the mating holes are marked and cored, they will still not coincide absolutely exactly, since when drilling even a cored hole, the drill will move slightly to the side.
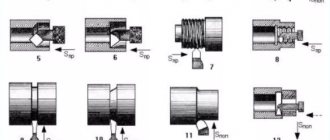
Drilling according to markings
Rice. 1. Drilling holes according to the markings:
a – marking and punching the center of the hole; b – marking and punching of the control circle; c – moving the drill away from the center of the hole; d – correction of the drill direction; 1 – mark from the center punch; 2 – groove from a pre-drilled hole; 3 – machined hole
This type of processing of workpieces is carried out in several stages:
- preliminary.
- final.
When pre-drilling, drill a small hole (0.25d). Next, the spindle with the drill is retracted to check the prepared hole with the original markings.
If the result of preliminary drilling is satisfactory (Fig. 1, b), final processing is carried out, for which work continues until the cutting tool leaves the part. If a bevel occurs and the hole being drilled goes away (Fig. 1, c), an adjustment is made using a cross-section tool - grooves are cut in the direction where the hole needs to be moved (Fig. 1, d). Thanks to the guides for the drill, the direction is set in the desired direction to correct the bevel.
At what speed should I drill metal?
The main elements of the cutting mode when drilling are cutting speed, feed and depth of cut. Cutting speed is the peripheral speed of the point of the cutting edge furthest from the center of the drill, measured in meters per minute ( m/min
).
Cutting speeds when drilling (working with cooling) of structural steels
Drill diameter in mm
Cutting speed in m/min
Cutting speed v
determined by the formula
where D
— drill diameter;
n
is the number of spindle revolutions per minute; π = 3.14 is a constant number. The number of revolutions of the cutting tool is determined by the formula
When drilling or reaming holes, it is important to correctly select the cutting speed at which the tool will work normally, that is, most efficiently. Thus, the cutting speed of the cutting tool and its feed per revolution constitute the cutting mode. The cutting mode must be chosen in such a way as to protect the tool from premature wear, taking into account maximum productivity. Cutting modes can be selected according to the table. 19 and 20. Table 20
Conversion table for cutting speeds and drill speeds per minute
Cutting speed in m/min
RPM
Knowing the diameter of the drill and the material of the workpiece, we find from the table. 19 and 20 cutting speed, and from the cutting speed and drill diameter we determine the number of drill revolutions per minute using a conversion table (or formula). The found number of revolutions and the feed value are compared with the actual number of revolutions of the machine spindle. Each machine has a spindle speed and feed table that is attached to the machine. When working with carbon steel drills, the cutting speed and feed rates should be reduced by 30 - 40%. To reduce friction and heat of the tool when drilling, coolant is used. If you use plenty of coolant when drilling steel, you can increase the cutting speed by about 30 - 35%. In addition, abundant cooling makes it easier to remove chips from the hole. For normal cooling, it is necessary to supply at least 10 liters
coolant per minute. When drilling various metals and alloys, it is recommended to use the coolants given in table. 21.
Recommended coolants for various metals and alloys
Structural and tool steel
Soap emulsion or mixture of mineral and fatty oils (castor, rapeseed)
Soap emulsion or dry
Soap emulsion or rapeseed oil
Soap emulsion or dry
Kerosene with castor or rapeseed oil. Soap emulsion
Soap emulsion or a mixture of alcohol and turpentine
If during operation the cutting edge of the drill quickly becomes dull, then this is a sign that the cutting speed is too high and needs to be reduced. If the cutting edges become chipped, the feed rate should be reduced. To prevent dullness and breakage of the drill at the exit from the hole, it is recommended to reduce the feed at the moment the drill exits. To obtain holes of a high class of accuracy, reamers in the machine spindle are mounted on special swinging mandrels, which enable the reamer to occupy the required position in the hole. This eliminates the “breaking” of the hole. To obtain high cleanliness of hole processing, the reamer should be lubricated with vegetable oil during operation. The cutting speed when reaming holes in steel is assumed to be from 5 to 10 m/min
, feed - from 0.3 to 1.3
mm/rev
. In table Figure 22 shows the cutting speed values when drilling holes in various metals.
Average cutting speeds with reamers on drilling machines in m/min
Basics of drilling
To make holes, two things can be useful - securely securing the workpiece and rigidly fixing the drill. To obtain holes in the workpieces, it is necessary to ensure their reliable fixation in a vice and first mark the location of the intended hole. You need to start this process at low speeds, gradually increasing the speed. It is also better to finish at low speeds.
When manual (not fixed) drilling, you must hold the drill perpendicular to the work surface. The less movement of the drill to the sides, the more the diameter of the hole corresponds to the diameter of the drill.
By securing the drill to a fixing stand, you can prevent unnecessary vibrations of the device. This also allows the use of high-power drills to produce large-diameter holes in materials of various thicknesses and densities.
If the drill jams, stop working. If the drill is equipped with a reverse function, then using it, carefully remove the equipment. If there is no reverse, a stuck drill can be freed using pliers and a hammer. To avoid jamming of the equipment at the exit, use low speeds and reduce the pressure on the drill. The depth of blind holes can be controlled using a drill depth limiter, which most often comes with the drill.
Conquering a tree
Before you start drilling wood, you can make a small indentation with an awl in the marked place to prevent the drill from slipping, or use equipment with a centering point.
When working on wood, to prevent chips and burrs at the exit, you can use tape or adhesive tape, sealing the place of the intended exit with them and removing them only after obtaining a hole. For the same purpose, you can place a wooden block under the output surface.
You can also use double-sided counter-drilling, excluding the exit of the drill as such, but in this case it is necessary to accurately calculate the location of the intended exit in order to obtain a hole with a smooth stroke.
We are friends with metal
When working with metal, to prevent the drill from wandering at the beginning of work, it is necessary to make a recess with a core (punching), or use drills with a small (stepped) diameter of the cutting head. Such equipment eliminates the need for core punching and does not leave burrs at the exit of the metal.
When working with sheet metal, for convenience, place a wooden board or block under the sheet. This will reduce the indentation of the metal around the hole and reduce the number of burrs at the exit. The sharp edge of the hole (burr) that forms on the exit surface can be removed using a countersink or a special deburring device. To obtain holes of large diameter, you can use a drill of a smaller diameter during the initial passage, and then drill the resulting hole with a drill of the required diameter.
Constant cooling will help extend the life of the drill and prevent overheating and breakage. Use oil or plain water as coolant.
We process concrete
A hammer drill is still recognized as a traditional tool for drilling concrete. However, if the volume of work is not so large, an impact drill can be a successful competitor.
In the absence of one, pliers and a hammer will help us again. Periodically interrupting the process of working with a conventional drill, remove the drill, insert a metal punch into the hole and, holding it with pliers, apply several blows with a hammer. These actions cause microcracks in the concrete at the bottom of the hole and allow the drill bit to pass through the material more easily.
When working with concrete, stone or brick, use special drills with carbide inserts. Be sure to monitor the cooling of the equipment, although, according to some sources, water cooling reduces their service life, so it would be advisable to use dry drilling with temporary breaks for air cooling.
When drilling a heterogeneous material (for example, reinforced concrete), it is better to use two types of drills (for concrete and for metal) to reduce the risk of changing the hole path and damaging the equipment. To prevent drills from overheating, it is necessary to periodically cool them using water or lubricating oil.
We work with glass and tiles
To make holes in glass and tiles, use special drill bits with a conical carbide tip. To prevent slipping from the intended point of starting drilling, stick insulating material on this place; the glaze on the tile may slightly chip off. Cool the drill and surface constantly using water, vinegar or turpentine. Work with glass and ceramic tiles only at low engine speeds, avoiding damage to seams and joints.
How to choose a drill
Safety
In terms of electrical safety, commercially available power tools belong to class II: double working insulation, use without additional grounding is permissible, i.e. Such a drill can be plugged into a regular, non-European socket through an adapter. At the “iron bazaars” you can find tools of class I (“industrial”), with a grounding terminal on an iron body. It is unsafe to use it in everyday life, and in most cases its chuck fits a drill with a conical shank (Morse taper), which is not suitable for rotary impact drilling. Therefore, do not buy such a drill, even if it is powerful and cheap.
Class I is indicated on the nameplate of the drill, and if there is no designation, the body is partly or completely plastic, and the cord with a Euro plug is a class II tool. Class III - a power tool with an operating voltage of up to 42 V (low voltage) can be identified by the class designation on the nameplate and by a special plug with flat crosswise contacts. It is suitable for home use, but inconvenient: you need a powerful step-down transformer.
For protection against the ingress of foreign objects and water, power tools and equipment are marked with IP (Ingress Protection) signs with 2 numbers after them: 1st - from foreign objects, 2nd - from water. If the protection for any position is zero, the letter X is placed instead of the corresponding number. Thus, an IP32 drill can be used outdoors in good weather; IPХ2 - only inside, IP34 - outside in fog and drizzling rain, and IP68 can work during the Samum in the Sahara and under water.
Fundamentally: the first digit 2 means that the device is protected from penetration of fingers; for example, the plug socket has a degree of protection of IP22. But this does not mean under any circumstances that if the drill chuck with the same degree of protection is grabbed by hand during operation, it will stop on its own. The IP standard does not guarantee foolproof protection.
Cartridge
An ordinary three-jaw chuck is accurate and quite good for rotary drilling. When a rotary impact drill is used, the drill rapidly becomes loose, and the chuck itself loses accuracy and may completely fail: the threaded race of the cam mechanism bursts. For work on hard, brittle materials, the three-jaw chuck is suitable for occasional use or with a diamond working element in rotation-only mode.
In a quick-release chuck (you can tell by its corrugated plastic collar), the drill is clamped by a collet. This type of chuck holds the drill better during impact-rotary drilling, but is the least accurate and is not very suitable for delicate work. Massive drills are equipped with a two-sleeve collet chuck - clamping and loosening are carried out by various rings.
Patron of SDS (Steck-Dreh-Sitzt, nam. "Vstavil-povernul-sitting" Special Direct system Either, osobaâ rovnaâ systems, angle.) Izobreli in the Bosh company. The SDS that works for the machine is completely suitable: a system of figurnyh grooves, SM. . RIS, completely firmly fixes the working body in accordance with the principle of the kitajskoj puzzle; submenu drill delaetsâ only 2 mA legkimi movements.
Unfortunately, SDS is not suitable for mechanics and carpentry: the centering accuracy of the drill is insufficient. An adapter from a three-jaw chuck to an SDS makes no sense: it will become loose from vibration, just like an ordinary drill. Therefore, the SDS drill is incompatible with a conventional drill in terms of the placement of the working body.
Note: SDS fit comes in 3 types: SDS+, SDS Top and SDS Max. SDS Top is used occasionally, as a crotch and generally bad option; SDS+ is designed for one-handed tools weighing up to 5 kg; SDS Max – for a languid two-hander.
Power and speed
When buying a rotary impact drill for general work, you don’t need to skimp on power. A supply of power is needed to create the required torque at low speeds. The external feature of a commutator electric motor with alternating excitation, used in drills, is close to flawless, but the low-power motor at low speeds overheats from the huge current. It is also better to purchase, if not included, a front cap handle.
The highest speed of the drill is also important. A diamond tool is practically “eaten up” at a rotation speed of less than 1600-1700 rpm; its normal operating speed is from 2500 rpm. Carbide tools need more than 1500 rpm. If you come across a drill with a 600-1200 rpm rating, it is a special tool and not suitable for general purpose work.
For precise work on metal, a conventional low-power drill with only rotation is best – 120-200 W. A stand that turns the drill into a tabletop drilling machine will be very useful. And if you also fork out money for a rotary table for the bed, then you can mill small parts with a dental bur.
Mains or battery?
A home craftsman needs a cordless drill in 2 cases:
- If you work on the side, this is your more or less permanent extra income.
- If you have a non-electrified cottage or garage.
In any case, an expensive professional drill with a lithium battery and its charging time of 10-20 minutes is unlikely to pay for itself. This is an option for experts who work a full shift day after day. A regular alkaline battery, charged in 4-8 hours, will suit you. In the latter case, it can be “pumped up” to a hole or two in half an hour.
Section result
All of the above can be boiled down to the following tips:
- Permanent construction work, including metal structures, requires a hammer drill and an impact drill of 350 W or higher.
- Repetitive household work - rotary impact drill from 250 W.
- For precise drilling - additionally a precise drill for rotary drilling at 120-150 W; better - with a bed.