A hand-held electric tool such as a milling cutter can be successfully used to perform various types of processing of wood products. With the help of this equipment and a set of working attachments, you can not only decorate the surface of a wood product, but also qualitatively prepare a furniture façade or door for installation by using a router for cutting in locks, door and furniture hinges. Of course, you can perform the procedure for selecting grooves in a wooden product manually (using a regular chisel and hammer), but when using a router, the productivity of such an operation increases significantly, and the quality of the final result also increases significantly.
Making a recess for the lock using a router placed on a special device
Lock installation process
Having selected the most necessary tool, you can begin installing the door leaf.
We will not describe the entire process from beginning to end, since this is not related to the topic of the article. Let's talk only about the process of inserting a locking device, breaking it down into stages for ease of presentation. To summarize, we note that installing locks in a door leaf requires minimal carpentry skills and a suitable tool. You can do all the work from start to finish with your own hands. You need to know not only what tools are needed, but also what cutter is needed for a particular stage of work. If you manage to study and prepare all this, then the work will give you pleasure and the result will bring satisfaction.
In this article we will look at a faster method of inserting a lock into an interior door, compared to. This method speeds up the work significantly, and if you need to install a lock on several doors, then this is what you need.
We start the insert by marking the door leaf. I install a lock on an interior door so that the lock handle is 900 mm from the bottom of the door. I mark this size on the door leaf.
I apply the lock to the door and align the hole for the handle with the mark, outline the edges of the lock.
I find the middle of the door leaf thickness and draw a line.
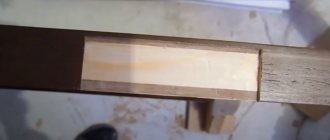
I measure the thickness of the part of the lock that is later hidden in the door, in my case it is 12 mm. I take a drill 1-2 mm larger in diameter and drill holes from mark to mark on the canvas. I try to keep the holes next to each other.
Then use the same drill to drill holes into the longitudinal groove.
Use a chisel to trim the groove for the lock. I didn’t have a drill with a diameter of 13-14 mm, so I had to trim it with a router at the end to get a sufficient width of the groove for the lock. But if the drill had the required diameter, then there would be no need to trim anything; the result would be approximately the same groove, only with an uneven edge.
We apply the lock and see if it fits well.
If everything is in order, use a knife to mark the lock area on the door leaf.
I apply the lock, it should fit tightly.
I mark the holes for the handle and latch. I place the lock on the side of the door, align it with the edge of the door and make sure the edges line up with the edges of the milled groove.
I drill holes for the handle and latch. I use a 20mm Fostner reducer.
To install a lock in a door, you first need to buy this lock. To choose the right lock, you need to know two parameters: the width and thickness of the vertical bar of the door. If the thickness is less than 40 cm, then there is no point in embedding the lock.
Locks come with handles and without handles. If the choice fell on the first option, then first the lock is cut into the door, the next step is installing the handle. Stores also sell latch handles. And although they are structurally quite simple, cutting them in is not so easy - this process requires experience and the necessary set of tools.
Well, the choice has been made. Let's move on to installing the lock.
Installation of the locking mechanism
The door lock is usually cut into the center of the left or right door strip, so you need to measure 1 meter from the floor surface and mark the place where the door handle will be located. Drill a hole for the lock mechanism. The diameter of the drill must be equal to the thickness of the lock, the length of the lock must correspond in size to the depth of the hole. Using a chisel, we knock out a platform for installing the support plate for the lock. Drill a hole for the handle. We install the lock and mark the place for the screws. We make holes and secure the lock with self-tapping screws.
Handle attachment
To attach the handles on both sides of the door, you need to install the linings and secure them with self-tapping screws. We check the operation of the lock and handles. The process of installing the handle is not complicated, but it can only be used for doors that are made of wood. A lock can be embedded into a wooden door absolutely anywhere, but doors made of steel or MDF require a completely different approach.
To insert a lock into an MDF door, you will need experience and theoretical knowledge, since such a door has an additional wooden beam, which is located at a distance of 1 meter from the floor. The rest of the door is completely hollow. Without knowing this feature, you can try to embed the lock above or below this beam, which will damage the door. Therefore, it is better to entrust this to experienced craftsmen.
To install a lock in metal doors, you need to contact a highly specialized company, such as ours. Trying to do everything yourself will lead to wasting your time, breaking the lock, and damaging the door. We don't think you need such expenses.
Furniture hinge insertion
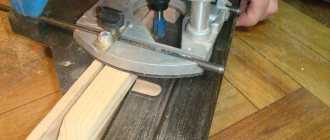
To select a large-diameter blind hole with a hand router, you need to make a template yourself. It has a stop bar, thanks to which the tool can be easily positioned on the furniture door. It is done very simply.
Milling for a furniture hinge Source amazon.com
A rectangle with sides 280×140 mm is cut out of plywood 4-5 mm thick. Divide the width in half and draw a line. We retreat 70 mm from the corners along one of the sides along the length and also connect these points with a line. At the intersection we drill a hole with a diameter of 51 mm.
We select a wooden plank for support. Its length is 140 mm, and its cross-section is 5×30 mm. We place the stop at the very edge of the hole, stepping back from the edge of the rectangle by 15 mm. We attach the plank with glue and small nails. The template is ready.
The depth is set on the router to 11.5 mm. The template is applied to the furniture board, and the strip rests against its end. And in several passes the groove is selected. In this way, a blind hole is made for a standard furniture hinge with a 35 mm cup.
Design Features
Not the least role in the quality indicators of reliability is given to installation work; however, when creating a design, additional safety measures are used, which are achieved through the following indicators:
- The thickness of the steel sheets used to form the door leaf increases, reaching 3 mm.
For standard products, the thickness of the steel sheet relative to the requirements of GOST standards should even exceed 3 mm.
Internal doors are subject to more stringent, far from conditional requirements, which consist in the installation of additional reinforced stiffeners in the door leaf.
At the same time, standard entrance doors are equipped with only two or a maximum of three horizontally directed stiffeners, while internal doors are equipped with a combination of vertical and horizontal stiffeners. Thus, a unique, in visual perception, steel mesh made from a square section profile or from an angular profile makes it possible to eliminate deformations and mechanical damage to the door leaf.
The weak point of many internal opening doors is the vestibule; by the way, it is worth noting that interior units are on the same list. The design of the entrance type cannot afford such a disadvantage as a gap between the sash and the frame for many reasons.
If the interior blocks can be additionally and quite easily eliminated from the existing gap in the vestibule, then the entrance fabrications are quite difficult to reconstruct in this direction. At the same time, the existing gap in the vestibule opens up more opportunities for unauthorized entry into the building. They get rid of a typical problem during the manufacturing process of the structure in factory or factory conditions, by strengthening the site in the locking area. Thus, any type of impact, including a mechanical nature, is prevented in the bud.
Overview of species
A set with a router may contain a cutter, which is equipped with protectors and rods for performing the same type of work. The convenience of a manual router is that, if necessary, you can buy various types of sets of wood cutters that cut the required holes quickly and easily.
There is a huge range of cutting tools available for sale. They can be purchased at specialized construction stores or at the construction market. According to their purpose, cutters are divided into groups. For example, a spiral cutter will be needed to make a round hole in an interior door for mounting a handle. The classification is truly impressive; there are even devices for making lining.
According to their design, cutters are divided into the following types:
- with replaceable cutting edges;
- monolithic;
- prefabricated
Grooved
Based on the name, it is not difficult to guess that the main purpose of this cutter is to make grooves on wooden surfaces. You can also make recesses, grooves and recesses using a groove cutter. To embed a locking device into interior doors, you will have to use this particular type of cutter during the work process. For the best quality of work, you will need a groove cutter that is ideal in length. It will help to make the optimal recess at the end of the door.
There are 3 types of slot cutters:
- structural – will help to make such types of connections as “swallow tail” and “P” type groove hole;
- straight – mainly used in processing straight grooves;
- fillet – produces decorative carvings.
To produce grooves of different sizes, it is necessary to change the equipment to a larger size or adjust the router.
Edge
An edge cutter is used for making various carved elements and patterns on the area of the material being processed; it will also help in making the edges of products.
There are 4 types of edge cutters:
- straight – used in work using templates;
- edge cutter with a disk shape - this type has high accuracy and is used when making rebates;
- horizontal edge cutter – used for decorating edges;
- shaped type of edge cutter - will help in processing baseboards, facade frames and panel edges.
Almost always, this type of equipment is equipped with a bearing, which allows processing of ends and edges.
Curvy
Figurine cutters are used for cutting out various decorative elements on furniture and doors. Milling cutters of this type are equipped with a bearing - this allows you to work not only with straight workpieces, but also with a curved edge, which is very convenient.
There are 2 types of figurine cutters:
- horizontal;
- vertical.
In turn, the horizontal view is divided into 2 more types:
- one-sided;
- double sided
The difference between the devices is that single-sided cutters process the edge on only one side. Double-sided ones are designed for simultaneous processing both from above and from below. Vertical figurine cutters are used for deep milling of panels and are used to create skirting boards.
Manual method
If you don’t have a milling machine, you can cut in the hinges manually by making a cut using a chisel and hammer.
Marking
The location of the upper and lower hinges is marked on the door leaf.
To do this, use a tape measure or ruler to measure 20 cm from the top and bottom edges. To avoid mistakes, craftsmen draw an arrow indicating where the loop will be directed from the mark. The arrows are directed towards the center of the door end. Place the loop map against the mark and trace its outline with a sharpened pencil. The hinge part must not touch the door leaf.
It is not recommended to simply measure the length and width of the card and draw a rectangle with this data on the end, since the card may not have a strictly rectangular shape - it may be beveled or trapezoidal.
The loop will fit perfectly into the groove made along the contour. In order not to confuse the loops during installation, they are signed with a marker B (top) and H (bottom).
Inset
The hinges are cut in stages:
Installation
Having screwed one part of the hinge to the door leaf with self-tapping screws, proceed to inserting the other part into the hinge beam. Different masters carry out this stage in different ways.
Choosing a milling machine
Types of milling cutters
The following types of milling cutters are currently produced:
vertical or submersible. The tool is designed for cutting grooves of various depths. A router for inserting hinges and locks belongs specifically to this type;
edge or edging. The equipment is intended for decorative processing of the edges of wooden products;
combined. The machine is more professional and versatile, as it combines the capabilities of vertical and edging equipment;
special. A special router can be dowel, lamella, and so on. A special device has a narrow focus and is intended exclusively for a specific purpose.
What to look for when purchasing
equipment power. For home use, unlike professional use, you should not purchase overly powerful equipment, since this factor affects the rotation speed of the cutter and the weight of the machine; it is most advisable to purchase a device equipped with a speed control function, which facilitates the accurate performance of various works
It is desirable that the speed switch is located in a protected area and does not operate smoothly, but in jumps; When choosing, you need to pay attention to the actual amount of the cutter extending beyond the clamp. The numbers in the equipment model indicate only the stroke length of the head
For example, FM-62, in this model 62 mm is the maximum stroke length;
- determine the ease of use of the router. The weight of the equipment, functionality, ease of placement of handles and triggers, and the length of the power cord are assessed. The simpler and more convenient it is to use the device, the fewer problems will arise during its operation;
- try turning on the machine. The head of quality equipment should move freely. In this case, the presence of backlashes and/or distortions is completely eliminated. The machine should operate almost silently;
- the working surface should have a wide view. It is desirable that additional lighting be located in this area;
- the presence of additional nozzles, various holders and other elements. The more complete the equipment, the higher its functionality.
By purchasing a milling machine, based on the recommendations presented, you can select the optimally convenient and high-quality equipment.
Briefly about the main thing
To cut a lock with a router or hang hinges on a door, you need to choose the right tool. It is best to use a simple submersible model, since the combined model is heavy. This will create certain inconveniences, especially if there is no experience in such wood processing.
Using a router to cut in fittings is easy. But the process is greatly simplified if there are special templates. Having placed the device in the desired place, all that remains is to set the required processing depth on the tool and install it on top.
When working, you need to carefully monitor the process in order to notice overload in time. It can occur if the wood structure is too hard. Then you just need to reduce the speed of the tool using a special switch on the body.
Ratings 0
Installing hinges with a router
To carry out the work, the home craftsman will only need the hinge router itself, as well as a pencil, felt-tip pen or office cutter - any tool that allows you to leave marks on a wooden surface will do. However, if you do not have jewelry precision, then it would not be a bad idea to stock up on a well-sharpened chisel and a small hammer.
Before starting, be sure to mark the loops with a pencil or felt-tip pen
The entire process of making grooves with a milling cutter occurs as follows:
Set up the router accordingly - the whole process is described above. Attach the hinge that you will install on the door to the installation location and mark on three sides with a pencil or cutter. Having removed the loop, put the router to work. Carefully follow the marked path to remove any wood.
If you are not sure that you can do everything perfectly the first time, it makes sense not to approach these boundaries closer than 1-2 millimeters - it is better to leave a small gap. When the boundaries of the groove are marked, you can relax a little and quickly select wood in the remaining area - you no longer risk going beyond its limits. Using a hammer and chisel, carefully tap the edges. First, cut through the borders to the desired depth, and after that, work from the sides, cutting out the excess and creating a groove into which the loops will fit perfectly. Even if you decide to use only an electric tool, going straight along the marked boundaries, you will still have to work with a chisel
After all, the router carefully rounds the corners. And the hinges have angles of 90 degrees. Therefore, they will have to be aligned accordingly. Repeat the entire procedure on the door jamb to install the second part of the hinges.
At this point, the work can be considered complete - all that remains is to insert the hinges into the prepared grooves and securely fix them with self-tapping screws.
Hi all. Today we’ll talk about the correct and simple installation of hinges with a router into the door leaf and door frame. Loops can be inserted in several ways, the most accessible is the manual method of inserting loops, but it takes the longest and the result will largely depend on the levelness of your hands and accuracy. Tapping with a router speeds up the process several times and the quality of each installed loop is the same, which is very good for serial tapping.
Personally, I install the hinges at a distance of 200 mm from the edge of the canvas; this, in my opinion, is the most optimal option.
Let's start marking, set aside 200 mm from the edges of the door leaf, this will be the edge of the hinge. Apply a loop to the mark and align it. In order to mark a loop on the door leaf, I recommend using a regular segment knife; simply cut the veneer of the door leaf with it and move the knife from the edge of the loop to the center.
If you move the knife differently, your hand may tremble and a scratch on the veneer will be outside the hinge, which in the end will not be very good. We mark the edges of the loops in this way.
Now you need to prepare the router for work. I have a Makita RP0900 router, it’s quite a normal machine, but it has a significant drawback, as for me, it’s a sharp start, when you press the button it jerks, because of this you can mill in the wrong place. The principle of setting up a router is the same for all manufacturers. First, we install the cutter. To mill the hinges, I use a regular groove cutter 18 mm in diameter. Like this:
We align the cutter flush with the router platform and tighten the screw, which is responsible for fixing the platform.
There is a depth stop on the side of the router; on my router it looks like this:
We insert a loop between the bolt and the limiter rod and fix it to fix the thickness of the loop.
We set the width of the loop insertion; to do this, you need to attach the loop to the side stop of the router and turn the cutter so that the edge of the blade coincides with the edge of the loop; to adjust, move or move the side stop until the blade matches. When setting up a router, it must be de-energized, otherwise you risk becoming a man with nine fingers.
We check our depth settings on some piece of wood. Personally, I check immediately on the door leaf, just make a small approach in the middle of the hinge. I apply the hinge and see if it is flush with the door leaf or not. If it’s not level, I adjust the setting and try the depth again.
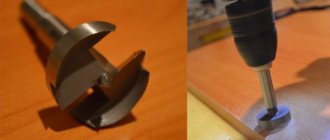
Castle part
First of all, you need to select and prepare a feather drill. The diameter should be 2-4 mm larger than the thickness of the embedded part of the lock. It’s better to give a larger margin: it’s difficult to ideally hold the drill perpendicular to the end of the door; there will probably be a small error due to the fact that the drill may twitch slightly along different fibers . To ensure that the hole does not turn out to be too small, or, conversely, too deep, we wrap the perk with electrical tape at a level slightly larger than the dimensions of the recessed part. Markers and pencils are not very suitable for marking as they wear out quickly.
@youtube.com, channel DIY apartment renovation (Remontkv.pro)
After the nest is ready, we are not in a hurry to choose a recess for the cover. Firstly, we check whether the lock fits into the socket , and secondly, we set up the router on the block. And only then we select the recess.
The hole for the handle is drilled last. And then after we once again assessed the lock against the main frame and made sure that we had not made a mistake with the preliminary markings. Again, take a drill with a diameter of 12-16 millimeters - the handle will block the hole, and no one has canceled the error in measurements.
A common mistake is that the mating part of the lock on the frame is marked until the door is already installed and the mounting foam has dried. Don't do this! The answer will take its position only after installation, so do not try to calculate or guess it. There is no need to rush here, otherwise, most likely, you will have to interrupt it in place - for some reason the lock tongue will not fall into the slot intended for it.
Source
Electric tool for installing interior doors
Using a drill or screwdriver, installing feather drills and using a drawing, you can accurately make a hole for the lock and for the handle.
A drill is a tool for drilling holes of various diameters in wood, metal, and drywall. An impact drill can cope with concrete and brick, but in this case it is better to use a hammer drill.
The professional drill has a powerful motor, which means it can withstand heavy loads without overheating. Such a tool is better protected from dust and moisture and can work for 8 hours almost without interruption. It is less versatile and costs more, but a professional who makes money with it cannot do without it. For professional use, it is better to choose a drill:
- With a power above 800-1000 W.
- With high speed.
- With long power cord.
- With relatively light weight.
- Speed limit function.
- Reverse.
To drill shallow holes with a drill, use feather drills for wood of the required diameter. You need to drill on both sides to avoid damaging the door. A screwdriver makes it quicker and easier to fix door hinges, handles and locks using screws. Professional models allow you to work with tougher materials and screw in long screws.
When choosing a screwdriver, you should pay attention to:
- The amount of torque (for professional models from 30 Nm).
- Speed of revolutions (there may be two speeds for fastening and drilling).
- The presence of a quick-release chuck for quickly changing attachments.
- Availability of automatic feeding of screws (shop screwdriver).
- High capacity battery.
- Ergonomics.
You can purchase a drill with a screwdriver function; this is a universal tool for the home.
You can also drill holes with a hammer drill, but you may need it if you need to level or enlarge the doorway.
A hand router is a device that ensures high accuracy of landing recesses.
The submersible machine will allow you to select grooves of arbitrary depth and width, which is exactly what is needed for inserting locks and hinges. Before purchasing, it is recommended to look at the device in operation and read the technical documentation.
For a high-quality machine, the head should move freely, distortions and backlashes are unacceptable. When choosing a router you need to consider:
- How noisy is the device?
- Quality and amount of visibility of the working surface.
- Light weight and convenient length of the network cable.
- Availability of additional attachments and holders.
- Availability of adjustable cutter rotation speed. The regulator must be located in a safe place so that adjustments can be made during operation.
- Additional lighting.
If you have no experience working with a router, there is a danger of damaging the door, so for insurance it is better to purchase a template, or make it yourself from plywood, chipboard or MDF.
Pavel Soldatov's template is suitable for any manual router with an installed guide and a diameter difference in relation to the router of 8 mm. When using it, you will not need to make markings. DoorProfi templates will require certain skills.
To make recesses, recesses and grooves using a router, use a straight groove cutter.
To prepare recesses using a manual router, you need to do the following:
- On a flat horizontal surface, combine the door frame and leaf, observing all technological gaps.
- Transfer the dimensions of the loop onto the beam with a pencil or marker.
- Carefully process the resulting contour with a chisel, gently tapping it with a hammer. This will avoid the appearance of cracks in the door leaf during further work with the router.
- Set the immersion depth and rotation speed on the router.
- The cutter attached to the electric motor shaft is smoothly immersed into the workpiece material to a specified depth. Then, as the tool moves horizontally, the edges of the cutter drill out the groove.
- To form a groove of significant depth, you need to make several iterations, removing wood in layers of no more than 5 mm.
When working with a hand router, the finished recesses for the hinges and lock are smooth and neat, which ensures an ideal fit of the parts to be joined. This is much easier and faster to do than with a chisel.
Also, for inserting door hinges and locks, you may need a jigsaw, a mounting gun and consumables: chisels and peaks for a hammer drill, attachments for a screwdriver, self-tapping screws.
Choosing professional tools can greatly facilitate and speed up the process of inserting hinges and locks on doors; you just need to choose them correctly and learn how to use them.
The essence of the technique
Instead of hollowing out a groove in the wood with a hammer and chisel after marking the loop, we resort to another method. Using a finger cutter , we will make these indentations much faster and more beautiful.
@youtube.com, channel Repairman School
Please note: it is better to make a socket for a mortise lock using a feather drill, without making a face or reconfiguring the router. Next I will describe this technique.
Choosing a milling machine
Types of milling cutters
The following types of milling cutters are currently produced:
vertical or submersible. The tool is designed for cutting grooves of various depths. A router for inserting hinges and locks belongs specifically to this type;
Vertical groove cutting machine
edge or edging. The equipment is intended for decorative processing of the edges of wooden products;
Equipment for processing product edges
combined. The machine is more professional and versatile, as it combines the capabilities of vertical and edging equipment;
Universal milling machine
special. A special router can be dowel, lamella, and so on. A special device has a narrow focus and is intended exclusively for a specific purpose.
Device for cutting grooves of various shapes
For home use, it is recommended to purchase specialized devices that can perform one function, and for professionals, the most suitable option would be a combined router.
What to look for when purchasing
When purchasing a milling machine, it is recommended to pay attention to the following most important aspects:
equipment power. For home use, unlike professional use, you should not purchase overly powerful equipment, since this factor affects the rotation speed of the cutter and the weight of the machine; it is most advisable to purchase a device equipped with a speed control function, which facilitates the accurate performance of various works
It is desirable that the speed switch is located in a protected area and does not operate smoothly, but in jumps; When choosing, you need to pay attention to the actual amount of the cutter extending beyond the clamp. The numbers in the equipment model indicate only the stroke length of the head
For example, FM-62, in this model 62 mm is the maximum stroke length;
The most popular milling cutter models among buyers
- determine the ease of use of the router. The weight of the equipment, functionality, ease of placement of handles and triggers, and the length of the power cord are assessed. The simpler and more convenient it is to use the device, the fewer problems will arise during its operation;
- try turning on the machine. The head of quality equipment should move freely. In this case, the presence of backlashes and/or distortions is completely eliminated. The machine should operate almost silently;
- the working surface should have a wide view. It is desirable that additional lighting be located in this area;
- the presence of additional nozzles, various holders and other elements. The more complete the equipment, the higher its functionality.
Recommendations for choosing a router are also presented in the video.
By purchasing a milling machine, based on the recommendations presented, you can select the optimally convenient and high-quality equipment.
What auxiliary tools are needed to select grooves for locks?
In addition to the router, the home craftsman will need a number of additional hand tools:
- To mark the door leaf:
- Laser or standard tape measure with steel blade.
- High precision carpentry corner.
- Construction metal ruler with a blade length of 1000 mm.
- A simple pencil or marker.
Markup Tools
- To fix the door leaf:
- Place a soft layer on the workbench or floor to prevent damage to the end of the door leaf during operation.
- A slipway for fixing the product in the desired position.
- Clamps for clamping the door leaf after installation on the slipway.
Clamps for fixing the canvas
- To select material for installing a lock:
- 2 or 3 replaceable heads with collets for the router.
- A set of cutters of all categories described above.
- To refine the sample after cutting with a router:
Set of cutters
- A chisel with a narrow cutting edge.
- A hammer with a hammer weight of up to 300 - 500 g.
- A file with a coarse abrasive.
- Sandpaper for finishing grooves.
- To fix the lock in the body of the canvas:
- Set of self-tapping screws.
- Drill with a thin drill bit for marking holes for self-tapping screws.
- Screwdriver with variable rotation speed and a set of bits.
- A hand-held slotted or Phillips screwdriver for tightening self-tapping screws.
Screwdriver with a set of bits
All tools must be of high quality, well sharpened, free of dirt and oil stains, and ready for work.
Features of application
- The template is made from reliable materials, but it must be handled with care. Therefore, drilling through it is prohibited. This may reduce the life of the product.
- When marking, you must definitely retreat 1.1-1.2 centimeters from the edge.
- Hinges from different manufacturers may vary slightly in size, this concerns the distance between the centers of the screws. Then the template is used to find a place for the cup. This hole is universal for all fasteners. The cutters are selected based on the façade material. For fixation, it is advisable to use reinforced self-tapping screws.
You can see the direct use of the template for inserting loops in the video below.
Templates
One-time work can be accurately completed without special complex templates, using only a parallel stop, which limits the displacement of the cutter beyond the markings to one side.
But for professional work with large volumes, special templates are often used. These can be either sets of templates for different configurations of fittings, or universal ones with adjustable sizes.
Both homemade and factory-made ready-made options are used.
An example of the design of one of the factory templates:
The device makes it possible to install and move the router in the position required for sampling exactly in place.
Example of homemade templates:
It makes sense to make such a device when there is a large amount of work to be done.