I was doing some simple woodworking and needed a router. But since I was not sure that this tool would be needed often, I did not buy it and made the router myself from an angle grinder. I thought that this experience would be useful to readers, and then I will tell you how to make a wood router from an angle grinder with your own hands.
Hand tool
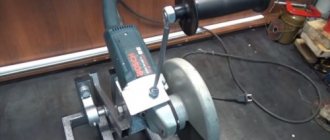
So, how to make a milling cutter from a grinder... It is important to use a vice or clamps to securely hold the workpiece. Otherwise the part will not be stable. Using various methods, you can make a milling machine from a grinder. I'll tell you about one of them.
You need to start by developing drawings of the basic base of the tool. The best solution is to make a metal base. It must have sufficient thickness and weight. All this affects how reliable the device will be. Let's move on to creating a plate for fixing - a bracket for attaching an angle grinder. The same material is used as the base. It is also important to make connectors for the back of the instrument. They should be made in the place where the handle is located. Blanks can be made of any shape.
Parts of square pipes are welded to the edges of the fixture. Products that are longer and have a smaller diameter will be guides. They must be welded to the base. In order for the tool to be fixed as securely as possible, you will need to create and weld metal “ears”. To fix the tool at the required height, you need to make a mount. To do this, you will need to weld two nuts and place threaded rods in them. Wing nuts must be attached to them using welding. Thanks to this manipulation it will be easy to fix the tool in the required position.
Source uk-parkovaya.ru
As an adapter, you need to place a drill chuck on the attachment. To install it, you need to cut the thread in advance. It is cut from the inside and must match the angle grinder shaft. After which the drill chuck is screwed onto the shaft and the necessary cutter is installed in it. Next you need to assemble the machine and secure it in the bracket.
Important rules for cutting wood
Cutting and processing wood can be done using a well-known device - an angle grinder. A power saw made from a sanding device will help you handle small wood jobs.
Milling with a grinder will require compliance with the following rules:
use the attachment only for wood products;- work is carried out with gloves;
- the unit must be securely fastened;
- minimum operating speed;
- before use, you should make sure that the material does not contain nails, screws or other metal components;
- the mechanism must be kept in one plane, avoiding distortions;
- The nozzle is replaced when the power supply is turned off.
Stationary tool
The design includes the following elements: a table top with a lined rail, a drive and a solid base.
Source crydee.sai.msu.ru
The following types of such devices are distinguished:
- fixed table top – movable tool;
- movable base – stationary tool.
Design Features
A standard router consists of the following components:
- Base or frame.
- Work stand.
- Electric drive.
- Electric motor.
- Working mechanism.
If the base and work table can be made from scrap materials, then the working head, electric motor and cutters are a little more difficult to build.
When considering the option of using a grinder to make a machine, it is important to provide for the presence of a stepper motor in the design. The drawings take into account that the installation of the cutter requires the use of stepper motors. Creating a working head is not an easy task. These characteristics immediately affect what abilities the machine will have.
The following technical characteristics are important:
- Electric motor rotation frequency.
- The power of an electric motor.
- Desktop scale.
- Maximum weight of workpieces.
Movable base - stationary tool
It is necessary to make sure that the tabletop is mobile and the grinder is motionless. So that the tabletop can be moved under it, you need to build a structure of guides. It is important that the tabletop is securely fastened. We fix the angle grinder on the vertical bed. It should be strictly to the side of the workbench.
Algorithm of actions:
- make a wooden frame (you can also make it from corners);
- install plywood to the frame;
- to make a good milling cutter from an angle grinder, you need to create connectors specifically for the shaft of this tool;
- using clamps you need to fix the device in the frame itself;
- Make guides on the tabletop so that the part can be moved freely;
- the surface needs to be sanded and painted.
As a result, you will make a device with a vertical attachment..
Source bifai.ru
Self-tapping screws should not be visible above the surface of the countertop. As for the guide rails, it is important that they can be easily rearranged and removed. The best option for fixing them is self-tapping screws.
To use all the capabilities of a homemade milling machine, you will need to buy additional attachments - cutters.
You can clearly see how to make a router from an angle grinder in this video:
A slightly different look at the question - about the advisability of making a router from an angle grinder, see this video:
Algorithm for making a milling cutter from an angle grinder
The manufacturing algorithms for a stationary milling installation and its manual counterpart are different. The latter option is easier to implement: less labor and materials are required.
Stationary machines
The milling machine consists of the following structural elements:
- strong, stable frame;
- drive;
- table for performing work with a ruler (slat).
Accordingly, when creating a working model of the installation, you will need to make these parts and then connect them together. An angle grinder will be used as an electric drive. It will need to be securely fastened to the table top.
The stationary machine can be made in two versions: with an angle grinder fixed on the table or with a movable installation of an angle grinder. The first one is quite easy to implement practically with your own hands. It should be taken into account that the working tool can be secured so as to perform processing in horizontal or vertical planes. The order in which the installation is assembled depends on this.
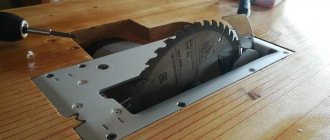
A machine for processing a workpiece in a horizontal plane (with a vertical cutter position) is assembled in the following sequence:
- make a frame from metal corners (they are connected by welding) or wooden blocks (fastened with self-tapping screws);
- sheathe the frame with chipboard or plywood, securing the sheets with bolts;
- a hole is cut out in the tabletop for the angle grinder shaft (larger in diameter than its cross-section);
- using punched paper tape or clamps, attach the grinder to the table top with bolts from below, approximately as shown in the photo below;
- on the surface of the tabletop, planks are installed from wooden slats (pieces of chipboard or plywood), which act as guides along which the workpiece will move;
- wooden and metal parts of the structure are painted (after having been cleaned with sandpaper);
- For ease of operation, attach the toggle switch for turning on the grinder.
The bolt heads located on top of the tabletop must be flush with its surface. Therefore, you will need to drill holes of the appropriate size for them. The guides are removable structural elements. They need to be rearranged for each workpiece. They are often fixed using self-tapping screws.
It is necessary to provide such access to the grinder so that it is convenient to change attachments.
Using a toggle switch, you can supply power to the power tool by simply locking its button in the on position. A more difficult option would be to remake the electrical circuit of the angle grinder.
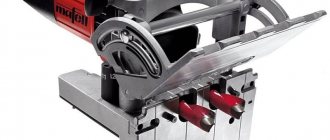
The option with a horizontal cutter arrangement is implemented in a similar way, only the grinder is fixed to the side of the structure, resulting in something like a circular saw. The appearance of the created machine is demonstrated in the photographs below.
To use the machine, you need to install cutters. There are varieties of them on sale that resemble ordinary cutting discs, which are fixed to the shaft using a clamping nut. An adapter is required to use key bits. Moreover, on one side it has a threaded seat (for screwing the grinder onto the shaft instead of a nut), and on the other, for fixing the cutter.
Manual frezer
With a movable version of fixing the angle grinder, it is easier to remove it if necessary in order to use it for its intended purpose. It is much easier to make a manual router than to create a mechanism that allows it to move back and forth, as well as left and right. Working with such a tool will require securely securing the workpiece so that it does not vibrate or move, for example, in a vice or using clamps. This will largely determine the quality of the work performed, as well as the convenience (speed) of its implementation.
There are many options for making hand-held tools from angle grinders for milling. At the same time, different materials are used in the work. The method for creating a hand-held wood router from an angle grinder is demonstrated in the video below.
Manual devices are more reminiscent of attachments for an angle grinder, allowing you to use it like a router. The simplest models do not provide for vertical movement of the cutting attachment. They are designed to perform simple operations.
If we compare the manual and stationary versions of homemade milling cutters, it should be noted that the quality of processing of the latter is higher. But the first ones are easier to make, and the grinder can be easily removed if necessary. The tool must be handled carefully, following safety precautions. It’s great when an angle grinder has a speed controller. This allows you to set the desired rotation speed of the cutter while working with different materials.
General information
Tools and accessories
A vertical router, unlike a standard drill, has a flat base, namely a sole on which it will stand and move along the table or part being processed. The body will be fixed and begin to move vertically along the guides. In order to make a homemade router based on a drill, you need to make a stand and attach an electric drill to it.
If you wish, you can replace the plywood with laminate or chipboard of the same thickness. A cutter made from an electric drill will be much more convenient for work if the sole, that is, the base, is made of organic glass with a thickness of 1 to 1.2 cm. In this case, the work area will be clearly visible, as well as the markings on the board. Metal clamps and fittings should be used as simple as for water pipes.
The size should be selected according to the diameter of the drill body, just above the chuck. Secure the wood router with screws 0.5 cm in diameter and 2 cm in length. Self-tapping screws of this size are very often used to make crafts from wood. They can be used to attach brackets, shelves and hooks. Often, after repairs, screws remain, and they can be replaced with self-tapping screws, the diameter of which is 0.55 cm and the length is 1.8 and 2.2 cm.
In order to make a wood milling machine from an electric drill, you need the following:
- Wrench.
- Electric drill.
- Drills 0.4 and 0.8 cm.
- Spade or core drill.
- Electric jigsaw.
- Screwdriver.
As a rule, in a home workshop or garage you can easily find all the necessary tools, and a screwdriver can be replaced with a Phillips screwdriver, a jigsaw with a hand hacksaw for wood.
Principle of operation
The operating principle of a lamellar router is quite simple. Thanks to the gearbox, the torque from the engine is supplied to the cutter. The latter is fixed to the shaft. The installed casing protects limbs from getting into the cutting area, and the cast platform allows you to securely position the device on the surface.
How to Rewind a Grinder to 12 Volts
Do-it-yourself grinder from a drill and chainsaw
Quite often in everyday life you need to repurpose working tools. This does not apply to the situation when you need to use an angle grinder, but you don’t have one. There are options to come to the rescue: a drill, a gas-powered one, or an electric saw, what is the duration of the project, what tools are available.
The usual ineffective method of getting an angle grinder from an electric saw
Grinder from a drill ()
For such a transformation, the following tools will be useful at home:
Before starting the transformation, you need to make sure that in the coming days the drill itself will not be useful in the work. In the last article, I told you how to connect and start a 380-volt motor in a single-phase 220-volt power supply. And later it’s enough to follow the step-by-step instructions:
- Choose an attachment for your future grinder.
- Take a small diameter steel rod without grinding off one of its edges. This action is necessary for the best fit into the nozzle. Also, for the best adhesion, you should slightly grind down the places that will come into contact with the petals of the cartridge, not the rod itself.
- Fix all parts.
A frisky, unusual method for creating an angle grinder
There is no second, more difficult method to achieve the desired result.
- The chuck is removed from the drill. For an angle grinder it is not necessary, so there is an option to clean it, lubricate it, or store it.
- Choose an attachment for the upcoming tool. It would be better if it were a part made of strong steel; a lightweight version would be inappropriate here.
- Choosing a rod. It needs to be of such length that its part protrudes outside the drill by 1.8-1.9 cm. Next, one of its ends should be ground off with a rasp so that in the process a rod comes out that completely coincides with the socket in the nozzle itself. Before the joint, it is worth smearing its ends with machine oil for the best passage.
- Installation of the ball bearing is carried out to the output area. A rod will be threaded through it for future fixation at the base. If this step is not necessary, the rod is fixed in its own place.
Do-it-yourself 12-volt cordless grinder
Bulgarian
homemade. Without machines, current was used in production (motor with a Bulgarian disk and almost
Following the instructions, the grinder comes out in 1-2 hours
There is an option to make an angle grinder using this method within a few hours, but you can’t get the necessary tool here.
Grinder made from chainsaw and electric saw ()
A more common method of making a grinder with your own hands is to convert it from a gas-powered or otherwise electric saw. Because of the ready-made fixture
Working of a disc for an angle grinder
will have a number of advantages:
- Possibility of autonomous operation.
- Highest power.
- Cost of operation.
To transform your chainsaw into a different electronic form into an angle grinder, buy special attachments at any hardware store. They will help to accomplish these transformations in a matter of actions.
For an angle grinder, you need to reduce the risk of disc failure. For these purposes, the saw is equipped with a special protective casing. It is also worth reducing the number of revolutions using a speed reducer.
Bulgarian 12 volt ()
For the client to be able to use an electronic instrument, its 12-volt power needs to be converted to 220.
You will learn how to correctly connect single-phase 220 volt electric motors using the example of motors from a washing machine.
Thus, it is natural to power it from a car in which a constant current flows with a voltage of 12 Volts, by installing a special invector.
Low-power invectors should be connected to the cigarette lighter; there are no special requirements. The only aspects are:
- Use at temperatures ranging from 15 to 50 0 C and average humidity.
- Do not allow devices to operate in direct sunlight.
- Do not use the space under the seats for storage, as the invector will heat up during operation. To cool it, you need unobstructed air flow.
It is recommended to connect a more powerful invector to the battery terminals. However, it is prohibited to turn on the ignition or engine if the invector produced is connected to a non-removable battery.
It’s natural to make an angle grinder from different tools that everyone has nearby. Thanks to the instructions, the work can be done with your own hands in just 2-3 hours.