Paint application can be carried out using manual tools, but the process will take a long time and the quality of painting will not always be high. To remove these moments, you can use a pneumatic spray gun. But it is important to choose the right spray gun in order to get good quality painting and use it for a long time. There are several types of devices; their features and rules of use will be discussed in detail below.
Operating principle and scope of application
To understand how best to work with a pneumatic sprayer, you should study the principle of operation of the device. Paints equipment using a motor that creates the necessary flow of compressed air. This air flows through the hose, the varnish or paint enters the wall through the gun. The composition must be collected in a special tank.
The pneumatic paint sprayer is designed so that the air moves to the gun, where there is a limiter on its output, the barrier is removed by pressing the trigger. Then the flow goes to the channels and nozzle for the spray gun, to the exit through the air cap.
The release of paint starts after pressing the trigger with great force. From such an impact, small particles are created from the paint and varnish material. Acrylic or other type of paint is evenly distributed over the surface under pressure.
Paints equipment using a motor that creates the necessary flow of compressed air.
Nozzle selection
Setting up the optimal operation of the spray gun is not based on regulators alone. An important part of this process is choosing the right nozzle capable of passing materials of a certain viscosity through it. The larger the diameter of the central hole of the nozzle, the thicker the mixture can be fed through it. If you want to figure out how to set up a spray gun for high-quality painting, it’s definitely worth paying attention to this detail.
You can determine what size nozzle is needed for spraying paint and varnish material from the information indicated on its container. Almost every more or less large manufacturer of paints and varnishes indicates the required nozzle diameter in millimeters with tenths (1.4, 1.5, 2.0, 3.0, etc.). Among the most common types of coating sprayed by a spray gun are:
- “Metallic” and other base enamels – 1.4 mm
- Primers -1.4 mm
- Clear varnishes – 1.5 mm
- Epoxy primers – 1.8 mm
- Liquid putties – 2.5 mm
The size of the nozzle opening affects the spray volume and the thickness of the resulting layer. If the hole diameter is smaller than required, the coating material will flow with difficulty and the painting speed will drop significantly. When the nozzle, on the contrary, exceeds the required dimensions, the paint is supplied in copious quantities, forming smudges or forcing the pace of work to be accelerated (in such situations, you can get out of the situation by tightening up the supply of material). The choice of nozzle may depend on the “style” of the master’s work. Some prefer to make a thin layer, while others like to specifically fill the part with the mixture. If you are just a beginner, it is best to use the medium nozzle sizes recommended by the paint manufacturer.
Pros and cons of pneumatic spray guns
A pneumatic spray gun for painting is distinguished by its ability to distribute paint over the ceiling using the air method, when the process involves applying a certain pressure. Painting work with this device can give good results, thanks to the following advantages of the spray gun:
- The layer obtained after painting has better appearance and quality when compared with the airless method;
- Durability of the device due to the use of metal parts that can cope with wear and tear longer. Loads exerted during work;
- Versatility, can be used for solutions of various viscous properties.
But, like any device, an air spray gun also has its disadvantages. Experts note the following points:
- It is necessary to select a suitable compressor to provide the required level of pressure;
- You should understand the operating rules of the device in order to regulate the operation correctly. You need to carefully read the instructions for the spray gun, then the spray gun will be adjusted correctly and the spray will be uniform; for this you need a gearbox with a pressure gauge;
- When working with the surface of a car, it is important to obtain a layer without defects that may appear from humidity in the air and other impurities. In areas of the car where defects are unacceptable, install a moisture separator and an air preparation device.
When painting areas of the house where a perfectly even layer is not necessary, using an electric spray gun is suitable; for demanding areas, a pneumatic paint sprayer is required.
The resulting layer after painting has better appearance and quality when compared with the airless technique.
Receiver for air storage
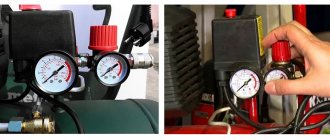
The air squeezed out of the cylinder goes into a sealed tank, where it is concentrated, compressed several times. This container is called a receiver and is an intermediate link between the compressor and the tool. The main task of such a tank is to prepare air for its further release under the required, uniform pressure.
Most receivers are equipped with internal and output pressure gauges with a reducer, a safety valve, a condensate drain system and a tap with a fitting for connecting a hose. From electronics, a pressure switch is installed on the tank, preventing a critical concentration of the injected air, turning off the electric motor at peak performance and starting it when a certain level drops.
The duration of uninterrupted operation of the spray gun, without starting the engine and pumping, depends on the volume and strength of the receiver. If the compressor performance is higher than the tool consumption, you can confidently paint even while pumping, and the pressure in the receiver will still increase.
Main components of the mechanism
The set of parts that make up the spray gun is small. If you understand these components, then adjusting the spray gun will be easier. Below is an overview of the parts in the order in which they are installed to distribute the air before exiting the nozzle.
The set of parts that make up the spray gun is small.
Gun
The body part contains all the elements that ensure the spraying of the material. On the handle of the gun there is a place for a fitting where a hose is installed, from where the air comes. After the valve is attached to the trigger, in the barrel there is a closed valve for air flow and parts regulating the size of the torch, air pressure and paint supply. There is also a reservoir for the solution so that it does not just come out; a needle-tip serves as a barrier, which regulates the flow of paintwork.
The trigger, when pressed, opens the valves in stages, air starts first, followed by paint. At the exit, everything enters the nozzle, where the solution is broken into particles.
The body part contains all the elements that ensure the spraying of the material.
Tank
The tank into which the paint is poured is made in different ways. Its position can be on the side, which is convenient for small devices. The lower tank is convenient when processing vertical bases. Typically, such containers are made of metal and volumetric, about a liter. The top type of tank is versatile due to the ability to hold the spray gun in different positions.
Standard tanks are made of plastic.
There are vacuum types of containers. which can be installed in the desired position. Manufacturers call them disposable. but in practice, consumers use them several times.
The top type of tank is versatile due to the ability to hold the spray gun in different positions.
Nozzle (nozzle)
Due to the difficulty of cleaning, the nozzle is most often replaced. Typically, the part is sold together with an air cap and a needle, the reason is the need to select a set of these elements that is accurate in size.
Due to the difficulty of cleaning, the nozzle is most often replaced.
Conclusion
As you can see, the instructions for setting up the spray gun do not seem particularly complicated. Having a technically sound tool, paint diluted to the required consistency, and a little patience, you will certainly achieve optimal quality paintwork (see also the article “Spray gun for painting a house”).
If after all the above recommendations you still have questions, watch the video in this article.
The most commonly used tool for a car painter is a spray gun. They apply primer, paint and varnish. The quality of the final coating of the car body depends on the choice of the type of this tool and the correct settings of the spray gun. In this article we will try to understand the technology of calibration work and learn how to carry out test measurements before applying paintwork to the car body.
Additional items
A compressor spray gun will be easier to use if the kit includes additional parts. Their presence is optional, however, they will help to get the best result.
A compressor spray gun will be easier to use if the kit includes additional parts.
Gearbox for spray gun
A small device that consists of a pressure gauge and a pressure regulator. When working, it is important to know how much pressure is needed for the spray gun to create an even layer. Therefore, the presence of a regulator simplifies adjustment. There are mechanical and digital types of devices.
In the latest professional devices, the gearbox may be built-in.
The pressure gauge that is installed in the compressor can only show the pressure level when spraying. Requires setting the location of the part on the input part.
When working, it is important to know how much pressure is needed for the spray gun to create an even layer.
Water separator
When water-based or other paint must be applied without the slightest defects, it is necessary to exclude moisture in the air, it will leave craters on the surface. To do this, you need a moisture separator, which is placed between the handle and the end of the hose from the compressor.
There are small devices and special stations. The latter, of course, give the best result, completely eliminating moisture and pollution from the air. So it’s easier to get a metallic effect on a car by choosing a similar device.
When water-based or other paint must be applied without the slightest defects, it is necessary to exclude moisture in the air, it will leave craters on the surface.
Tips for use
Scheme of using a spray gun.
In order for the equipment to work correctly and efficiently, it is necessary to provide conditions for its operation. After each use, the spray gun must be washed so that the nozzles are not clogged with paint residue. All ventilation holes in the tank must be blown out and checked to ensure there is no sign of clogging. Blockages lead to an uneven supply of paint mixtures, the paint flows intermittently, and the torch can deviate greatly from the axis.
After cleaning, dry it if any drops of water remain. The spray gun must first be disassembled so that there are no traces inside the nozzles. For cleaning, use soft, non-abrasive products; metal brushes should not be used. If this rule is not followed, the nozzles and air heads may be damaged. When cleaning with a solvent, under no circumstances should the spray gun be completely immersed in liquid and left there. The equipment should only be stored in a dry place. Before each use, the spray gun must be assembled and checked. The correctness of its settings largely depends on the state of the device.
Which is better
Instruments differ in different levels of consumption; low consumption is observed in devices of the LVLP type. In addition, the levels of pressure required to apply paint vary. Which option is required for a particular task is decided taking into account the solution that will be used.
The type of viscosity of the paint is important. Also, when purchasing, you should pay attention to the weight, size of the container for the material, strength of parts, the presence of additional attachments, and the ability to adjust the operating mode.
Instruments differ in different levels of consumption; low consumption is observed in devices of the LVLP type.
Tool parameter settings before use
Setting up a spray gun for beginners is one of the most difficult moments when using it for the first time. You should start by testing the parts for integrity. In this case, you need to fill the device three-quarters, and the engine turns on.
After connecting the hose to the gun, look at the quality of fastening the bolts and nuts. When you are convinced that the paintwork is not leaking and the work is proceeding uninterruptedly, you can proceed directly to painting the base.
You need to adjust the operating parameters of the tool using the regulator screw. The screw located at the bottom of the pistol part rotates. In one direction it increases the volume of air flow, in the other it decreases. The level of material supply is also regulated.
Turning the screw clockwise results in a circular spray pattern, while counterclockwise produces an ellipse.
You need to adjust the operating parameters of the tool using the regulator screw.
Modern equipment for car painting
Modern industry has taken care to simplify the technological and technical aspects of the car painting procedure. Now this process is much more convenient and less labor-intensive compared to painting several decades ago. The invention of the spray gun allowed many car enthusiasts to transform their vehicles with their own hands, so that the result was not worse than that of experienced craftsmen.
Depending on what we need for drawing. the entire car body or its individual parts, select the appropriate tool. The most versatile equipment for painting plastic and metal surfaces is a spray gun. a special spray gun that resembles a pistol in its form. With it you can paint the entire car, so its elements, while the brush is more suitable for developing small work and has no relation to the coloring of the car as a whole.
When working with a spray gun and knowing its specifics, it is important to know to what extent the pressure changes on the car's paint. This indicator plays an important role directly in the dyeing process. How to adjust correctly, the whole result will depend. In order not to throw money and your own time down the drain, you need to take this seriously and take into account the advice and experience of people specializing in this.
Incorrectly selected pressure for painting a car is fraught with certain defects in the paintwork. It is logical to note the following:
- Too much pressure causes staining and loss of paint. Result. a damaged piece of work that needs to be redone.
- The pressure is too low to provide the required surface cleanliness. In addition, you will need a powerful large compressor.
What is the function of air cap
The air cap is responsible for breaking the paint material into particles. The air flow is directed to the paint and a torch is formed. The moment of mixing air with the material occurs precisely with the help of an air cap. For this purpose, special holes are created in it.
The air cap is responsible for breaking the paint material into particles.
What should the torch size be?
Before setting up the spray gun, you need to understand what size torch is needed. The reference point is the area of the surface to be treated. When you need to create a narrow stripe of color, you need to make a small torch.
When the entire surface is to be painted with one color, choose the largest width.
Before setting up the spray gun, you need to understand what size torch is needed.
Inlet Pressure Setting
The device, which is accompanied by official instructions, operates taking into account the permitted pressure norm. The best result is obtained when a regulator and pressure gauge are installed at the inlet. It is important to mount it closer to the handle, then the readings will be more accurate.
The device, which is accompanied by official instructions, operates taking into account the permitted pressure norm.
Setting the inlet pressure using a pressure gauge-regulator
The pressure gauge regulator helps to accurately adjust the pressure level, then the paint supply process will be correct. This parameter is important, otherwise the layer will be applied unevenly and paint consumption will increase. The best accuracy is obtained with a scheme where the part is placed at the input.
The pressure gauge regulator helps to accurately adjust the pressure level, then the paint supply process will be correct.
If the gun is equipped with a built-in pressure gauge
When this part is built into the spray gun, it acts as follows:
- The screw responsible for supplying air flow is unscrewed completely.
- The screw responsible for the shape and size of the torch is also unscrewed.
- Press the trigger, when the screws are unscrewed, air moves in.
- The pressure gauge sets the required pressure level.
The pressure gauge sets the required pressure level.
If the pressure gauge is without a regulator
There are devices where there is no adjustment screw installed, but there is a pressure gauge. Then the screw for the air flow is unscrewed completely, the torch screw also opens as much as possible. Press the trigger to force air into the gun. The pressure level is changed using a reducer located at the compressor outlet. The result is looked at on the pressure gauge.
The screw for the air flow is unscrewed completely, the torch screw is also opened as much as possible.
If there is no pressure gauge at all. Least accurate method
When a part is missing, how to set up a spray gun for painting. The adjustment is carried out using the compressor gearbox, taking into account the main pressure losses:
- The air supply compartment is unscrewed.
- The torch compartment opens.
- They pull the trigger.
- Not forgetting the loss of main pressure, use a reducer on the compressor and set the desired parameter. The level is set higher by 0.6 bar from the specified level when using a 10-meter hose with a diameter of 9 mm. To obtain better accuracy, it takes into account how many filters the device has.
The adjustment is carried out using the compressor gearbox, and the main pressure losses are taken into account.
Features of a piston supercharger
Upon superficial examination, the turbine compressor system is clear and quite simple, but this mechanism hides several important nuances in its design. It is the design features that allow this machine to work for a long time without interruption.
The mechanism must be constantly lubricated during operation. Due to high speeds, the rubbing parts (shaft, connecting rod and piston) quickly wear out, reducing performance. Oil supply to the system can occur naturally or forcefully. In the first case, the lubricant is picked up from the bottom of the crankcase by the protruding parts of the crankshaft and splashed along the inner walls of the mechanism. Refrigeration compressors use a circulation system that sucks in oil and circulates it through all components. In the case of forced supply, oil is sprayed throughout the compressor using a plunger pump (lubricator).
Protection against overheating caused by friction and air compression is of particular importance for long and safe operation of the compressor. For normal operation, forced air or water cooling is used. Budget models are often equipped with a fan, while more powerful units have a radiator with a closed circulation system. Multistage compressors have additional air cooling chambers.
Filtration of intake air, even in such a strong, unpretentious mechanism, plays an important role in determining the productive service life of the device. Dust particles, when they get inside the compressor, act as an abrasive, gradually erasing and wearing out the moving parts. If you want to extend the life of your equipment, be sure to install a filter, regardless of the cleanliness of the work area.
Rules for using the spray gun
To avoid problems when painting, you should not forget about important working rules. Professionals note the following nuances:
- Internal work requires the creation of good ventilation;
- When working outdoors, use the tool without direct sunlight;
- Compositions for cars are explosive and therefore require careful attention from the technician;
- Dilution of the solution is carried out strictly according to the instructions.
When working outdoors, use the tool without direct sunlight.
With an electric motor from a truck compressor
The most powerful and complex version of a homemade piston supercharger based on a truck compressor. With proper care, it can last for decades, even longer than purchased units. Assembly requires skill, precision and, preferably, basic knowledge of mechanics. You will need welding, a grinder and the following elements:
- Electric motor 1-1.5 kW.
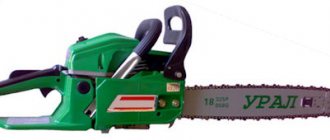
- Compressor from a truck (MAZ, ZIL, KamAZ, Ural, KrAZ). You can find it cheaply at metal warehouses or bulletin boards (used).
- Cylinder from 20 liters.
- Fittings and fittings.
- Fan.
- Car radiator.
- Washing machine pump.
- Pressure switch or automation kit.
- Metal plates, angles and tubes for assembling the frame.
- Hoses or tubes made of metal-plastic for connecting the compressor to the receiver and draining oil.
- Pressure gauge for internal and output pressure, with reducer.
In order not to create a huge footcloth of text reflecting all the intricacies of the mechanism of a homemade piston compressor, we present a selection of visual videos where the assembly and operation of these devices is demonstrated in all its glory. Enjoy watching and good luck in your creative endeavors.
Source
Setting up and using the spray gun
The scheme for using the tool is to configure the equipment. Make adjustments when the paint container is full and the lid is tightly closed. It works as follows:
- The air and paint flow is regulated, the device is placed vertically with the direction towards the paper.
- The trigger is pressed and held until drips appear.
- Afterwards, you can move the tool to understand what distance from the surface and speed are needed for uniform painting.
Next, you can paint the prepared surface.
Make adjustments when the paint container is full and the lid is tightly closed.
Adjusting the paint supply
After setting the torch size and selecting the optimal pressure, the paint supply is regulated. To do this, the adjusting screw is tightened until it stops, and then released two turns. It is not recommended to try a larger feed at once when making adjustments. An inexperienced craftsman can spoil the surface even in the first sprays and waste material in vain.
In addition, the spray booth will be heavily contaminated. Too much paint will be sprayed in one second, and minor delays and too close to the surface will lead to unsightly drips. In this regard, a small feed is more profitable: it is more effective to increase the feed in the process than to decrease it.
The operating principle of the feed adjustment mechanism is that the adjustment screw acts as a limiter for the movement of the stainless steel needle. Due to this design, it cannot completely open the paint outlet. Thus, the operator has the opportunity to improvise and adapt by opening the propeller fully and manually operating the trigger force.
How to set up a spray gun - basic nuances
When setting up, it is important to obtain the desired pressure level; the required parameter is indicated by the manufacturer on the packaging. The paint must also be brought to the desired level of viscosity. The integrity of all parts must be checked to prevent leaks.
When setting up, it is important to obtain the desired pressure level; the required parameter is indicated by the manufacturer on the packaging.
Problems and their solutions
Any equipment can fail over time, due to wear and tear of parts and others. Some breakdowns can be fixed without any problems. Common problems will be discussed below.
Any equipment can fail over time, due to wear and tear of parts and others.
The gun doesn't paint
There are three options when you can use the spray gun for its intended purpose in case of this error:
- The air is supplied at low pressure; you just need to adjust the compressor;
- The nozzle or needle is dirty; until these parts are removed and cleaned, the paint flow will not open;
- The needle and nozzle are broken and should be replaced with new ones.
The nozzle or needle is dirty; until these parts are removed and cleaned, the paint flow will not open.
Spray gun spits
This type of failure can be caused by the problems described below:
- The air cap is loose and needs to be tightened;
- The pressure and viscosity of the material are not suitable, the indicators need to be brought back to normal;
- The paint is too thick and it will bleed;
- The breather on the container with the material is clogged and needs to be cleaned;
- The pressure has dropped, you need to bring it to the desired level.
The paint is too thick and it will bleed.
The torch moves to the side
It is possible that the hole on the side of the air cap is dirty and needs to be cleaned thoroughly. Or damage is detected on the holes, then new parts are installed.
It is possible that the hole on the side of the air cap is dirty and needs to be cleaned thoroughly.
A pneumatic spray gun can create a beautiful layer on a variety of surfaces. It is distinguished by the evenness of paint distribution, but it is important to set it up correctly before work. To do this, it is important to study the operating rules that were described above.