If you ask anyone who is into DIY what their biggest dream is, chances are pretty high that they will say either a 3D printer or a laser cutter/engraver. A laser wood burner is a very cool thing, just like a 3D printer.
Two years ago I was browsing through videos and magazines when I came across an interesting article about a laser engraver. I've seriously wanted one of these cars ever since. I looked for it a couple of times on eBay and Amazon, but they were too expensive. However, now, prices have reached a level where they are affordable for DIY enthusiasts.
In the end I got the 5500mW Laser Engraver.
The CNC pyrograph has the following features:
- Can engrave on wood surface, plastic, bamboo, rubber and leather.
- Cuts paper, foam and thin leather.
- Engraving area: 15cm x 20cm
- Powered by Arduino Nano
- Compatible with Open Source Software
- Operating power: 5500 mW
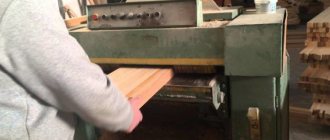
Despite the fact that the assembly kit arrived quite a long time ago, I only now had some free time. In this instruction, I want to share with you my experience in assembling a CNC burner with my own hands, tell you about its use and what you can do with it. I hope this information will be useful to many.
Our experience in assembling a machine in a single copy for our own needs
The disadvantage of self-assembly is “Design errors”, we wrote it in the first place for a reason. We encountered this problem ourselves when we wanted to save money and assemble a CO2 laser machine ourselves. In fact, taking into account design errors and various alterations, the amount paid for spare parts was equal to the cost of a finished similar machine. And we do not consider the wasted personal time and the fact that the machine could have functioned earlier and begun to pay for itself.
Such an assembly would be profitable if we planned to produce such machines later. But since our task was simply one laser machine for ourselves, this turned out to be a completely unprofitable waste of time. The other day, a welder came to our rented premises to repair pipes for the heating season and said a good phrase from the book “Heart of a Dog”: “Everyone should mind their own business.” Yes, it is true that we do not understand how to weld pipes, and the welder does not understand how CNC machines are assembled. And that's normal, that's how it should be.
Wood burner with hard and wire pen: how to use and make it yourself
There are various ways to decorate the surface of wood, one of the simplest and most effective is pyrography, or wood burning.
Any wood product can be made beautiful and unique by adding just a few contrasting touches.
It is not difficult to become a master of creating masterpieces using the burning technique. To do this, you don’t need to purchase expensive equipment, just buy or make a wood burner.
It's really simple - to create a beautiful and original thing, you don't even need artistic talent; you can download any images from the Internet or purchase an album of drawings in a store.
Methods for creating images
The principle of creating a pattern by burning is that part of the wood is charred and darkened, thereby standing out in contrast against the general light background. Working with a very thin tool, you can paint pictures on wood.
There are various pyrography technologies, many of them are complex and require special equipment. Among others:
- open flame treatment;
- firing using a clay stencil;
- burning with hot sand;
- friction burning on a lathe.
These are quite complex techniques, but an electric device is best suited for creating pyrography masterpieces at home. In the design of such a wood burner, the high temperature of the tip is created due to the flow of electric current through it.
The industry produces various models of burners, so it is not difficult for a novice master to choose the right tool. In addition, if you have the skills to work with a soldering iron, you can assemble such a device yourself.
Types of burners
Choosing a burner is a responsible matter. The quality of the resulting products largely depends on its characteristics. Both professional wood artists and beginning craftsmen use two main types of burning devices. These are devices with a wire tip and models with a solid tip.
With hard pen
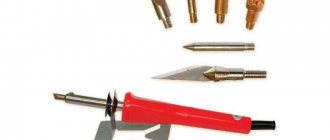
This device is in many ways reminiscent of a regular soldering iron. Its working part is a sting, which is heated by a nichrome wire hidden under a metal casing. Unlike a soldering iron, a burner is equipped with removable attachments of various geometries. Depending on the price of the device, their number can reach 20 or more pieces.
The abundance of attachments allows you to make strokes of different widths and shapes, and by combining them, create unique images. Wood burners with a hard pen are characterized by low price, high durability, and ease of use. As disadvantages, it is worth mentioning the heating time (5 minutes or more), as well as the bulky design with a long handle, which complicates the performance of delicate work.
With wire pen
In burner devices with a wire pen, the heating wire itself is the working tool. The current is supplied directly to the pen, so the instrument is ready for use almost the moment it is turned on.
Devices of the middle and highest price categories have a power regulator, which allows you to select the optimal thermal mode for any type of work.
The small thickness of the wire used and its bend create a small contact patch with the material, which allows you to easily perform the most delicate work.
The disadvantages of this type of burner include the relatively high price and difficult repairs.
Separately, it is worth noting the string cutter-burner. This is a device that allows you to use heated nichrome thread to cut parts from a thin board or wood-based sheet material.
How to work correctly
It is easy to notice that the working tool of a wood burner resembles an ordinary pencil, and therefore the technique of working with it is not much different from ordinary drawing. It’s just important not to forget that the “pencil” is very hot.
The entire work process can be represented in a few simple steps.
Preparation
You need to choose a board on which the drawing will be applied. Its surface should be flat and smooth. To level the wood, the wood is scraped and treated with sandpaper.
A good material for burning, especially for a beginner, is plywood. It is cheaper, its surface is almost ready for work, you just need to smooth it with sandpaper.
Drawing
For those who have drawing skills, it is not difficult to cope with such work; moreover, craftsmen can do without a sketch, working straight away with a burner.
For beginners, we can advise you to select a suitable picture on the Internet, print it and transfer it to your work surface.
Here, old time-tested copy paper will come in handy; you can scale the image using the square transfer method.
For a novice master, it is worth choosing simple drawings that are not replete with small details. In addition, it is better to immediately make something concrete, not some abstract board, but, for example, a plywood stand for a microwave oven, which can be decorated with floral patterns.
Burnout
Using the heated tip of the burner, they begin to apply a pattern along pre-designated lines. The handle of the instrument is held like a regular pencil.
Drawing begins with the outer contours. Straight lines are performed with quick movements without pressure. It’s not difficult to make an accent or draw a thick line; you just need to slightly reduce the speed of the burner’s movement. In curved areas, you must hold the tool perpendicular to the surface of the board, avoiding excessive pressure.
Note! If there are several closely spaced lines, you should not try to draw them as quickly as possible; the wood must cool, otherwise the spaces between them may burn out.
The shade of the line can be changed within a fairly wide range. This is easy to achieve by changing the temperature of the tip, the shape of the working tool (in the case of replaceable attachments) and the angle of inclination.
Final processing
The completely finished image is processed with fine-grained sandpaper. Then they are coated with a layer of furniture varnish and, if desired, partially or completely painted.
The simplest homemade burner
To decorate a small board with pyrography or simply try your hand at something new, you don’t have to buy a professional machine.
From a soldering iron or radio components
You can make your own wood burner using a soldering iron. To do this, it is better to choose a model with a replaceable tip. Nozzles with the required profile can be easily made from a copper or brass rod.
A practically professional burning device can be made according to a circuit with current regulation in the primary winding. To work, you will need very few parts: a transformer, several resistors, capacitors and dinistors. The circuit is not particularly complicated, however, manufacturing the device will require knowledge and skills in working with a soldering iron.
Mini burner
If soldering radio components doesn’t appeal to you or you simply don’t have the time, you can make a device of the simplest configuration. To make a mini-burner you will need:
- unnecessary power supply (charger) from a mobile phone;
- syringe needle;
- sewing needle;
- material for the handle (wooden skewer or brush handle);
- soldering iron and solder;
- shoe thread;
- electrical tape or heat shrink tubing.
The process of making a burner is not particularly complicated. You should start by preparing a syringe needle. The plastic part is bitten off from it; it is not needed in this device.
Both needles are attached to a wooden handle diametrically opposite. The easiest way is to secure them with threads. The sewing needle is carefully bent to such an extent that its point barely touches the point of the hollow syringe needle.
The plug is cut off from the old power supply; it is also not needed. The ends of the wires are stripped. The wires are soldered to the needles. Polarity doesn't matter. At this point, the production of a homemade wood burner is almost complete.
As a final touch, it is necessary to give the product an attractive appearance and create conditions for convenient use. The wire is wound to the handle. This can be done using the same thick thread. This design will be convenient and reliable, however, it is worth strengthening the thread with glue, and after it hardens, put heat shrink on the handle or wrap electrical tape.
Note! Heating of the tip occurs almost instantly. The principle of operation of the device is extremely simple: resistance arises between the needles and the needle from the syringe (due to the fact that it is thin-walled) becomes hot.
Perhaps, such a burner will not be able to make a picture (insufficient power, not the most convenient tip), but you can practice and decorate, for example, a cutting board.
CNC burner
The burner will help add originality to the interior, diversify it with handmade products, but not only. You can make good money by making paintings created by fire. Landscapes, decorative panels, portraits, household items and kitchen utensils with elements of burning are in consistently high demand.
The use of modern technologies will significantly simplify the creation of masterpieces using the burning method. Computer-controlled machines have long become commonplace in wood and metalworking shops. There are similar solutions for pyrography. Such a burner can be connected to a personal computer, transfer the required image to it, and it will do the rest itself.
To make your own CNC wood burner, you will need significantly more knowledge and materials. Typically, such machines are purchased for production purposes. But for those who want to assemble the device themselves, you can use a laser for burning.
In general, there are two directions in the development of CNC burners. They differ in the main working tool.
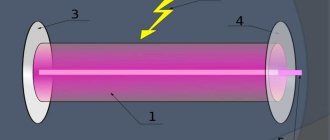
Laser burner
As the name itself suggests, the main part of the machine is the laser. It is from this that its main advantages emerge:
- high accuracy of drawing due to a small contact patch;
- versatility, the machine can be used when working with wood, leather, films, paper;
- The burner is immune to changes in temperature and humidity.
Disadvantages include the low speed of the laser burner and difficulties in drawing halftones. In addition, the cost of such devices is high.
Making a powerful burning laser from a DVD drive with your own hands
Making a powerful burning laser with your own hands is not a difficult task, however, in addition to the ability to use a soldering iron, you will need to be attentive and careful in your approach.
It’s worth noting right away that deep knowledge from the field of electrical engineering is not needed here, and you can make a device even at home.
The main thing when working is to take precautions, since exposure to a laser beam is harmful to the eyes and skin.
A laser is a dangerous toy that can cause harm to health if used carelessly. Do not point the laser at people or animals!
Selection of electronics
Source: viltech.ru
After purchasing Arduino, you need to install software written in C++ on it. It is at this stage that an important advantage of the platform manifests itself - the availability of ready-made solutions on the Internet. There are ready-made libraries, and functions, classes and operators are described many times, so you can immediately learn to program for Arduino in practice.
PyroPrinter is the pride of our engineers
It took us two years and the work of 5 engineers to develop. We conducted hundreds of tests and burned thousands of images, simplifying the process of operating the device as much as possible before we finished developing this nichrome burner. All this is so that every time you make a board you get a high-quality image. Such products are practically no different from the work of an artist who can work on a painting for a week. The Pyroprinter will create high quality A4 in 2 hours.
This type of business is becoming popular in Germany, Ukraine, Kazakhstan, Russia and a number of European countries. Already more than 25 people from Russia, the CIS and Europe have bought a nichrome CNC burner to create their own home business and are successfully producing custom paintings.
Ease of use
You do NOT need to undergo special training
or learn complex programs for expensive production equipment. To burn a picture, simply load the image in BMR format into the control program and press START. The nichrome CNC burner with nichrome thread will do the rest of the process on its own. For better quality, you can pre-process the photo in Photoshop.
To do this, you do not need to know Photoshop - we give video lessons on preparing photographs.
It is not difficult to assemble; for this we have recorded detailed lessons that are provided with all materials. To now make sure that it is not difficult to install, see the story below. Lisa completed the assembly in 35 minutes and spent another 10 minutes editing her photo.
Even schoolchildren and girls work with our equipment
We have made management as simple as possible and does not require special knowledge.
The entire process is as automated as possible. You don’t need a special separate room - you can burn portraits on wood right at home. When burned, a slight smell of wood appears, which does not cause discomfort.
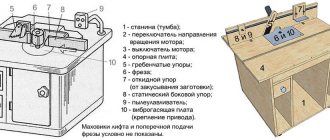
What are shields for?
Adding shields, such as CNC Sheild v3 or v4, to the circuit expands the capabilities of the CNC machine. You can simultaneously connect several shields to Arduino to perform different tasks. Main functions of the equipment:
- Ensuring work autonomous from a computer;
- Connecting and outputting information to peripheral devices;
- Parallel control of several motors;
- Connect to Wi-Fi or mobile networks.
Self-production of the machine
Since a wood burner is expensive, a person with a high income can purchase the product; craftsmen are trying to build machines with their own hands.
It is difficult to design such a product; a person will have to spend a lot of time, effort and money.
It is recommended to use a printer, an old plotter or a powerful engraving machine as a base for the machine.
If the craftsman has certain skills in electronics and is good at using tools, it is not difficult to build the base yourself.
Experts say an easy way is to construct a machine from an unnecessary printer; the device will use a belt drive and computer control to move the table in the transverse direction.
It is recommended to attach a typewriter carriage with a moving part that moves in all directions above the table. The burner needle is fixed to the moving element. The final stage is connecting the engine to the computer through a special unit and installing the optimal program suitable for burning images.
Experienced craftsmen assure that it is quite difficult to assemble a burner with your own hands. The chance that the product will work properly the first time is about 50%. The indicators make specialists think about the feasibility of producing such a unit at home.
Electric wood burner: master class on creating a pyrograph with your own hands using improvised materials
Creative people who love to make crafts with their own hands will undoubtedly be interested in such a direction as wood burning.
Its second name, pyrography, refers to the process of transferring a design onto a wooden surface using a soldering iron. The result is extraordinary masterpieces, and the process itself helps relieve stress.
The finished works are suitable as gifts for loved ones, friends or to decorate a wall in your own home.
On sale you can find dozens of models of electric burners from different manufacturers. Each type has its own characteristics, but they are all divided into two large groups:
- with hard feathers. Burning devices with hard nibs can maintain a certain incandescent temperature of the pen. When choosing a burner, you need to take into account that the more power, the faster you can work. They are durable and easy to use. Most suitable for making large drawings. The set includes different attachments with which you can perform different types of work;
- with wire feathers. Burning devices with wire pens can be used for delicate and painstaking woodwork.
How to make a wood burner with your own hands
Not everyone has the opportunity to purchase a burning device. To save money, you can make it yourself.
To make a burner, you need to prepare a soldering iron, nichrome thread, pliers, 1 sewing needle, 1 syringe needle, barbecue sword, glue moment, heat-shrinkable tube and power supply.
- You need to take a syringe needle and bite off her nose with pliers.
- Attach two needles parallel to the barbecue sword and wind the thread on top.
- Next, bend until it touches the tip of the syringe needle.
- Solder the wires from the power supply to the needles.
- We tightly wrap the wires around the sword with a thread.
- The protruding wooden bottom of the sword can be cut off.
- We impregnate the wound thread with Moment glue.
- Place a heat shrink tube over the thread.
The burner is ready, now it needs to be tested. To do this, you need to connect the power supply to a 220 V outlet; if everything is done correctly, the needle threads should turn red within a couple of seconds. The device should only be tested on wooden surfaces.
- All necessary materials and tools are prepared in advance.
- A piece of wood of the required size is selected. It is better to do the drawing on the smoother side. Wood varies in hardness from 1 to 10. Accordingly, hardness 1 refers to the softest wooden surfaces, and hardness 10 refers to the hardest. For the first attempts, it is better to use soft wooden pieces.
- It is recommended to place the burner on a special stand, as it heats up instantly.
- Then you need to sand the piece of wood on which the design will be applied. You can use sandpaper for this.
- Instead of continuous lines, it is necessary to apply strokes. You can't press too hard on the wood, otherwise it will be difficult to control the pencil and then erase the extra lines.
- There is no need to rush to get the job done faster. Wood burning itself is a long, painstaking process. For beginners, it is recommended to try to use the same amount of force when applying the design. The design can be made darker by holding the burner handle on a specific area.
- The piece of wood must be positioned so that the grain is directed downward. This will help make drawing easier, since the device will move downwards all the time. Burning against the grain will significantly increase the resistance.
Workflow Recommendations
- It is important to choose a comfortable place for the wooden plank. You need to place it so that you can easily reach any part with a burning device.
- It is recommended to start burning the design from the bottom or along the outer edge.
- It is necessary to go through places several times. If you touch the wooden surface softer, it will be easier to move the device. You should try to keep your wrist on the board.
- First of all, you need to finish drawing the main lines, and then move on to the rest of the details.
- To make a regular 2D drawing, and for a 3D one, you need to purchase different attachments.
- Once the sketch of the drawing is ready, you can move on to adding colors. But you need to remember that an additional color will not always look beautiful. To do this, you can use watercolor paints.
- Each attachment requires regular cleaning. This can be done using a sanding block for quick cleaning. Remove the nozzle with pliers and, to be safe, immerse it in cold water for a few minutes.
- When the drawing is completed, you need to apply a special varnish coating to it and wait until the surface dries completely. It must be applied in a well-ventilated room or outdoors.
Wire burner and its advantages
If you burn with nichrome (wire or so-called thread made of this material), then the following “advantages” are available:
- The result is “live” images, where there are shadows, penumbras and tints. Halftones are achieved by changing the temperature (the nichrome thread is heated more or less, while simultaneously adjusting the time of contact of the wire tip with the surface;
- actually control the saturation of the image on the CNC itself to obtain images with different intensities;
- The master burned the same 20x20 cm portrait in about 2 hours, 5 times faster compared to a laser machine. And this is a great advantage when burning large format paintings on wood using CNC.
- it is easier to prepare the workpiece for work;
- bright light does not harm the eyes;
- no tar is released, which means no blowing is needed.
The nichrome burning device has a drawback: the need to maintain a stable temperature in the room. But there is a way out - close the window so that there is no draft. There is a slight smell when burning, the room will have to be ventilated after finishing the work.
Important! It is not recommended to work with plastic; the resulting smoke is very caustic and hazardous to health.
Another disadvantage is that the nichrome thread in the burners must be changed after 5-7 pictures. It does not affect expenses, so business will not be affected. 1 sting made of nichrome costs 2-3 rubles.
Therefore, if you decide to assemble a burner with your own hands, then it will be with nichrome thread.
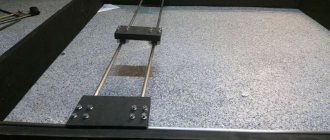
What is included?
- Controller
- Hairpins (2 pcs.)
- Controlled nichrome burner (carriage)
- Plywood blanks (2 pcs.)
- Brush
- Sandpaper
- Ruler for removing carbon deposits
- Linings for rulers for different thicknesses (2 pcs.)
- Workpiece mounts (2 pcs.)
- A set of spare tips and wire (nichrome and tungsten alloy made in Germany)
- Plywood box-table
Weight about 9.0 kg. dimensions of transport container: 75*18*20 cm
Electronic materials:
- Licensed Pyroprinter software (all updates are free, can be installed on any number of operating systems)
- Video:
- assembly and configuration, first launch
- photo processing (burning in photographic style)
- photo processing (effect of a hand-made drawing)
- how to quickly find clients
- changing the burning sting
- preparing a solution for pre-treatment of plywood
- Instructions and master classes:
- Internet promotion (website, VK, Instagram, etc.)
- for plywood preparation, treatment with solutions
- officially for work
- machine maintenance
Support:
1. If you are afraid that you won’t be able to cope, don’t worry. Our technical support will help you if something doesn’t work out for you.
2. If there are problems installing the program, our engineer can install it remotely via Teamviewer.
All photos from the article
In artistic graphics, there is such a term as pyrography, which literally means drawing with fire and for this they use a homemade or professional wood burning device. But we should not forget that not only solid wood can be finished here, but also plywood and cork, leather and thick fabric, cardboard and felt.
Only the tip of the tool itself, of course, will differ in size and even in configuration. We will tell you what types of devices there are and whether you can make them yourself, and also bring to your attention a video in this article.
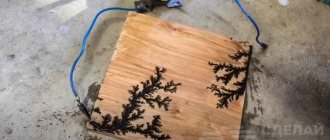
Burner with nichrome thread
The device is equipped with a different impact mechanism, which gives the burnt images significant volume, the drawings seem natural and rich. The image is applied to the wood using a nichrome thread; the brightness of the color depends on the heating temperature of the thread and the time of exposure to the surface.
When drawing shadows, the wire tip must be quickly passed over the surface, without stopping on the tree. But if the drawing requires bright and thick lines, the wire can be left for 3-4 seconds.
Experts include the following advantages of the machine:
Various models of homemade devices
On the Internet you can actually get acquainted with burners that can create designs on plywood, metal and even glass, achieving high photographic similarity of images. It's worth taking a quick look at a few options:
- A homemade laser burning machine, also called a pyroprinter, can be controlled from a laptop, then an LPT cable is not needed. But in practice, given the high cost, the CNC laser burner is used much less frequently, although it also has its adherents.
- For the simplest option – a laser pen – you will need the following elements:
- IR laser diode (1W output) and optical fiber;
- one type of mechanical pencil;
- a cooling radiator from an unnecessary TV with thermal grease applied to improve thermal conductivity;
- batteries, preferably type 2AA or D;
- eye protection - glasses that filter laser radiation - 750 - 900 nm.
Having disassembled a thin mechanical pencil (it is better to take one with a metal body), you need to cut the optical fiber along the length of the pencil and insert it into the tip. Secure with epoxy or a drop of glue, connecting to the wire and power. As you can see, there is nothing complicated in this example.
- A small plywood engraver - CNC for wood burning can be created from old 3D printers. This homemade laser has a lens that adjusts its focus; its travel is sufficient to focus the light spot (along the height of the material) within 10 mm. And if we take into account the costs of numerical software control of the device, then the entire structure, including drivers and guides, costs around 5,500 rubles.
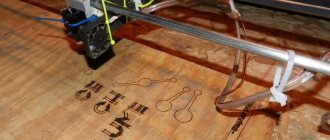
- You can make a CNC engraving machine from old CD/DVD drives. As an example, we disassemble three DVD drives, leaving the motor and sliding mechanism on the metal chassis. The control wires must be soldered to the motor (or to the motor contacts or to the cable loop).
Laser CNC burner:
Advantages
1. Higher boundary accuracy.
This is due to the fact that a CNC laser machine draws dots on wood. This is its important feature, from which its disadvantages also arise. It is better to write office signs, badges, draw vector objects, texts and images with very clear boundaries, drawn with lines using a CNC laser.
nichrome and laser
2. Burns not only on wood.
It also burns onto wooden surfaces and leather, but can also cut out ORACAL-type film. Those lasers that can cut plastic, wood, and foam are more powerful and expensive, respectively.
Cutting letters on Oracal film
3. Low requirements for room temperature.
Disadvantages of a CNC laser burner:
1. Drawing an image with dots
. The main disadvantage is that it is difficult to create halftones for an image using a CNC laser burner. That is, the black dot either exists or it doesn’t. Any artist knows that the effect of volume in an image is achieved by shadows on the surface of the face. Shadows create volume for objects and make them “alive”. In many ways, the perception and recognition of faces by the human brain is designed in such a way that recognition of a person occurs largely due to shadows showing volume. In the case of laser CNC, the shadow can only be obtained by reducing the density of the black dots.
2. Low burning rate.
The image is burned at a speed of 10 dots per second. So, we burned a painting measuring 20*20 cm for 10 hours. At the same time, I won’t say that the image was very dark. There is no longer any need to talk about some kind of serial execution of orders - either you will have to install several CNCs, or be content with a small number of orders.
Laser burning of portraits. Screenshot from the screen. Laser burning of A4 format takes about 9 hours
3. Drawing with pixels.
As the work progressed, several more unpleasant features of the Laser CNC came to light: when editing an image and enlarging a photograph, the CNC draws “pixels” on the wood. That is, the images are no longer uniform, and rather resemble a mosaic made of squares.
At low magnification the image may become pixelated.
4. Bright glow from the laser, like when welding.
I immediately remembered an old friend who works with professional printing equipment (the machine produces matrices for offset printing with a laser) - he has either “minus 6” or “minus 7” vision. There is actually a way to protect yourself from bright light - these are specialized glasses. But it is not always possible to choose them correctly - each laser with a different laser wavelength corresponds to different glasses that protect precisely from this range of light radiation. If you have children and want to install a laser at home, then this, in our subjective opinion, is simply unthinkable!
The bright light from the laser can seriously damage your vision.
5. Not every tree is suitable.
Those who burn on wood know that you can run a soda solution over the wood before burning. But during operation, the laser simply burns the remaining soda on the surface. To prevent this from happening, you have to rinse the workpiece very thoroughly.
Not all plywood is suitable for laser CNC