The current rating of burning equipment should start with the device Uzor-10K, which is average in price and capabilities. Among its differences are a shock-resistant plastic body, two heating modes for painting on wood and the main image, and shadows or gradient.
The burner tip heats up in just 1 minute, allowing you to start working almost immediately. And the simple switching of buttons and convenient design make the device suitable even for 6-year-old pyrographs. Another plus is good strength and long service life - on average, devices operate for at least 3 years.
A small disadvantage of the domestic device is the need to separately purchase a burning board and a minimum number of attachments. You will also have to turn off the device every 15 minutes - otherwise its handle may get too hot.
The cord is quite long, but does not spin easily, there is no holder, and the needle is relatively thick. However, the device still burns out well, without requiring strong pressure and cooling quickly after being turned off.
Preparing the tree
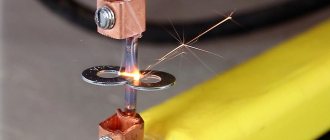
To burn lightning using a Lichtenberg apparatus, you need a material that absorbs moisture well.
Accordingly, a blank made of plastic or metal is not suitable for this purpose (as is laminated chipboard). Therefore, natural wood or plywood is used to burn lightning.
Options for the base can be different: pine, oak, hornbeam, beech. On any wood, the pattern will turn out to be very beautiful and, most importantly, unique and inimitable (you will not find the same pattern anywhere else).
Moreover, before you start burning, you need the electrolyte to be completely absorbed into the wood - otherwise nothing good will come of it. You'll just be wasting your time.
An ordinary soda solution is used as an electrolyte.
It is very simple to prepare - dilute 2 tablespoons of baking soda in 0.5 liters of water, and then mix thoroughly.
To obtain a high-quality result, it is advisable to add a little more soda - the more powerful the electrolyte, the greater the current, and, therefore, the more beautiful the pattern.
The only drawback of the soda solution is that dark stains may remain on some types of wood after its use.
As an option, some experts recommend using a saline solution as an electrolyte, but it works much worse. The saline solution boils very quickly, splashes out, and the electrical circuit breaks. So there is nothing better than soda.
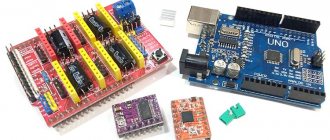
Choosing a transformer from a microwave oven
To make a Lichtenberg apparatus with your own hands, you use a high-voltage transformer from a microwave oven. Please note: a transformer from a welding inverter will not work.
To burn Lichtenberg figures onto the surface of wood, high voltage and low current are required, which is provided by a high-voltage transformer.
While a transformer from a welding machine, on the contrary, generates low voltage and high current. For this reason it is not suitable.
As for the choice of power source, absolutely any transformer from a microwave oven will do (their characteristics in different models of microwave ovens do not differ much). The main thing is that the transformer works.
We recommend watching a video that outlines the process of assembling a homemade “lightning generator”, as well as the principle of its operation.
https://youtu.be/E4b79ah4gG4
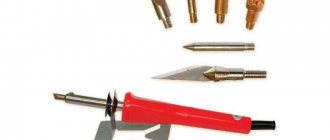
Wire feather
A device where the working body is a feather made of flexible wire. Mostly these models are intended for people who have some experience in wood burning. These devices have step-by-step adjustment of power and heating temperature, which makes it possible to create real masterpieces with certain skills and patience. If the wire burns out, it is easy to replace.
Another clear advantage is their safety, which allows us to recommend the use of wire models for children's creativity. The disadvantages are the high cost and the need to find spare parts when the working tool burns out.
Tips and secrets for beginners
- When making the first point, blow lightly on the sting, and then the beginning of the line will be smooth and will not stand out.
- Try to follow the contours in one line. Move the tip slowly to avoid scratching the wood. Help yourself by moving the material itself.
- Filling is best done with a tip heated to medium temperature. Movements should be soft, circular. If you heat the pyrograph too hot, it will leave deep black grooves in the wood.
- Periodically clean the tip from carbon deposits during operation. This can be done with a regular metal dishwashing sponge.
- Remember that a scorched line cannot be erased, so try to draw it very carefully.
- If you want thick lines, move the tip slowly. Thin lines are drawn quickly.
- The hotter the pyrograph is, the darker the lines will be.
- To achieve smooth tone transitions within one line, use a table fan. It will periodically cool the tip, and the color will turn out darker or lighter. Be careful!
What else can you burn on?
In addition, as on wood, with the help of a pyrograph you can create beautiful designs on fabric. This type of creativity is called guilloche. Usually for this purpose they take acetate silk, satin, nylon, panvelvet and other synthetic fabrics, since they are melted evenly, applied to natural fabric and burned with an electric pyrograph.
This technique is used to make various panels, collars, napkins, imitation lace borders, covers for diaries and books, and decor for scrapbooking.
Master class: burning out a funny puppy
First, let's make a panel with some cute animal, for example, a puppy, using the contour technique. Prepare the following for work:
- plywood blank with processed edges;
- fine-grained sandpaper;
- black carbon copy;
- a simple pencil;
- sketch;
- paints, brushes, clear varnish for wood;
- pyrograph