Wood burning (pyrography) is a simple and affordable way to decorate wooden surfaces. Pyrography allows you to make a unique souvenir with your own hands or transform wooden furniture, making it a real masterpiece. But this is impossible to do without a special device. Modern manufacturers offer a large selection of expensive and not so expensive wood burners.
But if you have no money at all, but have a soldering iron at hand, you can make a burner yourself. To do this, you only need a few tools and materials that almost every owner has on hand, as well as a little time and effort.
Main types of burning process
Pyrography is expressed using classical methods and techniques for wood processing. Craftsmen practice an open stream of flame, evenly treating the entire surface of the front side of the product. This creates the desired, deeper background for the painting.
It is effective to use a layer of clay, which allows you to burn a bare pattern previously cut out on the applied material. This method allows you to paint a light picture on a dark background and vice versa.
The method of treating wood with hot sand is practiced. The master immerses the workpiece in the mass, if it is necessary to give a shade to the light material, experimentally determining the required exposure time.
The device of a butane cutter, like a wood burner, is considered independently. The main characteristics of this technique are suitable for creating heterogeneous elements with irregular shapes (waves, clouds). There are ways to burn with a solar ray by focusing the energy with a lens.
Burning out by friction on a lathe and hot objects is known. Relief burning is used, making boundary cuts. Miniature pyrography with the smallest specimens of feathers is also in use.
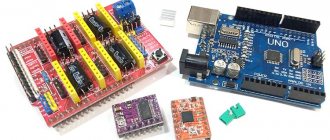
PyroPrinter is the pride of our engineers
It took us two years and the work of 5 engineers to develop. We conducted hundreds of tests and burned thousands of images, simplifying the process of operating the device as much as possible before we finished developing this nichrome burner. All this is so that every time you make a board you get a high-quality image. Such products are practically no different from the work of an artist who can work on a painting for a week. The Pyroprinter will create high quality A4 in 2 hours.
This type of business is becoming popular in Germany, Ukraine, Kazakhstan, Russia and a number of European countries. Already more than 25 people from Russia, the CIS and Europe have bought a nichrome CNC burner to create their own home business and are successfully producing custom paintings.
Methods of working with a wood burner
A classic device for wood burning can perform various types of application of objects based on the general idea of the future painting.
A popular option is contour burning, where only the boundary lines of objects are processed. In the case of silhouette burning, some figures or background are completely burned out. Experienced craftsmen can resort to decorative burning, which allows them to convey shadows.
Mastering the chiaroscuro method will allow a sophisticated creator to draw pictures that convey volume and dynamics using a homemade burner.
Preparation of the workplace
A well-lit, thoroughly ventilated place is suitable for work. If possible, this is best done on a balcony or on the street near a private house.
In an enclosed space, it is appropriate to sit near a window into which fresh air will flow.
- The working surface can be a table, but it will need to be protected from possible damage.
- This is easy to do with a piece of rags and a sheet of tin. You can use a regular baking sheet.
It is important to prevent accidental sparks from touching flammable objects: textiles, furniture. If you handle the working device carelessly, damage to property may occur, which is expressed in the form of holes and scorch marks.
Burning device
A modern electric burner will allow even beginners to practice. The burner consists of a step-down transformer, the main characteristics of which must be at least 5 V and 2A. You need a handle with attachments and an electrical cord, which are connected into a single circuit. Various feathers and filaments can be used as nozzles, which can be given the desired shape. Factory instruments are often converted by replacing the original rheostat with a laboratory transformer. This addition will allow you to control the intensity of the incandescence, which allows you to diversify the color scheme in your work.
There are two types of burners:
- Burning apparatus with a wire tip, including those made by yourself.
- Electric burner with a hard pen for wood.
The main characteristics of an electric burner with a hard pen are distinguished by the rapid heating and cooling of the tool. A few seconds after switching on, the electric burner is ready for use. Thermal mode allows you to control the power value. A tip made of nichrome wire allows you to achieve precise movements and better results. It is attached to a special fork holder. The sting heats up red in a few moments. The tip of the device can be adjusted to the desired shape. Wire feathers can be attached in various ways: either with two bolts, or using replaceable attachments.
The device with a wire pen has the following main characteristics:
- long service life of the heating element;
- simple replacement of the wire element;
- A wood burning device allows you to draw lines of various parameters.
The poor qualities of the device include the high cost and difficulty of repair, and the difficulty of finding components.
Burning machine with hard pen
Electric burner with wire tip
Electric burners using a hard tip have the general appearance of a soldering iron. The difference is the sets with replaceable attachments for more convenient work with wood. The advantages of such a unit include a low price (3 times less) and a large number of attachments.
The models are easy to use and durable. However, such a tool will heat up and cool down for about 5 minutes, and the shape often does not allow for painstaking, small work. The handle of the equipment also heats up during operation and requires regular stopping of work.
This device is suitable for creating thick lines and shadows over a large area of the drawing.
Final processing
After receiving the image, the surface is treated with sandpaper. You can protect wood from the negative effects of the environment as follows:
- The wood is varnished. This substance significantly extends the life of the product. At the same time, the drawing does not lose its outline, remains bright and saturated.
- If necessary, partial or complete painting of the space formed between the drawn lines is performed.
Final processing of the product can be carried out using a wide variety of protective substances. The choice is made based on the result obtained.
Sources
- https://electrod.biz/informatsionnyie-stati/vyizhiganie-po-derevu.html
- https://ArmRinok.ru/oborudovanie/payalnik-po-derevu.html
- https://pcity.su/izgotovlenie/mozhno-li-vyzhigat-payalnikom-po-derevu-ili-kozhe-rekomendacii.html
- https://npf-tvorchestvo.ru/derevo/mozhno-li-payalnikom-vyzhigat-po-derevu.html
- https://gktsg.ru/derevo/mozhno-li-payalnikom-vyzhigat-po-derevu.html
- https://generator98.ru/delaj-sam/payalnik-po-derevu.html
- https://gazsnabstroy.ru/prochee/mozhno-li-vyzhigat-po-derevu-payalnikom
Wood burner diagram
Any wood burner circuit consists of the same elements:
- metal screen;
- nichrome wire holder or other element for effective wood burning;
- burning element;
- device body;
- wire for electrical power.
Devices, as a rule, are powered from a standard 220V network using a transformer. Modern devices with a built-in laser for burning wood have appeared on the market.
Wood burner diagram
Do-it-yourself manual wood burning circuit diagram and subsequent setup are always relevant for burning enthusiasts. To create all the elements of a homemade device, knowledge of radio electronics is required. There are already invented schemes that are perfect for a homemade mechanism.
Next step
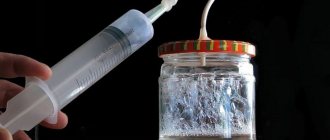
Next, you need to take a high-quality double wire. It must be cleaned on both sides and two holes made in the cap to bring the wire out. Having done this, you need to connect each wire to the corresponding needle. It is advisable to screw the wires very tightly, since the quality of the current flow depends on this.
For safety and quality, it is necessary to finally secure the wire (including threads) with insulating tape.
At the end of the work, you need to use an unnecessary button (preferably from an old tape recorder) and a rechargeable battery. The main thing is not to confuse the polarity, otherwise the homemade device will not heat up (more precisely, its tip).
All is ready! All that remains is to try out the made device in operation.
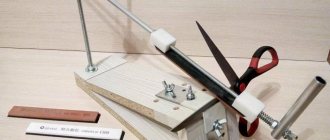
Making a simple burner
If you wish, you can assemble a wood burner with your own hands. To do this, you will need a small set of tools and some improvised means, commonly used household items. To assemble a homemade burner you need the following materials:
- Wood bead.
- Insulating adhesive tape.
- Power unit.
- Nichrome alloy filament.
- Soldering device.
- Flux for soldering.
- Tin for solder.
- Electric drill with attachments.
Other materials may be added to the list, such as sewing threads and rubber thermal tubes.
How to choose a tool?
In order to learn how to work with a tool, you should choose it correctly. Recommendations for selecting a suitable burner:
- The volume of work carried out and its complexity are determined. Small burnt designs with fine lines look attractive, but they can be almost invisible on larger pieces.
- Beginners often purchase a tool from a low price category. This decision is justified by the fact that in the absence of experience, mistakes can be made, due to which the device will cease to function.
- The most important parameters include power, tip dimensions, the possibility of using attachments and their number, heating time, etc. All required information is indicated in the operating instructions.
- The classic version of the tool is represented by a combination of a step-down transformer, a handle and a working part. There are also sophisticated burning machines on the market that can be used to produce complex images.
- It is recommended to give preference to products from popular manufacturers, as they can last for a long period.
Only over time will the master, based on personal experience, be able to select the most suitable tool. The choice of design is often made depending on the available options for burners and attachments for them.
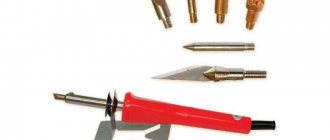
Advantages
This process has a number of advantages, thanks to which it has earned its widespread use. These include: No need for any additional purchases. The soldering iron is a ready-made tool for burning. Starting from 30 W, there is no longer any dependence on the instrument parameters. All of them become suitable for this task and you don’t need to think about how to make a burner from a soldering iron.
Using a 60 Watt soldering iron for burning
This is a relatively safe process. There is no great risk of electric shock or fire. Using simple, low-power models, children can also be allowed to use pyrography, but you should still not forget about safety rules.
Easy to learn tool. It is much easier to use for burning than for soldering. There is no need to delve into technical details, the selection of additional consumables and modes. Everything is mastered on an intuitive level.
Safety precautions
You should work with the burner carefully. The main recommendations are as follows:
- When using the tool, you need to use a special stand, which is made using heat-resistant material. In its absence, ceramic dishes or other products made from this material are used.
- The tool should not be left on the surface being treated for a long time. This is due to the fact that prolonged exposure to high temperatures leads to fire of the material.
- No flammable materials should be located near the work table. Even short exposure may result in a fire.
- Drawing should be done carefully. Clumsy and quick actions can lead to burns.
- Even a high-quality tool can overheat. Therefore, it is recommended to monitor the heating level of the working part.
At the time of burning, unpleasant smoke may appear, which is not recommended to inhale. Work must be carried out in a prepared workplace. Distractions lead to mistakes being made, and the work will have to start all over again.