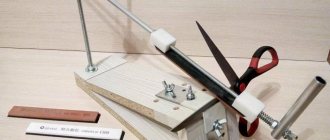
Working with genuine leather is a fascinating and interesting activity that requires the purchase of many expensive special tools. However, some of these devices can be made independently. Let's look at how a tool that is suitable for leather processing can be made, using the example of a stepper punch, marking wheel, hole punching tool and stamps.
Cylindrical leather punches
Professional tools that are used for punching holes in the leather industry or in the saddlery industry, of course, differ from household tools both in their quality characteristics and the strength of the materials used, but a homemade option can also be good.
If you need to make a hole of a large diameter (for eyelets, rivets), you should use a hole punch in the shape of a metal pipe with a sharp edge. It may have a rubber or plastic handle, and you can additionally equip it with a service hole to remove knocked-out leather circles. By choosing different tube diameters from 1.5 to 18.8 millimeters, you can make holes of different sizes.
To make a hole on a leather product, you will need to lay it on a flat, hard surface, make a mark, place the punch vertically, and press the tube with your hand, turning it slightly. As a result, you will get a neat, smooth-edged hole that your cylindrical punch made.
Knife for working with leather with your own hands
A leather cutting knife is a rather unique tool that must meet certain requirements. However, some of the tools we are used to are also suitable for this task. What types of knives are there for cutting, sanding, fleshing and embossing? Let's look at this issue in more detail.
Cutting is a type of leather processing during which the edges are trimmed so that this area can later be used for products.
The name of this word comes from the German “to sharpen”, and this reflects the essence of the operation. During the process of whittling, which is also called sanding, all excess is cut off, and a piece of leather is brought into proper condition.
This operation is an essential part of working with any skin.
The resulting material is most often used to create a pleasant, beautiful and high-quality binding for books, notepads and other similar things.
There are such varieties.
The only problem with such a solution may be very rapid wear of the cutting part. This option is considered unsuitable for full-time work.
If you are working with thick leather and don't want the edges to be rough, you can trim them with a special tool. Of course, it is very sharp on the inside and incredibly thin on the outside.
Externally, this device resembles a tuning fork, since it is represented by two dense parts, the inner surface of which is incredibly sharp.
It is indispensable in the matter of cutting off roughness and unevenness along the edges and therefore is actively used by masters of their craft.
In addition, it can be used to cut the top layers into strips.
In a professional environment, it was designated a tool for lowering the edge.
By the way, there are also serrated discs that allow you to leave holes along the edge of the leather, similar to those left by a sewing machine. It will look aesthetically pleasing and is not difficult to do.
In this case, the master is also ensured safety, because the handle is made in such a way that to access the disk it is necessary to press the lower part of the structure.
However, workers know that after skinning an animal, the material is not immediately ready for use. It still needs to be sharpened and separated from the rest of the skin. And this is exactly where the described device is an assistant.
So, from the above it is clear that a true professional does not make do with a straight razor or a stationery knife.
His arsenal should include a variety of knives that will help him successfully solve various, sometimes very complex, tasks.
Of course, they are unlikely to be useful in the household, but if you decide to seriously take up furriery, then the information gleaned from this article will be useful to you.
For a review of leather knives, see below.
Revolver punch
To make braiding, it is better to use a revolver-type hole punch; you can also make it yourself. In appearance, it is very similar to rings for working with metal, only on its head you will need to place a drum that has 6 sharpened cones of different sizes, from 1.4 to 5 millimeters. In order to make a hole, a piece of leather will need to be inserted between the anvil and the punch, and squeezed with force. This way you will get a hole of the required diameter.
These durable devices can be made from stainless steel with a brass anvil and a compression spring, replaceable steel punches, which have a lifetime warranty. It is only important to take into account the recommendations regarding the thickness of leather products.
Classification and device
Due to the fact that leather has a high density, a needle or awl is not always suitable for punching it. From here it is clear that for greater efficiency you should use a special tool (punchers and hole punchers), the models of which can be divided into:
- Lowercase;
- Curly;
- Revolver;
- Ring;
- End
A standard punch is a tube with a sharpened working surface. Sharp sharpening is the main design requirement, based on the fact that the smaller the area the device is in contact with the material, the easier it is to make holes in it.
IMPORTANT! It is quite possible to make a hole-punching and punching device yourself; you just need to select a tube of the required diameter and sharpen it with high quality.
There are also modern models that have a countersinking function. For such samples, the work cycle consists of two steps:
- The tip punches a hole;
- Special built-in blades expand the opening to a given size.
The countersinking process itself is a mechanical processing of the material, in which the accuracy of the hole being punched is calculated in tenths of a millimeter. Performing such manipulations manually is practically impossible, because It will be necessary to apply excessive muscular effort to the device, maintaining increased accuracy. In a countersink, various metalworking machines can be used as a working drive. The shape of the hole will depend on the working part of the hole punch. As an example, we can give a conical shape of a tool, the impact of which will produce round holes.
Models for eyelets
To install eyelets (fittings that protect holes from destruction) on the material, you will need to make round holes with a certain diameter. It is very difficult to perform such an operation using improvised tools or at home. Therefore, for this process, special devices are used, which, when making holes, simultaneously attach special rims to their edges, protecting the edges of the holes from destruction. Typically, such rivets may also contain the branding of the manufacturing company or its proprietary pattern. Eyelet models not only perforate products, but can also simultaneously bend the edges of holes, which in the future will not require special processing of their edges.
Linear models
Their shape can be compared to a comb or a dinner fork. They have special spikes that are arranged in a single line, standing at an equidistant distance from each other. This device contains needles ranging from two to six pieces. They are installed on the same line along which the future seam will pass. By striking the end part of the device, the material being processed is pierced and holes are made in it. The number of spikes on the line punch will determine the sewing speed. Upon completion of penetration, the spikes are removed from the holes, and the comb itself is shifted the required distance to one side, maintaining an even step. Line punchers can be divided into two options:
- Products that work on the principle of a cutter, pressing/piercing holes, and pushing the material apart;
- Products that cut out a small cavity in the material, removing the resulting excess (this option leaves the highest quality and neatest holes).
It is worth noting that for inline models, the spikes may have different shapes. The most common are round and semicircular options, but there are also:
- Diamond-shaped;
- Triangular;
- Oblique;
- Rectangular.
IMPORTANT! An important role in the work of urgent samples is played by the thickness of the cross-section of the spikes and the distance between them. For example, French seams are usually made using bias punches and they are traditionally used for sewing purses or finishing leather watch straps.
If you plan to work with very coarse and dense material, then it is preferable to use cutters whose spikes have a larger diameter and increased spacing. This ratio will allow you to stitch the future product with thicker threads. It should be noted that for this category there is no universal toolkit suitable for all working situations, therefore, the more different line combs a master has, the greater the range of tasks he can perform.
IMPORTANT! The diamond-shaped shape of the studs is characteristic of the Chinese tailoring school, which has developed historically. Their line punches classically have 1, 2, 4, 6 teeth with a standard distance between them of 5 millimeters.
Revolver models
In appearance, the devices in question resemble pliers, on one part of which a revolver-type device is installed for punching holes. Using such a sample, you need to turn the device and install the working spike of the desired type. Next, all that remains is to place the material to be processed and press the handle to make the hole. As a standard, revolving models have six studs with a diameter of 2 to 4.5 millimeters. The risk of the drum spinning during operation is prevented by a special blocker. However, one press of this model means making one hole, which means it is not possible to get a seam right away. The main purpose of revolving devices is to punch single holes, for example, for a waist belt or a bag strap.
Curly models
Punching holes using ring or shaped devices involves removing part of the material that falls under their working part. With the help of such devices it is possible to make large-sized slots. Their traditional shape is a regular tube with a pointed end. Cutting is carried out by applying the pointed part to the material and hitting the end of the tool with a strong blow. The range in this model range is very large. Thanks to them, it is possible to make not only an oval or round hole, but also to repeat the outlines of complex geometric shapes - stars, polygons, trapezoids, etc. The models under consideration are usually supplied in kits where the tubes have a diameter from 2 to 22 millimeters.
End models
They are most often used for trimming skin. Special trimmers used for processing belts, shaped like a curved steel plate, have become very popular. This plate is convenient for cutting ribbons for waist belts.
"Hunting" models
With their help, wads are specially cut, which are subsequently inserted into the cartridge. They have large-sized shapes, compared to sartorial variations. Their diameter corresponds to the caliber of the cartridge loaded with the wad. Their main purpose is to cut out the desired piece from a very dense material, which is usually cork, cardboard or felt.
Special models
These variations are equipment capable of working both on leather and thick fabric, and on metal. This may include:
- Pneumatic - such samples require connection to a pneumatic compressor. They are used for processing various materials, including tin, sheet metal or metal tiles.
- Hydraulic - they are, to a greater extent, similar in principle of operation and appearance to industrial machines designed for making holes in metal.
- Manual - these variations for dense materials will require remarkable strength from the master. Their body itself is always made of durable carbon steel, due to the specific nature of processing dense products. Due to their massive construction, they are less susceptible to deformation when cutting into the workpiece.
IMPORTANT! Special models can lose their sharpness very quickly, so a periodic sharpening procedure is provided for them. In this case, you need to sharpen the working part not only on the outside, but also on the inside, completing this process with polishing.
Leather stepper
If you plan to hand sew parts of a thick leather product, you will need to first punch holes in the leather. A step-by-step hole punch will do the best job for this task. In its shape, it is similar to a fork, the tines of which have a special diamond shape. Just decide in advance on the size of these teeth, and if necessary, place them to the hole at an angle of 45 degrees. With skill, you can not only use a hole punch to mark a line for a straight seam, but even stitch a leather product.
To prepare a leather product for a Mexican braid or braid, you can make a step-by-step hole punch, the teeth of which are arranged diagonally. You can also use it to punch holes in suede and leather, the thickness of which is no more than 5 millimeters.
Instead of an epilogue
A review of the modern market for the devices in question has established that in almost all segments it contains products from foreign manufacturers. At the same time, it is quite capable of meeting the stated prices in terms of its quality, although the prices may seem quite high. It is recommended to purchase such tools through online stores, because in them you can find a sufficient assortment that can satisfy both a professional craftsman and an amateur. As for the brands of manufacturing countries, I would like to note German companies that have all the good characteristics of the goods they supply, and, unlike others, they try to fill the market not with individual tools, but with fairly expanded sets. The Russian manufacturer is not even represented with its own products, however, it produces goods of decent quality under an American license.
Punch manufacturing options
To make a simple hole punch, you can also use a thin tube with the desired diameter, sharpening its edge. If you need to make not just a round, but a decorative hole in the shape of an oval, crescent or semicircle, you can initially give this shape to the end of your hole punch. Such a tool can be made from an ordinary small screwdriver, an IV needle, or a table fork.
The main thing when making a hole punch for leather with your own hands is to remember that leather is a noble material, but with the necessary skill and accuracy you can make useful, comfortable and beautiful things and accessories from it.
FAQ on working with leather for beginners
It’s been almost ten years since I started making leather goods. At that time, there were no lessons or master classes on leather working techniques at all. And even now there are very, very few of them. I also didn’t have any acquaintances knowledgeable in this area, so I had to learn from my mistakes, from articles from the Internet and rather rarely published specialized literature.
Gusarova Maya Nikolaevna.
Where to buy leather?
You can buy leather in specialized leather stores. Most of these stores can be found in the directory in “DoubleGIS” under the heading “Fur/Leather - Raw Materials”. You can often find scraps of leather in various workshops.
How much does leather cost?
Most leather is sold as whole skins. The cost of leather is usually shown per square decimeter.
Pork, calf and goat leather, depending on the thickness, quality and processing features, can cost from 5 to 40 rubles. per square decimeter.
At the beginning of the article, the photograph shows calfskin with the romantic name “Venice”; its cost in leather stores is 25 rubles. per square decimeter.
The skin of various exotic animals: such as snakes, pythons, monitor lizards and so on... can cost from 100 rubles. per square decimeterThe smallest skins have an area of about 40 square decimeters
In the studio, various trimmings can be purchased at a cost of 100-200 rubles. per kilogram.
One kg of scraps is about 50-60 square decimeters in area.
Where to buy leather working tools?
You can purchase many accessories for working with leather at regular hardware stores. Some tools have to be made by hand. Special tools for embossing and more can be purchased in online stores.
How to cut leather?
Knives
To work with leather, it is convenient to use knives with replaceable blades that can be broken off as they wear out. Produces excellent knives and replacement blades. You can buy such knives and blades in construction tool stores, materials stores, repair stores, as well as in specialized online stores
If you cannot find special construction knives, then you can also use ordinary cheap office knives, which you can buy at any office supply store. The only inconvenience of such knives is that you will have to break off the blades more often.
You can also use a shoe knife (in books about working with leather they write about it very often), but it has the disadvantage of requiring frequent sharpening.
You will also need a wide and long metal ruler.
The ruler should be wide in order to protect your fingers from a sharp cutter, namely a metal one, because a wooden ruler will very quickly become unusable. A metal square is also needed.
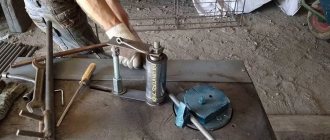
About other equipment for bending metal edges
Do-it-yourself electric scooter????
????- master class with step-by-step instructions for doing it yourself. tips and simple diagrams for beginners + the best photo reviews A homemade edge bender for body repair can also be with a pneumatic drive. Pneumatic edge benders are in demand among tinsmiths. The principle of operation is to create a pressure of up to 6.2 bar, due to pneumatic cylinders and beam rotation. It can be used with metal thicknesses up to 1.2 mm, and the resulting edge width can be up to 12 mm. Air consumption 113 l/min.
Automatic edge benders can be purchased at retail. The price is reasonable and the device is simple. It is not necessary to have experience when using equipment in repairs. The hole punch-edge bender is popular because it can be used to simultaneously bend the edge of a metal and make a hole with precision.
Tools
What tools do professionals use when installing vinyl siding?
Scroll
| Tool | Functions |
| Scissors | Cutting panels to length and width |
| Hole cutter (perforator) | Creating oval grooves for fastening the panel to a wall or sheathing |
| Notch punch | By making a notch and bending the area in front of it, the punch forms a lock on the locally cut panel for attaching the edging of the opening or additional element |
| Panel removal hook | The hook allows you to disassemble a latched lock in one movement and remove a poorly secured or damaged panel |
This is what a siding punch looks like.
In addition, when marking and installing, you will need a tool more familiar to any builder:
- Corner, tape measure and pencil;
- Construction level and plumb line;
- Hammer and screwdriver for fastening the sheathing.
Is it necessary to use scaffolding when covering a private house with siding?
- A one-story building can be covered with stepladders;
- When the house is two or more stories high or when working alone, scaffolding, scaffolding or wide trestles are necessary. In principle, it is possible to secure a two-meter bar from a ladder; however, constantly moving it and lifting it to a height of 3 meters or more will be extremely tiring and will greatly slow down the work.
It is much more convenient to install from scaffolding.
Replacement
The price of specialized professional tools is not affordable; The installer’s desire to replace them with devices already in his collection is quite understandable.
If your plans do not include professional cladding of facades with vinyl siding, most of the equipment listed above can be found with functional analogues.
Scissors for cutting siding can be successfully replaced with metal scissors or a grinder with an abrasive wheel for stone or metal. The grinder is more practical: it gives a perfect cut even at low temperatures, when polyvinyl chloride becomes brittle;
- An improvised puncher for siding can be easily made with your own hands from a steel tube with a diameter of about 10 mm. It is enough to flatten it on an anvil or in a vice until it forms an oval shape; then the edges are sharpened using sandpaper. In order to make a hole, it is enough to place a block under the edge of the panel, attach a notch and apply a couple of blows with a light hammer;
- To connect additional elements with a panel cut in place, ordinary silicone sealant is often used. Its elasticity compensates for the slight difference in temperature expansion of the sheathing elements. High-quality sealants from reputable manufacturers (Henkel, Ceresit) are preferred: cheap compounds have weak adhesion to smooth surfaces.
The sealant in the photo evoked special sympathy from the author.
Installation rules
Detailed instructions for installing vinyl siding can be found on the website of any well-known manufacturer. We will try to highlight the main postulates.
Lathing
- For vertical sheathing, it is better to take a single board with a height from the base to the top of the wall, rather than assemble it from several parts. When composing the sheathing from short sections, it will be very difficult to mount it strictly in one plane, which will affect the appearance of the facade;
- It is desirable that the width of the bar or sheathing board for siding be at least 60 mm, that is, it covers at least two holes in the fastening strip. This width will ensure that the fastener (screw or nail) is placed in the middle of the groove.
A galvanized profile for gypsum boards is often used as lathing.
Sheathing
- Galvanized screws or nails are used for installation. Fasteners without anti-corrosion coating will quickly decorate the facade with rusty streaks;
- The fastener, as already mentioned, must be located strictly in the middle of the groove, allowing the bar to move during expansion or compression;
- For the same reason, the fasteners are not screwed in or not fully screwed in: the head and the bar must be separated by a gap of 1 mm;
- The panels are never mounted tensioned. The planks adjacent along the length of the facade should be separated by a gap of 6 - 8 (if installation is carried out in winter - 10) mm; The gap is closed by a siding docking strip mounted after the panels.
The fastening of siding strips and opening trim should allow for displacement relative to the sheathing.
Features of preparation for construction
If you decide to build a house yourself, you will have to solve a lot of problems, and many of them are not even directly related to construction.
First of all, it is worth determining several important parameters:
The dimensions of the timber are one of the most important parameters, since it is the cross-sectional size of the timber that affects the thermal conductivity of the material and the energy efficiency of the house itself. Timber with side dimensions of 100, 150, 200 mm is available on the lumber market, and it can be either square or rectangular. Although the “bigger is better” principle is perfectly suited for this case, increasing the size still leads to an increase in the weight of each unit of timber, which is critical when doing all the work yourself. The layout of the house - even the construction of outbuildings requires careful planning, not to mention a residential building. In the case of houses made of timber, practically nothing changes - before construction you will not only have to create a house plan, but also, if necessary, prepare all the necessary documents to put the structure into operation. Dimensions of the house - when planning, be sure to calculate all the dimensions of the structure, since the amount of materials for building the house depends on them
Take into account absolutely all the nuances - from the total length of the walls, to the number of interior partitions, and other parameters that may be missed during the construction stage, but will be revealed after its completion. Soil characteristics - when constructing any type of structure on a site, it is worth paying attention not only to the technical component, but also to the soil characteristics. If the soil is sufficiently loose and unstable, even a massive foundation can sag, which will lead to the appearance of cracks, as well as the occurrence of loads on the timber walls themselves
Of course, wood is more resistant to such defects, however, the destruction of the foundation is critical for any home. Features of the roof - the type of roofing structure is also related to the layout of the house, as well as the features of the choice of building materials. If the design is too complex, you will need to take care of various auxiliary structures to simplify the installation of the roof.
Of course, all these are basic requirements and parameters, since each design is individual and different from others. Having become familiar with this information, you can move on to analyzing each stage of building a house made of timber.
Calculation of the required punching force
The metal cutting process is characterized by the fact that during this process a rather complex load pattern appears, which is concentrated in the area where the punch, the material being cut and the matrix interact.
The punch is made in such a way that it does not enter the material with its entire end, but only with the outer annular part. The response comes from the matrix. Moreover, the pressure arising in the interaction zone of these three components is distributed unevenly.
In other words, during the cutting process a pair of forces arises that form a circular bending moment. Under its influence, the sheet bends. As a result of this bending, pressure is generated, which affects the punch and the edge of the matrix. In addition, it is necessary to take into account the fact that tangential forces appear under the influence of friction forces. As can be seen from the above, when punching, a non-uniform force field arises. Therefore, when carrying out calculations, a conventional value is used - shear resistance. As a result of the research, the resistance depends not only on the properties of the metal, but also on the level of hardening, the thickness of the cutting, the gaps in the punch/die pair and the speed of the cutting process.
Electric drill
When thinking about how to make a hole in a belt, you should consider using an electric drill
If you are careful, you can use it to make fairly even, neat holes. To begin with, it is recommended to fix the belt by pressing its ends with a heavy weight.
In this case, the area to be treated must be located on a flat, hard surface, for example, a wooden block.
To determine the optimal drill size, it is enough to manually insert several rods of individual diameters into the existing holes on the belt. It is recommended to stop at a drill that will fit tightly enough into the hole.
How to make a neat hole in a belt using a drill? To do this, you must first make a slight indentation at the intended point using the tip of a sharp knife. As a result, the drill will not jump to the sides during the work.
When starting to make a hole, it is necessary to make short-term starts of the drill mechanism. This way you can minimize the risk of making a sloppy hole.