Let's study a step-by-step master class: do-it-yourself foil embossing
Now even a child can perform the simplest imitation of coinage. You can find ready-made creativity kits for this on sale:
But, perhaps, it is more interesting and, undoubtedly, much cheaper to make a craft yourself from start to finish, coming up with your own design, and the materials for such a craft can not only be bought in a store, but even the most junk ones.
Let's take a step-by-step look at how to do this work yourself.
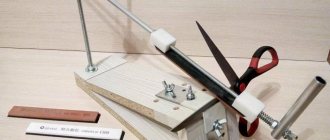
As a result, you should end up with approximately the following set of materials and tools on your table:
...or this one if you're ready to take on a little more complicated work:
Operating procedure:
- Cut out the tin sheet from the can. This method is suitable for older children, or parents can help here. Carefully, so as not to cut yourself, cut off the top and bottom of the can, cut the resulting tube lengthwise and straighten it to make an even sheet. Using a ruler, align the edges and cut them evenly with scissors. It is better for preschoolers and primary schoolchildren not to perform such complex operations, but to use ready-made sheets of foil.
- Place the foil face down on the backing: the design on the finished product will be a mirror image. You can put a stencil on top and gently press with a stick along the contour, or you can draw your picture on the foil with a marker and only then press the image with a stick. You can draw with a solid line, short strokes, or dots. Be careful not to rip through the foil!
- Using a ruler with a stick and pressure, draw a frame along the contour of the work, stepping back one centimeter from each edge.
- The finished product can be framed or carefully glued to cardboard by folding the edges of the foil sheet around the cardboard base. Girls can decorate their work with self-adhesive rhinestones or paint it with transparent gel paints with glitter.
All that remains is to place your embossing as a decoration on a shelf or hang it on the wall. And you can also please your family or friends with a gift for any occasion.
Other variations in the production of similar works are possible - both simpler and more complex. We present to your attention several video instructions for children on making imitation embossing on foil.
Types of embossing
There are hot and cold stamping. In the hot version, a specially prepared stamp (cliché) is heated to the required temperature, and then pressed against the foil. The hot-melt layer melts, and as a result of the pressure of the foil stamping press, an imprint is left on the product. This method is quite widely used in mass production, although it is not suitable for thin films, which melt too quickly when exposed to high temperatures.
Material that meets the requirements of cold stamping must contain an adhesive base that is destroyed when exposed to ultraviolet radiation. The process itself will require the following equipment:
- foil unwinding mechanism
- a device that creates a pattern using UV varnish
- drying plant
Anyone can perform this procedure at home using a laminator or iron - the quality of the finished product depends both on the materials used and on your experience and skills.
To foil using a laminator you will need:
- Laser printer.
- Laminator with high operating pressure.
- Matte or glossy foil.
- Plain paper (it is better not to use textured or decorative paper - it is too thick, so the drawings may end up with blurry edges).
Now you can proceed directly to foiling:
As you can see, using a conventional, manual laminator, you can only foil on flat surfaces.
The advantage of foiling with an iron is that the iron can be found in any home, unlike a laminator. The original picture or text is prepared in the same way. Place the foil on top of the printed design, set the iron to maximum temperature and begin to smoothly move the hot surface over the sheet. Usually, a couple of minutes of this smoothing is enough for high-quality foiling, but you can increase this time a little. Now wait until the material has cooled, then remove any excess.
If the task is to refine the product, then metallized (gold, silver or bronze), textured (including transparent) or colored foil (glossy and matte options are possible) will suffice.
DIY gift for dad
Master class “Machine” (work in embossing techniques)
Author: Sukhareva Tatyana Alekseevna, teacher of the Medical Educational Institution Child Development Center, kindergarten No. 166, Tyumen
The master class is designed to work with children of senior preschool age, teachers, parents and creative people.
The minting technique is very ancient, developing over many centuries. It was known in Ancient Egypt, Ancient Greece and Rome. Since ancient times, coinage has been used in the art of Iran, China, India and Japan. Coinage received significant development during the Renaissance in Western Europe. It reached high perfection in pre-Mongol Rus' and flourished again in ancient Russian art of the 15th-17th centuries. High relief coinage from sheet silver was produced by Greek craftsmen in Moscow, and hammered ladles and bowls were produced in Novgorod.
Purpose: interior decoration, making gifts.
Goal : development of artistic and creative abilities through the use of fine arts.
Tasks:
– develop artistic taste, sense of composition; Creative skills;
– develop children’s horizons, replenish their active vocabulary;
– promote the development of fine motor skills and hand coordination;
– form and develop manual labor skills;
– cultivate accuracy, hard work, perseverance.
Required material:
▪ Round brush or sushi sticks
▪ Album (or soft backing material)
Progress:
We place the template on the foil, having previously placed something soft (album).
We trace the design along the contour with a brush or sushi stick
We remove the template, this is what we get on the foil:
Take a brush and start tapping dots around the outline
This is what happens
Then we begin to mint individual parts. Let's start with the windows.
Then we turn the work over and trace the contour of the part that was minted.
Let's turn it over, this is what happened
The same principle applies to the second window, wheels and headlight.
We turn the work over and trace the entire outline and details again.
We turn it over, this is how we got the job
Turn the work over with the wrong side up and take the cardboard
We put cardboard on the work
And fold the edges of the work onto the cardboard
Turn it over, our work is ready. You can put it in a photo frame and give it to dads for the holiday.
Various types of products
Embossing is widely used in the production of products for various purposes, from sheets of metal of different grades. It is widely used in the decoration of buildings inside and outside. This operation is used in the production of metal utensils, decorative manels, and jewelry.
When creating products, craftsmen use special techniques, for example, chasing grapes. There are many secrets in this business that are often passed down from generation to generation.
Paintings and interior elements are produced in embossing workshops. In addition, some craftsmen carry out work on the production of paintings that consist of several layers, including those that consist of several metals. This combination gives the composition multicolor.
Embossing on three-dimensional products
In embossing workshops, fragments are also produced that can be installed in furniture made from solid wood and various types of panels.
For as long as coinage has existed, separate styles have developed (Caucasian, Eastern, etc.). Modern masters use all previously developed styles and at the same time develop their own.
Let's start simple
In any store you can always purchase ready-made creativity kits. But it’s much more interesting to do everything from start to finish yourself, and also come up with a drawing. All you need is effort and patience.
The following materials will be needed:
- a sheet of foil or an aluminum can;
- backing under a sheet of foil. Important: the thicker the sheet of foil, the softer the backing should be. Felt and rubber are suitable as a backing;
- To apply the drawing you will need a tool. It can be a sushi stick, a brush (its hard tip), a non-writing pen, etc.;
- a stencil, a drawing template, or you can come up with one yourself;
- scissors;
- ruler.
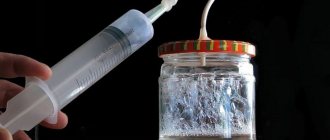
Let's start making coinage. We take the jar. We cut off both bottoms. Now cut the jar from one edge and straighten it to form a sheet. Now use a ruler to straighten the edges and cut them off. The option of using a sheet of foil is not excluded.
Now place the material face down on the backing. The drawing will then appear in a mirror image. Now we put the stencil on the sheet and use a tool to press the picture. You can push either a solid line or a broken line. Now you can make a frame in a similar way.
Gift for family and friends
Every child at least once gave their parents gifts made with their own hands. Undoubtedly, the parents were happy to see the little surprise from their baby. One of the gift options could be embossing for dad. Today we will look at step by step how you can make a cute “Car”.
- foil;
- cardboard;
- tool (brush, sushi stick);
- template or stencil;
- backing (it could be an album or felt).
Let's get started. We put the album, the foil on it, and then the template as follows:
Exactly along the contour we trace our drawing with a tool.
After drawing the lines, remove the template and get the following.
Now, using the same tool, we make points around the machine.
Now we mint individual parts of the machine. You can start with the windows.
Now turn the foil over and trace the same part along the contour.
If you turn the work over, this is what you should get:
We then make the remaining parts of the machine according to the same principle.
Now we turn the foil over and trace around the office and parts of the machine with the tool again.
As a result, you get such a wonderful gift for your parents.
Now, back side up, we place our work on the table. Let's take cardboard.
Then place the cardboard on the foil.
The gift is ready! If there is a suitable frame, then you can put your work in this frame. For children, the process will seem very exciting, you can be sure. Girls can use the same principle to make a flower for their mother.
Minting of the first Russian coins
Rus' owes the appearance of its own money to His Serene Highness Prince Vladimir, who introduced it into regular circulation in the 10th century. The minting technique had some characteristic differences and consisted of several step-by-step actions.
- Metal round timber (silver or gold) was prepared.
- Stamps were placed on both sides of the press, after which the workpiece was placed on the lower one.
- The press was driven and compressed the workpiece, simultaneously imprinting an image on both sides.
The technology, as is clear from its description, was imperfect; the coins turned out to be different not only in appearance, but also in weight. At the same time, the weight error of the spool was only 0.4 g and, on the scale of the total mass, was not at all critical. It was from this coin that the concept of a spool as a measure of weight, which is 4.266 g, originated.
With the change in the political situation in the country, which led to the fragmentation of the state, silver coins began to be minted en masse and circulated locally. Metal disks were cut out of silver wire “by eye,” which inevitably led to a fairly significant scattering of the specimens. They differed not only in weight, but in shape and in the printed image. The coins of that period (rubles from the word chop) were not smooth, but uneven and rough. For this quality and for their light weight, they were nicknamed “scales” among the masses.
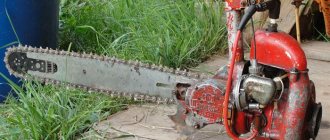
Video Master class Forging embossing Embossing on thick foil video Foil
If you manage to find thick foil (toothpaste used to be made from it in tubes, now some types of perfume products remain), then remember the fascinating technique of embossing. Although in a simple version, it can rather be called foil stamping. Children cope with such work very easily, and the crafts turn out to be unusual and cute.
. everything new is well forgotten old.
Yes, at one time we were taught this technique at Pedagogical School No. 2 of the Moscow City Executive Committee: a tin from a tube, a rod from a pen. And what wonderful work turned out.
LEARNING IS ALWAYS HELPFUL!
beauty! It’s good that there are still people who care and who are passionate about teaching children
Very interesting technique! It’s just a pity that the material for work is not always available.
You can buy foil for thermal insulation of saunas; saunas are sold in rolls, 1 meter wide, 6 - 12 meters long.
Enough for a long time!