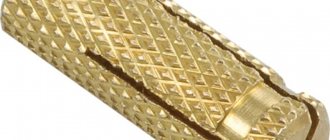
You just need to remember a simple rule: place the metal ring (that is, usually the picture) down towards the grinder!
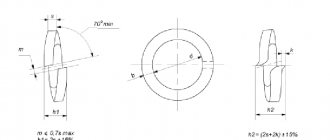
In the center of the wheel (cutting or grinding) there is a ring made of galvanized steel, which has four punched holes around its circumference, usually with the edges dented down, to prevent this ring from rotating relative to the abrasive. The inner edge of the ring is wrapped inside the circle, in its central hole, and ends flush with the opposite surface of the circle, without going out onto it.
When producing wheels, the ring is riveted while pressing the disk from above, after the entire pie of mesh and abrasive has been formed.
The ring is usually located on the label side of the circle. However, there are circles where the ring comes out on both sides of the circle, and on some circles with a recessed center, it is only on the side opposite the label and is on the recessed side. That is, manufacturers make rings differently. Although, it must be admitted, most cup circles still have rings on the convex side, which is “kakbe hintae”, that it is still preferable to place the discs with the ring down, towards the grinder.
History of the issue.
At the very beginning, after purchasing the grinder, I intuitively placed the circle with the label facing outward. On that circle, the metal ring in the center was also pressed on from the side of the picture. So I sawed and did not experience any problems. But then I had a cup-shaped circle (with a sunken center) and it had the picture and ring on the convex side. I placed it with the picture facing outwards, and it turned out that the circle was scraping against the protective casing. I had to turn the circle around. That’s when this question arose for the first time... The other day, while watching videos about tools on YouTube, I came across a discussion of this issue, and decided to find out for myself how to set up a circle correctly? As I mentioned above, opinions online are evenly divided on this issue.
Grinder - what is it, application, choice, safety precautions
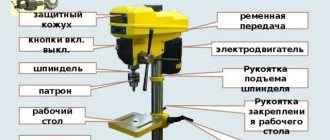
An angle grinder, or angle grinder, or grinder is a hand-held power tool for cutting, grinding and other processing procedures of metal, stone and plastic. The device has a small cylindrical body, on one side of which there are devices for installing attachments on the spindle, on the other - a handle for holding the device during operation. Inside there is an electric drive powered by a 220 V household network.
Angler grinders differ in size, power and corresponding scope of application into 3 main types:
- Large-sized. Dimensions 500 by 150 mm, power up to 3000 watts. Used for production. Able to work continuously for a long time. They have a high resource.
- Average. Case dimensions – 350 by 130 mm, power up to 1.5 thousand watts. Used in professional work. The device can be used for several hours daily.
- Small ones. The dimensions do not exceed 270 by 110 mm, and the power is 1.2 kW. Intended for everyday use. Allowed to work for a limited period of time with pauses.
Most often, small models of grinders with a power of up to 1.2 kW are used for domestic purposes. Source expertnov.ru
Sometimes those who are just starting to use a grinder reduce the basic rule of operation to deciding which direction the nut is unscrewed to change the attachment. In fact, this is only the technical side of servicing the device - to use it successfully, you must first of all choose the right model for its purpose, convenience and power.
For example, the most comfortable operation will be facilitated by the correct selection of a device according to a number of parameters such as:
- The number of handles, their location, the presence of anti-vibration pads.
- Motor power. The characteristic must correspond to the work, as well as the types of nozzles used. So, the smaller the disk, the higher the speed of its rotation. However, the use of a wheel that does not comply with the manufacturer’s recommendations can lead to equipment failure and violations of safety regulations.
- High quality. Both the device itself and the replacement attachments must be of proper quality. Since the work involves rotating mechanical parts, the destruction of which can lead to catastrophic consequences.
Only high quality angle grinders and equipment allow you to quickly and safely cut workpieces Source 1metallocherepica.ru
One of the main conditions for effective work with an angle grinder is compliance with safety requirements. First of all, these include:
- Correct selection and preparation of a safe work site.
Before starting work with an angle grinder, it is necessary to prepare the place in accordance with the following series of requirements:
- Select a flat, free space of sufficient area.
- For maximum reliability and safety of using the grinder, the workpieces being processed are fixedly fixed to the bolted connection with the required side, and, as necessary, they are unscrewed and reinstalled in accordance with the work plan.
- If necessary, remove nearby objects that could be damaged by sparks, smoke and other factors in the operation of the device.
- All fire hazardous elements – solvents, fuel, rags, etc. – are removed from the work area.
- When working on a construction site with building materials, primary fire extinguishing means are prepared - sand, a fire extinguisher, and water supplies.
The angle grinder can be used in dry weather outside and indoors with normal air humidity.
You can operate the grinder in conditions of normal air humidity Source mosoblzhilservice.rf
- Use of personal protective equipment.
Using an angle grinder at home is associated with a risk of injury. Therefore, in order to protect themselves, the user must use the following protective equipment during operation:
- Wear goggles or a face mask to prevent sparks or fragments of material and disc from entering.
- To muffle the sound, use earplugs or construction headphones.
- Protect your hands with gloves or mittens made of thick fabric. At the same time, their material should not be old, worn out, with dangling threads, and the products themselves should be accurate in size.
- To prevent dust from entering the respiratory system, use a respirator.
- Wear boots made of thick leather with metal inserts on the toes to protect your feet from sparks and falling objects.
In addition, the entire body must be securely covered with protective clothing made of thick fabric. In this case, the form should not have freely dangling parts that could wrap around the rotating elements of the device.
When working with an angle grinder, the operator must have reliable protection Source mosoblzhilservice.rf
See also: Catalog of companies that specialize in completing unfinished houses
- Use only serviceable tools.
To successfully operate an angle grinder, each user must have an idea of which direction to unscrew the disc and how to change it in general. However, in addition to this basic requirement, before starting work, the device must be checked for serviceability according to the following points:
- The power cord and plug must have a complete sheath and be free of kinks and other defects.
- The guard is tightly secured and positioned in a direction that prevents sparks from hitting clothing or the face.
- The gear handle must be solid, without cracks and tightly screwed in.
- The working disk must be installed level, without the slightest distortion.
In addition, any user should know how to use the grinder correctly and which direction of rotation of the disk in relation to the material being processed to choose.
Nuts for angle grinders
The design of the clamping nuts depends on the type of grinder on which they are used. On ordinary, inexpensive household angle grinders, they mainly use standard nuts with a special open-end wrench included or floating ones, which can be unscrewed/tightened with a regular wrench. On more expensive professional angle grinders, where efficiency is required when replacing consumables, nuts of a special design with self-clamping elements, flange type with a freely rotating internal part, and nuts with additional automatic balancing to eliminate vibrations are used.
Quick-release nut for angle grinder Makita 115\125\150\230. Photo 220Volt
Operating rules
Due to its specificity, the grinder belongs to the category of the most dangerous household power tools. Since its design does not imply all-round protection, like, for example, a circular saw, but rotates at a speed of more than 10 thousand rpm. the disk can rupture for various reasons and fly apart in any direction.
There are many reasons for the rotating disc of an angle grinder to rupture. Source ytimg.com
In this case, the flight path of the fragments can be anything. Moreover, the tool itself can break out of the operator’s hands during operation and also go in an unpredictable direction. However, it is still possible to operate the device quite safely, but provided that a number of requirements relating to the following several aspects are strictly observed:
- Preparing for work.
- Position of the device during operation.
- Backfire.
- Preventing disc rupture.
Let's look at each of them in more detail.
Preparation
It is necessary to prepare for the upcoming work in advance. You need to have a basic understanding of how to service the angle grinder, in particular, in which direction, if necessary, to unscrew the nut securing the circle. In addition, you must complete the following series of preparations:
- Make sure that the device and its attachment are in full working order. It should work smoothly, without interruptions, and the disk should not be damaged.
- Use protection for the face and eyes - in the form of a reinforced protective mask or goggles.
- Overalls should be tight, but not restrict movement; however, they should not be too wide to create the possibility of the fabric being caught by rotating parts.
One of the main safety requirements for working with an angle grinder is properly selected workwear Source montazh-saidinga.ru
- Use mittens or gloves made of thick leather to protect against abrasions, cuts and flying sparks.
Important! When working with an angle grinder, the operator must have normal reaction speed and coordination in space. Therefore, in case of fatigue, taking specific medications or ill health, it is better to postpone the event to a more favorable time.
The main difference between the two sides of a circle
On any cutting disc, two surfaces are clearly distinguishable. One of them (the back) is plain, formed by an abrasive material. On the 2nd (front) there is a label containing basic information about the properties of the disk. But the main distinguishing feature of the two surfaces is the presence of an iron ring on the front side.
Self-locking nut
Replaces conventional clamp fastener. Advantages:
- no special key required for unscrewing;
- can be easily dismantled;
- highest wear resistance;
- strong.
Disadvantages:
- quite expensive;
- Maybe another time it will stick to the circle and in this case it should be turned away as usual.
Prescription instructions
The instructions for many angle grinders, for example for the Metabo WP 850, correctly indicate that “the metal flange of the abrasive cutting wheels must be adjacent to the supporting flange.” Manufacturers are not in vain in giving such advice, because they ensure safe work with equipment and reduce the risk of the worker receiving serious injuries.
Video description
Video on how to choose the correct direction of rotation of the grinder disk:
- Excessively long operation. Any disk has a limited period of use. The closer it is ground to the base, the higher the risk of it breaking.
- Improper use. When a cutting wheel is used for sanding, its thickness and strength quickly decrease, making it more likely to break.
- Presence of a defect. A crack, break or chip may be present on the wheel even when it leaves the factory, and may arise during operation.
Note! From a safety point of view, the angle grinder should rotate to the side clockwise - if you look at the open side of the disk. The reason for this is simple: if the disk jams, it is almost impossible to hold the device, and in this direction it will simply go away from the user, and not towards him, as in the opposite direction of rotation, that is, counterclockwise.
Reasons for snacking
Typically, such a problem appears on angle grinders with a working surface diameter of 150-180 mm. When powerful torque is applied, the disc bites. This leads to the fact that it is impossible to remove the fastening with an ordinary wrench, even when using severe physical force.
2nd common reason. Introduction of a grinding disc that does not meet the factory specifications of the tool. This leads to disruption of the entire mechanism and jamming. In the rarest cases, a nut cannot be loosened when rust appears on its threads. In most cases, this occurs during long-term use of the tool or storage without a tip configuration.
Video description
Video advice on how to properly hold an angle grinder while working:
The problem can be solved with the following tricks:
- Overalls made of thick fabric reliably protect the operator from spark flow. Since the temperature of the sparks is low and does not cause much harm.
- A mask or goggles reliably protect your eyes and face from accidental sparks.
- The guard can direct the sparks so that they only fly downwards.
In the practice of working with a grinder, there are situations when the tool needs to be positioned so that the rotation of the circle is reversed to the safe position. In such a situation, the operator needs to use more reliable means of protection. However, the device should be used in this position in exceptional cases.
History of the issue.
At the very beginning, after purchasing the grinder, I intuitively placed the circle with the label facing outward. On that circle, the metal ring in the center was also pressed on from the side of the picture. So I sawed and did not experience any problems. But then I had a cup-shaped circle (with a sunken center) and it had the picture and ring on the convex side. I placed it with the picture facing outwards, and it turned out that the circle was scraping against the protective casing. I had to turn the circle around. That's when I first had this question...
The other day, while watching videos about tools on YouTube, I came across a discussion of this issue, and decided to find out for myself how to set up a circle correctly? As I mentioned above, opinions online are evenly divided on this issue. Then I began to develop my own point of view.
Video description
Video on how to properly unscrew the fastening nut on an angle grinder:
However, sometimes after work the nut becomes so tight that it cannot be unscrewed even with a special wrench. The reason for this is the use of a wheel that is too large or equipment that is not designed to work according to factory parameters. In addition, the threads may become welded, oxidized, or rusted.
There are the following ways to solve this problem:
- Heat the nut with a torch, which will cause the metal to expand and weaken the contact.
- Use a special insert into the holes of the nut. Creating a lever will allow for greater effort to unscrew.
- Saturate the thread with oil, turpentine or WD-40, and then, after some time, unscrew the nut with a wrench.
- Tighten the circle that has not been used for a long time even more tightly, and then unscrew it in the usual way.
Recommendation! To ensure that the nut is not over-tightened during operation, and can then be easily unscrewed, a cardboard spacer must be installed between it and the circle.
The disk is bitten, how to remove the clamp
You can loosen a clamped threaded connection by heating the clamping nut by friction against the wooden surface of a thick beam or the stump of a tree cut down at the dacha. Unlike heating with a blowtorch or gas torch, here it is possible to regulate the force of pressing the nut against the wood. More uniform heating of the threaded connection for several minutes makes this method less safe in terms of maintaining the functionality of the angle grinder. In practice, as shown in the following video, the clamping nut will easily unscrew when it reaches a temperature at which a drop of water will instantly evaporate after it hits the surface of the angle grinder’s clamping nut, heated by friction.
How to install the disk correctly, do you need to tighten it?
While the grinder is working, the clamping device pressing the disc tends to tighten even more. Therefore, when installing a new consumable, you only need to lightly tighten it. Further, the laws of physics will provide him with a reliable clamping of the tool.
Briefly about the main thing
A grinder is a power tool for processing metal, stone and plastic. Based on size, power and scope of application, angle grinders are divided into large, medium and small. When choosing, the features of the handles, the power of the electric drive and the overall quality of the tool are taken into account. Effective operation of the device is associated with compliance with safety rules - selection and preparation of the location, use of protective equipment and full serviceability of the device.
Safe operation of the angle grinder is possible with proper consideration of a number of aspects:
- Preparation.
- Device position.
- Backfire.
- Disk rupture.
The direction of rotation of the working disk that is safe for the operator is clockwise. In this case, you need to unscrew the nut on the grinder in the same direction in which the working disk rotates - in the standard case, clockwise.
Ratings 0
When the fastening bolt is turned
Occasionally it happens when a bolt turns in a threaded hole; let’s look at how to unscrew it in more detail.
First you need to pry the product with a nail puller and try to pull it out as high as possible. Leaving the connection in tension, slowly turn it out with a wrench. If you don't have a nail puller, you can use a screwdriver. If the bolt is small, you can remove it with pliers.
The head is clamped and pulled upward using force. If it is not possible to remove the bolt immediately, then begin rotating the head clamped with pliers counterclockwise, without weakening the force upward.
These lubricants are intended for rubbing parts. If you lubricate a bolt or nut with it, over time the lubricant will harden and will be more difficult to unscrew than a rusty bolt. It is better to lubricate the bolts and nuts with graphite lubricant when tightening them.
It can be bought at any auto store.
I hope that the article was useful and helped you find a way out of a difficult situation.
In which direction does the disc on the grinder unscrew?
Floating fastener
In such a nut, the lower sector and the upper sector are not dependent on each other, they rotate on their own. It is used in angle grinders instead of a standard standard nut. The advantages of a similar fastener are:
- it does not require a special wrench to unscrew (an ordinary open-end wrench or a regular cap wrench will do);
- The circle is not pressed tightly as it should, the clamping fastener turns loose.
There is probably only one drawback - its price is slightly higher than the standard one.
What solution to the problem is offered by specialists and amateurs + (Video)
What is a newspaper gasket? This is a paper washer the size of a nut. It is put on the installed disk, and a nut is screwed on top. This piece of paper was a stumbling point, because the safety inspection always spoke about the harmfulness of such a decision.
Representatives of safety authorities treat the installation of gaskets made of any other materials in the same way:
But there is a solution that does not contradict safety requirements and allows you to install and remove the disk normally. This is a special nut that consists of two elements - a nut and a pressure washer. The use of such a nut does not require any shims, because with it the disk does not jam.
If you don’t have a special key at hand, then craftsmen suggest doing without a key. This does not mean that you can do without a key at all, but use a “gas key” or other device. To do this, you need to hold the latch, tighten the nut with a gas wrench and unscrew it. This way you can replace a jammed disk, but this is a very inconvenient operation for one person.
There are also suggestions to hold the disk with your hand and unscrew it. Maybe, but it’s unlikely that you’ll be able to change broken disks this way. It is better to use wrenches that are designed for removing and installing disks.
Some foreign power tool manufacturers, such as Bosh, produce grinders with easily removable nuts. They securely fix the disk on the tool shaft and are easily and quickly removed to replace the disk.
How to unscrew a bolt: 45 practical recommendations
Effective methods for unscrewing a rusty bolt or nut at home
How to unscrew a bolt? An article about effective methods with an overview of the best and non-standard tools.
In this material we will look at how to unscrew a torn bolt (with torn edges), a rusted bolt, a crankshaft pulley bolt, a wheel, an exhaust manifold, a cylinder head and other components and assemblies.
The recommendations will also be useful in household work - when repairing faucets, toilets, garage equipment, prefabricated buildings, etc.
How to unscrew a bolt
Bolts are usually unscrewed with spanners or open-end wrenches, screwdrivers, sockets using a wrench, ratchet or pneumatic impact wrench. However, other options are also possible.
Before unscrewing the bolt, from the available tool you need to choose the one that suits best:
- thin short open-end wrenches, especially with a too loose (broken) jaw, are the worst option, which is better to immediately abandon in a situation with unscrewing rusty stuck bolts (this will lead to torn edges);
- ring wrenches are preferable to open-end wrenches, since they cover the perimeter of the bolt head more tightly;
- A 6-point socket wrench or socket is preferable to their 12-point versions, since hex ones have a larger area of pressure on the flat working surfaces of the head and are less likely to tear off the edges;
- a tool with an extended handle or additional attachment is preferable to a short one;
- Due to its simplicity and strength, a crank is preferable to a ratchet, because for the latter, the application of increased forces can lead to damage to the mechanism (this is especially true for ratchets with a large number of teeth, each of which is smaller and not so durable);
- an air impact wrench is better than a hand tool;
- in combination with a wrench or an air impact wrench, the best solution would be the Super Lock head, in which the force is applied not to the corners (edges), but to the planes, which prevents the edges of the bolt head from being licked off;
- a torque amplifier (multiplier) will help apply a force to a large stuck bolt that exceeds human physical capabilities;
- a screwdriver with a large handle of a typical shape or a T-shaped power one will do a better job than traditional compact versions;
- a suitable clamping tool (pipe (“gas”), wrench, clamp, vice, pliers, etc.) will be useful in the absence of keys or when the edges are licked;
- if the head height is sufficient, in rare cases a pin driver of the appropriate size can be used.
Further, when describing the methods, we will show how to unscrew a bolt from an atypical tool.
It is worth purchasing a durable Super Lock socket for wheel bolts and carrying it with you in the car at all times, since wheel fasteners often get damaged during seasonal tire changes and can cause serious difficulties for the car owner on the road in the event of a puncture.
Do-it-yourself quick-release
A quick-release nut can solve the problem with a standard clamping nut jamming on a household angle grinder. When buying it in a store, you will need to invest considerable financial resources. However, if you have mastery of turning and welding techniques, you can decide on the possibility of making a quick-release nut yourself. The following video shows a manufacturing option.
Welding machine BlueWeld Gamma 3250. Photo VseInstrumenty.ru
The author needed the following basic materials and equipment:
The procedure is as follows.
The author, performing the technological operation of making holes on a quick-clamping nut, eliminates one of its advantages - the refusal to use a special key. Further testing of the homemade nut in operation will certainly help the author conclude that it is possible to operate the quick-clamping device by tightening/unscrewing it only by hand. There is no need for large clamping forces to securely fasten the working tool; it will be enough to apply a moment of force using the user's hand.
The main function of preventing disk jamming is performed by bearing balls. The clamping force does not change during operation, since the threaded part rotates along with the balls.
Source
Cutting wheels for grinders, in turn, have their own subtypes, such as:
- Cutting wheels for metal work;
- Abrasive wheels for working with stone;
- Circles for woodworking;
- Diamond blades (mentioned above).
The purpose of each type of disk usually corresponds to its name.
Among grinding discs, there are four main subtypes - flap, wire, diamond and bakelite-based grinding discs (straight, profile T41 and disc, profile T27).
- The petal disc is made of sandpaper. Its main purpose. This is the removal of an existing coating, such as old paint, primer or a layer of paintwork. Also, discs of this type are used for polishing wood products.
- Wire discs are used by craftsmen to remove rust. They can also remove other types of stubborn stains.
- Diamond discs are used for polishing stone.
- Disc discs are made of plastic or rubber and are used for polishing iron surfaces.
Measures to prevent jamming
To prevent the latch from jamming, you must adhere to the following recommendations:
Many angle grinder owners are faced with a situation where the disc lock begins to clamp. To solve this problem, you need to figure out which way to unscrew the grinder disk and what methods can be used to remove the clamp. Using the recommendations above, tool owners can easily cope with this annoying problem.
Korovin Sergey Dmitrievich
Master of Architecture, graduated from Samara State University of Architecture and Civil Engineering. 11 years of experience in design and construction.
Architect, that's it. You need to build, not turn screws. There is a groove on the shaft for an open-end wrench 17. Place the wrench, rest it against the casing (protection) and use a gas wrench to easily tighten the top nut. Study to be an architect.
In my case, the open-end wrench bends.
2013–2021 © Self-construction - a site for those who build!
Source