Using a high-quality tripod will help ensure maximum accuracy of the data provided by the laser level. It is for this reason that many are interested in the types and brands of these devices. No less relevant topics are the competent choice of devices and the possibility of making them yourself.
DIY laser level holder
Level, level, plane builder - with the advent of the “laser” prefix, these useful devices for precise orientation in space acquire a modern sound and at the same time a significant cost.
Despite the fact that any of the devices can significantly make the life of a builder, repairman, or simply a thrifty and homely owner, many are in no hurry to purchase “professional” models, mainly because of the high price. However, expensive equipment for one-time use (for example, leveling walls) can be completely replaced with a homemade device. To do this, you must first understand the structure of the level or plane builder.
Principle of operation
The basic element of any device whose name includes the word “laser” is an emitter of highly targeted monochromatic (one-color) radiation.
The phenomenon is based on forced radiation, which, depending on the power, is perceived differently.
Low-power laser emitters based on red, red-orange, yellow-orange and green diodes make it possible to produce a point or beam of light.
At a high level of pumped energy, a laser beam can turn into a weapon - it can set fire to materials that absorb radiation well.
Devices used in everyday life and construction and repair work operate on laser diodes of the red, yellow-orange and green spectrum; blue and violet ones are much less common (such models are much more expensive). To concentrate light radiation, biconvex lenses are used, as well as other optical devices that allow the beam to be converted into a plane.
Household appliances have a standard circuit shown in the illustration. Design variations are related to the power of the emitter and additional accessories.
Laser-based level and level design
Laser levels and levels use the principle of directly indicating a target - a point or line on a surface. They can be tracked directly (in relatively low light) or through the eyepiece of the device.
In addition to a point or line (the trace of the intersection of a light plane with a solid opaque surface), levels and levels allow you to obtain a cross-shaped pointer, as well as simultaneously use two or more emitters.
Due to the scattering of the laser beam into a plane, such devices are often called “laser plane builders”.
In general, the set of functions of the device depends on the number of emitters and optical devices for concentrating or scattering the beam.
Substitutes for professional equipment
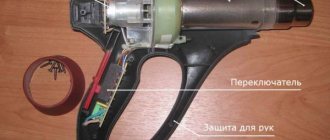
In homemade devices, a special laser emitter is replaced with a conventional laser pointer.
With sufficient power and quality, as well as the presence of two or more attachments that allow you to transform the laser beam, such a pointer is quite suitable for making a laser level with your own hands.
You just need to take care of sufficiently strong and convenient fastening and installation of the pointer in a strictly defined position with the possibility of displacement.
As can be seen in the illustration, a telescopic tripod with a convenient mount that allows the holder to be rotated is used to mount the professional device.
Since such tripods are often found in the households of amateur photographers, they can be easily adapted to make a tripod for a laser level with your own hands.
If you don’t have a tripod, you can make a simple stand based on a stick or timber with a support at the bottom, use a container of water or a hanging mechanism.
These options will be discussed in detail below.
How to make a laser level on a tripod
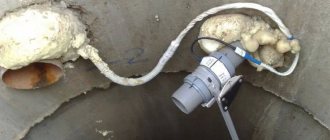
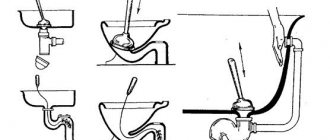
If you have a tripod and a construction bubble (“spirit level”) level, creating a device comes down to installing a tripod and attaching a level to it with a laser pointer fixed on it. The illustration shows a level with an existing groove for the pointer, but in fact the fastening is simply done using clamps, wire or even tape.
The most difficult part is the correct orientation of the laser beam. To do this, it is advisable to insert a piece of hard rubber or foam between the pointer and the surface of the level, securing it with clamps or elastic bands, as shown in the diagram.
Here 1 is a pointer, 2 is a piece of dense and moderately elastic material, 3 is clamps or elastic bands.
After setting the bubble level strictly horizontally (this can be done on any flat surface), the laser pointer turns on.
Once parallelism between the horizontal plane and the laser beam has been achieved, you can mount the resulting device on a tripod in any convenient way.
Support in the form of a rod, float device or suspension
As already mentioned, in the absence of a tripod, we use improvised means - a barbell made from a broom handle, a shovel or just a piece of timber, or a container of water.
The structure of the rod is very simple: a beam or stick is attached to a piece of board or OSB board (plywood) strictly vertically and so that the structure is stable.
You can check the angle between the support and the rod with a building square, but it is better to use a regular building level. Spacers can be used as support, as shown in the diagram below.
A block the size of a bubble level with an attached pointer is mounted to the top of the rod - and the device is ready.
If you place a large container on the floor, filled almost to the brim with water, and place a level with a laser pointer on a flat piece of foam, you will also get a quite suitable support for a homemade level.
In addition, in a container with water, the device can rotate freely, “drawing” a plane along all the walls of the room. Interestingly, for such a “float” level you don’t even need a bubble level.
With an even piece of foam plastic on which the pointer is rigidly and strictly horizontally fixed, the laser beam will move only horizontally - due to the impeccable evenness and horizontality of the water surface.
Simple steps for making such a laser level with your own hands and its operation are shown in the video.
The suspension is even easier to install. A beam is attached to a chandelier hook or other similar mount on the ceiling of the room using a rope or thin wire.
A laser pointer is fixed on the beam so that the light beam is directed to the floor (if floor marking is needed) or to the walls.
Next, by rotating the resulting level from the pointer, we obtain a light point or line on the desired surface.
In the illustration, a tripod is used as a mount for the hanging level, and the pointer itself is fixed in a hole drilled in a beam.
Additions to the homemade laser level device
Additional details and the use of not one, but two or more laser pointers will help increase the accuracy of the device.
One of the simplest improvements is the use of a bubble level with two pointers, mounted on a rotating flange with markings, which will help you rotate the device to an arbitrary angle. In order for the system to work properly, it is important to accurately align the axes of the laser beams and secure the flange strictly horizontally. The convenience of the system is that it can be mounted on a tripod or rod.
By changing the position of the levels and the number of pointers, you can get a laser marker that provides a light cross.
If your household already has an optical level, you can use it as a stand to add a laser pointer. An example of such a design is shown in the photo.
The scheme is extremely simple: a bar with a “bundle” of a construction bubble level and a laser pointer attached to it, rigidly mounted on the level’s stand.
For those who have a tripod for a camera or video camera at their disposal, we offer a diagram of a do-it-yourself level made from a tripod with adjustable legs, brackets and the same “bundle” of level + pointer.
DIY laser level - video
Another very interesting manufacturing option is presented in the video.
Useful tips for creating homemade levels using laser pointers
Despite the convenience, compactness and low price of self-made devices, they have two main disadvantages: relatively low accuracy and a short period of operation with constant use of laser emitters.
The first issue is solved by setting up the device. To eliminate the second drawback, experts advise replacing the coin-cell batteries in laser pointers with an external power source. It is important to select a source with the required voltage.
Typically it is 4.5 V, but may vary for different models.
Review of manufacturers
Nowadays, many manufacturing companies present their products on the market of tools, measuring equipment and additional devices. Naturally, the leaders of the segment are such giants as Bosch . And in this case we are talking about the largest developer of power tools and electronic devices. For many, this brand is associated with traditional German quality.
On the market, the company offers high-quality tripods of various types, as well as rods and holders for laser levels.
In addition to the German giant, other manufacturers also present their developments.
- ADA Instruments is a company that started its activities more than 10 years ago. Initially, it was positioned as a brand of diagnostic and measurement equipment developed for a variety of industries. By the way, ADA stands for ADditional Accuracy, which means “additional accuracy.” The manufacturer offers potential buyers models of geodetic and telescopic tripods and rods.
Do-it-yourself laser level rod
ADA Silver. It comes in two versions. With and without a tripod. The tripod allows you to work without resting on the ceiling and outdoors (when there is no strong wind :-))
Where to place the rod: at home or outside?
If you're looking for a traction bar, this should tempt you. This is actually a Roman chair. This type of device allows you to achieve a greater variety of exercises compared to a conventional traction booster.
Nothing beats bodybuilding or cross-training outside. But you will need to consider the weather, and unless you live in an area where it never rains, the weather will be a limitation.
However, you can attach the rod to the wall of your covered patio.
Tips for anchoring your bar
The advantage of a bar is that you can exercise whenever you want. You won't have a view of your garden and you won't be breathing fresh air, but at least you'll know you'll be dry! Attaching the door pull is really not difficult since you have little or nothing to do. You just have to be sure to place it on a frame that will support your weight.
The difference in price, by the way, is small. Without a tripod, a telescopic rod costs approximately 2,000 rubles. With a tripod it costs 200-300 rubles more.
I'll test the barbell without the tripod today.
The spacer bar comes in a convenient bag with a shoulder strap. Consists of 5 threaded elbows, a movable platform and 2 support heels. have centimeter marks on them.
.
For a wall panel it becomes more complex. You must be a minimum master. It is secured with an ankle and screws. Think about this also to make sure for your safety that the wall or ceiling can support your weight, weight and a lot of tensile forces. Here are our tips to fix your bar in the best possible way.
You must determine the height at which it should be installed. To do this, know that your body should not touch the ground when your arms are extended and your knees are bent. You must be able to access the bar without jumping. The space between the rod and the ceiling must be sufficient to allow the head to pass over the rod.
Face the wall and extend your hand. Make a mark in the middle of your arms and draw a line at that level. Check horizontality with a level. Using a suitable drill bit, you should now drill the mounting holes in the wall.
Using a hammer, simply press the holes Anchors adapted to support in the holes Now place the bar on the anchors and screw the rod!
The first knee is telescopic, with rotary fixation. It also has a spring, thanks to which it is convenient to install the rod in the spacer. The maximum height to which the tripod can be expanded is 3.6 meters
. If you have a tripod, you can place the level even higher.
Where to buy a traction bar at the best price?
By following these steps, you can make your operations safe and with optimal comfort of use. But keep in mind that the price of traction in Intersport or other is often high. The selection is wider, the invoice is smaller, delivery is fast and the quality is on target.
The pressure level is adjusted to the spray nozzle. Replace the high pressure flow with detergent in operating mode without replacing the spray nozzle. The spray gun is easily accessible and can be placed in the machine along with the spray nozzle to clean the gap.
For our flow of 3 meters high, 4 sections were enough.
The movable platform for fixing the laser level has a 5/8 thread. Many devices have such threads or adapters from ¼ to 5/8.
However, before purchasing a barbell, make sure that your plane builder model is suitable for the barbell. On some models with legs, these legs can be unscrewed, but even this does not help to screw the device. There are also special adapter screws on sale. There is a handle-clamp to secure the platform.
The platform easily moves up and down (until it is latched) and also, thanks to the soft support heels, the device can be rotated 360 degrees. The fastening screw has a through hole through which a plumb point is projected.
Maximum weight of the device
which the bar can support is 4 kg. The bar itself, by the way, is light. Its weight is only 1.5 kg (aluminum knees).
Using such a telescopic rod makes working with a laser level much easier
. It makes it easy to hang the ceiling and make markings along the entire wall. Centimeter marks come in handy here. In general, a very useful accessory.
Let's try to find the pros and cons of the spacer rod.
- Fits most 5/8 threaded appliances
- The elbows are connected by metal threads
- not suitable for devices with ¼ thread (adapter required)
- Not suitable for all levels on legs (adapter screw required)
- plastic handle-clip (requires careful handling)
Tips for choosing
The higher the class of measurements performed, the stricter the requirements for the sets of equipment used. Based on this, special attention should be paid to the main selection criteria, including tripods for laser levels. One of the key points will be the material from which the device is made. Most often used:
- metal (in the vast majority of cases it is aluminum, one of the main characteristics of which is lightness);
- tree;
- fiberglass (fiberglass).
Each of these materials has its own characteristics that should be taken into account when choosing a specific tripod model. First of all, you should pay attention to deformation under temperature influence. By the way, metal has the highest coefficient of expansion, and therefore it will deform when exposed to sunlight.
The result of this phenomenon can be significant deviations of the sighting axis of the level from the horizon.
Wooden and fiberglass fixtures have almost identical coefficients of thermal expansion. Based on this, it is difficult to give one of the options a clear advantage. In this case, they most often rely on personal preferences.
When choosing tripods, their weight plays an important role. Heavier structures provide maximum stability. But at the same time, transportation becomes significantly more difficult and the mobility of the equipment is greatly reduced. Another important criterion is the features of the “legs” fixation mechanism. Currently available models are equipped with:
- clamping screws;
- fastening elements in the form of special clips;
- combined elements.
The use of models with fastening clips allows you to maximize the speed of work. In situations where rigid fixation of a level or level is paramount, preference should be given to tripods with screws or combined mechanisms.
Taking into account all the existing nuances, the following basic rules for selecting the most suitable device can be identified:
- with increased requirements for accuracy, priority will be given to heavy models made of fiberglass or wood;
- if maximum mobility of the entire structure is required, then it would be wiser to choose aluminum tripods equipped with clips;
- If you have a level with a compensator, you can be guided solely by preferences, taking into account financial capabilities.
DIY laser level mount - Metals, equipment, instructions
| Dear friends and site visitors! Thank you for your viewing of the content, I hope you find useful information on the site about tools. Today I want to ask you for help for my friend Mikhail Pogorelov, who was in trouble. His two-year-old daughter Snezhana was diagnosed with the disease “Sensorineural hearing loss.” The degree of the disease is quite high, and the baby is losing her hearing every day. The parents are saving for a hearing aid, but besides that, the baby will need surgery on both ears, the cost of which is simply exorbitant - 30 thousand euros for one ear. Parents are raising funds to undergo an operation in the near future, since the older the baby gets, the more she loses contact with the outside world. I ask for help from everyone who can and possibly knows Mikhail. The baby wants to hear this beautiful World, so let's help her. You can provide assistance by transferring any amount of funds to Mikhail’s bank account: PrivatBank card: 4149-4978-5183-0598 Pogorelov Mikhail Andreevich Thank you all personally from me. |
Carrying out construction work without such an important tool as a laser level or level is unacceptable.
The laser level is intended for prompt and most accurate marking. To use this tool, you do not need to read the instructions or undergo additional training.
To use the level correctly, you need to place it on the surface of the floor or wall, then turn it on and get ready-made projections. This device is good for everyone, with the exception of only one drawback - high cost.
If you plan to carry out construction activities at home, then you can make a laser level with your own hands, eliminating the need to spend money.
The tool in question is a small device that is fixed on any surface, for which the following elements are used:
- Magnet
- Tripod stand
- Fastening straps
The main distinguishing feature of laser levels is the shape of the projecting beam and its direction. To create the beam, powerful LEDs are used, as well as a system of prismatic lenses. The range of the instrument depends on the power of the LEDs and the number of lenses.
Internal structure of the laser level
There are three types of laser levels:
- Devices that reflect a point projection on a surface. With their help, points on the wall are marked, after which they are connected using a ruler, thereby obtaining a flat plane
- Products that project a plane in the form of a line. These lines can be horizontal or vertical, depending on the model of the tool. Such devices are popular among builders when carrying out interior finishing work.
- Rotary type tools that have a long range. These are some of the most expensive products that are often used in outdoor construction work.
Some of the main structural elements of laser levels include:
- Light source in the form of a powerful LED
- Lenses, with the help of which not only the shape of the beam is created, but also the range of action
- Power source in the form of batteries or accumulators
- The housing in which all the components of the device are assembled
- Clamp for leveling the tool body
Design of a rotary laser level
The operating principle of a laser level is simple and is as follows:
- The instrument projects a laser beam as a line or point onto one or more planes. Based on these projections, appropriate work is carried out
- The accuracy of the resulting projection depends on the quality of the device alignment. Leveling can be manual or automatic. For manual leveling, a system of bubble flasks is used, and for automatic leveling, pendulum mechanisms are used.
- To obtain a projection, just level the device and then turn it on
Based on factory products, you can make a homemade laser level. In fact, to build such a tool you will need very little effort and investment.
Making a level from a laser pointer yourself, step-by-step instructions
Making a level from a laser pointer is a quick and easy way to get a homemade laser level for construction work. To make such a device you will need the following materials:
- Laser pointer that can be purchased for pennies
- Construction cord
- A wooden block, the length of which is up to 0.5 meters and the size of 25x25 mm
Components for making a laser level with your own hands
When all the components for constructing a homemade product are ready, you can resort to constructing a tool. To do this, follow these steps:
- From both edges of the block you need to drill holes parallel to one to one. One of these holes is needed to secure the laser pointer, and the second is needed to secure the cord.
- After this, you need to fix the laser pointer, and then proceed to secure the rope. This rope will act as a fastening and leveler, with the help of which the device will be suspended from the ceiling or other surfaces
- The hole for attaching the rope should be through, which will allow it to be level when hanging. The result is a self-leveling laser level, designed by yourself
The main rule when creating a homemade laser level is to securely and firmly fix the tool support. To use the tool, you need to hang it by a rope in the center of the room, then turn it in the desired direction, and then mark the points along the radial projection on the wall.
Making a laser level from foam plastic and water step by step instructions
To make a laser level from a laser pointer, foam plastic and a container of water, you will need to prepare the following materials:
- Scotch
- Laser pointer
- Small capacity
- Expanded polystyrene or polystyrene foam
The action plan for building a level with a laser pointer is as follows:
- You need to fill a small container with water to the top. A saucepan or small bucket is suitable for such purposes. Instead of water, you can use oil (waste oil) if you plan to work outside during windy weather.
- You need to attach a laser pointer to a piece of polystyrene foam. To attach the pointer to the foam, use tape or other similar materials. The location of this device on polystyrene foam should be uniform, since the accuracy of the readings depends on this
- A water tank is installed at the required height to obtain markings, after which the pointer is turned on
- The constructed device is placed in the container, after which points on the wall are marked based on the projected rays
Despite the simplicity of this design, the result is accurate projection indicators. This version of the invention is suitable for those cases when you need to cut out a plane for laying tiles. Watch this video, which shows in detail the principle of making laser levels with your own hands.
Laser level from a pointer and a water level step by step instructions
If the need arises to make a more or less high-quality device, and at the same time not invest a lot of money in it, then we will consider another version of the product. If you need to make a laser device for projecting lines with your own hands, then for this you will need:
- Laser pointer
- Water level
- Rails for making a tripod
Ready tripod for laser level
If you have a ready-made tripod from a camera or microphone, this will greatly simplify the manufacturing process. If you don’t have a tripod, you can make one from slats. To do this, a tripod is made, from which a beam 25x25 mm thick extends in the central part. A water level is fixed at the top of the beam, at which the laser pointer is fixed. This completes the manufacturing process.
Purpose and design features
First of all, it should be noted that the operation of the measuring instruments in question provides for the complete elimination of vibrations. A high-quality laser level tripod will provide maximum stability. In this case, there will be no even minimal deviations that could negatively affect the marks.
Tripods for levels are a special support or holder for securely fixing equipment. It is in this position that it is possible to achieve appropriate accuracy of readings. Many experts call the described devices tripods because of their design features and appearance.
In practice, geodetic tripods equipped with special screws are often used to install laser levels. This type of device can be classified as universal. They are used when:
- monitoring the implementation of construction work of varying complexity;
- determining the parameters of objects under construction;
- construction of linear structures (power lines, pipelines);
- identifying and determining the extent of deformation of various structures.
Structurally, the stand for a laser level consists of a base and a tripod head. At the same time, budget models are non-separable. At the same time, professional devices allow you to install different types of measuring instruments. An integral part of the device is the screw with which the device itself is attached to the bracket.
Different models of stands can be equipped with rectangular, triangular and spherical bases.
Universal tripods have a more complex design. We are talking about a tripod, in the center of which there is a telescopic tripod with a worm gear. Thanks to such features, the specialist has the ability to change the position and direction of the central pillar. The retractable part allows you to adjust the height of the entire structure.
As demand for measurement equipment and additional devices grew, manufacturers tried to expand their product lines as much as possible. As a result, the market now offers a whole range of tripods for laser levels and levels.
It includes many varieties.
- The above-mentioned geodetic tripod , which is a specialized device equipped with a thread for installing instruments. The main advantages in this case include a wide working surface, versatility and maximum reliability of equipment fixation. These tripods are effectively used for work both indoors and outdoors.
- An elevation tripod is a device that is characterized by reliability and allows you to operate levels with large weights. Its main feature is the presence of a crank strut. Using the handle of this mechanism, you can adjust the working height with maximum precision.
- Photo tripods , which are extremely lightweight devices. Their advantages include mobility, as well as the ability to quickly change not only the location of the device, but also the angle of inclination. The main disadvantage is the presence of rubber pads on the legs, which complicates use outside the premises. An equally important point will be the inability to operate in strong winds due to its low weight.
In addition to all of the above, there are wall holders (brackets).
Another type of device for fixing levels deserves special attention. We are talking about so-called spacer structures, which are an alternative to classic tripods. The operating principle of this device is to move the equipment up and down the bar. The latter is installed directly between the floor and the ceiling.
These telescopic stands are usually brightly colored with alternating stripes of orange and black. This solution allows you to use the rods both during the day and in the evening. The height of some structures can reach 3 meters or more. The racks are made of aluminum and have minimal weight, which simplifies their transportation and installation.
It is important to consider that spacer rods are used primarily indoors.
How to make a laser level with your own hands
A laser level is a properly designed device that is used in any construction work, helps speed it up and perform general marking of any surface with a high level of accuracy. To use such a device you do not need to have any specific knowledge or professional skills. It is important to understand how to make a laser level with your own hands.
Purpose and classification of devices
The principle of operation of the device is quite simple: you need to place the laser level on the surface of the floor or wall, start it and wait for the device to create vertical or horizontal marking lines, depending on the surface used.
But such a device in construction stores costs a lot, so it’s best to figure out how to create a tripod for a level with your own hands, especially since such a procedure does not require much labor.
In appearance, the alignment looks more like a compact device that can be installed on different surfaces. The most common mounting of the device is carried out using the following settings:
- tripod stand;
- magnetic mounts;
- bracket;
- special fastening belts.
In addition to the principle of fastening, construction devices differ from each other in the features of the projection of the laser beam onto the wall surface and its direction.
Devices that are used to determine direction create a projection on the surface in the form of a point.
The levels that delimit the plane include in their structure a special optics system that turns the beam into the plane itself. Today, experienced builders identify the following types of laser systems:
- Rotary device , which can rotate around its axis, while forming clear outlines. This device has a durable body, well protected from external factors. This product is often used for various construction works: from pouring the floor to creating a ceiling.
- Positioning apparatus , which includes two radiation sources, it helps to project the plane visible to the builder. This device is most often used to furnish a room.
- A self-leveling device is a level that includes a special pendulum that can emit about five rays. Such a device may also have a cross-type sight.
The main disadvantage of such leveling levels is their high price. The cost for a simple device is not always rational for the average user and is as much as ten times more than the cost of a simple bubble or water device.
Making a pointer with a laser
If you count all the costs for a telescopic rod for a laser level, then a person will only have to spend money on purchasing a pointer.
All additional details can be created independently from scrap materials that can be found in any home.
The main task in creating the device will be to mount the special pointer in such a way that it can rotate in any direction. First, it is important to prepare the special parts of the future device:
- self-leveling laser pointer;
- construction cord;
- a simple drill powered by electricity;
- a block of wood with an aspect ratio of 25 by 25 centimeters and a length of 5 meters;
- a special support in the form of a stick for installing the device.
To construct a laser cut pointer with your own hands, you need to follow some simple steps:
- Several parallel holes are drilled in the prepared wooden block on both sides. One of them is needed for attaching the pointer, and the second for guiding the construction cord.
- After the laser device is installed in place, a rope is tied, which is needed to suspend the device above the desired structure. A hole is created at the opposite end of the block so that the cord can easily pass through it.
- A special rope is inserted into the hole made, which is attached to the beam and tightened well.
- In this case, any convenient shelf can serve as a support, including a simple shovel stuck into the ground on the site.
It is important to ensure that the installed support is fixed and securely fastened. If you neglect this rule, then you simply won’t be able to set the desired level.
Determining device quality
Using a laser level, created with your own efforts from a pointer, you can mark any room, but it is best to take into account low-light conditions so that the light beam is well defined.
At the beginning of work, the device must be attached with a rope to the middle of the room in which construction work is being carried out.
The level, made with your own hands, is turned in a certain direction, after which the total distance of the beam length is marked on it, then a stick is attached, on which it is very easy to mark.
After completing such procedures, the spacer plumb can be directed in any direction desired by the user, where the corresponding marks are made (it will self-level).
Moreover, if the position of the main support is fixed, then all marks on the surface will be located at the same level.
After marking the main points, they can be combined with a construction cord, along which the necessary marks can be set with a construction meter.
Creating a laser level
To design a laser level in this case, it is important to prepare in advance a container for liquid, a piece of plasticine, and also a patch, that is, a material that can easily be used to fasten the main part of the device (electronic holder). Of course, for this you will need to use a laser pointer and a piece of polystyrene foam. The device construction procedure itself will be carried out in accordance with a special plan:
- First, take a small container and completely fill it with liquid. Most often, a large saucepan or a simple bucket is used as a reservoir.
- A pointer is attached to the foam. It is best to use a simple nozzle that will project the point. It is important to ensure that the pointer is attached to the foam as best as possible. It is better to fasten it with a special rubber band, plasticine or a clamp.
- The container with liquid is mounted at the required height - it will act as a stand for the laser level.
- The laser ruler with foam plastic is placed inside the container.
- Then the pointer turns on.
- By changing the location of the foam in comparison with the central axis on the marked surfaces, special points are marked. All marks will be on the same level.
Move a mark
Let's figure out how to move the elevation mark using a level. For example, we need to make a benchmark, based on which the excavator operator will dig a pit, two meters deep below the floor level of the building. The value of the floor height is what we need to indicate to the excavator operator.
We install the rail at the reference design point, the height of which corresponds to the design height of the building’s floor, that is, zero, and take a reference. When independently developing a project or when → linking an existing project to the area, the height of this point is set using a peg or a mark is set on some fixed surface (brick fence, tree, pole, etc.). Or such benchmarks (marks) are set by a surveyor accompanying the construction site. Let, for example, it turn out to be 162.
Directly at the site of the future pit, we drive in a peg and, placing the rail close to it, again take the value, let it be equal to 179. The difference will be 17 centimeters. We set aside 17 cm from the bottom of the batten up the peg, mark the value with a marker or pencil. By driving another peg nearby so that its top coincides with the notch, we get a clearly visible landmark, after which the peg with the notch can be removed.
Do-it-yourself rod for a laser level - Metalworker's Guide
To make such a rod you need two tubes. Choose a diameter such that one fits into the other. Choose the length based on the height of the room. The length of one should be half the length of the second. Cut the long one in half.
We insert a smaller tube into a larger tube, and also onto the other end. The telescopic effect has been achieved. We drill holes on the tubes and weld nuts there. We screw the wings into them to secure the tubes (so that they don’t move together).
If you need spacers (legs) like a tripod, you can use ski poles. Well, you can figure out the fasteners for the level yourself.
add to favorites link thank
DIY optical level tripod made of polypropylene pipes
To use an optical level comfortably, it requires a tripod; sometimes you need to mark a horizontal line somewhere on the wall, while the level stands on the floor; you have to come up with stands for it.
Of course, tripods are sold, their cost depends on the height and type of construction, and starts from 1500 rubles (the smallest one), and given the fact that you will use the tripod very rarely (trust me), there is no point in spending money on it, or not at all So, it’s a pity to buy an expensive tripod, so I decided to make it with my own hands from polypropylene pipes, and at the same time try out a welding machine for these pipes.
Of course, if you think that you will use a tripod very often, and even more so you need to carry it with you, then it is better to choose a factory-made one, or there are a lot of such tripods, you can look at this link.
Okay, let's proceed directly to manufacturing, for this we will need:
- PP pipe (D 25 mm, 2.5 m) - 1 piece
- PP pipe (D 20 mm, 2.5 m) - 1 piece
- Tee PP 25 mm – 3 pieces
- Pipe holder 25 mm - 5 pieces
- Hot glue gun
- How to cut pipes, I had a reciprocating saw
- Polt or pin that is screwed into the level (from below)
Almost everything is assembled
We cut the pipes to size, I chose the size of the support legs about 30 cm
Let’s figure out what it will look like, we need to keep the proportions somehow
We warm up the machine for welding polypropylene, bought by the way in Leroy Merlin for 800 rubles, it seems to cook well, the water supply system at the dacha was installed using it, there have been no leaks so far.
When I welded the central tee to the pipes, I bent them slightly down towards the floor (relative to the tee itself), so that the center was slightly raised, this makes it easier to use the tripod on an uneven surface. The arrows show where to bend.
I also bent the legs down so that the side tees would also rise from the floor, as a result the level stands on four points of support (points), and not flat
I welded the central tube into which the 20 mm pipe will fit, because the tripod is telescopic.
I cut the pipe by 25 mm, at a height of 1 meter, inserted a pipe with a diameter of 20 mm into it (in the store I immediately measured it to fit into each other), cut it completely inserted, and left a few cm.
Next, you need to secure the bolt with the thread up, in the tube on which a level or something else will be attached. I did this using a heat gun, a very convenient thing to have around the house. You can buy it at a hardware store or order it from China (cheaper and more choice)
I soldered the bolt into the pipe and it holds well. This is what happened
I attached an optical level to a tripod and extended it to its maximum, resulting in an impressive height. The closet in the background won't let you lie.
I tried it with the level on, it is self-leveling, it calibrated to the horizon without problems, as evidenced by the green color of the power button.
Field tests already at construction site
Based on actual use, I can say the following:
It is better to take stronger pipes, these are quite flimsy, and the level may wobble if pulled out higher, which is why it may not be calibrated at all.
There is no need to install pipe holders at the ends of the legs; due to the fact that the pipes are curved relative to the tees, they stand normally.
The cost was about 200 rubles.
For those who don't have a laser level but want one
I bought my level from Leroy Merlin. It’s not expensive, it cost 2500, it’s a very useful thing, I don’t regret the purchase.
For those who do not have such stores in the city, and the greed of sellers is off the charts, you can order from China, I will leave here a link to the search page on Ali, specifically Laser levels, read the reviews before buying.
Inexpensive levels are household ones, they are not visible in daylight, you can only work indoors even during the day, their range is several meters. In general, see for yourself.
And I almost forgot, these scissors are used for cutting polypropylene and metal-plastic.
I bought it in Leroy Merlin, for 400 rubles, for those who don’t have the opportunity, you can buy it on Ali, I made a selection of inexpensive ones, link to Ali.
That's all I have, thanks for your attention. Ask questions, I will answer as soon as possible.
Content:
The construction of residential and office buildings in the world, especially in large cities, is ongoing. In monolithic construction, when constructing bridges, and repairing roads, it is always necessary to carry out work in accordance with the requirements of state standards. Therefore, not a single construction team works without a special measuring device - a level . With its help, you can determine the height of the foundation, identify points of height difference during road repairs, and design the location of structural elements. But it’s not only in industrial construction that precision is needed.
Device stand
It remains to resolve the issue of stable mounting of the level during operation. You can mount the body on a camera tripod. By rotating the tripod frame, you will project a horizontal plane in the form of points anywhere on the walls of the room.
The second option is to reuse the case from the old hard drive. If you screw the device body strictly centrally onto the HDD shaft axis, you will get a freely rotating structure with a 360-degree coverage sector.
The main thing is to use a flat surface installed in the middle of the room when working.
And if your volume of work is not large and does not require vertical markings, then you can make a level from a pointer in 10 minutes as shown in the video. By the way, such a laser level does not require repairs at all and is always at hand. An undeniable advantage over all modern instruments.
Read also: Thermal conductivity of titanium and aluminum
The tripod is used as a support for optical devices; it ensures the most accurate pointing and maintaining the position of the device during operation. The key parameter of a tripod is its minimum and maximum height.
A rod is a device for determining height differences, used together with a level.
Main advantages of the device
Of course, there is no need to expect that a level created by yourself will perform all complex marking operations. But for use in domestic conditions, such a device is quite suitable and will even in many ways surpass the quality of a water device. This device is also provided with the following functions:
- large length of emitted projection;
- minimal defect rate with comparative ease of use;
- increasing the speed of space marking.
But the main advantage of such a device will be the projection of the beam onto a horizontal plane. It is with the help of this property that the builder can accurately determine the vertical and horizontal markings of both the floor and the walls and ceiling. In addition, such a device can be used for marking a summer cottage, house facades, or when creating a fence.
Formation of the cross
Another type of level that you can create yourself is a laser cress. This device is convenient to use when hanging cabinets in the kitchen or paintings indoors, as well as in many other cases. To create such a construction tool, you need to prepare a tripod from a video camera, a non-working player and several unnecessary disks.
- A cross made of laser pointers is installed on a tripod so that it begins to rotate around its axis. You can also use a drive from the player for this.
- It is also important to take into account that the level can freely move from one vertical to another to the desired height.
- The discs are glued together and attached to the old player.
- At the end of the work, a cross of laser pointers is attached to the disks. To install it, you need to use tape or other convenient means.
Due to the fact that the device will be in a stationary position on the tripod, it can be rotated in any direction without changing the height level. Having set all the necessary marking indicators, you can accurately set the level to any desired height in the room without regularly adjusting the device.