A furniture jig for drilling holes, a drawing of a kind of template that allows you to accurately install assembly elements and greatly simplifies and speeds up the process.
Using this device you can make holes for:
• dowels • footing • tie bolt • mounting holes for the counter plate of a furniture hinge • mounting holes for the cup of a furniture hinge • center for the flange of a furniture hinge • center of an eccentric coupler
The design consists of two parts:
• marking unit • clamp
It is an “L” shaped plate made of thick sheet corrosion-resistant steel GOST 7350-77, in which through holes with a diameter of 8 and 3 (mm) are drilled horizontally and vertically. To ensure that the processing tool fits better into the holes, chamfers measuring 0.25x45˚ are made on its edges. The plate is hardened and ground.
Made from steel circle GOST 2590-88, which allows you to install a furniture jig for drilling holes at the required distance from the edge of the chipboard being processed. The movement step is ten millimeters.
How it works? For a better understanding, let’s open the article: “How to assemble cabinet furniture” and take a look.
Let's say we want to install a furniture hinge:
1.
We lay the template on the facade.
2.
Install the lock into the hole.
3.
Drill a hole with a diameter of three millimeters to the required depth for the fastening screws of the cup.
4.
Drill a hole with a diameter of three millimeters to the required depth for further processing.
The prepared hole will be the guiding center for milling a hole for the flange of a furniture hinge with a diameter of thirty-five millimeters. 5.
Place the template on the body.
6.
Drill a hole with a diameter of three millimeters to the required depth for the mounting screws of the strike plate.
Let's say we want to install an eccentric coupler:
1.
We lay the template on the horizontal surface of the chipboard part.
2.
Install the lock into the hole.
3.
Drill a hole with a diameter of three millimeters to the required depth for further processing.
The prepared hole will be the guiding center for milling a hole for the eccentric of a furniture tie with a diameter of fifteen five millimeters. 4.
From the end of the chipboard, along one center line, drill a through hole with a diameter of eight millimeters to the required depth
In the picture shown
The centers on the furniture jig for various technological operations are shown in different colors.
• no need for calipers, rulers, pencils • reduced labor intensity • ease of use
To better remember the sequence of operations, mill the hole numbers on the furniture jig to a depth of 0.25 (mm).
Source: kak-cdelat.ru
Homemade template for inserting furniture hinges
Many home craftsmen prefer to make furniture with their own hands. A cabinet or stool assembled in a garage is sometimes in no way inferior in quality to a factory-made product. If the master has the tools and skills, of course.
Moreover, homemade furniture is much cheaper. A sheet of laminated chipboard is relatively inexpensive. With proper sawing, you can make a cabinet and several stools, and maybe more, from one blade. The only question is the size.
But to make furniture, in addition to the above-mentioned skills and tools, you also need special equipment. Various types of conductors and templates for marking, which greatly facilitate the work.
For example, in order to install hinges when assembling cabinet fronts, it is necessary to make the most accurate markings for the strike plates and hinge cups. That's what a template is for. It can, of course, be purchased in a store or online. But in small towns or villages, due to the remoteness, purchasing such devices is very difficult.
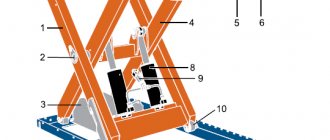
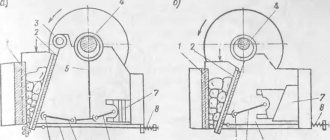
This article just talks about how to make a template for installing furniture hinges. Only available materials are used, in general, what came to hand. Some semblance of the drawing is shown schematically in the first figure (Figure 1).
Figure 1 - Schematic drawing of the template
Nowadays in furniture production, four-hinge cup hinges are mainly used. They are installed in a blind hole with a diameter of 35 mm. To drill such holes, use a Forstner drill.
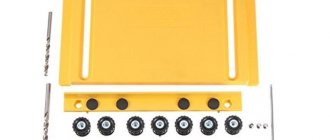
So, you will need the loops themselves. As well as strike plates and screws included in the kit (Figure 2).
Figure 2 - Hinges, strikers and screws
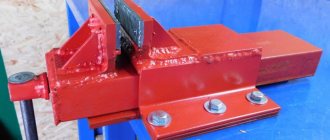
The standard factory template is made in the shape of a corner. After a short search, the upper part from the old rim lock, also having an angular shape, was adopted. It fit almost perfectly (Figure 3).
Figure 3 - Lock
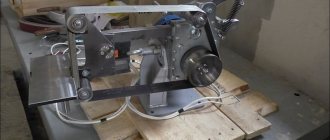
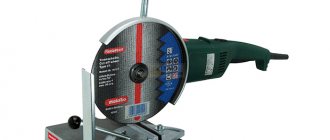
Tools (Figure 4):
- Drill.
- Clamp.
- Roulette.
- Calipers.
- Forstner drill with a diameter of 35 mm.
- Drills with a diameter of 2.5 mm and 5 mm.
- Roulette.
- Hammer.
- A metal pencil with a sharpened carbide tip (punch punch).
- Three small pieces of chipboard.
- A screwdriver, but you can also use a screwdriver.
Figure 4 - Tools
We place the part on a piece of chipboard and begin marking (Figure 5). First, use a caliper to draw a center line. Then we retreat from the inner part of the corner 22 mm along this line and make a notch with a center punch. This will be the hole for the hinge cup.
Figure 5 - Template layout
We also measure 37 mm from the inside of the corner and draw a segment perpendicular to the center line. We retreat from the center 16 mm to the left and to the right along the segment and make notches. Here holes will be drilled for strikers for overhead or external hinges.
The next step will be marking the holes for internal or inset hinges. This is when the facade (door) does not cover the cabinet wall, but goes inside it. This operation is similar to the previous one, with the difference that you need to retreat 67 mm from the corner (Figure 6).
Figure 6 - Template marking, continued
We check the markings very carefully and drill holes along all notches with a drill with a diameter of 2.5 mm.
Now you will need to install the loops using the manufactured conductor. To do this you will need two more pieces of chipboard. We place the pieces next to each other and set them aside approximately 80 mm from the edge (Figure 7).
Figure 7 — Marking of blanks
We draw two parallel lines along the chipboard scraps (Figure 8).
Figure 8 - Marking of workpieces. Continuation
Having attached the template, we mark the drilling point for the hinge cup, first the right one and then the left one. You can immediately make shallow holes with a drill with a diameter of 2.5 mm (Figure 9).
Figure 9 — Marking for the hinge cup
Similarly, we mark the places for the strikers (Figure 10).
Figure 10 — Marking for strikers
Use a Forstner drill to make a hole in the chipboard. Carefully, slowly, trying to keep the drill strictly vertical. Each time we check the depth with the loop cup (Figure 11).
Figure 11 — Drilling the hinge cup
Using a drill with a diameter of 5 mm, we make holes for the screws that secure the strikers. Here, too, it is necessary to monitor the drilling depth (Figure 12). If the holes are not deep enough, the powerful screws will not go in completely and will be squeezed out of the chipboard. Otherwise, you can pierce the workpiece right through. Therefore, it is better to use a limiter.
Figure 12 - Drilling holes for strike plates
Insert the loops into the holes. Using an awl or center punch, we mark the places for attaching the cup to the workpiece, trying to get exactly into the center of the hole. Then we use a small drill to dig deeper into the chipboard. We secure the hinges with self-tapping screws with a diameter of 3.5 mm (Figure 13).
Figure 13 - Holes for screws and blank for Forstner drill
We assemble the structure and check it for opening and closing (Figures 14 and 15).
Figure 14 - Hinges ready for assembly
Figure 15 - Assembled loops
Source: hobbywood.ru
Template outline
This article just talks about how to make a template for installing furniture hinges. Only available materials are used, in general, what came to hand. Some semblance of the drawing is shown schematically in the first figure (Figure 1).
Figure 1 - Schematic drawing of the template
Nowadays in furniture production, four-hinge cup hinges are mainly used. They are installed in a blind hole with a diameter of 35 mm. To drill such holes, use a Forstner drill.
Design features and types
A jig, in essence, is a template for drilling holes, allowing you to make them as accurately as possible. It is used both to create holes, the axis of which is perpendicular to the surface of the part, and for drilling at an angle.
Due to their versatility and simplicity, drilling jigs are widely used in various fields. In particular, in the mechanical engineering industry they have long been used to successfully drill holes in workpieces of various configurations and made of different materials. You cannot work without a conductor in furniture production, where such a device is actively used when assembling furniture, installing accessories on it and performing a number of other technological operations. Construction is another area where conductors are widely used. They are used, in particular, to drill holes in building structures. Conductors are also needed for drilling pipes and solving other tasks.
Even a simple device in the form of a strip with a stop greatly facilitates and speeds up the process of making holes of the same type
As furniture jigs, overhead models made of lightweight materials are most often used to make them more convenient to manipulate. You can purchase such devices prefabricated or make a furniture jig with your own hands. Qualified furniture makers may not use a jig to accurately and accurately drill holes in furniture structural elements, but to do this they must have extensive experience in their field.
The most significant advantage of the jig is that with its help, even a person who is not highly qualified can perform high-quality and accurate drilling of both a hole perpendicular to the surface of the part and an inclined hole. The use of jigs eliminates the need for complex preliminary calculations and marking the locations of future holes, which reduces the labor intensity of assembling a furniture structure and allows such work to be completed in a shorter period of time. Even a novice specialist can understand the use of a jig for drilling for dowels and solving other technological problems.
An overhead jig with a turret head is suitable for drilling standard holes for dowels of any size
Before purchasing or making your own homemade jig, determine what tasks you need to use it for, and based on this data, select its type and design.
Among the jigs for drilling holes, a number of categories can be distinguished by type of design and functionality.
These jigs are so called because they are placed on the workpiece and secured to it or simply fixed by hand. Using jigs of this type, in particular, they drill holes in chipboard, MDF boards and other flat parts.
Such templates can be used to make holes on cylindrical parts. Conductors of this type are equipped with vertical and horizontal axes of rotation, which makes it possible to make holes at different angles with their help.
These are devices that are especially relevant for small batch production, where the ability to quickly change over the equipment used is important. This type of conductor is endowed with just such functions.
This universal jig is designed for drilling holes for minifix, confirmat, rafix and door hinge
These devices for drilling holes are required in cases where such a technological operation has to be performed in several planes.
Sliding and pinning
The sliding jig, in full accordance with its name, does not require fastening: it is simply applied to the area of the surface of the part where the hole needs to be drilled. Fixed jig devices, although more convenient, somewhat limit the freedom of action of the specialist, which is especially critical when performing drilling work on machines equipped with only one spindle.
Types: choose the one you need
Invoices. They do not require fixation before being used for their intended purpose. Structurally simple, mobile, but they need to be held with a hand free from the drill, since often the equipment is not secured in a special device, which is not very convenient. Considering the simplicity of the design, making it yourself is quite simple. Used when drilling chipboard and MDF.
Jigs for drilling holes at an angle. The design is easy to imagine, since the name speaks for itself. Such equipment can also be an overhead one. In the production of high-quality furniture, there is also drilling at an angle, which is not the simplest operation in the production process - this requires skill. Although in this case, sometimes the required angle is violated, as a result the assembly will not be of such high quality and the appearance of the furniture will suffer, especially if it is not made of chipboard, but of wood - here you can’t fill in an ugly drill. Equipment of the required design completely eliminates unnecessary problems.
Rotary conductors. They have folding brackets, and this allows drilling on two adjacent planes.
Sliding gearboxes. With their help, you can drill several holes without reinstallation. To work with such equipment, the necessary skills are still required.
Areas of use
Furniture jigs and templates are devices that are practically indispensable when assembling furniture structures. The use of jigs allows you to avoid the main problem that arises when drilling holes - the drill entering the workpiece at the wrong angle. Correcting this error takes a lot of time and effort, and it is not always possible to fix it at all. The jig used for drilling holes not only allows the drill to be correctly oriented at the processing site, but also prevents the tool from straying from the specified trajectory.
Devices such as furniture jigs and templates are used both in the production and assembly of furniture, when holes must be made in the elements being connected to accommodate fasteners. In such cases, a jig for dowels or a jig for drilling for confirmation is often used, without which it is not possible to make high-quality holes for fasteners. Such a device is indispensable in cases where it is necessary to make holes, including at an angle, in thin slabs (in particular, when making holes in chipboard or MDF).
A jig for oblique holes is indispensable when making hidden connections between panels and boards
When using a jig to drill holes, the process of assembling furniture is simple and fast. Using such a device, holes can be drilled at any distance from the edge of the part, regardless of its width.
Modern furniture actively uses dowels, which at the same time are a rather outdated fastening element. That is why the doweling jig is used in the production of furniture structures. The main difficulty when using such fasteners is that the axes of the holes made in the parts being connected have a right angle to each other. Accordingly, such holes should be located strictly perpendicular to each other. Without the use of such a device as a dowel jig, it is difficult to perform them.
A jig for making holes in tubes will be a very useful device for a home workshop
Furniture production is not the only area in which jigs designed for drilling holes are used. Templates are no less often used to drill a hole in a pipe and other cylindrical parts. Conductors allow you to make high-quality holes even in small-diameter pipes.
The size and operating principle of modern conductors may vary. Some of the models of such devices are much easier to buy, and some are easy to make with your own hands. The fact that serial devices, especially those for universal use, are not cheap, also speaks in favor of making a furniture jig for drilling holes with your own hands.
Jig for drilling holes
A drilling jig, as a rule, is a bar (plate) with holes and bushings (sleeves). Using a jig it is much easier, for example, to drill pipes.
As for furniture production, they are also used here, although relatively recently.
With the help of such equipment, the manufacturer is relieved of the following problems:
- Marking.
- Punching (point depressions in the material for a drill).
- Drilling while maintaining perpendicularity.
The latter is especially difficult to achieve, since it requires serious skills acquired only over the years.
Some operations, for example, drilling for dowels (short wooden rods designed for hidden joining of parts), require very precise markings, and no less accurate drilling at an angle of 90°.
With such a device as a conductor, these tasks are solved easily and simply.
Homemade conductor devices
Jigs of the simplest design, for example, those used for drilling holes for confirmation, are relatively inexpensive, so many craftsmen do not bother making them themselves and purchase serial models. Meanwhile, there are those who try to make even such simple devices with their own hands. The question of how to make a jig for drilling with your own hands often arises and, if necessary, drill non-standard holes.
To make your own jig for dowels or a jig for confirmations that is simpler in design, you can use drawings and videos on the Internet.
When manufacturing a jig, you will need perfectly accurate drilling of guide holes and hardening of the finished device
To manufacture such a device, naturally, you will need a drawing of it. You also need a minimum set of tools and equipment:
- electric or hand drill;
- a set of locksmith tools;
- Bulgarian;
- welding machine (for the manufacture of jig devices of a more complex design).
Operating principle of the device
We install the jig, having previously positioned the moving part so that the holes in the bearings are in the center of the edge part of the furniture board, chipboard or plywood.
After this, using an electric drill or screwdriver, we drill holes for installing dowels.
First - in one blank, then - in another (reciprocal).
We “set” the dowels on the glue and connect the blanks together. Thanks to the use of a homemade conductor, the result is ideal.
The nuances of making a high-quality furniture conductor, we do it ourselves
A furniture jig is a simple mechanical device that serves to speed up and simplify the actions when drilling holes. The use of this device allows you to create technological holes without pre-applied markings and do this with perfect accuracy, as well as a adjusted slope. The device is indispensable during the assembly of furniture structures and carpentry work. For use in everyday life and in small-scale production, it is very easy to make a furniture jig with your own hands.
A furniture jig is a good assistant during assembly.
Today we will talk about templates for making furniture, which make the life of furniture makers a lot easier.
They are designed for precise marking for drilling holes when assembling cabinet furniture. Being an indispensable device in continuous production, they allow drilling operations to be carried out most efficiently and quickly when processing standard parts.
These devices are presented on the furniture market in a wide range, are produced by well-known brands, and can be either universal or intended for individual operations.
At the same time, many home craftsmen and small carpentry workers most often make their own models of jigs necessary for specific operations with parts of their own range of products.
What is it and its purpose
In essence, a furniture jig is an ordinary template with holes of the required diameter. The working part of the device is a rectangular block of solid material with holes located according to the required markings. For convenience, it can be equipped with adjusting and locking mechanisms. Based on the simplicity of the design, you can quickly make stencils for furniture with your own hands using available materials.
The jig ensures the desired direction of the drill at an angle of 90 degrees to the surface, eliminating the possibility of deviation. This is especially important when working with narrow parts of furniture, such as the ends of walls or doors. Without this device, it is quite difficult to maintain the required angle, which can lead to defects, because even a slight deviation in the direction of the mounting hole can make it impossible to assemble individual elements into a single structure.
For the perfect fit of furniture elements to each other, the accuracy of the location of the holes for fasteners is also of great importance. Those who make furniture with their own hands are often faced with the need to create a number of identical holes at a certain distance from each other. To make the work easier, make it faster, it’s easier not to mark up every time, but to use a template.
Using the jig you can work with different furniture materials: wood, chipboard, MDF.
Tools for marking, assembly and processing
First of all, those who want to assemble furniture with their own hands will need a basic set of tools.
The arsenal for measurements and markings includes:
- ruler – you need a metal and thin one, up to a meter long;
- a simple pencil (it is better to take a hard-soft one, it is marked with the letters HB);
- carpenter's square (helps to build perpendicular lines);
- eraser;
- tape measure (a five-meter tape measure will do);
- levels of different sizes;
- awl;
- stapler;
- hammer;
- clamps (for fixing parts at the desired angle).
Do not forget about fasteners and tools for tightening them - screwdrivers, hexagons.
Be sure to choose an iron ruler.
Selecting a model for production
Conductors of industrial production can be highly specialized and universal. Templates of the first type are used to perform certain operations on typical parts. Universal devices are suitable for working with different materials and objects of various configurations.
Based on design features and functionality, conductors are divided into the following types:
- overhead - when used, they are applied to the surface in the desired area, fixed with clamps or held by hand. Used for drilling holes in flat parts;
- rotary - the working part moves in both vertical and horizontal planes. Used when working with elements of complex geometric shapes and to create holes, the axis of which must be located at an angle;
- tipping - used to create holes in perpendicular planes.
A marking jig is used to mark the locations for drilling holes. It is much thinner and lighter.
The conductor device can be specially created for a certain type of fastener: dowels, confirmations, screws, corners. There are devices to simplify the process of installing fittings.
According to the type of fixation, furniture jigs can be sliding or fixed. The former can be moved freely over the surface if necessary, while the latter are rigidly fixed in the right place. The presence of an adjustment mechanism will help to combine the device with different types of workpieces.
For large furniture manufacturers, the availability of a variety of additional accessories plays a decisive role, since they significantly reduce time costs. In this case, the cost of the tools does not matter much. A completely different approach to purchasing the necessary equipment from those who have a small furniture production facility or from independent craftsmen who produce certain types of furniture. In this case, making furniture templates with your own hands turns out to be much cheaper and more practical. The choice of the necessary options and the complexity of the device are determined not only by production needs, but also by the skill and experience of furniture manufacturers.
What is it used for?
When manufacturing and assembling elements of furniture structures, specialists have to carry out many similar actions related to both marking locations and drilling future holes. The furniture jig allows you to optimize both of these processes.
According to their functional purpose, furniture jigs can be marking and drilling. The first, as their name implies, are intended to simplify the marking of the locations of future holes. Drilling jigs used in the production of furniture structures exclude the use of marking devices.
Drilling jig for confirmations
Many people purchase a furniture template, designed for preliminary marking of the locations of future holes, in a factory-made version. However, you can make a jig for assembling furniture with your own hands. The easiest way is to make a furniture jig from a metal ruler, to which the crossbar is screwed strictly perpendicularly. This furniture template is a multi-purpose marking device that is easy to make and use. The holes through which the drilling sites will be marked are made in a metal ruler at a certain distance. So, if holes are drilled for a minifix, then the distance between them will correspond to 32 mm, and for shelf holders - 100, 200 or 300 mm.
You can make a simple furniture marking template using a regular carpenter's square as a base, in which holes are also drilled at the required distance. Such a marking device, although more functional, is less stable on the surface of the workpiece. This is its most significant drawback.
The simplest furniture template for handles is a plate with calibrated holes, on the reverse side of which a stop strip is fixed
Using a similar principle, using available materials, you can make highly specialized marking devices (for example, a jig for furniture hinges or for marking holes intended for fixing furniture handles or any other furniture fittings).
Of course, if you have your own serious furniture production and the volume of assembly operations performed is quite large, you should pay attention to professional equipment for furniture assembly. However, the cost of such furniture jigs and templates, especially if they are produced under well-known brands, is quite high.
Materials and tools
To manufacture a device, you must first decide on the tasks that it will perform. Accordingly, the necessary material is selected from which the furniture template will be made with your own hands. The most durable, reliable and “long-lasting” is considered to be a metal conductor. To create a furniture jig for drilling with your own hands, it is permissible to use wood, plywood, textolite, and plexiglass. This is due to lower labor costs and cheaper materials. All this is important, especially if you are going to make several different templates yourself.
To make a conductor, a piece of reinforcement, a block or a plate is suitable - something that can probably be found in any garage or home workshop. To make a simple marking device, you can take a regular school ruler - wooden, plastic or metal.
Of decisive importance in the manufacture of the jig is the accurate calculation of the location of the holes on the workpiece. You can take a ready-made diagram or make it yourself. The latter option is preferable, since the dimensions in the drawings must correspond to the tasks being solved.
Tools you will need:
- drill;
- grinder or jigsaw;
- a set of locksmith tools;
- clamps;
- vice.
Advantages
A furniture hole jig not only improves the quality of assembly, but also minimizes the possibility of an error that could lead to a complete replacement of an expensive damaged part. Working with the template can be entrusted to low-skilled personnel, since this operation is simpler than manual reconciliation. Workers do not need to measure angles, mark and check measurements. The drilling angle is controlled by a jig, which eliminates the possibility of deviations. This significantly improves drilling accuracy, which is especially critical for deep holes.
In order for work with a conductor to be effective, the tool must meet the following requirements:
- be washable and intuitive to use;
- it should speed up the assembly process;
- allow you to make several holes at once without additional manual basting;
- improve the quality of work with a drill.
The material from which the conductor is made is of no small importance. For templates, plastic or plexiglass is most often used; drilling devices are made of steel. When choosing a conductor, pay attention to the following characteristics:
- passport value of deformations under increased loads;
- aligned axis of the hole for the drill;
- no overheating during operation.
Factory conductors have all the above advantages; they are manufactured on the basis of long-term scientific research and have undergone strict quality control.
Manufacturing stages
Let's consider the process of creating a metal conductor device for confirmations. This fastener is most often used when assembling furniture:
- A piece of the required length is cut from a square metal block (10x10 mm) using a grinder. The ends of the resulting segment are leveled and cleared of burrs using a file. Corners and edges can be rounded for ease and safety of use;
- The hole locations are marked on the workpiece. Their centers should be located at a distance of 8 mm from the side edge (the thickness of the chipboard sheet is 16 mm). There should be 32 mm from the end and between the holes, in accordance with the generally accepted system of furniture fastenings. For marking, you can use a carpenter's angle or caliper. It is better to make marks on the part using a sharp metal object - an awl or a large needle. You can use a core and a hammer to make holes for the initial installation of the drill. When drilling holes, it is important to prevent the drill from moving and make them strictly perpendicular to the surface of the workpiece;
- use a drill with a diameter of 5 mm to make holes;
- to create a stop, you need to cut a piece of the required length from a metal plate (1x25 mm);
- sand the edges with sandpaper;
- bend the workpiece at a right angle, holding it in a vice. Fold the parts, aligning them coaxially;
- fasten the parts in this position using a clamp;
- From the side of the plate along the length of the device and at the end, drill holes corresponding to the size of the screw. Cut threads and fasten parts;
- Cut off the excess thrust plate and process the edges.
Devices for making upholstered furniture
When assembling furniture, keep in mind that the main toolkit is designed for the manufacture of cabinet interior elements - cabinets, chairs, shelves, etc. If you want to start making upholstered furniture, you will have to supplement the arsenal.
To assemble high-quality furniture, you need to use special tools.
Required tools:
- A knife with a thin blade and a sharp tip.
- Construction type stapler.
- Separate stapler with 8mm staples for upholstery, drapery, decorating.
- Threads.
- Adhesive for furniture and fabrics. Pay attention to the composition - it should not contain dangerous toxic components.
- PVA.
Also, assembling furniture will require finishing materials, chemical compounds for polishing, and varnishing.
Conductor for assembling furniture with your own hands: buy or make it yourself
Hello dear friends, lovers of assembling and making furniture with your own hands! Today we have a quite interesting and useful topic for many. After all, we will be talking about a conductor for assembling furniture.
Such a device can be bought without any problems on Aliexpress, purchased at Leroy Merlin or any specialized store. But reading reviews and talking on furniture forums, I noticed that many, instead of buying a jig, make it with their own hands.
There are various drawings available online; you can easily find a universal template and use it to create your own device with your own hands. We will definitely talk about this today. But first, I propose to delve into the essence of the device, understand the varieties and answer a few basic questions.
Manufacturers of furniture conductors
The following brands of conductors are widely used in the domestic market and have proven themselves well.
Assistant
The furniture jig system of this company is designed for the production of cabinet furniture based on a 32 mm assembly system, suitable for all European fittings. The customer selects the complete set of the system individually for himself, which allows him to save money by choosing only the essentials. The Assistant jig contains modules for marking and drilling holes for guides (roller and ball), tandems, hinges, lifting mechanisms, confirmat, eccentrics, dowels, handles and other holes using the 32 mm system.
Dubel-Profi from KWB
German jig for drilling holes for dowels. The mechanism of the device allows for perfectly accurate positioning of holes with a diameter of 3 to 12 mm. The jig is equipped with a depth gauge and a special stop, which helps to drill at right and oblique angles. Thanks to the rubber pad, the device is convenient to use on smooth and polished surfaces.
Condor
The Condor furniture template is a portable device that is convenient to take with you directly to furniture installation. Thanks to replaceable bushings, the distance between the holes can be adjusted. The tool allows you to make holes for a dowel or confirmat. Milling grooves are installed at distances of 16 or 18 mm, which allows you to work with various materials.
A furniture jig is an indispensable assistant in any furniture production. This inexpensive device will help not only reduce labor costs, but also significantly improve the quality of your products.
Washing machine in the kitchen: installation options, reviews, pros and cons
Furniture jigs are fairly simple mechanical devices. They are needed in order to simplify and speed up the process of drilling various holes. Using such an object, you can make a hole according to the markings and with optimal accuracy and the required angle of inclination. It is actively used in the process of assembling furniture and when performing various carpentry tasks. The conductor is perfect for household use, since you can always do it yourself or purchase a small tool for personal use.
In essence, we are talking about a template for holes with different diameters. The main part of the tool is presented in the form of a rectangular block made of durable material. There are holes on the block.
To simplify work with the conductor, many models are equipped with additional adjustment and fixation mechanisms. If desired or necessary, you can make the tool yourself. And sometimes the result turns out to be no worse than Cheron.
With the help of a jig, the drill moves in a given direction and creates a hole of the required size. In this case, the material is drilled strictly at a right angle of 90 degrees. Some models allow you to adjust the angle or they initially have a certain inclination. It is extremely important to eliminate deviations when processing thin materials, the end parts of doors and walls. It is difficult to maintain the correct angle manually. Often there is a lot of waste, and you have to waste extra material.
The jig is designed for drilling all materials used in furniture production, including wood. Chipboard and MDF.
If you need to make many identical holes on different parts, or make them perfectly straight along one line, the jig will become simply an indispensable device.
Device for drilling holes for dowels and confirmats
Despite the fact that today a lot of new accessories have appeared in the furniture industry, the good old dowel is still used. This is explained by the fact that the connections are not visible through this piece of fittings, and this is especially valuable in the production of furniture made from natural wood.
As already mentioned, drilling for dowels creates many problems for furniture makers, especially those who are not sufficiently qualified.
In order for the furniture planes to be perfectly aligned, precise markings are necessary, and this equipment allows you to speed up the work and bring the quality to the desired level.
Working with confirmats - special furniture screws - although less troublesome, also requires certain skills. And considering how many holes need to be marked and drilled before screwing the confirmation into one piece of furniture, such a device will significantly speed up the work, and its quality too.
The simplest devices
- The conductor is two-slider. It allows you to drill holes in two adjacent (mating) parts. The device is constructed of two rulers, which serve as guides and are connected to a mounting strip. The holes made in it make it possible to install the strip on parts of different widths. Housings moved along rulers (replaceable) have a set of guide bushings, where the distances between them are different. The conductor is fixed by means of a connecting strip, and on the opposite side there is a travel limiter, pressed by a thumbscrew.
- The conductor is multi-position. Fastened with clamps. The design allows for vertical drilling. It is made of thick-walled aluminum angle. Since the device is quite long, it is equipped with an intermediate fastening in the center of the structure. The thick wall of the angle was used very successfully, which cannot be overestimated at the moment of placing the device on the surface of the part and when reinstalling the jig to 90°. The selection of the distance between the bushings is carried out according to the most common values provided for installing dowels or confirmations.
Procedure for working with a conductor:
- The device is fixed on the workpiece.
- The sleeve is inserted into the hole.
- Drill through the sleeve.
Blum furniture fittings: price, reviews, where to buy, how to set up
If you look at the assortment, then all factory or factory conductors can be divided into 2 categories. These are universal and highly specialized devices. The first type of template is suitable for performing various tasks, working with standard furniture elements. They can be used when drilling different materials and performing all kinds of operations. It is the universal models that have become widespread in everyday life and among those who assemble tables with their own hands and make original designs.
In particular, I recently had to deal with the creation of a manicure table. I also have plans to try to assemble a table with a hiding place myself. Everything is still at the design stage, but there are interesting ideas. In many ways, I reflected my observations in the material at the link.
Conductors can be classified depending on their design features and functionality.
There are actually 3 main varieties here. These are the ones home craftsmen should pay attention to.
- Invoices. When working with a conductor, you need to attach it to the material at the desired point, fix it with a clamp, if there is one, or hold it with your hand. Suitable for drilling flat parts;
- Rotary. Here the working part can move in a vertical and horizontal plane. An indispensable jig if you need to drill elements with a complex geometric shape, as well as for holes at an angle;
- Tiltable. This is an option for situations where you have to drill in a perpendicular plane.
There is a category of conductors that are designed for specific tasks and work with certain fastenings. This includes tools for dowels, for confirmations, corners, screws, etc. There are also solutions that are used for installing fittings for cabinet furniture and more.
Templates for furniture handles
We offer a range of templates to improve the process of installing furniture handles. The presented equipment greatly simplifies and speeds up the marking of handles and buttons, and also ensures high accuracy and quality of making holes for mounting fittings.
Using our templates, you will appreciate how easy and neat it is to install furniture fittings.
The assortment includes specialized equipment for installing furniture handles of various sizes. Templates allow you to mark and drill holes for buttons, handles of sizes 64, 96, 128, 160, 192, 224 mm, as well as shelves.
All items are equipped with a convenient measurement scale, allowing you to easily navigate the sizes. Some models are equipped with a ruler. Each template is easy to customize, suitable for both professionals and beginners.
We make furniture templates from stainless steel and polymer materials. Stainless steel is the most reliable material. However, plastic equipment is also strong and durable, designed for a long period of intensive use.
Do it yourself
Now let's talk about how you can make a homemade conductor. Let’s focus on a simple model, since it’s not worth doing something complicated with your own hands. It is better to immediately buy a quality tool from a trusted manufacturer.
Conductors are made from pieces of reinforcement, plastic and metal bars. You can take wood, but it is less durable.
Of the tools you will need to prepare a set consisting of: