DIY jaws for bench vices
It’s not difficult to make reliable and easy-to-use vices with your own hands.
The need for this may be caused not only by the desire to save on the purchase of a serial model, but also by the need to use a clamping device that will allow it to more effectively solve the tasks assigned to it.
Simple homemade vice from corners
Serial models of vices, although they are universal, are not always able to provide high precision in fixing parts; they are quite bulky and have a significant weight.
Homemade vices, used primarily in a home workshop, can be made more suitable for performing certain technological operations, and therefore more efficient and convenient.
Homemade bench vices may differ little from factory ones in both appearance and reliability.
Any person who spends a lot of time in his home workshop will confirm that it is quite difficult to do without such a device as a vice.
Without a clamping device, it is difficult to perform various operations with parts made of metal, wood and plastic.
The use of a vice guarantees not only high accuracy and efficiency of drilling, milling, etc. operations, but also the safety of the machine operator.
If there is no desire or opportunity to purchase a serial model of such a device, then it is quite possible to make a vice with your own hands, spending very little time and effort on it.
Homemade bench vise: option No. 1
You can make excellent strong bench vices yourself from profile pipes.
Below are detailed instructions in photo selection format, supplemented by a detailed video. Unfortunately.
The video is in English, but this is unlikely to prevent a competent master from understanding the essence of the process.
Homemade vice from profile pipes
Vise parts from the profile Running nuts Fastening the running nuts to the base of the vice Screwing in the lead screw Maximum opening of the vice The vice is assembled, it remains to be painted
Painting the moving part Painting the fixed part The vice is ready for work
Instructions for making a vice: option No. 2
Homemade vices do not require complex design developments and calculations.
You can use numerous photos and drawings of such devices, which are easy to find on the Internet.
A fairly simple, but at the same time very effective design is created on the basis of metal pipes.
As is known, pipes used for the installation of water and gas pipelines are manufactured in such a way that a product of a certain diameter fits tightly into a pipe of a subsequent standard size.
It is this feature of the pipes that allows them to be used for such a device as a homemade bench vise.
A visual drawing, photo and description of the manufacturing process will help you make this vise yourself.
Drawing of a homemade vice. Below are two photos of the finished product.
The structural elements that will make up a homemade vice are:
- a piece of metal pipe that will act as the internal moving part of the device;
- a piece of metal pipe of the following standard size, which will serve as an external fixed part;
- running nut with thread diameter M16;
- lead screw with thread diameter M16;
- a knob through which rotation will be imparted to the lead screw;
- front and rear supports, due to which the stationary pipe will be fixed to the base;
- pieces of rectangular pipe (future clamping jaws of a vice);
- two lock nuts with thread diameters M16 and M18.
Two main parts of the vice (movable and fixed)
To make such a vice with your own hands, you begin by welding a flange to the end of a section of a larger diameter pipe, which will act as a stationary element.
A nut with an M16 thread must be welded into the central hole of the flange.
A flange with a central hole into which the lead screw will be passed is also welded to the end of a section of a movable pipe of a smaller diameter.
At some distance from the edge of the lead screw, an M18 nut is welded to it (it will become a fixing element).
After this, the end of the lead screw, to which the nut is welded, must be passed through the inside of the movable pipe and inserted into the hole in the flange.
In this case, the nut should press against the flange from its inside.
Vise assembly (in the photo there is a hammer clamped in it)
A washer is put on the end of the lead screw protruding from the outside of the flange and an M16 nut is screwed on, which is then welded to the screw.
A washer must also be installed between the inner nut and the flange surface, which is necessary to reduce the friction force.
To correctly perform this stage of making a homemade vice, it is better to focus on the corresponding video.
After the movable vice assembly is assembled, you should insert it into a fixed pipe of a larger diameter and screw the second end of the lead screw into the nut of the second flange.
To connect the lead screw with the knob, a nut or washer can be welded to its end protruding from the side of the movable pipe, into the holes of which the knob will be inserted.
To give the structure stability, two supports are welded to the bottom of the fixed pipe, for which corners or rectangular pipes can be used.
The inner tube can also rotate during the rotation of the lead screw, which makes the use of such a vice very inconvenient.
To prevent this from happening, a longitudinal slot can be made in the upper part of the stationary pipe, and a locking screw can be screwed into the movable pipe, which will move along this slot and prevent rotation of the movable part.
Many photos of homemade vices of a similar design show devices whose moving and fixed parts are made of square or rectangular pipes. The use of such pipes also avoids rotation of the moving part of the vice.
The vise of the described design, authored by V. Legostaev, is a reliable and effective clamping device, easy to maintain and repair, which makes it very popular among home craftsmen.
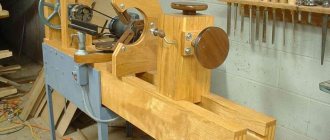
If you do not plan to heavily load the vice, then it is quite possible to make it from wood according to a simple scheme
How to make your own carpenter's vice
Almost any home craftsman has to deal with the processing of wooden products.
The need for such processing may be associated both with the manufacture of various wooden structures, and with the repair of existing ones.
Carrying out this work using improvised devices with metal clamping elements is not only inconvenient, but also fraught with damage to the surface of the wooden part, the appearance of dents and cracks on it. This is why it is best to use a carpenter's vice for wooden products. Making them yourself is also easy.
Homemade vice with wooden guides
As in the case of a bench vice, finding drawings, photos and even videos of the manufacture of such devices on the Internet is not difficult.
The simplest design of a homemade carpentry vice consists of the following elements:
- bodies made of solid wood, which also serves as a fixed clamping jaw;
- a movable sponge made of a wooden block;
- cylindrical metal guides along which the movable jaw will move;
- a lead screw that ensures movement of the movable jaw;
- a crank through which rotation is imparted to the lead screw.
The device of a carpenter's vice
The body of such a vice, on which the metal guides are fixed, is attached to the surface of the workbench using long screws or bolts.
It is necessary to make three holes in both the body and the movable jaw of the clamping device - for the guides and the lead screw.
How to make a carpenter's vice yourself
A bench vice is used to work with metal parts and workpieces.
If there is a need for processing wooden workpieces, then a bench vice is least suitable for such purposes, as they have some disadvantages. The parts being fixed may become deformed, so it is recommended to use a bench vice when working with woodworking materials. There is no need to buy them specifically for working with wood. For such cases, you can make a carpenter's vice with your own hands. Let's look at the manufacturing instructions in detail. Carpenter's vices are made of wood, which is an advantage in their manufacture. When working with wood, the need to use a welding machine is eliminated. A drill is used to drill holes, and to cut off parts of the future tool, a hand saw, jigsaw or grinder with a wood disc is used.
First of all, let's prepare the screw. To do this, cut off the required length of the stud. A nut is screwed onto the stud on one side. Using a plumbing tee, you should put it with the central hole on the stud.
Moreover, it is important to ensure that the pin does not protrude beyond the edges of the two parallel holes of the tee. Drill a hole in the center of the tee to install a key bolt at “10”
It is necessary to drill the tee together with the stud. Install a key bolt at “10” into the resulting hole. In this way, a handle for the future tool is made. Next, we move on to the manufacture of vice jaws. To do this, from a board at least 6 cm thick, you should cut the required length - 20-30 cm. Two boards should be the same size in length. It is these boards that will act as fixing jaws. In the center of both boards, you need to drill central holes through which the pin will pass. We drill additional holes on the sides of both boards, which are needed for guides. In one board, a groove needs to be made in the central hole to accommodate the nut. Now the nut is screwed in and a washer is placed on the stud on the side where there is a through hole. We install the stud in the central hole of the board with the groove. On the other side of the stud, a washer is installed and a tee is installed, secured with a bolt. The nut on the back side of the board should be tightened, drowning it in the groove. To prevent future rotation of this nut, it must be connected to the stud. You can use welding to do this, but an alternative method is to use a drill. Using a drill, a hole is drilled in the nut mounted on a stud, through which rigid fixation of the two parts is ensured. Using a bolt of the appropriate diameter, it is necessary to drive it into the hole made in the previous paragraph. Assemble the structure, resulting in a movable vise jaw. We use two metal rods that are necessary install in the side holes of the board. A second board is attached to the table or workbench, which will play the role of a stationary jaw of a carpenter's vice. To do this, we fix the board to the table with a clamp, after which we drill holes in the table structure. We begin assembling the structure. To do this, you need to connect the two parts using a wide nut. After screwing the nut onto the stud, you need to trace its edges around the perimeter. Using the resulting marking, you need to cut out a groove using a chisel. This is necessary in order to fix the nut in the jaws of the vice. We recess the nut into the structure of the jaw. You get an almost ready-made carpentry vice, which only lacks a handle. It can be made from a wooden tube of the appropriate diameter. After that we assemble the tool
In order for the guides to move freely in the fixed jaw, steel bushings should be made and installed inside the holes. The fixed jaw is fixed to the table surface using self-tapping screws. Moreover, this matter must be approached responsibly. You should first drill holes and also make grooves for the screw heads. After all, the surface of the board is the working part of the carpentry vice, so any protrusions on it and other defects will negatively affect the quality of the workpieces being processed.
In this simple way you can make a carpenter's vice at home. Moreover, you don’t need to buy materials to make them, since every home craftsman probably has everything he needs.
Homemade bench vise: video, photo, drawings
It’s not difficult to make reliable and easy-to-use vices with your own hands. The need for this may be caused not only by the desire to save on the purchase of a serial model, but also by the need to use a clamping device that will allow it to more effectively solve the tasks assigned to it.
Simple homemade vice from corners
Serial models of vices, although they are universal, are not always able to provide high precision in fixing parts; they are quite bulky and have a significant weight.
Homemade vices, used primarily in a home workshop, can be made more suitable for performing certain technological operations, and therefore more efficient and convenient.
Homemade bench vices may differ little from factory ones in both appearance and reliability.
Any person who spends a lot of time in his home workshop will confirm that it is quite difficult to do without such a device as a vice. Without a clamping device, it is difficult to perform various operations with parts made of metal, wood and plastic.
The use of a vice guarantees not only high accuracy and efficiency of drilling, milling, etc. operations, but also the safety of the machine operator.
If there is no desire or opportunity to purchase a serial model of such a device, then it is quite possible to make a vice with your own hands, spending very little time and effort on it.
Do-it-yourself vice - detailed instructions with photos
Fly tying tool
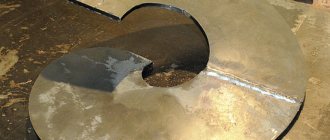
Most anglers prefer homemade fly tying vices to commercial ones. The device itself has a fairly simple design, which allows you to make them in a short time and without special tools at home. The most difficult step in making a vice is the jaws themselves. They are made from rectangular steel bars. Two holes are drilled in the finished jaws for fastening to the yew and one for the adjusting screw. The holes need to be threaded (M6) with a tap.
Next, you need to tighten both jaws with a screw. After tightening, disassemble the jaws and install the clamping screw, and adjust the opening angle to suit you. You need to make a small groove on the jaws for the hook.
The yew support can be made from a T-shaped or L-shaped steel rod. Sponges are welded to the end of one of the workpieces. The rod must be welded to the support, and if you need to make the support adjustable, then a piece of edged pipe is welded to the workpiece, the diameter of which is equal to the diameter of the workpiece. It is recommended to make the length of the support about 20-50 cm high for more comfortable work.
If the vice has become unusable and there is no way to repair it, then you should not immediately buy new ones, but try to make it yourself. Such a tool will serve for quite a long time and will cost several times less.
Originally posted 2018-07-04 07:41:07.
Do-it-yourself vice - detailed instructions with photos
When working with various materials and parts, most craftsmen sooner or later face a common problem - the ease of clamping the workpiece.
At the same time, standard vices may not be suitable in terms of dimensions/shape/weight/price/ease of use. And then the only option is to make a homemade vice with your own hands.
The task is not trivial, but not so difficult: you need skills in working with metal (cutting, welding) and a little design savvy.
Essential elements
DIY jaws for bench vices
It’s not difficult to make reliable and easy-to-use vices with your own hands.
The need for this may be caused not only by the desire to save on the purchase of a serial model, but also by the need to use a clamping device that will allow it to more effectively solve the tasks assigned to it.
Simple homemade vice from corners
Serial models of vices, although they are universal, are not always able to provide high precision in fixing parts; they are quite bulky and have a significant weight.
Homemade vices, used primarily in a home workshop, can be made more suitable for performing certain technological operations, and therefore more efficient and convenient.
Homemade bench vices may differ little from factory ones in both appearance and reliability.
Any person who spends a lot of time in his home workshop will confirm that it is quite difficult to do without such a device as a vice.
Without a clamping device, it is difficult to perform various operations with parts made of metal, wood and plastic.
The use of a vice guarantees not only high accuracy and efficiency of drilling, milling, etc. operations, but also the safety of the machine operator.
If there is no desire or opportunity to purchase a serial model of such a device, then it is quite possible to make a vice with your own hands, spending very little time and effort on it.
Homemade bench vise: option No. 1
You can make excellent strong bench vices yourself from profile pipes.
Below are detailed instructions in photo selection format, supplemented by a detailed video. Unfortunately.
The video is in English, but this is unlikely to prevent a competent master from understanding the essence of the process.
Homemade vice from profile pipes
Vise parts from the profile Running nuts Fastening the running nuts to the base of the vice Screwing in the lead screw Maximum opening of the vice The vice is assembled, it remains to be painted
Painting the moving part Painting the fixed part The vice is ready for work
Instructions for making a vice: option No. 2
Homemade vices do not require complex design developments and calculations.
You can use numerous photos and drawings of such devices, which are easy to find on the Internet.
A fairly simple, but at the same time very effective design is created on the basis of metal pipes.
As is known, pipes used for the installation of water and gas pipelines are manufactured in such a way that a product of a certain diameter fits tightly into a pipe of a subsequent standard size.
It is this feature of the pipes that allows them to be used for such a device as a homemade bench vise.
A visual drawing, photo and description of the manufacturing process will help you make this vise yourself.
Drawing of a homemade vice. Below are two photos of the finished product.
The structural elements that will make up a homemade vice are:
- a piece of metal pipe that will act as the internal moving part of the device;
- a piece of metal pipe of the following standard size, which will serve as an external fixed part;
- running nut with thread diameter M16;
- lead screw with thread diameter M16;
- a knob through which rotation will be imparted to the lead screw;
- front and rear supports, due to which the stationary pipe will be fixed to the base;
- pieces of rectangular pipe (future clamping jaws of a vice);
- two lock nuts with thread diameters M16 and M18.
Two main parts of the vice (movable and fixed)
To make such a vice with your own hands, you begin by welding a flange to the end of a section of a larger diameter pipe, which will act as a stationary element.
A nut with an M16 thread must be welded into the central hole of the flange.
A flange with a central hole into which the lead screw will be passed is also welded to the end of a section of a movable pipe of a smaller diameter.
At some distance from the edge of the lead screw, an M18 nut is welded to it (it will become a fixing element).
After this, the end of the lead screw, to which the nut is welded, must be passed through the inside of the movable pipe and inserted into the hole in the flange.
In this case, the nut should press against the flange from its inside.
Vise assembly (in the photo there is a hammer clamped in it)
A washer is put on the end of the lead screw protruding from the outside of the flange and an M16 nut is screwed on, which is then welded to the screw.
A washer must also be installed between the inner nut and the flange surface, which is necessary to reduce the friction force.
To correctly perform this stage of making a homemade vice, it is better to focus on the corresponding video.
After the movable vice assembly is assembled, you should insert it into a fixed pipe of a larger diameter and screw the second end of the lead screw into the nut of the second flange.
To connect the lead screw with the knob, a nut or washer can be welded to its end protruding from the side of the movable pipe, into the holes of which the knob will be inserted.
To give the structure stability, two supports are welded to the bottom of the fixed pipe, for which corners or rectangular pipes can be used.
The inner tube can also rotate during the rotation of the lead screw, which makes the use of such a vice very inconvenient.
To prevent this from happening, a longitudinal slot can be made in the upper part of the stationary pipe, and a locking screw can be screwed into the movable pipe, which will move along this slot and prevent rotation of the movable part.
Many photos of homemade vices of a similar design show devices whose moving and fixed parts are made of square or rectangular pipes. The use of such pipes also avoids rotation of the moving part of the vice.
The vise of the described design, authored by V. Legostaev, is a reliable and effective clamping device, easy to maintain and repair, which makes it very popular among home craftsmen.
If you do not plan to heavily load the vice, then it is quite possible to make it from wood according to a simple scheme
How to make your own carpenter's vice
Almost any home craftsman has to deal with the processing of wooden products.
The need for such processing may be associated both with the manufacture of various wooden structures, and with the repair of existing ones.
Carrying out this work using improvised devices with metal clamping elements is not only inconvenient, but also fraught with damage to the surface of the wooden part, the appearance of dents and cracks on it. This is why it is best to use a carpenter's vice for wooden products. Making them yourself is also easy.
Homemade vice with wooden guides
As in the case of a bench vice, finding drawings, photos and even videos of the manufacture of such devices on the Internet is not difficult.
The simplest design of a homemade carpentry vice consists of the following elements:
- bodies made of solid wood, which also serves as a fixed clamping jaw;
- a movable sponge made of a wooden block;
- cylindrical metal guides along which the movable jaw will move;
- a lead screw that ensures movement of the movable jaw;
- a crank through which rotation is imparted to the lead screw.
The device of a carpenter's vice
The body of such a vice, on which the metal guides are fixed, is attached to the surface of the workbench using long screws or bolts.
It is necessary to make three holes in both the body and the movable jaw of the clamping device - for the guides and the lead screw.
Design Features
Starting the difficult process of making metal yews at home yourself makes practical sense because of the achievement of great advantages. This essential tool:
- will be useful to everyone who is interested in metal arts - carpentry, plumbing;
- will be needed in an apartment, in a country house, in your home;
- allows you to perform various types of work with high precision - surface treatment, deburring, drilling, chamfering, etc.
An additional motivation for making a bench vice with your own hands is saving money. Finished products sold in stores are expensive.
Mechanic's vices installed in various factory workshops consist of structural cast iron (frame) and tool steel (thrust screw, handle, clamping jaws, bolts, nuts and other fasteners). Due to technological and objective difficulties, it is not possible to manufacture the necessary tools for the home from the alloys listed above. Therefore, home craftsmen have to look for an alternative, choosing a design where the use of cast iron is not necessary.
To understand how to make powerful metalworking yews without outside help for your own needs, a person must know the structure of standard samples installed in factories, as well as the specifics of the operation of such devices. Structurally, a bench vice consists of several main parts:
- base;
- movable and fixed jaws;
- parallel replaceable plates;
- thrust and clamping screws;
- inner nut;
- pen.
Popular models of factory vises have a rotation mechanism for a certain number of degrees. It is not of great interest for home modifications, so craftsmen who make vices for their own needs do without such a common improvement.
Before starting the required actions, the master, using a long handle, pulls back the movable mechanism with a replaceable metal plate. Next, he inserts a part or a workpiece into the gap formed and begins to tighten the mobile part of the vice until it stops, with the clamp, applying characteristic forces.
Adjustment of the bench vice forward/backward using a movable jaw is carried out by a long screw with an inch or trapezoidal thread, with a large pitch, which moves sequentially inside a fixed nut installed in the body. The rotation of the mechanical device is carried out after loosening the clamping screw and is carried out by the master using the necessary forces.
Some men, in order to save money and personal time, make miniature bench vices from improvised tools. The most famous version of a simple device used at home is the improvement of pliers. A through hole is drilled in the clamping jaws and a thread is cut. A bolt is screwed into the prepared hole on one side, and a nut is screwed on the other. During operation, the part is inserted between the jaws and clamped with a bolt/nut pair. It is difficult to prove all the advantages of a mobile design, because to achieve comfort and safety it is still better to use a stationary vice.
Homemade bench vise: video, photo, drawings
It’s not difficult to make reliable and easy-to-use vices with your own hands. The need for this may be caused not only by the desire to save on the purchase of a serial model, but also by the need to use a clamping device that will allow it to more effectively solve the tasks assigned to it.
Simple homemade vice from corners
Serial models of vices, although they are universal, are not always able to provide high precision in fixing parts; they are quite bulky and have a significant weight.
Homemade vices, used primarily in a home workshop, can be made more suitable for performing certain technological operations, and therefore more efficient and convenient.
Homemade bench vices may differ little from factory ones in both appearance and reliability.
Any person who spends a lot of time in his home workshop will confirm that it is quite difficult to do without such a device as a vice. Without a clamping device, it is difficult to perform various operations with parts made of metal, wood and plastic.
The use of a vice guarantees not only high accuracy and efficiency of drilling, milling, etc. operations, but also the safety of the machine operator.
If there is no desire or opportunity to purchase a serial model of such a device, then it is quite possible to make a vice with your own hands, spending very little time and effort on it.
Do-it-yourself vice - detailed instructions with photos
Do-it-yourself vice - detailed instructions with photos
When working with various materials and parts, most craftsmen sooner or later face a common problem - the ease of clamping the workpiece.
At the same time, standard vices may not be suitable in terms of dimensions/shape/weight/price/ease of use. And then the only option is to make a homemade vice with your own hands.
The task is not trivial, but not so difficult: you need skills in working with metal (cutting, welding) and a little design savvy.
Essential elements
Essential elements
What should be in the vice? Required elements:
- clamping jaws with a mechanism that sets them in motion, moving or pushing them apart. Typically a screw mechanism is used;
- base. The more force the clamping jaws must withstand, the more massive and durable the base must be. Most often this is a cast or welded part made of high-quality metal.
As a rule, you also need a device for attaching the vice to the workbench/table/machine. It can be screw-type (standard factory vices use a pressure screw), permanent, or with suction cups. If the model is quite massive, you don’t have to attach it to the table, but in this case there is always a risk of untimely movement.
When figuring out how to make a vice, it is necessary to outline the range of tasks. If this is a universal product used for fastening different parts, it is worth taking care of the large stroke of the clamping jaws and the large distance from the axis of the jaws to the base.
When performing precision work, it is worth choosing a lead screw with a small thread pitch - this will allow you to secure the part properly, without clamping it too tightly. The same goes for vices for working with brittle/soft materials.
In this case, it is worth supplementing the clamping jaws for the vice with elastic pads.
Depending on the type of operation, a rotating mechanism may be required (this will complicate the design) or an additional screw pair to move the top of the vice along the base.
Sometimes you need a very low, almost flat base. For example, this is how they make a vice for a drilling machine with their own hands.
How to make a bench vice with your own hands
How to make a bench vice with your own hands
After an approximate selection of the type of product, we decide on a drawing (sketch, diagram).
Important: the final dimensions of a do-it-yourself carpentry vice may differ from those planned. This is due to what materials will be chosen for the design and how much the master knows how to take into account the size of the gaps, welds and other elements.
So, you need to select the material (finished product) for:
- sponges – movable and stationary. Usually this is a corner, channel, less often a rail or strip;
- bases - strip, rectangular pipe, channel, solid part (cast or stamped);
- guide movable jaw. Most often it follows the shape and material of the sponge itself and is mounted on the edge of the base;
- lead screw. Rods with metric, rectangular or trapezoidal threads are used. The running nuts are selected accordingly;
- fastening to the table. A screw clamp or plate with holes for direct screwing to the table/workbench will work.
Important: in order to accurately center a carpenter's vice for a workbench with your own hands, it is better to select a guide and moving part of the product in the form of coaxial parts - for example, two pipes that fit into each other with a small gap.
If you can find drawings with dimensions for making a vice with your own hands, it is better to use an already developed option. If not, you will have to personally combine the actual details of pipe/channel/angle/plate scraps with the desired dimensions.
A diagram of a machine vice, made with your own hands from pipes and a corner, is shown below.
If there are no suitable pipes, you can make a homemade vice from a channel. The U-shaped part will be movable, hiding the lead screw and nuts, and it will be pressed against the base plate either by a larger channel (if you can select two profiles with a relatively loose fit) or by a welded structure made from corners.
Do-it-yourself vice at home
Do-it-yourself vice at home
So, as an example, we chose a do-it-yourself bench vise made from a channel, an angle, and a plate. The material is steel of an unidentified grade (theoretically St5). Used products from an old plumbing valve were used as a lead screw and nuts.
Fastening is welding, we will cut the metal with a grinder.
How to make a homemade vice:
- cut a piece of channel to the required length, select two plates of thick sheet steel for attaching the lead screw. One is placed at the end of the site, the other approximately in the middle;
- a base part is cut out from a plate with a thickness of at least 3 mm (preferably 5...8 mm). Additionally, three parts are made from the corners and the plate (for the welded holder);
- The holder can be connected to the base plate using welding or bolts. Below is an option with holes for bolts. A running nut is attached to the support plate
- The clamping jaws are made from the angle and the plate. The parts can be fastened by welding or bolts. If you plan to use a homemade vice for a drilling machine, including for work with shock loads, it is better to refuse welding - with such an impact the weld may come apart;
- All that remains is to mount the clamping jaws on a vice made of a channel (the drawings show exactly where it is best to secure the parts) and install the metal rod into the hole at the end of the lead screw. It will act as a lever to turn the screw and, accordingly, move the movable jaw. To prevent the rod from flying out of the hole, it is secured with a nut at the end.
If desired, you can strengthen the design of the jaws by welding additional elements to them - gussets.
If the steel is susceptible to corrosion, it is better to paint the homemade vice for the drilling machine after finishing all the work. You can do this with your own hands using a brush, since a spray gun or roller is inconvenient in this case. The vice is painted in disassembled form.
You can additionally attach linings made of aluminum corrugated corners to the jaws on the inner, working side - this will improve the adhesion between the surfaces.
The video describes in more detail how to make a vice at home with your own hands.
Using old mechanisms and scrap metal at hand
Using old mechanisms and scrap metal at hand
A high-quality new channel, angle, plates are not the only suitable material for making your own vice.
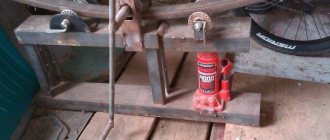
An old jack will work as a basic mechanism. For ease of work, a support plate is made (or pipes with a rectangular profile, as shown in the illustration) and clamping jaws are welded - also from a pipe or channel, angle. Do-it-yourself jack vices are no less convenient than industrial ones.
Another budget option is a rail vice. Considering the load capacity of this rolled metal, the model turns out to be very powerful. It can also be used as an anvil, the main thing is to securely fasten the product to the workbench.
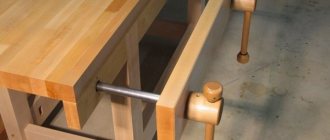
For those who work primarily with wood, a wooden vice would be a good solution; making them with your own hands is easier and faster - no welding is needed, the parts can be sawed off by hand. The main thing in this model is to select suitable threaded elements.
The option shown in the photo is designed to be permanently attached to a workbench. To make a quick-release version, it is better to make the base part with a plate that is bolted to the workbench.
For milling and carving, models with double-sided clamping are convenient - this design allows you to center the workpiece and/or move it during operation without removing it from the vice.
If the clamping force required is not very large, but you often need to change the position of the parts or the parts themselves in the jaws, you can look for a cam mechanism and make a quick-clamping vice. In this version, the screw clamp is replaced with a small cam; the clamp can be loosened or strengthened by slightly turning the lever.
Conclusion
Conclusion
As can be seen from the proposed materials, most models of homemade vices require very few materials, and the main tools will be an angle grinder, a drill and a welding machine. True, you will have to work in a workshop or garage, since welding will be inappropriate in a residential building or apartment.
Homemade vise jaws
Making a comfortable and high-quality homemade vice is quite simple. Even easier than knitting. They may be needed in cases where it is necessary to securely fix a part or product. An additional advantage of such a vice is its low manufacturing cost, since not everyone can afford to purchase a production model.
Varieties and advantages
Varieties and advantages
Factory vise models are made universal, so they cannot always fix absolutely any part well. They also have large mass and dimensions. Vises assembled by yourself can be made most convenient for performing a certain type of work. This will help increase labor efficiency and reduce time wasted.
Any master who constantly works in his workshop knows that it is difficult to do without such a tool as a good vice. This clamping device helps to perform various operations with products made of wood, plastic and metal.
The use of a vice can guarantee efficiency and good accuracy in performing various types of work. It will also ensure human safety. When it is not possible to buy a factory model of such a device, it is quite easy to make it yourself.
This operation will take little effort and time.
Homemade vices are usually divided into the following types:
Making a drilling machine
Making a drilling machine
Necessary materials
Necessary materials
It’s quite easy to make a homemade vice for a drilling machine at home. They do not require complex calculations and design developments. You can find a lot of high-quality drawings of bench vices on the Internet. A very simple but high-quality design is made using iron pipes or channels.
To assemble a bench vise with your own hands, you will need the following materials:
- A small iron pipe that will serve as the internal moving part of the device;
- A smaller iron pipe that will serve as an external fixed part;
- Large nut size M16;
- Large screw size M16;
- A special knob through which rotation will be transmitted to the screw;
- Two metal supports that will fix the stationary part on the frame;
- Two pieces of metal rectangular profile that will serve as vise jaws;
- Several lock nuts size M16.
Bench vice
Bench vice
Assembling such a home-made structure must begin by attaching a flange to the edge of the end of a large metal pipe, which will be the stationary unit of the device, using a manual welding machine. You need to weld a nut size M16 into the center of the flange. Next, another flange must be welded to the end of the smaller iron pipe and a lead screw must be inserted into it.
Another nut needs to be welded to the edge of the screw, which will serve as a fixing element. The end of the screw to which the nut is attached must be passed through a small diameter pipe, and then inserted into the through hole of the flange. It is worth remembering that the nut must be screwed to the flange from the inside.
On the lead screw, which is located outside the flange, you need to put a washer and screw on the nut. Next, it is securely welded to the screw. Another washer should be installed between the surface of the metal flange and the nut. This will help reduce the friction between them. At this stage of work you need to be very careful and avoid mistakes.
After assembling the movable assembly of the device, you need to insert it into a larger metal pipe and screw the other end of the screw into another flange. In order to attach the knob to a screw that protrudes slightly from a smaller pipe, it is worth welding a nut or a fly to it. You need to pass the knob into its through hole.
Good clamping jaws for bench bench vices should be made from small rectangular pipes. They need to be secured to the fixed and moving parts of the device. To make the vice much more stable, several supports must be welded to the bottom of the stationary iron pipe. Their role can be played by rectangular pipes and pieces of corners.
A small pipe can also rotate when the lead screw rotates. This makes the use of such a design very problematic. To avoid this, make a small slot on top of the stationary pipe and screw the lock into the moving part. This screw must move in the slot without allowing the small pipe to rotate.
Specialized clamping fixtures
We looked at options on how to make a classic vice. However, for full-fledged plumbing or carpentry work, special tools are needed:
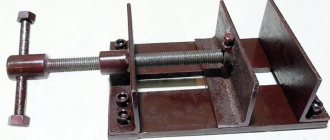
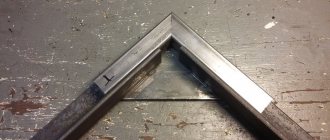
Angle vise
Designed for fixing workpieces at right angles.
Despite the apparent complexity of execution, such a clamp can be made with your own hands.
The frame is made of steel with a thickness of at least 4 mm. The stop corners are positioned strictly at an angle of 90°. A bracket for the running nut is installed symmetrically to the thrust planes. Using a hardened steel pin, a movable retaining angle, also 4-5 mm thick, is supplied to the stops. A flange for the driver is mounted in the center of the retaining corner.
When carrying out welding work, it is precisely necessary to fasten workpieces of different sizes.
To do this, the thrust nut and flange on the retaining angle are attached using an axis, which makes it possible to change the horizontal position of the pin collar.
Vise for drilling machine
A fairly common device of narrow specialization. Drilling machines are usually equipped with clamps, but this increases their cost.
You can make the device yourself. Moreover, a wooden vice is suitable for most drilling work.
For production you will need:
- plywood sheet 10-12 mm;
- two smooth pins for guides;
- threaded pin for the knob;
- furniture thrust nut;
- screws, nails, PVA glue;
The frame is made of plywood. It is necessary to draw a drawing and carry out all the work on site.
Next, we glue the sandwich together to make the jaws and the thrust strip.
From the resulting array 25 mm thick, we cut identical bars.
We try on the blanks on the bed.
We use steel or aluminum tubes as guides. All holes must be strictly parallel to each other. For high-quality holes, it is better to use not a drilling machine, but a milling cutter with a groove cutter. We check the assembled structure.
We install a furniture nut into the thrust strip. We fix the bars on the frame.
To fix the knob in the movable lip, ordinary nails in the form of locking pins are used. Homemade vice for a drilling machine is ready: