The tire for a chainsaw is a very important component; if for some reason it is faulty, operation of the tool is not possible. There are many reasons why it requires replacement. We will try to figure out in what cases replacement is necessary, and also consider the question of how to choose the right saw bar for a chainsaw. Let's start with the most important thing - choosing a headset.
Chainsaw malfunctions and how to repair the tire yourself
A chainsaw is a necessary thing in the home and garden, helping to quickly and efficiently carry out various work with wood. Like any electrical device, it periodically fails and requires diagnostics. The result of the last event is often the conclusion that it is necessary to repair the chainsaw tire - the mechanism that experiences most of the load during operation.
Compliance with the instructions is the basis for long-term operation of the mechanism
Any tool, especially a complex one like the Shtil 180 chainsaw, comes with an instruction manual. Before making the first launch, you need to study technical management. This is all the more pressing if you already have experience working with the Druzhba saw. Another assembly, chain tension system, starting conditions and tool adjustment require preparatory familiarization. There are reports on the forums that the sawyer flooded the spark plug during the first start - he pulled the starter repeatedly, it is necessary:
- move the lever to the last position;
- pull the starter slowly – 2 times;
- pull a couple of times sharply and quickly.
Design and principle of operation
To independently troubleshoot problems, the owner will need a good knowledge of the structure of the chain saw. This is a device powered by a single-cylinder internal combustion engine. Fuel liquid is gasoline. The saw mechanism is driven by a single-stage chain transmission and is covered by a casing for safety.
The main design elements are an air purification system, a chain mechanism, an engine, a tension device, ignition elements, a flywheel and a clutch. Many small parts connect the main components and contribute to the reliable operation of the device.
The properties of the automatic centrifugal clutch depend on the number of revolutions of the power unit. A low rotation speed does not transmit rotation to the drum. Only when a high number of revolutions is reached does the centrifugal force exceed the force of the springs, causing the drum to rotate. The chain and sprocket located in front begin to move.
Final carburetor adjustment
First, warm up the engine for 5-10 minutes (not at high speeds).
Adjusting idle speed
Now, by turning the idle speed screw (T, LA, S) counterclockwise, adjust the minimum number of revolutions at which the engine is stable. The chain should not move. If the engine stops idling, turn the idle speed screw clockwise accordingly. If the chain moves, turn the screw counterclockwise.
To finalize the chainsaw carburetor adjustment, we check the engine for acceleration and maximum speed.
Checking the acceleration
Smoothly press the accelerator and watch how quickly the engine picks up speed from idle to maximum power. If the engine revs slowly, it may be necessary to loosen the L (low speed) screw by turning it slightly counterclockwise (no more than 1/8 turn).
Setting the maximum speed
As mentioned earlier, the maximum speed is adjusted using screw H, the speed increases when turned clockwise, and decreases when turned counterclockwise.
The highest rotation speed of gasoline chain saw engines is between 11,500 and 15,000 rpm, depending on the model. Higher speed is dangerous for the engine, which will prevent it from starting. The maximum speed can be determined by interruptions in the ignition. If any appear, turn screw H counterclockwise.
Malfunctions and how to repair a tire
To repair a chainsaw with your own hands, you will need a detailed diagram and an understanding of the operation of the basic mechanisms of the device. The guide bar and its fasteners are vulnerable, consumable parts that experience the greatest load. You can repair the chainsaw tire yourself or by contacting a service center. Wear and breakage in this area are indicated by the lack of normal tension, sharp or intermittent movement of the chain, the inability to provide normal lubrication and fastening of the cutting axis in relation to the body of the unit. Types of breakdowns:
- The rear and front drive links are riveted. The reason is a mismatch between the pitch of the sprocket and the chain links, weak tension or wear of the sprocket. The problem is solved by replacing or adjusting the mechanisms.
- The presence of broken or broken links indicates weak tension or a broken chain.
- Rounded spout backs occur when the chain set is too long and there is not enough oil.
How to sharpen
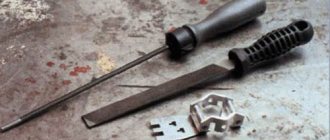
Periodic sharpening is a mandatory measure necessary for the normal operation of the gas device. Ways to sharpen your chain yourself:
- Using a file is a simple and common option that allows you to carry out the work directly at the sawing site.
- Use of a special machine. The method is found in private households and service centers.
- With the help of a grinder. Sharpening requires skill.
A special machine is the most effective method. But using a file you can also achieve good results.
Checking and adjusting the carburetor
In service centers, carburetor adjustment is carried out using special equipment. For each saw, the angles of rotation of the adjusting screws are different (they are indicated in the operating instructions). The need to adjust the carburetor does not arise very often, especially if the saw was purchased from a trusted seller. All of our Husqvarna saws are sent to a service center before being sold, where specialists adjust the speed control.
However, failure to secure the adjusting screws sometimes occurs.
Reasons for failure to adjust the chainsaw carburetor:
- Severe wear on the engine (pistons). In this case, it is necessary to take greater care of repairing the engine, but adjusting the carburetor can improve the functionality of the saw for a certain amount of time.
- Blockage in the carburetor due to damage to the air filter, use of poor quality gasoline and the formation of scale. In such a situation, in addition to adjusting the carburetor, you will also need to flush it.
- Severe vibration of the saw or damage to the protective cover. This happens extremely rarely, but there are still cases.
Signs that indicate the need to adjust the chainsaw carburetor:
- The engine either does not start, or starts and immediately stalls. This occurs due to the use of a poor fuel mixture.
- Significant increase in fuel consumption and emissions. An increase in the amount of exhaust gases indicates that the fuel is not completely burned. The reason for this may be fuel oversaturation.
The carburetor adjustment scheme differs for different models of chainsaws and is described in the operating instructions. However, the general principle remains the same: it is necessary to change the quantity and quality of the fuel mixture supplied to the engine cylinder.
Three screws will help us adjust the carburetor:
- “L” – low, for setting low speeds
- “H” – high, for setting the upper speed
- “T” (“LA”, “S”) – for adjusting the idle speed (models that have only one screw have the “T” screw)
When adjusting the carburetor of a chainsaw, the following rules should be observed:
- Make sure the saw chain is pointing away from you
- Place the saw on a stable, level surface; the cutting part should not touch any objects.
Please note: the instructions indicate the exact angles of rotation of the adjusting screws. Strict adherence to the instructions in the instructions will avoid damage to the engine.
The process of adjusting the carburetor itself includes two points: basic (with the engine not running) and final (with the engine warm and turned on).
How to choose a tire
Choosing a tire is a responsible event, the result of which depends on the operation of the entire device. Installing an unsuitable element not only leads to failure of other parts, but is also unsafe for the operator. In order to correctly select a component, you will need data on the length, size, shape and parameters of the shank.
The size is determined by the types of work you plan to do with the saw. Small dimensions are suitable for simple manipulations and cutting thin boards. The most powerful installations are useful for harvesting firewood from thick tree trunks.
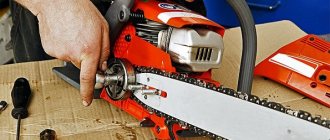
How to install a bar on a chainsaw
Before removing the tire, it is recommended to check that the necessary components and tools are available. Tire installation starts with the quick chain tension system, then moves on to the side and front devices. Following the sequence will allow you to correctly assemble the mechanism and ensure productive operation of the tool.
What you need to know before repairing
The “golden” rule for self-repair is to use only original parts and spare parts. If you try to install inappropriate elements of a different brand and configuration, then this is a 100% guarantee of future breakdown and failure of the electric saw. Before you repair a tool, create the necessary base for yourself. You will need:
1. Original factory parts from the same manufacturer. 2. Pliers, wrenches 3. Electrical tester, voltmeter. 4. Soldering iron. 5. Round and oval files, mandrel and sharpening gauge. 6. A machine for sharpening a chain (this is ideal, you can sharpen it manually).
Chainsaw tire
The tire for a chainsaw is a very important component; if for some reason it is faulty, operation of the tool is not possible. There are many reasons why it requires replacement. We will try to figure out in what cases replacement is necessary, and also consider the question of how to choose the right saw bar for a chainsaw. Let's start with the most important thing - choosing a headset.
How to remove the drive sprocket from a chainsaw?
As already noted, the sprocket can have a separate and pressed crown. Therefore, the sequence of actions will be different.
For a stationary located crown, the following is sequentially produced:
- Removing the casing;
- Removing the saw bar along with the chain;
- Disconnecting the clutch from the engine (the piston must first be locked);
- Removing the clutch together with the drum;
- Removing the crown from the drum using a regular open-end wrench (some manufacturers also include a puller with the spare parts kit).
The unit is assembled in the reverse order. For some models, before dismantling the crown, you will also have to remove the air filter.
Choice
Manufacturers of chainsaws recommend using a saw bar of a certain size and technical parameters for each specific model. To make the right choice, you should take these parameters into account and then there will be no problems.
Main settings
When choosing, consider the main five parameters:
- Length.
- Width of the guide groove.
- Tire sprocket pitch.
- The number of chain links intended for it.
- The type of shank and model of chainsaws on which it can be installed.
Depending on the power of the chainsaw, it is possible to install headsets of different lengths on it, which allows you to adjust the performance and load on the saw. Manufacturers can indicate the length in both centimeters and inches and, as a rule, this is not the entire length of the tire, but only a characteristic of the length of its working part. Choosing the right tire for a chainsaw should begin with studying the instructions for the chainsaw and finding out the permissible length for a particular model. For example, for the Shtil MS 180 chainsaw, the recommended lengths are 14 or 15 inches.
When choosing a headset, do not neglect the instructions and use longer components, because... This can put excessive stress on the engine and cause premature wear.
The width of the guide groove, as well as the pitch of the sprocket on the bar, must correspond to the same parameters of the saw chain, otherwise installation of the chain on the bar will not be possible. The groove width for household models of chainsaws is 1.1 and 1.3 mm for professional models 1.5. The most common sprocket pitch sizes are 0.325 and 3/8 inches.
When choosing, remember that the pitch of the chain sprocket must be the same as the pitch of the chainsaw drive sprocket; accordingly, when replacing the tire and drive sprocket in the kit, you can select these parameters as you wish.
Depending on the type of shank, the bar can only be installed on certain chainsaws. This is because the chain lubrication hole on bars designed for certain brands of chainsaws may be located in different places. For example, a tire from a Stihl chainsaw cannot be installed on Husqvarna and vice versa, be sure to take this into account when choosing.
A high-quality video description of the selection process can be viewed below. In this video, a specialist from the gas-powered tools sales department talks about the main characteristics of the saw set, its types and sizes.
When installing the saw chain on the guide bar, make sure that:
- the length of the chain (number of driving links) fits the bar;
- the chain pitch coincides with the pitch of the driving sprocket, and for Rollomatic chains, with the pitch of the driven sprocket;
- the thickness of the drive link corresponds to the width of the tire groove;
- The shank of the saw bar fits the saw motor unit.
If used correctly, 4 saw chains will wear out in the same period as 2 drive sprockets and 1 saw bar. Therefore, for professional use, it is recommended to have a 4 + 2 + 1 set for each saw (four saw chains, two drive sprockets, one saw bar). For domestic use, it is recommended to have two saw chains in the kit.
It should also be taken into account that if a new saw chain is used with a non-new drive sprocket, accelerated wear of the drive chain links will be observed.
The tension of the chain on the saw bar is adjusted so that the chain is completely adjacent to the underside of the bar and can be pulled along the bar by hand (Fig. 1). When installing and servicing the chain, wear protective gloves to avoid cuts from sharp cutting teeth.
Rice. 1. Checking chain tension
The main type of saw bar maintenance is to maintain the runners and bar groove in the required condition. The runners gradually wear out, an outer protrusion forms, which must be removed with a flat or triangular file or a grinding machine. The sides forming the runners must have the same height. A belt sander with a stop is required to straighten unevenly worn tire runners.
The depth of the groove must be no less than permissible, otherwise the guide links will slide along the bottom of the groove, and the cutting teeth will not adhere to the tire runners, and they will warp during operation.
The groove should be cleaned periodically using a groove cleaner on a filing template, and the tire should be turned periodically to ensure even wear.
Incorrect operation can lead to deformation of the tire, narrowing the guide groove. To correct this defect, a groove wedge is used, which is first installed at an angle of 45° in a place with the normal width of the groove, in front of the deformed area, and then driven through the narrowed area with a hammer. The procedure is repeated until the width of the groove is restored. After this, it is necessary to check the tire for cracks; if any are found, the tire is rejected, as otherwise it could cause injury.
During operation, the driven sprockets of the saw bars wear out and must be periodically replaced.
Replacement of the driven sprocket is required if:
- the gap “a” is not visible between the saw chain and the bar head (Fig. 2) - this means that the teeth of the driven sprocket are worn out;
- The driven sprocket roller bearing is damaged.
Rice. 2. Required clearance between saw chain and Rollomatic guide bar
To dismantle the driven sprocket, drill out the countersunk rivet heads using a drill with a diameter 0.5 mm larger than the diameter of the rivet head. Then, using the ejector, the rivets are pressed out, and the driven sprocket, together with the bearing, is removed between the side plates. To ensure good operation of the driven sprocket, it must be replaced with the entire assembly (sprocket and bearing).
To install the driven sprocket, the saw bar should be secured in a vice. Then you need to remove the roller bearing clamp in the form of two plexiglass washers, which prevents the cylindrical rollers of the bearings from falling out, and carefully insert the driven sprocket into the tire head, while the plexiglass washers should serve as guides (Fig. 3).
Rice. 3. Installation of the driven sprocket into the guide bar head: 1 - plexiglass washers
After installing the driven sprocket in place, the plexiglass washers are no longer needed.
Then you need to align the holes on the driven sprocket and in the saw bar, insert the rivets and rivet them so that the countersunk heads completely fill the countersunk areas of the holes. The sprocket must be thoroughly lubricated before commissioning.
Typical defects of sawing machines, causes, solutions
Incorrect adjustment and operation lead to unnatural wear and damage to the components of the saw set. The main types of such failures are listed below, the reasons for their occurrence and methods of elimination are described.
All driving links are knocked out at the front and rear (Fig. 4).
Rice. 4. Drive links are knocked out front and back
Such a defect may occur for the following reasons:
- the saw chain is too loose;
- the drive sprocket pitch does not match the chain pitch;
- A new saw chain is used with a worn drive sprocket.
In this case you should:
- replace and properly tension the saw chain;
- replace the saw chain and install a drive sprocket that matches the chain pitch and fits the saw motor block.
The protrusions on several successive driving links are broken and broken (Fig. 5).
Rice. 5. The protrusions on the leading links are broken and broken
Such a defect may occur as a result of the saw chain being loosely tensioned and jumping off, or when the saw chain breaks, these links accumulate at the drive sprocket.
In this case, the saw chain or damaged section should be replaced, the links of the new section should be adjusted to the rest, and then the chain should be tensioned correctly.
The back of all leading projections is rounded (Fig. 6).
Rice. 6. The back of the leading lugs is rounded
Such a defect may occur as a result of the saw chain being excessively elongated (large play in the chain joints), as a result of which the chain pitch does not fully correspond to the pitch of the drive sprocket; a lack of lubrication may also affect it.
In this case, you should replace the drive sprocket and saw chain, and check the operation of the lubrication system.
Hollow (concave) rounding on all protrusions of the driving links (Fig. 7).
Rice. 7. Hollow (concave) rounding on the protrusions of the driving links
This defect may occur because the depth of the groove on the head of the Duromatic bar is too low. In this case, the tire should be replaced.
There are nicks on both planes of the lateral projections of the leading links, which do not necessarily follow each other (Fig. 8).
Rice. 8. Notches on the side planes of the drive links
This defect can occur due to weak chain tension, causing the drive links to jump out of the bar groove and hit the bar head or shank.
In this case, you need to properly tension the chain, check the width of the groove on the shank of the bar, and expand it if necessary.
Flattening is observed on the protrusions of all leading links (Fig. 9).
Rice. 9. Flattening on the protrusions of the leading links
Such a defect may occur due to insufficient depth of the guide groove of the saw bar. In this case, the tire should be replaced.
One-sided lateral wear of all protrusions of the driving links (Fig. 10).
Rice. 10. One-sided lateral wear of the protrusions of the driving links
Such a defect may occur due to improper sharpening of one row of teeth (angles, tooth length, feed limiter).
In this case, you should sharpen the saw chain correctly. If the tire groove is already very worn, the tire must be replaced.
Wear of the side surfaces of all driving links with a sharpening of the end part (Fig. 11).
Rice. 11. Wear of the side surfaces of the driving links with a sharpening of the end part
This defect can occur if the saw chain does not fit tightly into the bar groove due to wear or expansion for some other reason. In this case, the saw guide should be replaced.
All of the drive link bosses showed hourglass wear (Figure 12).
Rice. 12. Worn hourglass shaped drive link lugs
Such a defect may occur as a result of the saw chain oscillating in the bar groove due to unequal sharpening of the cutting teeth (angles, tooth length, feed stop) in an irregular sequence on both rows of teeth.
In this case, you should sharpen the saw chain correctly. If the tire groove is already very worn, the tire must be replaced.
The tips of all the protrusions of the leading links are flattened (Fig. 13).
Rice. 13. The tip of the protrusions of the leading links is flattened
This defect can occur due to wear on the drive sprocket teeth, causing the drive links to sit on the base of the drive sprocket teeth. In turn, severe wear on the teeth of the drive sprocket can be caused by the beating of a loose saw chain.
In this case, the drive sprocket and saw chain must be replaced.
Uniform wear of all cutting teeth to the service marking (Fig. 14).
Rice. 14. Uniform wear of cutting teeth to service markings
This wear occurs during normal operation of a properly tensioned and sharpened saw chain with a properly functioning lubrication system.
When such wear is reached, the saw chain must be replaced.
Increased wear under the rear connecting rivet of all cutting teeth and opposing connecting links usually accompanies frequent breakage of the driving links (Fig. 15).
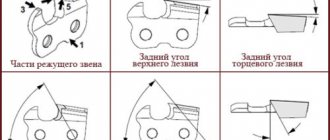
Rice. 15. Increased wear under the rear connecting rivet of the cutting teeth
Such a defect may occur for the following reasons:
- the rake angle of the tooth is too large, causing the rake edge to hang back;
- The front angle of the tooth is too small, resulting in the front edge hanging forward;
- The feed limiter is too low;
- cutting edges are dull;
- the chain is loose.
The chain must be properly sharpened and tensioned.
The sliding surfaces on all cutting teeth and opposing connecting links are worn at a bevel (forward or backward) (Fig. 16).
Rice. 16. The sliding surfaces on the cutting teeth and connecting links are worn at a bevel
This defect occurs when the saw chain is loosely tensioned, also when excessive feed force is applied to work with a dull chain and/or a chain with too large a rake angle of the cutting edges of the teeth.
In this case, the chain should be replaced, and the next one should be sharpened and tensioned correctly.
Severe wear of the sliding surfaces of all cutting teeth and connecting links with little wear on the tooth blades (Fig. 17).
Rice. 17. Severe wear of the sliding surfaces of the cutting teeth and connecting links with insignificant operating time of the tooth blades
Such a defect may occur for the following reasons:
- the saw chain operates with insufficient lubrication or its complete absence;
- Excessive feed force is applied to operate the chain with an oversized feed limiter.
In this case, you should check the chain lubrication, modify the feed limiters and sharpen the saw chain.
Concave sliding surfaces of cutting teeth and connecting links (Fig. 18).
Rice. 18. Concave sliding surfaces of cutting teeth and connecting links
This defect occurs when the saw chain is too tightly tensioned and operates under insufficient lubrication conditions. This leads to overheating of the chain and cracks in the connecting links. Typically, such defects occur when working with Duromatic tires.
In this case, you should check the lubrication system and properly tension the chain.
Cracks only under the rear rivet heads of some or all of the cutting teeth and opposing connecting links (Fig. 19).
Rice. 19. Cracks under the heads of the rear rivets of the cutting teeth and connecting links
Such a defect may occur for the following reasons:
- blunt cutting teeth;
- the rake angle of the tooth is too large, causing the rake edge to hang back;
- The front angle of the tooth is too small, resulting in the front edge hanging forward;
- The feed limiter is too low;
- Excessive feed force is applied.
If such a defect occurs, the saw chain must be replaced.
Cracks only under the front rivet heads of some or all of the cutting teeth and opposing connecting links (Fig. 20).
Rice. 20. Cracks under the heads of the front rivets of the cutting teeth and connecting links
This defect occurs when the feed limiter is set too high and excessive feed force is applied to improve the clean cutting performance of the saw.
If such a defect occurs, the saw chain must be replaced.
Cracked or broken leading edges of guides on all cutting teeth and connecting links (Fig. 21).
Rice. 21. Cracked or broken leading edges of guides on cutting teeth and connecting links
This defect occurs when the saw chain hits the guide bar as it enters it, this can happen for the following reasons:
- drive sprocket diameter is too small;
- low chain tension;
- expansion of the groove in the tire shank.
In this case, it is necessary to select the correct drive sprocket in accordance with the saw bar, or replace the saw bar, and correctly tension the chain.
A knocked-out recess on all cutting teeth and connecting links may be accompanied by the formation of burrs on the sliding surfaces of chain links and tire runners (Fig. 22).
Rice. 22. Knocked-out notch on cutting teeth and connecting links
This defect can occur for three reasons:
- the saw chain hits the bar due to vibration arising from weak tension or unevenly sharpened teeth (angles, length of teeth);
- a new saw chain is operated with a used drive sprocket with deep signs of tooth wear;
- The drive sprocket does not match the chain pitch.
In this case, you should tension and sharpen the chain correctly, and if there is significant wear, replace the chain, sprocket and tire.
Cracks in several connecting links located opposite the cutting teeth (Fig. 23).
Rice. 23. Cracks in connecting links
This defect occurs when the saw chain tension is weak or when the chain is operated with a worn drive sprocket.
In this case, you should replace all components of the saw set - the chain, bar and drive sprocket, since if you replace only one component, it will quickly be worn out by the remaining damaged ones.
Wear of the sliding surface of cutting teeth, connecting and driving links (Fig. 24).
Rice. 24. Wear of the sliding surface of cutting teeth, connecting and driving links
Severe wear on the saw bar and drive sprocket. At the same time, the saw chain works restlessly, jams and slips in the cut, and a large feed force is required for operation.
Such defects occur when using a saw chain that is dull or incorrectly sharpened (sharpening angle, angle of the front edge of the tooth, length of the tooth, height of the feed stop), as well as when using a worn saw bar (burrs on the runners, small groove depth). This leads to the fact that the chain does not adhere tightly to the tire and moves relative to it at a bevel.
This also requires replacing all components of the saw set.
A shiny front surface of the feed stop, high feed force required, low clean sawing performance are signs that the feed stop is too high and needs to be adjusted to the optimal height.
A shiny front surface of the feed stop or its heavy wear when the chain runs unevenly with a drop in clean sawing performance may be a sign of a feed stop that is too low (high feed per tooth), as well as weak chain tension.
In this case, you should sharpen the cutting teeth until the feed per tooth decreases to the required value, and correctly tension the chain.
The cause of uneven operation of the saw chain may be defects in the processing of the feed limiter (Fig. 25).
Rice. 25. Defects in the processing of the feed limiter: a) the feed limiter is too plumb (sharp); b) the front area of the feed stop is angular and not beveled; c) the feed stops are of unequal height and are not rectangular
The stops should be given the correct shape; the tooth blades may need to be sharpened; if they are too short, the chain should be replaced.
Poor sharpening of the saw chain and its uneven operation are the cause of defects in the saw bar. Here are the most typical cases.
Worn tire runners (evenly or unevenly, Fig. 26), which leads to saw chain slipping in the cut.
Rice. 26. Wear of the saw bar runners : a - uniform; b - uneven
Uniform wear of the bar runners is a consequence of normal wear and tear during proper operation of the sawing apparatus. Uneven wear is caused by an improperly sharpened saw chain.
In this case, it is necessary to equalize the height of the tire runners; if the depth of the groove turns out to be too small, then the tire must be replaced.
The reason for the saw chain slipping in the cut, its loose fit to the bar, as well as high wear of the sliding surfaces of the cutting teeth and connecting links can be the expansion of the groove of the bar (Fig. 27) due to external destructive influence, for example, jamming of the saw set in the cut. In this case, the tire must be replaced.
Rice. 27. Expansion of the tire groove
The cause of saw chain jamming can also be a narrowing of the bar groove caused by an external destructive influence, for example, jamming of the saw set in the cut. In this case, the groove of the part of the tire, after the head of the tire, must be widened, the tire must be checked for cracks, and if any are found, the tire must be replaced.
If wear of the tire runners is observed in the upper part of the shank and in the lower part of the tire, after the head (Fig. 28), then the reason for this is working with a loose chain. Further work with such a bar will lead to an increase in the rate of tire wear and damage to the saw chain.
Rice. 28. Wear of tire runners at the top of the shank and at the bottom
In this case, you can align the bar runners, but if the wear is already very large, then it is better to replace the entire saw set.
The wear rate of the chain and bar and the operation of the saw set are strongly influenced by the condition of the drive sprocket, which must be periodically checked using a special probe (control template, Fig. 29).
Rice. 29. Checking the condition of the drive sprocket
In a profile sprocket, the tips of the teeth wear out, while in a ring sprocket, wear appears mainly along the perimeter (Fig. 30).
Rice. 30. Wear of profile and ring sprockets
If the running-in marks are the same depth (0.5 mm) or deeper than the length of the measuring pin, the drive sprocket should be replaced.
Which tire is better to install
Answering the question of which tire is best to install on a particular model of chainsaw is quite simple. It is worth installing the model recommended by the tool manufacturer. As a rule, leading companies producing chainsaws, in parallel with the production of the tool itself, also produce consumables that are specially designed for their tool.
Accordingly, it is better to choose a tire for a chainsaw in the direction of products designed specifically for your model and manufactured by the manufacturer who assembled the saw itself.
If this is not possible, a good option is chainsaw bars that are made by leading companies in the saw chain and chainsaw bar industry, such as Oregon.
How to eliminate the possible risks of purchasing counterfeit tires?
The information field contains signs by which it is easy to distinguish an original branded chainsaw from the most reliable fake. As for tires, their advantages and disadvantages manifest themselves directly in operation.
In the domestic market of household appliances, about 15% of the total sales of chainsaw components are third-rate counterfeits of unknown origin, producing at best half of the standard resource.
Operating a chainsaw complete with a fake bar and chain is economically unprofitable and unsafe. A significant number of traumatic situations are created when using counterfeit tires and chains.
You can buy a high-quality and durable branded tire of the desired model, without significant risks, at a branded outlet or representative office of a licensed dealer company. If this is not possible, you should use the services of a reputable online store that has earned the trust of customers.
Read also: Ariston hob does not turn on, what to do
Why does it wear out?
This is one of the questions that chainsaw owners ask all the time. It's easy to answer. Friction occurs on the surface of the headset, which causes wear.
The contact of dust and dirt on the rubbing surfaces increases wear of parts.
There is another pressing question: why does a tire wear out prematurely? This can be answered by studying the design of the tire and the operating principle of the lubrication system, which is what we will try to do.
The lubrication system begins with the oil tank, where oil is filled and then, using an oil pump, it is transferred to the point where the bar shank comes into contact with the chainsaw body. To adjust the oil supply, the tool pump is equipped with a special screw. At the tire installation site there is a special slot that coincides with the hole for obtaining lubricant on the tire. The cause of premature wear may be insufficient lubrication of rubbing parts, which in turn occurs due to the following malfunctions.
- excessive contamination of the oil filter (the first thing you need to pay attention to);
- contamination of the oil supply channels on the headset or on the instrument itself;
- incorrect adjustment of oil supply by the pump;
- malfunction of the pump itself;
- the use of low-quality lubricants or oil that does not meet the requirements of the chainsaw manufacturer.
Reasons why it takes away from a straight cut
Sometimes situations arise when it is almost impossible to make a straight cut with a chainsaw; the tire moves to the left or right. The reason for this behavior of the tool may be the following:
- Incorrect chain sharpening. The teeth of the chain are sharpened on one side more than on the other. The problem can be resolved by sharpening the chain correctly.
- Uneven wear of the chain links, the support pads of the chain links on one side have a large wear-out, due to which the chain tilts slightly and obtaining a straight cut is no longer possible. The problem can only be solved by replacing the chain.
- And lastly, uneven wear. As in the previous case, for this reason the chain will change its slope and will no longer cut smoothly. The only way to solve the problem is to replace the tire.
The inability to make a straight cut with a tool is a sign of increased wear of the bar and chain, which in turn should be sought for its cause. Eliminating the effects of wear by replacing consumable parts will not bring the desired result, because... If the lubrication system malfunctions are not eliminated, after a while everything will repeat itself.
Home repairs for standard breakdowns
Often, when the saw is operating, the user hears an unpleasant, cutting sound in the ear, and smells a burning smell. This is what we talked about at the very beginning of the article - lack of oil in the mechanism. Check with a dipstick: if the crankcase is full, it means the conductive channels are dirty. Fixing the problem is simple - add oil or clean the furrows. Quite often the instrument begins to “glitch” when stopped. It does not stop immediately, but after a while. The longer the saw is in use, the longer this time period becomes. To fix the problem, you need to replace the brake band. It's just worn out and stretched out. Sometimes, while sawing, the device suddenly begins to vibrate strongly and lose power. You already know the reason - the brushes are worn out. If you do not replace it, the saw will soon stop turning on. The chain does not rotate. There are several possible malfunctions: – the teeth of the plastic gear are “licked off”. It is part of the gearbox and is the first to take the blow in case of critical overloads. And that's great! It is better to replace the gear than to throw away a burnt out motor or, worse, get injured. When replacing a worn one with a new one, lubricate the gear well with oil. – wear of other parts (drive sprocket, cam, spring, clutch cup, bearing). Having identified a worn or crumbled part, replace it with an original spare part. – chain tension is incorrectly adjusted. The situation occurs with both key and keyless tension. The instruction manual always describes how to properly tighten the chain and check its tension.
Read also: How to glue thin plastic end-to-end
Why is it heating up?
In some cases, during operation, you may notice that the tire heats up excessively; there are two reasons for this phenomenon. The first is a manufacturing defect. Such parts are equipped with low-quality bearings, which heat it up during operation. A defective part will heat up and nothing can be done about it, only replace it with a new one.
The second reason is, again, not enough lubrication, or its complete absence. If signs of overheating appear, such as melting of the paint on the tip of the tire and strong smoking, you should stop using the tool and contact a service center.
The choice of chainsaw tire largely depends on the characteristics of the chainsaw itself. You should only choose components recommended by the manufacturer, taking into account the pitch of the drive sprocket, the width of the chain groove and the shape and size of the shank. The key to long-term service of a chainsaw saw set is the uninterrupted supply of a sufficient amount of lubricant of the appropriate brand. Excessive wear of the bar and chain, as well as their heating, is a sign of improper operation of the saw chain lubrication system. We have highlighted the main points of choice, remember them and take them into account when purchasing, and then you will definitely buy what you really need.
All malfunctions of chainsaws can be divided into two main groups: malfunctions of the engine with all its components and systems (ignition, fuel supply system, cylinder-piston group, exhaust system) and malfunctions of other components (chain brake, lubrication system, clutch, tire, etc. .).
Engine malfunctions
- The engine will not start;
- starts but stalls;
- works unsteadily;
- does not develop power, i.e. It runs fine at idle, but stalls under load.
When repairing a chainsaw with your own hands, you need to use the method of elimination - check one by one all possible causes of the malfunction, starting with those that take less time to check and eliminate (see here about the design and operation of a two-stroke engine).
Ignition system
. Almost all types of engine problems listed above can be caused by ignition system failures. Therefore, when they occur, it makes sense to start troubleshooting with a spark plug. This is all the more justified since the state of the latter can provide useful information about the operation of the fuel system. So, if a problem occurs, you need to unscrew the spark plug and inspect it.
The wire is disconnected and the spark plug is unscrewed with a special wrench.
If the spark plug is dry, this means that the problem is most likely not in the ignition system, but in the fuel mixture not entering the cylinder. You can wrap the spark plug back and get to work on the fuel system. If the spark plug is heavily splashed with fuel mixture, it means there is an excess of it. This may occur due to carburetor misadjustment or violation of starting rules. The spark plug is wiped and dried, the cylinder is dried by turning off the fuel supply and operating the starter to ventilate the combustion chamber and remove excess fuel. Then install the spark plug in place and repeat the start.
The presence of a large amount of black carbon also indicates a malfunction in the fuel system.
The ratio between oil and gasoline in the mixture may be incorrect, the carburetor may not be adjusted, or low-quality oil may be used. The spark plug is washed in gasoline, cleaned of carbon deposits with a needle or awl, the electrodes are cleaned with fine sandpaper and replaced.
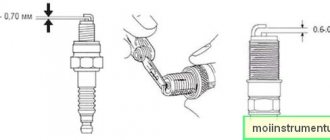
In all these cases, it would be a good idea to check the gap between the spark plug electrodes. Depending on its brand, it should be in the range of 0.5-0.65 mm. You also need to check the spark plug seal. If it is worn out or damaged, the tightness of the combustion chamber may not be ensured, which leads to a decrease in compression in the cylinder and problems in engine operation.
Even if, when checking the spark plug, there is good reason to believe that the fault is in the fuel system, you need to check the spark plug for the presence of a spark. At least to be sure that everything is in order. For this:
- put the ignition cable on the spark plug;
- using pliers with insulated handles, apply the thread or nut of the spark plug to the cylinder;
- pull the starter handle and see whether there is a spark or not.
If there is no spark, you just need to replace the spark plug. If the new spark plug does not have a spark, you need to check the condition of the high-voltage wire for a break and contact with the spark plug.
The reason for the lack of a spark may also be a faulty ignition module or a violation of the gap between it and the flywheel magnetic circuit. It should be 0.2 mm. Violation of the gap becomes especially likely if the saw was previously disassembled and the flywheel and ignition module were removed. The gap is set using a 0.2 mm thick gasket placed between the flywheel boss and the ignition module. A faulty ignition module must be replaced.
Having checked the ignition system in this way and not finding a malfunction, you can move on to the fuel mixture supply system.
Fuel supply system
. If by inspection of the spark plug it is determined that fuel is not entering the cylinder, all possible reasons for this need to be considered. It could be:
- failure of fuel to flow from the tank due to a clogged hole in its lid (breather), while a vacuum is created in the tank, preventing fuel from leaking out;
- contamination of the fuel filter installed in the tank;
- no or insufficient supply of fuel mixture from the carburetor to the cylinder.
To diagnose the first two reasons, it is enough to disconnect the fuel hose from the carburetor and see whether fuel flows out of it or not. If it flows in full stream, the breather and filter do not need to be checked; if it does not flow or flows weakly, we can assume that the cause of the malfunction has been found. The breather is cleaned with a needle. The fuel filter is removed through the filler hole of the empty fuel tank using a wire hook, along with a suction hose, from which the filter is disconnected and cleaned or replaced with a new one. Chainsaw manufacturers recommend changing the fuel filter every 3 months.
Insufficient supply of the fuel mixture from the carburetor to the cylinder or a violation of the correct ratio between fuel and air mixed in the carburetor can occur for several reasons: due to a clogged air filter, unadjusted carburetor, clogged channels or filter mesh.
Algorithm for self-replacement of the clutch drum with sprocket
How to replace the drive sprocket on an electric saw or chainsaw - more on this below.
To replace the sprocket, you need to do the following:
- remove the chain brake cover and pull it towards you (avoid contact of the brake band with the clutch parts);
- using a wrench, loosen the nuts holding the chain tension and the chainsaw cover;
- remove the chain and then the bar, removing debris and sawdust from the mounting holes;
- we fix the piston in the cylinder using a regular cord, but if possible, you need to use a piston stopper or a special lock;
- the clutch begins to rotate and does this until the piston touches the exhaust port;
- after which the stopper or cord is lowered into the candle opening and fixed there by tying several knots (the stopper will fix itself);
- unscrew the clutch nut (note that the thread of this nut is left-handed, take this into account when unscrewing);
- It is prohibited to use hard tools so as not to break the soft metal of the clutch nut;
- then the clutch is removed;
- then remove the sprocket gear itself;
- replace the old sprocket with a new one;
- Reassemble the structure in reverse order.
Why does a chainsaw cut crookedly? Determine the problem and fix it
A chainsaw is a truly unique tool that facilitates the work of felling trees and sawing firewood. The main advantage of this tool is the rapid increase in maximum speed, as well as the ability to instantly brake the chain. During the operation of the tool, various malfunctions arise, and one of them is uneven cutting. If a chainsaw cuts crookedly, it causes inconvenience to the sawyer and also wastes a large amount of fuel. If you encounter such a malfunction, then in this material you will learn how it can be identified and eliminated.
The main reasons why a chainsaw moves to the side
If during operation the chainsaw begins to cut crookedly, then in addition to an uneven cut, we get a number of the following negative consequences:
- The sawyer must exert physical effort to keep the tool straight
- Fuel consumption increases, which is associated with an increase in the trajectory of the tool passing through the material being cut
- Increased load on the drive sprocket, which leads to accelerated wear
- The tire wears out as the load on only one side increases
- Tool productivity decreases
- Obtaining a curved cut. If the forest is being prepared for making boards, then crooked trunks are equated to scrap. If a tree is cut down for firewood, then in the end the curved-sawn log will not be very convenient to cut
- Discomfort when working - the master quickly gets tired when working with a faulty tool
Why can a chainsaw cut trees crookedly? Many may think that the reason is a faulty chainsaw bar, but in fact there are four main reasons:
- Incorrect or uneven tooth sharpening
- Using a chain, bar or sprocket that is not pitched correctly
- Wear of the saw set - often this is due to abrasion on one side of the bar
- Untimely tightened chain
How to sharpen a chain yourself?
It's hard to believe, but almost half of the breakdowns occur due to a dull chain. It entails an increase in load on the motor, its overheating and premature wear. When the sawing band is dull, the gears of the gearbox, drive sprocket, bearings, etc. break. The first sign of dullness is dark and fine sawdust. The teeth cannot remove the desired layer, so the chips are crushed. If you examine such a saw, you can see defects on the edge and even torn pieces. Masters advise sharpening your saw as often as possible. If you delay this process, you will need to take the device to a workshop. Sharpening a file at home is possible using a special machine or manually. If you sharpen regularly, you can do it yourself, following the rules:
- Sharpening should not be done directly on the ground, as dirt can clog the oil grooves.
- Use sharpening devices: files (circle and oval), mandrel and gauge.
- The sharpening angle should be greater than 30 degrees.
- The file should protrude slightly above the tooth.
- Sharpen the teeth one at a time, turning the tape.
- Having sharpened the teeth, using a gauge, you should straighten the cuts (protrusions that are responsible for deepening during the sawing process).
- If the cuts protrude slightly beyond the line of the teeth, then they can simply be filed off with a file.
As you can see, troubleshooting is easy, but also difficult. Remember that with proper operation and care, the need for repairs will occur much less frequently.
Household, semi-professional and professional hand-held chainsaw equipment, regardless of cost and performance characteristics, has an identical design. The cutting set, which includes a chainsaw bar and saw chain, belongs to the category of replacement equipment.
The decision on which tire to put on a chainsaw is made by the owner, taking into account many factors. First of all, this is the compatibility of the seat and the channels for supplying lubricant to the working area, engine power, and the specifics of the work to be done.
Specific assistance in choosing a tire independently can be provided by recommendations from experienced specialists or information from the instructions for use.
In particular, a long saw set is preferable for felling and sawing large-diameter trees, while a short saw set is preferable for crowning trees and preparing for the installation of construction timber.
Crooked sawing due to uneven sharpening of teeth
If the tool cuts on one side, then the first thing you need to do is check the chain. The teeth on the tool must not only be sharp, but also properly sharpened. Correct sharpening is when each tooth is ground to the same distance as the previous one. This sharpening method prevents chain imbalance during sawing. The instructions for the tool indicate that each tooth should be ground to the same distance when sharpening. If this requirement is not met, then in addition to the fact that the chainsaw will be pulled to the side, it is possible that the load on the engine will increase.
If the sharpening of the teeth was carried out by a beginner, then it is worth making sure, after the work has been done, that it was carried out correctly. Some filers rely on a simple rule - file sharpening should be done in the same amount for each tooth. However, this assumption is not correct, since the chain teeth wear unevenly. As a result, it turns out that sharpening each tooth leads to the restoration of their sharpness, but not the uniformity of wear. When the saw begins to cut crookedly, you need to check all the teeth on the chainsaw to ensure they are sharp and evenly worn.
To prevent uneven wear of the chain, you should sharpen the teeth in a timely manner, that is, sharpen with a file every 15-20 hours of operation. Once every 2-3 months (depending on the frequency of use of the tool), sharpen it using a special machine.
If you are not sure that you are sharpening the chain teeth correctly, then you should entrust this work to a professional. Although this is a costly endeavor, it is much more effective. If you want to learn how to properly sharpen a chainsaw chain, then this material describes detailed instructions for beginners.
How to avoid premature breakdowns? Chainsaw maintenance tips
Your main assistant should be the instruction manual. If you have lost it, you can contact the dealer of the company whose chainsaw you use; they will provide you with instructions in electronic form.
So, before each time you turn on a gasoline chain saw, be sure to check that the chain is in good condition, whether its teeth are sharpened, and whether it is well tensioned (does not sag, but is not too tight, it can be pulled a little away from the blade).
You can sharpen the chain using a special machine or a file with a special template (depending on the tooth pitch of the chain, there are different templates).
Every time after use, the chainsaw must be cleaned: the chain, bar, air filter, housing, cooling fins, cracks and other grooves are cleaned of sawdust. After using the saw, turn the bar over so that it wears evenly, lubricate the sprocket (if there are grooves for lubrication in the front of the saw).
During long-term storage, be sure to drain the fuel and oil! The chain and the bus form an electrochemical pair, so they rust together and must be stored separately.
If the saw set is selected incorrectly
Often, most sawers simply do not pay attention to the fact that not only the chain has technical characteristics, but also the tire and the drive sprocket with a crown. All these parts must correspond to each other in terms of such a technical parameter as pitch. Most chainsaws are equipped with a headset with standard pitch parameters of 0.325. The tire, chain and drive sprocket, or rather the crown, must have the same pitch. If one of these parts does not meet the same standard, this will lead to accelerated wear of individual parts and the entire tool.
The tire also has such a parameter as the width of the groove. The value of this value can vary from 1.1 to 1.6 mm, which depends on the power of the tool. It is strictly contraindicated to install a bar with a groove width of more than 1.3 mm on a household chainsaw. A standard chain in such a tire will have too much play, which will lead to accelerated wear of both parts.
Never buy an instrument set unless you know or remember the exact dimensions. A “roughly similar” chain, bar or sprocket may not be suitable for your tool, and in the end you will need to change all the consumables. To find out the tire seat width, you will need to use a caliper or look in the technical description for the tool.
What tools are needed to replace the sprocket?
To replace the drive (drive) sprocket you will need the following tools and components:
- a special key for removing this part (usually supplied with expensive branded chainsaws; cheap saws are not equipped with such a key);
- a drift made of aluminum or copper (only from soft metals and only in the absence of a key);
- hammer (for striking the drift while unscrewing the sprocket);
- flat screwdriver for tightening the nut;
- sprocket bearing grease.
Severe saw blade wear
A bar lasts much longer than a chain. However, this does not mean that you can use it forever and not think about replacing it. Usually the guide is changed after 2-3 worn chains. Before replacing the chainsaw guide, you need to assess its technical condition. If a chainsaw has a Chinese-made tire, it can wear out faster than the chain. That is why, when you detect a crooked cut of wood with a chainsaw, it is necessary to diagnose the tire.
To make sure the tire is worn, you need to remove it and inspect it. Wear usually shows up by shortening one of the beads. Sometimes it is extremely difficult to detect this visually, so you need to use a caliper. A difference of a few tenths of mm indicates that the tire needs to be replaced. There is also a simple way to check guide wear using a square. To do this, the tire is placed on a flat surface, and a square must be placed on its side. If the top and bottom walls of the guide are in contact with the square, then the part is in good condition.
Accelerated tire wear can occur due to improper functioning of the oil pump. If lubricant is supplied with long interruptions, friction increases accordingly, which means parts wear out faster. If the lubrication mechanism works properly, this significantly increases the service life of not only the headset, but also the entire tool.
When is the chain loosened and why is it dangerous?
Every chainsaw needs to regularly tension the chain. If this rule is not followed, the consequences can be very traumatic. Most sawers know what we are talking about and how to properly tension or tighten the chain. The correct tension of the cutting set is when, when you try to pull it away from the bar, the three shanks are completely visible, as shown in the photo below.
If the chain is loose or over-tensioned, it will cause tire wear. And not only the guide, but also the sprocket, bearing and engine. That is why make it a rule to check the chain tension before using the tool.
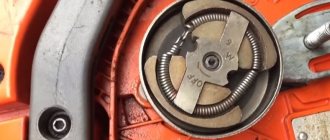
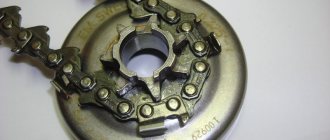
Drive sprockets for chainsaws, their types and design
There are two types of chainsaw sprockets - prefabricated and solid. The solid one is a monolithic element installed behind the clutch - the so-called sprocket with a stationary crown. The crown is fixedly attached to the clutch drum connected to the centrifugal clutch.
A similar design is used in most chainsaws, including those made in China. There is nothing complicated about how to remove a sprocket from a Chinese chainsaw - but you need to remove the entire sprocket.
With more expensive models the situation is even simpler. Their chainsaw sprockets have a prefabricated design with a replaceable crown. The crown fits onto the drum shaft and transmits torque to the chain. Therefore, replacing the sprocket on a chainsaw is very quick and simple - the crown is removed, and the drum can be left in place.