Replacing the clutch on a chainsaw
Chainsaws, for various reasons, need repairs from time to time. Of course, you can contact a service workshop or an experienced mechanic. However, many problems can be fixed at home with only a minimal set of skills and tools.
Answering the question of how to remove the clutch from a chainsaw, we note that this is not a difficult operation if you strictly adhere to the disassembly technology. Owners of the tool may encounter certain difficulties if the chainsaw has been in use for a long time and the clutch parts have become stuck to each other. However, even in this case, you can disassemble it yourself.
Carburetor repair and adjustment
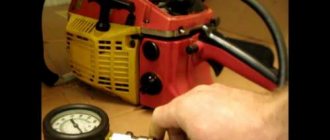
Carburetor adjustment is carried out on a warm engine. If the engine cannot be tuned, then the cause of excess gasoline in the mixture may be a stuck carburetor. To remove the part, you need to unscrew the fastening nuts, disconnect the ignition and linkage from the engine control lever. Then remove the lever. You can then remove the filter and carburetor.
The muffler is secured with two nuts. You need to unscrew them and pull the muffler towards you. Then unscrew the screws of the coil and dismantle it. The carburetor on the Stihl saw has 1 idle speed adjustment screw. If the idle speed is abnormal, the carburetor needs to be repaired. This is a complex process and difficult to do on your own. You should contact a repair shop.
Sources:
https://crast.ru/instrumenty/sceplenie-shtil-180-ustrojstvo
Clutch replacement
When replacing the clutch, we do not recommend using metal or plastic objects as a stopper. The former can scratch the cylinder, the latter can litter it.
Disassembling the clutch:
- We turn on the chain stop brake, remove the protective cover and dismantle the saw set;
- We remove dirt, sawdust, dried grease, if any;
- Remove the air filter and spark plug;
- Using a spark plug wrench, unscrew the spark plug;
- Rotating the crankshaft, bring the piston to the top point, then withdraw it by 6-9 mm;
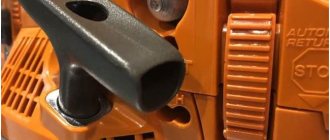
- Use a rope, 7-8 mm in diameter, to stop the piston in the upper position;
- Use a special wrench to unscrew the nut on the clutch.
Most of the moving parts of a chainsaw have right-hand rotation. Therefore, the clutch nut has a left-hand thread. Remove the cover by turning the key clockwise. It is forbidden to carry out this operation with a hammer and chisel - you will knock off the edges!
- Remove the cover and drive sprocket. We diagnose faults and evaluate wear of parts. We assess the condition of the needle bearing;
- If necessary, we replace parts with new ones (most often the drive sprocket needs this);
Installation of the chainsaw clutch system is carried out in the reverse order, but you should pay attention to some features.
Nuances when installing the clutch system:
- On some chainsaw models, there may be a washer between the drive sprocket and the clutch. Pay attention to which side it faces the engine;
- Some oil pump drives are equipped with a special spring (whisker), which is responsible for transmitting rotational motion from the drive sprocket to the oil pump. It is important to adjust the spring so that its free end (whisker) fits into the corresponding groove on the sprocket body. Otherwise, the saw set will not be lubricated;
Important: after dismantling and assembling the clutch, be sure to check the operation of the automatic oil supply system.
Removing the clutch and oil pump drive
Before disassembling the clutch
, it is necessary to remove the drive sprocket. To do this, carefully remove the lock washer from the grooves on the shaft and remove the sprocket and needle bearing.
READ For the combustible mixture of a gas-powered saw, use
High head 19, you need to unscrew the clutch
.
The thread on it is left-handed, so it unscrews towards the bar, and not towards the rear of the Stihl
180 saw.
Unscrewing and removing the clutch
, you need to immediately remove the reflective plate and the oil pump drive; this is easy to do, since they are put on the shaft without any fastening.
About washing
In this article we will talk about washing, their structure and operation.
Home_3
Owner reviews
Vladimir Khlestov, 44 years old, Armavir
“After six months of use, the chain on the chainsaw began to spin constantly. I decided that there was a problem with the idle speed. No amount of carburetor adjustments helped. They took it apart in the workshop - it turned out that the spring on the coupling had burst. They changed everything in 10 minutes, and I couldn’t find the fault for two months. The main thing is correct diagnosis of the malfunction.”
Yaroslav Nedelko, 31 years old, Vinnytsia region
“I cut mostly hardwoods. Quite often you have to sharpen the chain, and the drive sprocket wears out. The first time I removed the clutch, I had to work hard. The metal is tightly stuck and cannot be unscrewed. I sprayed it with kerosene - it didn't help. Only after using Deshki was it possible to tear it off. And all because the oil was leaking somewhere, so the coupling was welded to the sprocket. I think so."
Andrey Kosoglazov, 23 years old, Primorsky Krai
“After three months of using the chainsaw, a longitudinal groove appeared in the sprocket - everything works, but the chain does not rotate. They said the problem was in the clutch. It is not at all difficult to disassemble it, the main thing is to find a puller and do not forget that the coupling nut has a left-hand thread. In short, I unscrewed and changed everything without any problems. It works great, and there was nothing complicated there, you just need to be careful.”
The main reasons for replacing the drive sprocket
The Allen wrench is the main tool you will need when replacing the sprocket.
The most common reasons that force tool repairs associated with replacing the drive sprocket are:
- chain jamming due to defects occurring during operation of the unit;
- high sprocket wear as a result of long-term operation of the unit.
With regular use of the device, increased wear of the drive sprocket occurs as a result of increased loads placed on it during the process of sawing wood. There are two ways to operate the device:
- use of one saw chain;
- using several saw chains alternately.
When using the first method of operation, the chain is operated until it is completely worn out. This method has several disadvantages. The main one is the problem with monitoring wear during intensive operation of the unit.
When using two or more chains in the process, it is possible to achieve uniform wear of the chains and sprocket, which allows you to extend the period of operation of the device before repairs, which involve replacing the sprocket. In addition to sprocket wear, you should not forget about the bearing that is installed in the sprocket. This structural element operates at any engine speed. When replacing the sprocket, the bearing must also be replaced at the same time.
The coupling complete with sprocket must be replaced promptly. If repair work is not carried out in a timely manner during operation, the tool experiences increased vibration, which leads to increased wear of the bearings installed in the internal combustion engine on the crankshaft axle shafts. The maximum wear depth of sprocket teeth should not exceed 0.5 mm. The life of a sprocket is twice as long as one chain, so two chains should be used during operation. After the life of the chains has expired, the chains and drive sprocket should be replaced at the same time.
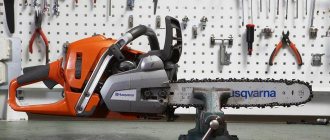
Sequence of repair work
At the first stage, the saw set is dismantled and the cover of the guide bar is removed. After removing the cover, the guide bar and saw chain are dismantled. Unscrewing the fastening nuts is carried out using a universal wrench, which is included in the delivery package of the unit.
After removing the saw chain and guide bar, the air filter is dismantled. Then the spark plug is removed. A pre-prepared engine piston stopper is installed in place of the dismantled spark plug. The stopper allows you to fix the position of the piston in the cylinder and prevent the crankshaft from turning. The clutch should be removed using a special puller installed in the universal key connector. All actions should be carried out clockwise.
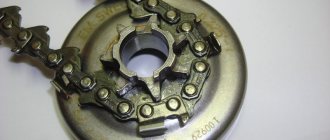
After removing the clutch, access to the internal parts of the device opens, that is, after removing the clutch, you can remove the sprocket.
After removing the clutch drum, depending on its type, the ring and sprocket are inspected and checked. Depending on the design of this unit, replacement of worn-out structural elements is carried out
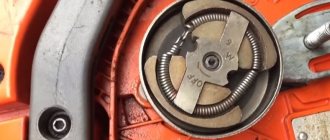
When carrying out repairs, special attention should be paid to the springs of the centrifugal mechanism and its cams. If wear is detected, they should be replaced.
If the components do not cause any complaints, all structural elements are installed on the chainsaw in the reverse order. First of all, unscrew the piston stopper and pull out the starter cord, after which the piston stopper is installed in place. This complex sequence of operations makes it possible to clamp the centrifugal mechanism onto the crankshaft of the unit. The clutch is installed in place and clamped using the universal key included in the chainsaw kit. Clamping with a key should be done counterclockwise.
The last stage of the repair work is the installation of the remaining structural elements of the device.
When replacing a sprocket, all work must be carried out carefully and with caution. All repair work must be carried out using special tools, otherwise the centrifugal mechanism or saw chain may be damaged
The chain drive of a chainsaw of any design determines the performance of the tool. Moreover, during operation the chain
stretches, and the teeth of the drive sprocket wear out. Illiterate selection of the sprocket will sharply reduce the durability of the chainsaw teeth, and its incorrect adjustment will lead to premature wear.
How to remove the clutch on a Shtil 180 chainsaw
When storing engines for a long time, it is important to prevent corrosion processes inside the cylinder-piston group. To prevent such undesirable processes, in addition to other operations, it is desirable to achieve a closed state at the intake and exhaust valves. IN.
Chainsaw. How to unscrew the clutch.
We often encounter breakdowns caused by incorrect actions of tool owners when unscrewing the clutch. How this is done is described in general terms in the article.
Generators. Species and types
This article deals with the types and types of generators, their classifications and two special cases. This article will be useful to those who choose equipment for their tasks: having information.
Generators. Understanding Load Types
The most important thing that I tried to convey in this article is the understanding that when choosing the power of a generator, you need to operate primarily with the indicators of starting currents and maximum voltages. Why? -.
Generators. Recommendations for use
This article provides the most general recommendations for operating generators, as well as frequently repeated difficulties and errors.
Chainsaw. How to unscrew the clutch.
We often encounter breakdowns caused by incorrect actions of tool owners when unscrewing the clutch. How this is done is described in general terms in the article.
This task is faced every time there is a need to remove the drive sprocket and (or) chainsaw clutch.
You can find a lot of videos and text material on this issue on the Internet. If you want, all this is easy to discover. It's always a good idea to look up the information in the tool's user manual.
Each saw model has its own characteristics in performing this procedure. Therefore, we will describe this process from a general ideological position.
1. The chain brake cover must be removed. To begin, pull the brake lever towards you. This must be done so that the brake band does not touch the clutch cup. Then loosen the two nuts holding the cover in place. Loosen the mechanical chain tensioner. Release the chain and bar tension. Then finally unscrew the two nuts and remove the chain brake cover.
2. Remove the bar and chain, remove any dirt, if any.
3. Remove the spark plug from the cylinder spark plug hole.
4. Next, you need to fix the piston in the cylinder. To do this, by rotating the clutch, we observe the upward movement of the piston. In most cases, as soon as the piston closes the exhaust gas outlet, lower any suitable rope into the spark plug hole, enough to prevent the piston from moving further upward. You can tie simple knots on the rope to enhance the effect. Remember that you will have to pull the rope back later. So don't miss the second end