Defects and malfunctions of the hammer drill
To understand the defects and malfunctions of power tools of this type, our team reviewed several popular brands and identified the causes of the most common breakdowns:
- Increased wear of the working element;
- The appearance of cracks on the handle and body;
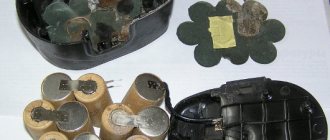
- Rechargeable models have short-lived batteries;
- Frequent kinks in the wire in electric models;
- Problems with the impact mechanism and its interaction with the conventional one;
- Fragility of bearings, chuck, parts with teeth, safety clutch.
Why does the hammer drill heat up?
Most often, the reason for this is the length of operating time and heavy loads on the tool. The engine interacts with working units, which may result in overheating. When it appears, turn off the tool, give it time to cool - at least half an hour.
If the rotary hammer hammers but does not drill
- The conical spring holds the clutch, if it becomes loose, a problem may arise;
- The locking roller no longer locks the large shaft gear;
- The tool lock in the barrel stops working.
In this case, it is enough to replace or tighten up the problematic parts and start in a gentle mode.
Important! When replacing the old one, install an identical new one in place of the old one.
Smell from the hammer drill
Third-party odors may occur during overheating or increased load for which the model is not designed. If it is new or just from repair, most likely the parts simply have not gotten used to it, and this process will take time.
Hammer doesn't work
- A short circuit that led to the combustion of the rotor or stator;
- Complete wear of carbon electric brushes;
- The brush holders are loose and do not hold them;
- The lamellas on the collector are burnt out;
- The winding on the rotor or stator has broken;
- Battery failure;
- The power cord is kinked.
Winding can be done at home. If you decide to replace brushes, buy two at once, regardless of whether one or both are damaged. If a short circuit occurs, replace the burnt parts with serviceable ones. If the problem is in the wire or battery, buy new ones and install them in place of the old ones.
Oil is leaking from the drill
Leakage is a direct indicator of wear and tear on certain parts inside the mechanism. Spin the model and make diagnostics, change the lubricant if necessary.
The hammer drill is slipping
The reason for this is a weakened coupling. It is enough to tighten it or replace it.
Reverse doesn't work
The reason is the failure of the mode switch button. Disassemble the back panel and, if necessary, replace the contacts.
The hammer drill does not rotate under load
Most likely, the load does not correspond to the permitted norm, resulting in this defect.
Malfunction of stopping the drill when drilling with impact
The reasons why a Makita hammer drills with an impact and the drill rotates is due to wear on the teeth of the safety gear and the teeth of the barrel. Often this malfunction occurs when using a rotary hammer as a mixer for mixing mixtures. During operation, the safety clutch slips, and if you take into account the spring load, the load is large.
A visual inspection will not allow diagnosis. You can remove the barrel and secure it in a vice and turn the gear with a wrench, but this can be understood if there is severe wear; in most cases, only disassembling the barrel for diagnostics will help.
Advice on what to do in this case. If it is not possible to remove a suitable part or replace it, then evaluate the wear of the barrel. This is done this way: insert a new drill and move it to the sides; if the play is large, it is better to replace the barrel completely.
It is worth noting that the reason for the drill turning when drilling with impact can be:
- wear of the shaft bearings;
- the gear near the drunken bearing can be licked.
On sale, if you search, you can buy a gearbox assembly for a hammer drill and its cost is about 2000 rubles.
The reliability of some sellers is questionable, and if you consider that these are often spare parts taken from analogue tools that are sold, for example, on Avito. How
For example, there are many Chinese hammer drills similar to Makita. An example is a network hammer drill FAVOURITE RH 950 and its cost in the aisle is 3000 rubles. which is profitable to sell for spare parts.
We replace the parts with serviceable ones and get ready to assemble.
Video of quick disassembly of a Makita rotary hammer
Even very reliable Makita rotary hammers break down over time. Any breakdown can be eliminated, you just need to have straight arms and perseverance. In addition, hammer drills are also subject to mechanical breakdowns. Operating rotary hammers with hard materials in a dusty environment will shorten their service life and require user intervention to perform preventive maintenance.
Rotary hammer malfunctions
After a tool stops working, many users try to fix the problem themselves to save time. This is strictly not recommended, since the industry produces several types of rotary hammers:
Figure 2. Stages of lubrication of a hammer drill.
- electromagnetic - the peak in them strikes due to the reciprocating movement of the core inside the coils;
- electro-pneumatic - the clutch assembly transmits the shock through the air cushion to the flying piston through the impact piston.
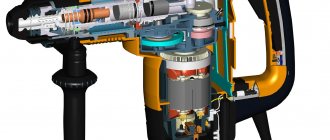
The impact energy in the second case is five times greater, reaching 1.5 kW. In broken shanks of parts, fatigue damage begins over time, therefore, despite the air cushion, the pistons require periodic replacement. Rice. 1
There are straight, L-shaped tool bodies. The first are intended for limited spaces (niches, narrow cracks), the second - for the destruction of materials in the immediate vicinity of the working body. The cooling of engines of L-shaped models is much more efficient, so their service life is one and a half times longer than direct modifications. Professional rotary hammers are equipped with powerful electric motors, often have an L-shaped body, and are much heavier than their household counterparts. They are equipped with compensators that reduce vibrations on the tool body, electronic overheating protection systems, speed adjustments (for drilling mode), improved ventilation systems, and button locks.
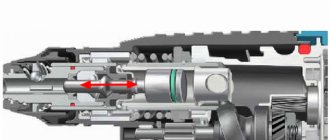
Design and operation of the impact mechanism
Before talking directly about the causes of problems with the drilling part of the hammer drill, it is worth understanding the structure of the impact mechanism. It consists of:
- gears with oblique teeth, which transmits the rotational impulse from the engine to the drill;
- rolling bearing. He is better known as a drunken bearing;
- stem piston;
- flying piston or striker;
- striker.
The working cycle itself is repeated according to the same algorithm:
- Pressing the start button transmits a rotational impulse from the engine to a gear with oblique teeth.
- On the same shaft with it there is a drunken bearing. It drives the barrel piston.
- Due to this movement, air pressure increases between the piston and the striker. It causes a flying piston to strike the firing pin.
- The striker transmits the impact impulse to the drilling part.
- After the impact, the barrel piston returns back, the air pressure between it and the striker weakens. The flying piston also returns to its original position.
Most well-known manufacturers produce rotary hammers with three operating modes:
- impact and rotation;
- only blow;
- only rotation.
Basic faults
There are more than a dozen of the most common causes of rotary hammer malfunctions. Breakdowns can be caused by mechanical or electrical problems.
When the motor is running, the following mechanical breakdowns may occur: the drill does not rotate, it does not make impact movements, the drill is not fixed in the chuck or is stuck in it, there are extraneous noises when the equipment is operating.
The following characteristic signs indicate an electrical malfunction: there is no attempt to rotate the electric motor, strong sparks are generated on the electric brushes of the commutator during operation, acrid smoke is emanating from the device or there is a corresponding unpleasant odor.
Replacing the main components of a rotary hammer
It is best to replace key elements before the part becomes unusable. This will protect the instrument from more severe damage, which would be more expensive and time-consuming to correct. The most common replacements are:
The hammer drill does not spin and does not drill
If the chuck does not rotate when you press the start button in drilling mode, the cause can first be determined by the sound. If the electric motor hums but does not turn the chuck, most likely something is preventing the rotor from rotating inside the gearbox. What happened to the engine will have to be found out by disassembling the mechanical part of the tool.
If the engine does not hum when turned on, it is more likely that the motor has failed. Having opened the lid of the device, it is necessary to determine what exactly led to this phenomenon. This could be an open circuit, a broken start button, or a short circuit in the coil windings. Using the tester, the specific cause is determined and appropriate repairs are made.
The hammer drill is cracking and won’t turn, how can I fix it? Don't forget to read the description of the video!
Makita repair
Makita2450 is in great demand in Russia. It should be noted that the instruments are made in Japan, but the HR 2450 model is made in China. Makita 2450 is a professional tool. Thanks to its reliability, a Makita hammer drill will last a long time. You can repair the Makita 2450 rotary hammer yourself, which is a big plus.
The Makita hammer drill has many elements. Rubber parts in the circuit are often the cause of failure.
Replacing the button and brushes
A noticeable burning smell emanating from the hammer drill indicates that the brushes are faulty and need to be replaced. When used for a long time, brushes wear out, spark, and may even start to burn. In this case, they should be replaced.
The brushes are located in the electrical part , so after removing the plastic case and disassembling the brush assembly, you need to remove the old brushes from under the lock and replace them with new ones. Now some manufacturers immediately include spare brushes in the kit, which simplifies the task for the average user.
Changing the switch button is much easier, but it is not included in the additional kit. In a disassembled case, it is enough to disconnect the damaged button and put a new one in its place.
Sometimes the problem with the switch is not that serious, and some technicians advise simply turning the button 180 degrees and continuing to use. But this life hack only helps if the problems are minor.
Peculiarities of rotary hammer maintenance
Any deviation from good performance is already a warning that something is wrong. If your tool does not work as before, but with some errors, then you can always find out the reason yourself. But to do this, you need to understand how a hammer drill works from the inside.
When buying a device, especially an expensive and branded one, the client first of all pays attention to quality. After all, you really want the device to last for a long time. But regardless of the price and manufacturer, there are always two components: electrical and mechanical.
The specifics of the repair will depend on which part the breakdown is located in.
When disassembling and repairing a rotary hammer with your own hands, you need to know the characteristics of the device and how the engine is installed: vertically or horizontally.
If the rotor is installed vertically, then such rotary hammers are called barrel hammers . Their peculiarity is that they work on the principle of a crank impact mechanism. This instrument is heavier, but still powerful. It is worth considering that because of this, a vertical hammer drill requires more lubrication to maintain it in order.
Rotary hammers, where the engine is horizontal, are less demanding and more convenient to use. This tool is ideal for home repairs.
Once you know all this, it's time to understand what's inside. The electrical part is always located closer to the place where you need to hold the hammer drill. It houses the “heart” of our impact mechanism – the engine. In addition, this part contains a power button, structures that absorb interference, as well as a power cord.
The mechanical part includes the impact mechanism itself, the gearbox and the cartridge. These are the main details of this part. Sometimes, to improve the model, new mechanisms are added: different operating modes, a vacuum cleaner and other additions.
Repairing a screwdriver step by step
We take out the engine and carefully disconnect the motor and gearbox. Let's disassemble the gearbox itself. To assemble it exactly as it was, you need to photograph it or schematically sketch the location of the gearbox. If the teeth of the coupling are worn out, then replace it with a new one
It must be firmly fixed.
We carry out repairs using a bench vice, drill and drill of the required size. You will also need wire cutters and some screws.
The repair process will not take much of your time and attention. If you still decide to repair the worn teeth of the old coupling rather than buy a new one, then you will need a drill and a drill bit. To do this, you just need to drill several holes in the places where the teeth were and screw the required number of screws into these holes.
If parts of the screws protrude, then shorten them using wire cutters and turn on the screwdriver to check the functionality of the tool.
Below in the video you can visually watch the repair process itself.
Fastenings: what they are like + (Video)
The clamping mechanism is attached to the drill shaft using the following methods:
- threaded connection;
- conical connection.
The design of a threaded connection often uses an additional locking screw, shown in the photo below. With its help, reliable fixation of the cartridge is ensured.
Chuck, key and locking screw for threaded connection
The threaded connection is ensured by identical threads on the tool shaft and in the channel of the clamping mechanism. The type of thread used in a given connection plays a significant role, and they can be metric or inch. The thread used on a drill is designated using a special abbreviation, which looks like this:
"1.5-15 M13x1.2"
The abbreviation stands for the following:
| Designation | Decoding |
| 1,5-15 | The first digits of the abbreviation indicate the minimum and maximum diameter of drill bits that can be used for clamping with this chuck |
| M13 | The letter designation indicates the use of a metric type of thread, and the number “13” is its diameter in mm |
| 1,2 | Designation of thread pitch in mm |
If the tool uses inch thread markings, the abbreviation is designated UNF. Modern drill models use inch threads, since the choice of clamping mechanisms with inch threads is much wider.
To securely fasten the clamping mechanism, the shaft is equipped with a locking screw, which has a left-hand thread. Therefore, unscrewing the screw to remove the cartridge is carried out in a clockwise direction.
A less common method is to secure the cartridge using a clamping mechanism based on the use of a Morse taper. In this case, the shaft is a cone shape and the clamping mechanism is equipped with a similar shape in the internal channel. The fastening of the mechanism occurs under the influence of forceful mounting of the device onto the structure of the shaft of the electric motor of the tool. Such mechanisms are marked using the following abbreviations: B10, B12, B18, etc.
Key chuck for drill with cone connection (marking)
The letter designation indicates the marking of the cone, and the digital designation indicates the diameter of the tail of the tool. The conical connection has the following appearance, shown in the photo below.
Cone Connectors for Chucks
The conical fastening method is more reliable, since it can withstand greater force loads than the first connection option. In addition, it is easy to use: it is easy to remove and just as easy to put on the shaft.
Finding out how to secure the cartridge
In order to find out how the chuck is secured to the drill, it is necessary to conduct an external inspection. Experts can determine this moment at first glance, and for inexperienced craftsmen there are markings by which one can judge the method of securing the chuck to the drill. Examples of markings for conical and threaded connections are described above.
https://youtube.com/watch?v=MrK4G4JSHDU
Mechanical breakdowns - how to fix them
Faults in the mechanical part of the tool are easier to detect than in the electrical component. This is due to the fact that any mechanical defects are audible. The main signs of mechanical malfunctions of the devices in question include:
- The occurrence of extraneous sounds
- Vibration and chatter of the chuck
- The tool motor can be heard running, but the chuck does not rotate
To repair the device and eliminate mechanical faults, you will first need to disassemble the housing. Knowing the design of a screwdriver, it will not be difficult to eliminate any breakdowns that occur in the mechanical part. If extraneous sounds occur, which indicates the cause of wear on the bushings and bearings of the motor armature, then these elements need to be replaced. When the bearings and bushings wear out, they need to be replaced, but first you need to buy these parts. Difficulties may arise when purchasing, since it is almost impossible to find spare parts for outdated models of tools.
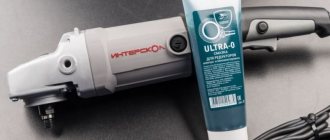
This is interesting! Before installing a new bearing, it should be well treated with lubricants, for example, Litol-24 or Solidol, or even better with special lubricants.
In addition to bearing failure, the gearbox on the screwdriver may break. A number of malfunctions of this device include:
- The gearbox shaft bends due to heavy loads
- The working surfaces of the gears wear out
- The pin on which the satellites are attached breaks
- The bearing or support sleeve of the gearbox is worn out
Most often, it is the gearbox that fails, or more precisely, its component parts—gears. The causes of gearbox failure are:
- Incorrect use of the tool
- Heavy loads for which the device is not designed
- Lack of lubrication
- Material from which the devices are made
If the screwdriver is “old school”, that is, its gearbox consists of steel gears (instead of plastic), then it is advisable to repair it rather than buy a new one. To do this, you need to disassemble the device, inspect it and find the cause of the malfunction. When repairing a gearbox, it is necessary to clean the mechanism and parts from obsolete lubricant and apply new lubricants. If there are damaged gears, they need to be replaced. Do not rush to dispose of faulty gears, as you will need to buy the exact same parts (use them as a template).
This is interesting! If the tool has plastic gears, it is not recommended to replace them with steel ones. The reason is that plastic gears break under heavy loads, which protects the engine from combustion. If the device has metal gears installed from the factory, this indicates that the engine has a large power reserve.
To avoid unnecessary questions when independently repairing the mechanical part of screwdrivers, there is a table below that shows the main signs of mechanical faults, as well as ways to eliminate them.
| Symptoms of tool malfunction | Troubleshooting methods |
| The occurrence of extraneous sounds and hum | If extraneous sounds begin to appear when using the tool, this indicates wear of the bearings. To eliminate the breakdown, you need to check the integrity of the motor armature bearing and gearbox. If the bearings are in good condition, you should also check the integrity of the bushings, as they also wear out. Most often, the bearing shaft support sleeve wears out. |
| Vibration | Curvature of the reduction shaft, which contributes to the occurrence of strong beating and vibration. To solve the problem, you need to disassemble the case, assess the damage and make the appropriate decision to replace the part. |
| Clamp chuck failure occurs | If runout of the cartridge is detected, then you need to check the quality of its fixation. The part is fastened with a bolt, which is located inside the part (to see the bolt, you should separate the jaws). To screw the cartridge, the bolt must be rotated not to the right, but to the left, since it has a reverse thread |
| Jamming | If the tool is jammed, as indicated by the operation of the motor, but the chuck does not rotate, then you need to disassemble the housing and check the integrity of the gearbox. Jamming of the tool indicates displacement of the satellites, a violation of the integrity of the gears, or a violation of the integrity of the bearing. To fix the breakdown, you need to disassemble the screwdriver and find the cause of the jamming |
| Cracking and spinning at switch position | Gearbox malfunction. To eliminate it, you need to disassemble the tool and inspect the integrity of the mechanism. |
https://youtube.com/watch?v=Jr_xq9ZvvdE%3F
Trouble-shooting
hands has some advantages. That's it, repairs in a workshop are an expensive pleasure, but it takes a significant amount of time and, thirdly, the breakdown may not be difficult, so fixing it is quite simple and you can soon continue working.
Before starting the repair, the unit needs to be disassembled. Each model has its own disassembly aspects. Alas, as a rule, any model consists of two parts : front and rear halves, connected with screws. Before unscrewing them, you need to remove the cartridge. In some models, the cartridge does not need to be removed.
Disassembly algorithm
Do not forget that repair of a rotary hammer is only possible in de-energized mode! Due to the similarity in the internal composition of the main part of the hammer drills, the tool disassembly scheme is approximately the same. If no external faults are observed, you should start disassembling the device from the cartridge.
Next, the following parts are removed sequentially:
- rubber boot;
- retaining ring (using a screwdriver);
- plastic boot;
- washer;
- plate;
- spring;
- small metal ball.
When the last four parts wear out, the barrel cannot stay in the cartridge and begins to fall out. To fix this, you need to replace the broken part, and clean and lubricate the remaining parts.
The next part in the parsing algorithm is the body . The first thing to do is remove the switch. To do this, it must be transferred to the “Strike” state, indicated by a drawn hammer. Then, hold the button on this mechanism and turn it until it clicks.
To complete removal, take a screwdriver and use it to pry up the switch and remove it. In order to get to the electrical fault, it is worth removing the plastic housing.
This is not difficult; it is usually held on with screws around the perimeter. If there is a problem in the gearbox, it must be dismantled and damaged bearings replaced.
Read also: Machine made from an engine from an automatic washing machine
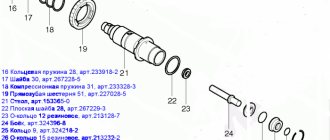
Rotary hammer design, assembly diagram and spare parts list
The tool consists of a single-phase motor and rotor. A gear located on the armature shaft is responsible for rotational movements. Between them there are bearings, one of which is “drunk”, it is this that transmits movement to the working parts.
Barrel hammer drill repair
This procedure is no different from repairing a conventional hammer drill. It is worth considering that the motor and shaft are located vertically.
How to fix a rotary hammer with your own hands
The repair procedure at home is the optimal solution and will cost less than the services of service centers. Instrument repair is expensive and it is not a fact that you will find a conscientious repairman. Before you think about how to make a hammer drill, you should acquire the necessary tools and stock up on theoretical knowledge on how to disassemble and assemble a hammer drill. After completing the repair, run it in gentle mode.
The hammer drill cracks under load
The hammer drill rotates and crackles. I worked my five years normally, faithfully. How can I fix this problem myself?
Oleg, often when overloaded in work, the steel striker splits, this leads first to a weakening of the blow, and then to its complete absence. The firing pin needs to be replaced.
The second probable reason is wear or breakage of the piston group of the hammer drill. The liner and piston should be replaced. If you have experience, you can do it yourself.
READ Which Hammer is Better Makita Or Metabo
A properly working hammer drill is an excellent assistant in the household and in production. This versatile tool with many functions allows you to comfortably solve even the most complex tasks. If a hammer drill breaks down, it is not at all necessary to immediately take it in for repairs. A home craftsman can disassemble and repair this tool himself. How to repair a rotary hammer with your own hands?
Mechanical malfunctions of the Bosch rotary hammer
When mechanical malfunctions occur in the operation of the tool, an extraneous unpleasant sound appears, sparking intensifies in the collector area, a burning smell appears, the tool heats up excessively, its power drops depending on the duration of operation and the impact on the material.
We will look at all the faults in the diagram of the Bosch 2-26 rotary hammer. Other models, such as Bosch 2-20, 2-24, differ in the design of the intermediate shaft and the installation of various bearings.
The hammer drill stops hammering, but drills
The hammer drill does not hammer under load or in idle mode for the following reasons:
- the rubber rings of the striker, striker, and piston are worn out;
- the rolling bearing race has collapsed;
- the cylinder and the firing pin of the percussion mechanism were destroyed;
- cut off the splines of the clutch mounted on the intermediate shaft;
The hammer drill has stopped drilling, but is chiseling
The main reasons why a rotary hammer hammers but does not drill are:
- the force of the conical spring pressing the clutch has weakened;
- the locking roller does not fix the large barrel shaft gear;
- does not hold the tool locking mechanism in the barrel;
- The hammer drill does not chisel or drill.
The main reasons why a hammer drill does not chisel or drill are:
- sheared teeth on the small rotor gear or on the large intermediate shaft gear;
- The rotary hammer electric motor does not work;
- there is no power to the hammer drill motor.
Now let's talk about everything in order
Let's consider options in which the hammer drill does not hammer, but drills
Wear of rubber rings on the striker, striker, piston.
This reason appears gradually as the rubber rings wear out. At first the blow weakens, then disappears altogether.
The malfunction is eliminated by replacing the indicated rubber rings with new ones.
For any repair of rotary hammers or their components, all rubber products must be replaced.
Repair kit for rubber sealing rings for a Bosch 2-26 rotary hammer
The rolling bearing race has fallen apart (drunk bearing)
If the drunk bearing pos. 830 is destroyed, the rotational movement of the intermediate shaft cannot be converted into the translational movement of the cylinder in the impact mechanism.
Eliminated by completely replacing the rolling bearing.
Friction bearing
The cylinder, firing pin, and firing pin of the firing mechanism were destroyed
There are cases when the striker in the cylinder, pos. 26, gets stuck, which leads to destruction of the cylinder and the impossibility of creating air pressure in the barrel of the striker mechanism. And the second reason: destruction or breakage of the striker pos. 28, leading to distortion of the part and the impossibility of transmitting the shock impulse. Breakdowns are eliminated by completely replacing failed parts.
The firing pin is jammed in the piston, the piston is destroyed
The splines of the clutch, pos. 67, mounted on the intermediate shaft, were cut off
The malfunction can be eliminated by repairing the clutch or completely replacing it. When making repairs, the worn teeth on the clutch are filed down. To correct this defect, a round needle file and a drill are used. The coupling is clamped in the hand, and the tooth profiles are straightened using a drill with an appropriate file. The splines on the intermediate shaft are modified in the same way.
Restoring the teeth of the intermediate shaft clutch
Let's consider options in which the hammer drills but does not chisel
The force of the conical spring pressing the clutch has weakened
When the pressure force of the spring pos. 50 decreases, the clutch slips on the intermediate shaft without transmitting rotation from the small spur gear to the large gear pos. 22 of the barrel shaft pos. 821 of the impact mechanism. By the way, on different Bosch models, clutches are designed differently.
Details of the torque and translational impulse transmission unit
The locking roller does not lock the large barrel shaft gear
The large gear, pos. 22, is attached to the barrel shaft, pos. 01, with a roller, pos. 88, pressed against the shaft collar with a conical spring, pos. 80, and secured with a retaining ring, pos. 85.
The reason may be a weakening of the force of the conical spring pos. 80, destruction of the locking ring pos. 85, or loss of the fixing roller pos. 88.
Gear pos.22 on the shaft pos.01 of the barrel pos.821 of the shock block assembly
The mechanism for fixing the tool in the drill barrel does not hold the drill
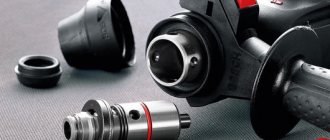
Bosch rotary hammers use two types of chucks: SDS-plus and SDS-max. The difference is in the design of the locking mechanism.
The reason is the wear of the antennae of the chuck raster bushing, which makes it impossible to transmit the shock pulse to the working tool of the hammer drill.
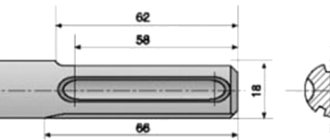
Tool shanks for hammer drill chucks Bosch 2-26
Let's consider options in which the hammer drill does not drill or chisel
Sheared teeth on the small rotor gear
The gears rotate and the teeth on one of them, usually the small one, are cut off.
When the working tool jams and the clutch does not work properly, the gear teeth on the hammer drill shaft and the intermediate shaft wear out or are completely destroyed.
In this case, the rotor or large gear of the intermediate shaft is completely changed.
Bosch 2-26 hammer drill rotor with cut splines
Hammer drill motor does not work
The reasons for a non-working electric motor may be:
- short circuit in the rotor, stator;
- destruction of carbon electric brushes;
- loosening of the brush holders;
- burnout of lamellas on the rotor commutator;
- breakage of the rotor or stator windings.
The listed malfunctions are eliminated by repair (manually rewinding the windings, replacing the commutator and desoldering the winding leads) or replacing the rotor, stator, and carbon electric brushes with new ones. The majority of malfunctions in the electrical part of the Bosch 2-26 rotary hammer are confirmed by increasing sparking in the collector area.
The length of serviceable electric brushes cannot be less than 8 mm. When replacing one brush, the second should change automatically.
The rotor or stator windings can be rewound yourself at home.
Burnt rotor manifold of a Bosch rotary hammer
No power to the electric motor of the Bosch rotary hammer
The cause of this malfunction is a break in the wire supplying power to the electric motor. Most often, a break occurs at the point where the cable enters the hammer drill. The wire should be replaced with a new one or repaired. The malfunction can be determined using a tester. If there is no tester, the fault can be found using the power phase and a screwdriver with a neon indicator lamp. Connecting the power wires one by one, at the other end, using a neon screwdriver, determine the presence or absence of a phase.
The power button for the hammer drill does not work. Determined by a short circuit tester.
Most often, the failure of the punch button is caused by a short circuit of the filter capacitor. It is best to replace the button with a new one.
Power cord pos. 5 at the entrance to the tool
Electrical problems
If the hammer drill is connected to the network, but upon startup there is either a lack of impact, or a lack of torsion, or both, the reasons should be sought in the electrical plane. Typically, these problems are accompanied by the following symptoms:
- extraneous sounds that are not typical during normal operation;
- the motor hums, but the drive shaft does not turn;
- graphite brushes spark;
- a distinct burning smell, visible fumes, black smoke;
- The hammer housing is very hot.
The motor hums, but there is no rotation
In this case, the source of the problem is hidden in the engine gearbox: it prevents the rotor from spinning. If there is no sound, there are more reasons:
- power supply failure;
- failure of the start button;
- short circuit in the coil windings.
One way or another, you will have to disassemble the electric motor, check for a short circuit, and only then make repairs.
Sparking graphite brushes
This malfunction is associated with wear of the brushes - they should be replaced. If the sparking does not stop even on new brushes, the reason is in the engine, or more precisely, in the stator and rotor windings. When assembling a rotary hammer at the factory, a special protective varnish is applied to these windings, which prevents dust from penetrating into the rotor and stator.
Stator with winding
If periodic maintenance is not carried out, there will be so much dust on the windings that the varnish will rub off. This may result in a short circuit. Because of this, sparks may appear on the brushes. To check for a short circuit, use a multimeter.
Preventive measures:
- periodic change of brushes;
- oil lubrication of the rotor shaft bearings;
- applying a new layer of varnish to the rotor and stator windings to replace the worn one.
Case overheating, odors, smoke
Sometimes the reason why the impact mechanism of a rotary hammer does not work is the strong heating of the body, accompanied by a burning smell and the release of smoke. It is necessary to immediately turn off the tool and give it time to cool down. Rapid warm-up after the next start-up implies the need to disassemble the engine and look for a breakdown.
Acclimatization and temperature ranges
Problem. Like any other power tool, a hammer drill does not like working in cold conditions (for example, if it has been in an unheated room for a long time) and has difficulty withstanding critical overheating. In the first case, due to too thick a lubricant, wear on the moving parts increases. In the second, the lubricant becomes too fluid and does not perform its functions well, the gaps between the rubbing parts decrease, which can lead to increased friction and jamming.
Solution. Before starting work, do not rush to load the tool, let it warm up a little - for a minute at idle. During intensive use and in conditions of high temperature, take breaks to cool the hammer drill (for example, for household models, manufacturers always indicate in the passport the permissible time of continuous operation and the duration of mandatory breaks).
Reasons for the lack of impact
At first glance, it seems that the impact mechanism has a simple design and there is nothing to break. Load, dust and vibration gradually take their toll. Typically, the impact force decreases as the mechanism wears out and eventually disappears. The sudden disappearance of the impact is explained by the deformation or destruction of some parts.
Striker and striker
These parts are made of high-strength steel. The firing pin rarely fails, but the bushing in which it moves absorbs some of the impact energy and breaks down over time. The fragments jam the firing pin and the hammer stops hitting.
The firing pin (“flying piston”) has a compression ring. When it wears out, part of the air passes into the gap between the cylinder in the barrel and the firing pin. The more wear, the weaker the impact. The problem is solved by replacing the ring with a new one.
Sometimes the striking part of the “flying piston” breaks on the firing pin. This is usually the result of pressure on the hammer when drilling holes. The drilling speed does not increase, but the load on the mechanism increases, which accelerates wear. Repair consists of chamfering on an emery machine or replacing a part.
"Drunk" bearing
It is mounted on the shaft at an angle and drives the piston. If there is wear or damage, the bearing must be replaced.
Mode switch
Mechanism parts may come out of the guide grooves. This may be a consequence of deformation, wear, or frequent use of the tool with the mode not fully engaged. The malfunction is eliminated by installing the parts in their places or replacing them with new ones.
Lubrication
Untimely replacement of lubricant can also be the reason for the lack of shock. Working with a hammer drill involves the presence of dust, which does not have the best effect on the properties of lubricants. Dust can clog the holes in the cylinder that allow air to circulate when the impact mechanism operates. The same effect cannot be ruled out when using too thick a lubricant not intended for hammer drills.
Preventive measures
It is better to prevent breakdown, so it is better to adhere to the following recommendations.
- Change the lubricant twice a year.
- Every six months, preventive inspection of brushes.
- Thorough cleaning every time after work.
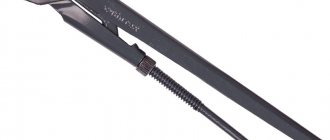
- Before work, lubricate the back of the drill or chisel to reduce the load on the striker.
If the hammer drill stops working normally or breaks down, read the instructions and inspect it carefully. Before you start making repairs yourself, really evaluate your capabilities. If you are sure, try to fix it yourself, otherwise, if in doubt, it is better to contact a specialist. And remember that already repaired mechanisms are not subject to warranty and service centers are reluctant to accept them for repairs.
What to do if there is no impact in the hammer drill
If the tool refuses to chisel, it is not necessary to immediately disassemble it or plan a trip to the service center. Sometimes the reasons for refusal can be elementary.
In some models of hammer drills, the impact mode is blocked by reverse. Simply move the lever to the desired position. A similar effect can occur from a mode switch that is not fully turned.
When drilling vertically, dust and small fragments can clog the chuck and striker under the drill. After removing the drill, you need to clear the cartridge of debris and push the firing pin down.
The use of cheap consumables can also cause a malfunction. The shank of a low-quality drill sometimes turns out to be riveted in the form of a “fungus” inside the chuck. It is not always possible to remove such a drill without disassembling the cartridge.
High-quality consumables, timely prevention and maintenance are guaranteed to prevent tool failure at the most inopportune moment. If there are hints of a malfunction, it is better to immediately contact the service center or, if you have experience, carry out the repair yourself.
Every real man has a hammer drill at home or in his garage. But no matter how “golden” and neat hands you have, sooner or later your loud “assistant” breaks. Repair for such a device is rarely located close to home, so often the best way is to try to fix it yourself.
In this article we will look at how to quickly determine the cause of the malfunction and repair the equipment at home.
Frequent breakdowns
Many years of experience of craftsmen shows that when solving a problem - why a hammer drill does not work - the cause can be found in almost any node.
This makes it difficult or completely impossible to attempt to independently diagnose and repair the instrument, although in some cases the breakdown is simple.
For example, if a hammer drill does not work in a vertical position, then with a 99% probability the cause lies in a break in the power cord at an area of 10-20 cm from the entrance to the tool and can be eliminated within a few minutes.
If a Bosch, Metabo, etc. hammer drill does not turn on, the reasons are also usually caused by a breakdown of the electrical part:
- a break in the power cable, a defective plug or power button - this is most often caused by a short circuit in the filter capacitor;
- wear or destruction of commutator brushes;
- loosening the screws of the electrical contacts;
- contamination or burnout of the collector lamellas;
- breakdown of the turns of the armature or stator winding;
- failure of the operating mode switch due to contamination.
The list of mechanical failures is even more extensive and, as a rule, requires the replacement of defective parts with new ones with similar characteristics. Any of the “Udachnaya Tekhnika Service” workshops can quickly, inexpensively and with a quality guarantee repair Bosch and other rotary hammers.
Every real man has a hammer drill at home or in his garage. But no matter how “golden” and neat hands you have, sooner or later your loud “assistant” breaks. Repair for such a device is rarely located close to home, so often the best way is to try to fix it yourself.
In this article we will look at how to quickly determine the cause of the malfunction and repair the equipment at home.
Why the hammer drill stopped hammering - the main reasons and solutions
In the operation of a hammer drill, the main role is played by the impact, and not the rotation of the drilling mechanism. If the impact force weakens or disappears altogether, it becomes impossible to drill surfaces with such a tool. The reasons why the hammer drill stopped chiselling relate to both the mechanics and the electrical part. The article talks about problems and how to fix them.
Do-it-yourself Dewalt hammer drill repair
To carry out repairs, you will first have to disassemble the tool and then replace the broken part with a new one. The analysis should be performed according to the following algorithm:
- It is better to start working from the top nodes. To begin with, the rubber tip is removed, the washer is the second, the spring is the third, and the ball is the last;
- The second step is to remove the screws holding the case in place;
- In the next step, remove the handle cover and disconnect the stator wires;
- Remove the brush holder;
- Disconnect the gearbox and housing until you see a gap, then remove the switch;
- After all these steps, place the tool vertically on a vice and carefully remove the broken part.
Please note: when disassembling a hammer drill, always take the time to clean its body so that it serves you as long as possible. Also, be sure to be extremely careful and follow safety rules.
Source