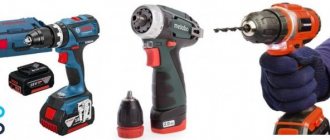
Over the past decades, cordless tools have conquered even those niches where the dominance of traditional equipment seemed unshakable from conventional corded power tools. Even impact drills are powered by portable batteries, not to mention regular screwdrivers. Despite the overall high reliability of cordless tools, the weakest point is still the batteries, and, to a certain extent, their chargers. Having discovered that the battery of a portable screwdriver is not charging, you need to localize the fault and make a decision to repair or replace the faulty unit.
The most common causes of breakdown
The most common reasons for battery failure include:
- corrosion and oxidation of contacts due to storage in high humidity conditions;
- deep discharge due to prolonged non-use;
- development of the resource of charge-discharge cycles;
- In lithium-ion batteries, the internal control circuit may fail;
- large loss of capacity due to the “memory effect” in batteries prone to this phenomenon;
- drying out of the electrolyte during prolonged use or storage;
- mechanical damage (including internal) due to impacts on the battery case.
| Battery type | Resource |
| NiCd | 500-1000 charge-discharge cycles |
| NiMH | about 500 cycles |
| Li-ion | up to 800 cycles or about 2 years regardless of the number of cycles |
Chargers often fail due to:
- corrosion and oxidation of contacts caused by the same reasons;
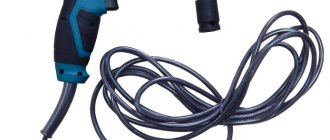
- hidden break in the power cord (most often near the housing or plug);
- failure of internal components;
- bent contacts due to mechanical stress.
To make a decision about trying to restore the functionality of the batteries and charge replenishment device, it is important to determine the true cause of the malfunction.
Battery types
There are three types of tool batteries:
- Nickel-cadmium (NI-Cd). The older generation, which is still equipped with household screwdrivers. Affordable price, good ratio of size and capacity (quite compact), hold a charge for a long time when not in use. The disadvantage is the memory effect. If you recharge without fully discharging, then “information” about the incomplete volume accumulates, it prevents you from releasing the charge until the real resource is exhausted.
- Nickel metal hydride (Ni-Mh) . An improved analogue of nickel-cadmium batteries with cleaner production technology. The memory effect, although present, is weaker. The main disadvantage is that they quickly discharge during storage.
- Lithium-ion. The most advanced type, which is gradually replacing other types in the segment of professional/semi-professional electric hand tools. High capacity, almost complete absence of “memory”, durability, low level of self-discharge in storage mode. The only drawback is the high cost compared to other analogues.
Important! The price of a nickel-cadmium type “can” with a capacity of 2 A*h is approximately twice as high as a lithium-ion type “can.”
How to check if the charger is working properly
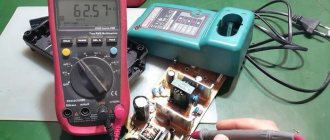
The very first diagnostic method is visual inspection. This way you can determine mechanical damage to the housing, power cord, as well as oxidation and corrosion of contacts. If everything is in order, the charger must be connected to a 220 volt network. Almost all units are equipped with supply voltage indicators that light up even without a battery installed.
Indication that the charger is connected to the network.
If there is no reaction in the form of a light bulb glowing after being plugged in, but there is obviously voltage in the socket, it is necessary to ensure that the indicating LED does not burn out. To do this, you will have to measure the constant voltage at the output of the charger.
If it is not there, you need to check whether 220 volts is coming to the input terminals of the charger. If the cord is removable, then you can test it with a multimeter for integrity. If not, you will have to open the charger case and ring from the plug to the connection points with the charger board.
This operation must be performed by disconnecting the power cord from the 220 volt outlet.
If the mains voltage is present on the board, then there is reason to assume that the charger control circuit has failed.
How to find a breakdown in the charging unit of a screwdriver
Few people know what is needed in order to find a breakdown in the charging unit of a screwdriver, so we will consider this process in detail. You should start by disassembling the charger case, but this is done exclusively with the device disconnected from the network. Make sure that the plug of the device is not connected to the outlet, and only then begin to disassemble the housing structure.
To get to the inside of the screwdriver charger, which is being repaired, you must first unscrew 3-4 or 6 screws securing the cover. The number of screws depends on the model of the screwdriver and the power supply itself. As soon as the case is disassembled, the following picture will appear before your eyes, as shown in the photo below.
What to do with all this? You need to start repairing the charging screwdriver by identifying the faulty element or assembly. To get started, do the following:
- An inspection is being carried out. If there are traces of soot, then the breakdown has been found, and you can begin to fix it, but do not rush. After all, the presence of carbon deposits on one element could cause failure of other parts. To find them, you need to do the following, so read on
- We arm ourselves with a tester, and, having set the switch to the dialing mode, we touch the fuse terminals with the probes. What it looks like is shown in the photo above. If the tester beeps, it means the fuse is good and the problem is somewhere else. Let us remember our initial check of the device for serviceability - if the tester readings were positive (and not zero), then the fuse need not be checked, and the reason is different. If the tester readings are zero, then the fuse is checked first.
- The next thing to check is the capacitor. Its malfunction can be identified by its shape - if it is swollen, then the repair of the screwdriver charging can be completed by replacing the burnt out element. Before soldering, it is recommended to make sure that the element is really faulty. To help, we again take a multimeter, only now we set the switch to the resistance measurement mode, and touch the terminals of the device with the probes. Shows “0”, which means you need to replace the capacitor and “it’s in the bag”
- Often the failure of a capacitor entails a burnout of the diode bridge. All or some of the diodes may fail, but in any case, they are worth checking. The photo below shows what a capacitor and diodes look like. You can check the health of the diodes by setting the multimeter to DC voltage measurement mode. To do this, we touch the leads of the diodes one by one with the probes. In one direction, the diodes must pass voltage and display the corresponding value on the device. After this, you need to change the polarity and ring the outputs again. If they pass in the opposite direction, then the corresponding elements should be replaced. If none are missing, then they are intact and do not require replacement.
- Checking the inductor or resistor is also checked using continuity testing or resistance measurements. If the continuity signal does not beep, then the resistor is faulty and needs to be replaced. All other elements rarely fail (unless it is a lightning strike in the electrical network, after which the entire board burns out completely), so usually this is where the search for faulty elements ends
Found faulty elements need to be replaced, but how to repair the screwdriver charger is described in detail below.
How to check if the battery is working properly
If the first visual inspection of the battery does not reveal any faults, then for a final diagnosis you need to try charging the battery on a different charger. This way you can completely localize the problem - if the battery on another charger also does not charge, then the fault is in it, and if it charges, then it’s all in the charger.
As a final check, you can measure the voltage at the battery terminals - if, after trying to replenish energy, the voltage on them is noticeably less than the rated voltage of the screwdriver (in most cases it is indicated on the battery case), then the battery is inoperative.
The video clearly shows the verification method.
How can I charge it?
If the required charger is not available, there are three ways to solve the problem:
- use the car charger;
- buy a standard universal charger;
- Convert an electric tool to be powered by an external battery.
Troubleshooting battery charging problems
If you strictly follow all the above rules, but for some reason the battery stops charging, you need to look for the cause of the problem. To do this, you will have to carry out diagnostics, including the following operations:
- We measure the battery capacity using special equipment. It is quite possible that it has simply exhausted its working life and requires replacement.
- We check the contacts. Due to contamination, charging may not occur at all or may be very slow.
- We make attempts to charge and discharge batteries several times using special devices. Sometimes this helps to restore even a “dead” battery.
- We check the serviceability of the 12 or 18 volt power supply and replace it if problems are detected.
- We test the electrical circuit to identify any breaks that have led to deterioration in battery performance and fix the problems.
In the vast majority of cases, faults that cause difficulties with charging the battery can be eliminated independently. But if no attempts bring the desired result, it is better to seek help from specialists.
Why the screwdriver battery does not charge - causes and solutions
The reasons for the absence or low charge level, as well as ways to eliminate the problem, are different:
- There is no contact between the charger and battery terminals. This is a consequence of the fact that the charger plates have bent. Carefully bend the plates back to working condition.
- Terminals are oxidized or dirt sticks to them. Contacts are cleaned and wiped with alcohol.
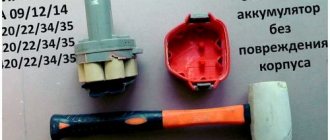
- Failure of one of the “cans”. Disassemble the battery pack housing by removing the cover (unscrew the screws or remove the latches). “Ring” each jar with a tester for the presence of voltage or discharge current. It’s easier with tension - it’s either there or it’s not, but this method does not always work. The discharge current is measured at the load resistor - for a faulty can it is an order of magnitude lower than for a working one. After diagnostics, the faulty can is separated from the working ones, and a new one, of exactly the same type, and with the same polarity orientation relative to the other elements, is installed in its place.
Important! The most difficult part of replacing a can is soldering the cans into the battery. At the factory they use spot welding, and when doing do-it-yourself repairs, they often use a soldering iron. During operation, it is important not to overheat the battery; you must work quickly.
There is another reason for the lack of charge, but it is typical only for nickel-cadmium batteries - the memory effect has worked, and the battery does not charge, although its resource has not yet been exhausted. To avoid this, it is important to charge correctly.
Replacing old batteries
This method can be used to repair the battery of any screwdriver. The repair procedure itself is not particularly difficult and begins with disassembling the battery. Using a multimeter, faulty elements are determined whose voltage will be below normal. Then they are carefully removed and exactly the same mini-batteries are purchased instead.
New parts are installed in place and connected by existing plates. Soldering or spot welding is used for connection. In this case, you need to ensure that the battery does not overheat. Therefore, the work must be done carefully and quickly using flux or rosin.
Tags
based on nickel. on nickel banks, nickel and nickel. Nickel batteriessome nickel batteries Batteries Batteries are charged with a battery screwdriver faulty battery decade cordless tool that the battery of portable batteries can be faulty battery if the battery is not working. Screwdriver battery screwdriver conventional screwdrivers.portable screwdriver failure of the screwdriver.battery of the Riobi screwdriver.what the screwdriver is not working batteriestype of battery elements.all elements.
operation of power tools
How to charge correctly
After purchase and before first use, you need to check the charge level, then proceed depending on the type.
Types of batteries
If this model does not have a “memory effect”, then you can immediately charge it and start working, otherwise you will need preparation:
- Ni-Cd: discharge twice or three times and then fully charge to reach full capacity, then use the standard charging procedure;
- Ni-Mh: can also be “pumped up”, like the previous option;
- Li-Ion: does not require a full discharge at all (it is even harmful), so you can charge it immediately.
General rules:
- Recommended temperature 10-40 Celsius (or according to instructions);
- Ni-Mh can overheat, for this reason you need to control the charging (others can also heat up excessively, so in hot weather or in a warm room it is worth organizing cooling for the battery if necessary);
- The charged battery must be disconnected from the charger.
Disconnected battery
For storage:
- if the tool is not in use, it is also better to disconnect the battery from it
- during long-term storage, you need to charge it periodically;
- take into account the characteristics of each type (Li-Ion and Ni-Mh should not be discharged, but Ni-Cd, on the contrary, can be stored discharged).
How much to charge:
- first of all, according to the instructions for the device, additionally paying attention to the indication on the charger;
- if you need to quickly replenish the charge - at least half an hour (again, if it does not contradict the instructions);
- A full charge can take up to 7-8 hours; more precise times are indicated in the documentation for the device.
Charging with indication
It is worth paying attention to the type of charger. In the amateur segment, a simplified circuit is used, while professional models can be equipped with impulse options. They are more “smart” and powerful, so a full charge can take about an hour.
We reanimate the DCB 145 battery
Lithium batteries are increasingly used in everyday life. Currently, they are increasingly found as replacement batteries for screwdrivers and other power tools. Despite their advantages, lithium batteries are also not without their disadvantages.
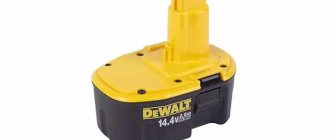
So, after 1.5 years of operation, the batteries from the DeWalt screwdriver began to discharge quickly, and it became impossible to work. The batteries were charged to a maximum of 14.4 volts, although the standard DCB-107 charger was used for this. In addition, charging happened very quickly, instead of the required 60 minutes, it took about 15 minutes at most.
Before talking about how I managed to solve this problem, I would like to introduce the reader to the design of a lithium battery from a screwdriver.
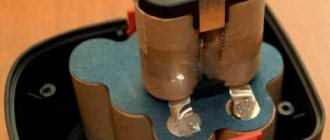
This is what a stock DeWalt DCB-145 battery looks like.
To open such a battery you will need a TORX hex screwdriver. The battery consists of 4 lithium (Li-ion) “cans” SAMSUNG SDI INR18650-13B with a capacity of 1300 mA/h each. All four “cans” are installed in a plastic box and connected in series using current-carrying plates. The plates are spot welded to the battery contacts. It is clear that this is a high-quality factory assembly.
I do not recommend separating the “banks” of a composite battery by cutting through the connecting current-carrying plates. I did so and regretted it. Next I will tell you why you shouldn’t do this.
INR18650-13B batteries themselves do not have a built-in charge/discharge controller. Unfortunately, I was unable 13B But, judging by the parameters of the batteries in this line, the maximum continuous discharge current ( Max Continuous Discharge Current ) can be from 18 (INR18650-13L ) to 23 (INR18650-13M ) amperes! Not surprisingly, they don't have a built-in controller.
Also in the battery case there is a 5-pin connector and a small printed circuit board.
A multi-pin connector is necessary so that during charging it is possible to control the charge of each of the four INR18650-13B batteries separately. As is known, the voltage is more than 4.1
4.2V for lithium batteries is dangerous and can cause damage or even fire. Therefore, the charger equalizes (balances) the current through each “bank” of the composite battery so that the voltage on each of them does not exceed 4.1V.
There is also a temperature sensor installed on the printed circuit board, which is adjacent to one of the lithium “cans”.
Thanks to the sensor, the standard charging DeWalt DCB-107 measures the temperature of the battery and turns off the charging mode if the battery is overheated or has a temperature below +4 0 C. In addition to the temperature sensor, some kind of circuit is mounted on the board, but it is filled with sealant.
This battery assembly is called “ Pack for Power Tool ”, that is, “Package” or battery assembly for a power tool. This is what she looks like.
Large companies like Samsung supply such assemblies to manufacturers of power tools on order. This may be why I was unable to find the exact specifications for the INR18650-13B batteries.
We got acquainted with the design of a Li-ion battery for power tools. Let's return to our “dead” batteries.
Before the batteries “died” they were very discharged. We used the screwdriver until the battery was discharged, and then, after taking a break, we worked with it for some more time. After this, the batteries began to charge poorly and did not hold capacity.
After measuring the voltage on each “bank” of the battery, it turned out that 3 of the 4 “banks” were not fully charged - up to 3.5 volts. Only one was charged to the required 4.1 volts (for Li-ion).
If we add up the voltage of all the banks, we get exactly the same 14.4V. Let me remind you that the standard charger charged the battery very quickly and turned off.
The first thing that came to mind was to replace those lithium “banks” that were not fully charged. But the search for original INR18650-13B did not produce results. Perhaps due to the fact that such assemblies are supplied only to order and are not available at retail. And the cost of four new batteries, for example, INR18650-22R , was almost equal to the price of one DeWalt DCB-145 battery. Therefore, I decided to refuse replacing batteries at that time.
What to do if the battery does not hold a charge?
- Order a new one. If the battery does not hold a charge, it has completed its cycles. It is normal that batteries wear out over time.
- Pay attention to the operating conditions. Li-Ion for drill-drivers is not kept at low temperatures.
- NiCd, NiMH are subject to memory effect. You may have set to charge the screwdriver battery until it is completely discharged. This causes the battery to not hold a charge - buy a new one.
- You recently purchased the tool, but the battery does not hold a charge? Perhaps you received a defective copy. Contact the service center.
First stage of testing
Checking the screwdriver battery at the first stage is the simplest; current and voltage readings are taken from the battery while it is charging.
Readings are taken several times, at certain time intervals:
- 30 minutes after charging has started, U will be about 13 volts ,
- another 30 minutes U will increase to 13.5 volts ,
- two hours after the start of the process - 14 volts ,
- a fully charged battery will produce a voltage of 17 volts .
As for the increase in current (amperage) during charging, if the operating condition of the battery is in order, then the current increases steadily during the first hour. In addition to the voltage, measure the current an hour after the start of the process. If the indicator has passed the “mark” of 1 ampere, your battery is in good health and does not need to be disassembled and repaired.
How to properly repair it yourself.
Be patient and start repairing.
Let's disassemble the battery.
Disassemble the battery carefully. Do not use force to avoid damaging the housing.
- Remove the battery from the screwdriver. If the buttons are stuck and cannot be removed, unscrew the screws of the tool body and remove the top half. One of the buttons has become free. Pull the battery towards you, moving it slightly in different directions, and it will also come off. When you take the battery apart, position the buttons so that they press easily into their grooves.
- The battery case consists of two parts and can be dismounted or non-removable. In the first case, unscrew all the screws and separate both parts.
Structural elements of a screwdriver
A screwdriver is rightfully considered an indispensable universal tool. The modern market of screwdrivers is represented by a large number of models equipped with batteries. Despite the variety of brands and modifications, all batteries have the same structure and only differ slightly from each other.
Each of them consists of individual elements connected in series with each other. All of them are made to standard sizes and have the same voltage level. Certain types of elements differ only in capacity, measured in A/h and indicated in the labeling.
Instead of an afterword
The Russian battery for the Interskol screwdriver However, the cost of a domestic battery, without exaggeration, is reasonable. For those who are not confident in their abilities, for whom it is “easier” to purchase a new battery than to restore the old one, this is an option. Those two or more for which the design is intended, when the structural part of the energy container has exclusive shapes (grooves, clamps, and specific bends), despite this, you will have to devote several minutes of your precious time to technical creativity. Because you will need to repack the battery into its “original” case. how to charge the battery of a screwdriver and what you need to do when the battery does not charge due to a long period of inactivity in a discharged state. To find effective recovery methods for you, do not forget about the safety of yourself and those around you!
Elimination of memory effect
Restoring a screwdriver battery does not always require some radical action. Often, alternating full charging (until the charging light goes out) and completely discharging the battery helps restore battery capacity. This method is also called “boosting the battery.”
How to erase battery memory effect
It is associated with the so-called “memory effect” and is characteristic of nickel-based screwdriver batteries. And it is especially pronounced in nickel-cadmium. It occurs when a battery that has been discharged to zero is not fully charged and begins to be used, or vice versa. This leads to enlargement of the crystals of the active substance, which reduces the area of its active surface.
Follow the manufacturer's recommendations for charging and discharging modes.
The so-called “training” of the battery helps to remove this effect or significantly reduce it. It consists of repeating cycles of full charge and discharge.
To do this, the recoverable battery is completely discharged using, for example, a light bulb. Then it is fully charged and discharged again. Repeat the process 5 times and if the individual battery elements are working properly, the characteristics will return to normal or close to it.
How to add distilled water correctly
Distilled water only evaporates from nickel-cadmium batteries when they overheat during operation. Therefore, to eliminate the problem and restore their functions, water must be added.
This procedure is performed in the following sequence:
- After disassembling the battery, mini batteries will be found inside. Their number may vary, depending on the brand of the instrument. The faulty element is determined by a multimeter. In a working battery, the voltage is 1-1.3 V. If this figure is lower, then the element is faulty and needs to be repaired.
- Next, the faulty parts are carefully removed without destroying the connecting plates. They will be needed later for reassembly.
- A hole no larger than 1 mm is drilled in the side. It is not located in the middle, but closer to the bottom or top of the battery. You only need to drill the wall, without going deep into the element.
- You need to fill the syringe with distilled water. The needle is inserted into the hole and through it the battery is completely filled with water. After this, it should stand in this position for at least a day.
- After a day, the battery is charged using a special device, and then left in a charged state for another 7 days.
- A week later, the capacity and voltage are checked again, and if it has not dropped, the hole in the case is sealed or sealed with silicone.
Assembly and initial charging of the screwdriver battery
- After you have replaced the defective elements, carefully check the solder joints.
- When installing the battery “bundle” in a protective container, do not forget about the insulating substrates that protect the elements from short circuits.
- Carefully glue or tighten the fixing screws at the connecting points of the housing.
It doesn’t matter at all what kind of screwdriver battery (Interskol, Makita or Bosh) you restored. The main thing is how well you assembled the energy device. Since any minor error during installation, be it a housing gap, a jammed wire, or incorrect positioning of the contact plates, can nullify all your efforts. Only after you have visually verified that everything is assembled correctly, you need to completely discharge the “new” battery. The battery for a screwdriver (12V) will run out very quickly if you “load” it to its full capacity. The next thing you have to do is perform 2-3 deep charge/discharge cycles. It is worth noting that this kind of prevention should be performed at least once every three months.