Cordless impact drill/driver 10.8 V Li-ion 2x2 Ah
9999 ₽ More details
Cordless drill-driver METABO BS 14.4 (1.5Ah)
9510 ₽ More details
Metabo
To obtain accurate and reliable data during geodetic work, a device called a level is used. First of all, before starting measurements, you need to check the level for serviceability, and then configure it correctly. Typically, this work is carried out in special geodetic laboratories and covers a number of important operations and procedures that reveal the real parameters of the level and allow them to be compared with the passport data of the device. If these data do not match, then the equipment is considered faulty.
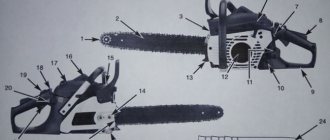
Level (a) and its optical circuit (b): 1, 4, 5, 9, 10 – screws, 2 – stand, 3, 7 – levels, 6 – visual level, 8 – sight, 11 – mounting pressure plate, 12 – lens, 13 – focusing lens, 14 – reticle, 15 – eyepiece, 16 – 19, 21 – prisms and lenses, 20 – mirror, 22 – level.
The level is checked within the time limits specified in its documentation, and if its service life has expired, then it is not recommended to use such a device. Such geodetic equipment may be subject to unscheduled inspections for various reasons, for example, due to the loss of a level certificate. The testing procedure in the laboratory for each device depends on its type. Let's consider the existing types of such equipment:
- optical levels;
- digital instruments for determining elevation differences on the ground;
- laser equipment for these works.
Optical circuit of a level with a compensator.
Setting up the last type of level is the most difficult, and therefore cannot be done independently. Such laser models are tested by experienced specialists in laboratories equipped with the latest technology. Checking such a level includes general control of individual equipment components, setting the required levels, checking the correctness of the compensator suspension, working with the radiation axis and establishing the correctness of the horizontal plane of the device, and measuring the quadratic error.
Digital level meters cannot be accurately adjusted without special equipment, so they must be tested under special conditions. Such equipment is checked for the accuracy of setting the level of the rack (round), the functionality of the digital part (consists of several stages), the range of action of the compensation system, and the presence of systematic and quadratic errors.
You can try to set up the optical level yourself, if you strictly follow the recommendations of specialists.
How to check an optical level?
The setup begins with an external inspection of the device and includes the following conditions:
Laser level device: 1 – laser tube, 2 – light guide, 3 – tripod, 4 – adapter part, 5 – lens, 6 – level, 7 – power supply.
- there should be no traces of corrosion on the body of the level;
- there should be no mechanical damage visible to the eye;
- All adjustment mechanisms must run smoothly, without jerks or delays.
Further testing and adjustment methods depend on the level model, but there are general procedures for all types of such optical devices:
- level adjustment;
- identification of tuning symmetry and their control;
- displacement of different axes of the device and finding the angle of displacement between them;
- correct installation of the level telescope reticle;
- squared error of instrument scale divisions.
Initial stage of work
The check begins with assessing the external condition and completeness of the level. Then the following parameters are visually examined:
- cleanliness of the optical surfaces of the telescope;
- the simultaneous image of the grid lines must be clear and contrasting;
- the ends of the contact level bubble are checked;
- the level should not have traces of corrosion and mechanical defects that may interfere with accurate measurements;
- the completeness of the equipment must correspond to what is indicated in its passport or certificate.
After this, you need to evaluate the performance of the level and make sure that its moving parts interact correctly. The following parameters are tested:
Types of laser levels.
- serviceability of all parts of the device;
- no wobbling should be detected in the lifting, fastening and guiding screws;
- the eyepiece should rotate smoothly, without jerking;
- lifting screws must satisfy the same requirements;
- the level illumination mirror must be checked for clouding;
- fastenings of moving parts must not be damaged;
- the locking screws are examined for clamping accuracy;
- you need to make sure that the compensator and damper are working, and all the adjustment screws must be set to the middle position;
- the serviceability of tripod parts is examined;
- you need to make sure that the mounting screw fits exactly the given level model.
After this, all clamping parts on the tripod are tightened and checked for stability. To do this, the device is installed on a tripod and put into action: the telescope is aimed at the staff and a reading is made. Then press (carefully) on the top of the tripod and take the reading again. If the results obtained coincide or differ slightly, and the bubble does not change its position, then the tripod is stable. If this is not the case, then you need to find the reason or replace the tripod with a new one.
Checking the circular level and adjusting
Leveling staff device: a – crutch, b – shoe, c – readings along the staff.
To set up an optical level yourself, you need to start by checking the round level. It represents the normal at the so-called zero point to the grinding surface. The main condition for this is that its axis must be parallel to the axis of rotation of the device.
To check, you need to install the telescope parallel to any 2 lifting screws, with their help you should try to move the bubble of the round level to the zero point, and then rotate the upper part of the level 180 degrees around the vertical axis.
If after this action the bubble remains in the center of the capsule, this check point can be considered completed. If this does not happen, then it is necessary to make an adjustment - perform a series of settings to obtain the desired relative position of the device parts and their normal interaction. To do this, using the screws for adjusting the circular level, you need to move the bubble by ½ deviation to the center of the capsule. Residual inaccuracy is eliminated using so-called lifting screws. These actions are carried out several times until the desired result is obtained.
Rules
Industrially produced levels have metrological certificates with a factory verification mark, guaranteeing correct operation of the device for a year when operating conditions are met.
Repeated verification of the optical level must be carried out at least once during the verification interval. The State Standard of the Russian Federation, in a recommendatory manner, determines the calibration interval of various types of levels lasting no more than one calendar year.
With certain skills, you can check the technical characteristics of devices yourself, which, however, does not provide a full guarantee of their quality. Qualified specialists from companies that have state licenses to perform metrological work, including verification and adjustment, will perform the necessary procedures and issue a state-issued certificate. The certificate duly confirms the compliance of the customer’s device with the characteristics declared by the manufacturer, which is recorded with a stamp by the inspection organization indicating the date and location.
A device that has not passed verification must be taken out of service with a corresponding note in the technical passport, since the measurements it performs will not have the required accuracy.
The cost of the verification procedure for one device varies from 1,500 to 2,000 rubles.
Horizontal line of sight and its verification
Checking the cylindrical level. Measurements with unequal distances to the slats.
To set it up, the following condition must be met: the pointing line of the device must be horizontal when the bubble is in the central part of the zero point. To check whether this condition is met, you need to select 2 points (C and M), which are separated by 25-35 m. The slats are installed in them, and the level is fixed on a tripod so that it is in the middle, between these points. The device is activated and a reading is taken along the slats, and then the difference between the levels of the points (C and M) is calculated. As an example, let’s say that the level reading on the first reading is 1.378 meters, and on the second reading – 1.278 meters. Then the excess (PRSh) is equal to the difference of these numbers - 0.1. Rearrange the tripod with the level as close as possible to point C and take a new reading on the staff. Let’s say it is 1.2 m. Then the theoretical indicator is: at the first point – S-PRSh = 1.278, and at the second staff – M-1.2 = 0.078 meters. Then they take a new reading on M and compare the resulting figure with the theoretical one. If this difference is more than three millimeters, then adjustment must be made.
Cylindrical level and slopes at the position of the bubble: a - side view, 6 - top view, 1 - ampoule, 2 - liquid, 3 - bubble, 4 - correction screw, 5 - ampoule slope.
Unscrew the protective cap on the eyepiece, using the adjustment pin supplied with the level, turn the set screw until the actual reading on the middle horizontal line coincides with the theoretical result (0.078 meters). Then the test is repeated.
If you install the level in such a way that the eyepiece of the tube, with the sighting axis positioned horizontally, is two to three centimeters ahead of the staff, then you can very accurately determine the height of the instrument from it. You need to put a cardboard or plastic cover painted black on the lens. In its center you need to make a hole of two to three millimeters. The main observer looks through it at the rail, and the assistant installs a movable part made of transparent material with a black line in the middle on it. According to the instructions of the observer, it is installed so that the mark is exactly opposite the hole in the cover. After this, a countdown is made along the staff.
Installing the telescope grid
To do this, it is necessary to strengthen the plumb line at a distance of 10-15 meters from the level and bring the equipment into working condition. The vertical line of the reticle is aimed at a plumb line, and if one end of it is deflected by a distance of more than 1 mm (measured with a ruler), unscrew the screws securing the eyepiece and remove it, freeing access to the reticle. Then correct it by turning it until it matches the image of the plumb line. The eyepiece is returned to its place and all screws are tightened. The check is repeated to ensure that the vertical grid is set correctly.
To check its horizontal filaments, the device is aimed at a target 12 meters from the tripod, and then the telescope is slowly moved in the horizontal plane with the aiming screw. Monitor whether there is any deviation of the thread from the target. If the difference is more than one millimeter, then the grid is adjusted in the horizontal plane in the same way as for vertical lines.
Compensator performance
A - c - diagrams of the location of the axes when checking the level, d - positions of the level during the third verification.
To ensure the correct operation of the compensation system, the following condition must be met: when tilting the device, the axis of the telescope must be horizontal within the range of the compensator.
To achieve this, the circular level bubble is moved to the zero point, and the sight line of the level is aimed at a vertically mounted staff. Carefully focus the device and take the first reading (for example, C1). After this, 4 positions of the circular level bubble are successively obtained by tilting the level axis with screws to lift it to the right, left, back and forward. After each change in position, a count is taken by points (C2, C3, C4, C5). Then calculate the difference between the readings - (C1 - C2, C1 - C3, C1 - C4, C1 - C5). These values should not exceed 1 mm. If this is not the case, then you need to take the level to a workshop where they will repair or replace the compensator.
Specifications
For greater sighting accuracy, Ada Basis has a 20x magnification capability. This and the 38mm lens diameter make it easy to see the required height differences on small to medium-sized construction sites.
The minimum focal length is 0.3 m. That is, at a distance less than 30 cm, everything will look blurry. For outdoor work this is not so important, but for indoor construction work this parameter is important.
A root mean square error of less than 2.5 mm per 1 km classifies the level to class 2 according to GOST. It can be used not only at construction sites, but even for laying roads.
The automatic air compensator operates within a range of ±15'. The installation accuracy is ±5'', and the error is ±0.5'' per 1'. Therefore, before operating the compensator, you must first set the level to a more or less horizontal position, and only then the automation will come into play.
The accuracy of the round level is 8' x 2 mm. For angular measurements there is a 360° dial with a division value of 1°.
Ada Basis operates in a temperature range from -25°C to +50°C. It must be transported and stored in a special case included in the kit. The size of the case is 28.2 × 20.7 × 20.1 cm, the weight together with the level is 2.65 kg, and the weight of the device itself is 1.65 kg.
For more comfortable operation, the manufacturer applied a rubber coating to the focusing screws. Unlike plastic ones, these elements do not slip under your fingers, which is especially important during frosts.
SET Level ADA Basis + Rack ADA Staff 3 + Tripod with screws ADA Light S
RUB 15,990
BUY
Set Level ADA Basis + Rack ADA STAFF 3 + Tripod with clips ADA Light
RUB 15,990
BUY
Set Level ADA Basis WITH VERIFICATION + Rack ADA STAFF 3 + Tripod with screws ADA Light S
RUB 16,990
BUY
Optical level ADA Basis (level, case, small instrument, plumb bob, instructions)
RUB 11,490
BUY
Optical level ADA Basis with verification (level, case, small instrument, plumb bob, instructions, verification certificate)
RUB 12,490
BUY
Determination of errors when measuring exceedances
The position of the bubble of the round level when checking the functionality of the compensator.
It is carried out in several stages on the ground, using the so-called method of leveling from the middle. This is done using two slats with a sighting beam up to 90-100 meters long. The places where they are secured are strengthened with leveling crutches or pegs into which screws with spherical heads are screwed. The slats themselves must be installed strictly vertically and must not change their position throughout all measurements.
The device is fixed in their alignment at an equal distance from these slats. It is activated and 10 measurements of the excesses are taken between them. This is one series of measurements. In total, you need to carry out 5-6 such stages. The level's horizon is changed before each such measuring series.
Review of manufacturers.
Review of manufacturers of GNSS receivers (you can see the range here)
Review of tacheometer manufacturers (you can see the range here)
Review of manufacturers of leveling equipment (you can view the range here)
Review of theodolite manufacturers (you can see the range here)
Review of thermal imager manufacturers (you can view the range here)
Review of manufacturers of solubilizers (you can see the range here)
Review of manufacturers and accessories (you can see the range here)
Investigation of the correct operation of the cylindrical level
If a cylindrical type level is used on the telescope on the model of the device, then it must satisfy the following conditions - its axis must be strictly parallel to the line of sight of the telescope. This check must be done in two stages:
- the plumb plane passing through the main axis of the cylindrical level must be parallel to a similar surface passing through the line of sight of the telescope;
- the projection onto the vertical plane of the angle between the axis of the level and the pipe should not exceed the limit established in the passport.
The first condition is checked using a rod installed 45-55 meters from the tripod, the lifting screw of which is directed in its direction. Carefully check the horizontal position of the device, use the lifting screw to align the ends of the level bubble, and use the fixing mechanism to obtain a clear image. They count down. Then the axis of the device is tilted using lifting screws so that the readings do not change, and the position of the ends of the cylindrical level is fixed. The same is done when tilting in the opposite direction. If the bubble remains in place in both cases or its ends move in the same direction, then the level setting is considered correct. If this is not the case, then adjustment is made with horizontal and vertical screws of the cylindrical level itself.
The second condition is checked using methods such as:
- leveling in a straight forward direction;
- the same, but in combination with measurements from the middle;
- application of the method using different arms.
With each method, and they are described in the specialized literature, at least 3 measurements of the angle between the level axis and the projection onto a vertical plane must be carried out. Then the arithmetic mean of these measurements is calculated and compared with the passport data. If the resulting figure does not exceed the permissible limits specified in the document, then the level is configured correctly.
The lineup
The most popular brands of geodetic levels among buyers:
- Bosch - optical levels from this company are equipped with magnetic compensators that allow you to quickly dampen vibrations due to tilt (Bosch GOL 20D-32D, costing 8500-14000 rubles);
- ADA – optical and laser levels designed for civil engineering and construction work and survey measurements. ADA Basis A00117 is a very popular optical level in everyday work; it has an automatic compensator that sets the line of sight exactly to the horizon (costs about 5,500 rubles);
- Condtrol - laser levels are distinguished by a multi-prism compensator design. A new generation of professional devices – Xliner Duo Condtrol, which allows you to build planes with a large sweep angle (up to 160°). The design of the compensator prevents damage to the system if the device is dropped or subjected to mechanical impact. You can buy models of this line at a price of 9,000 rubles;
- and many other companies: LaserLiner, Umarex, X-Line, GeoBox and others.
Levels with compensators continue to improve every year, with each new model released: they become more and more reliable, accurate and easy to use.
Optical levels are considered one of the most famous and popular in their field, easy to use and accurate geodetic instruments. The basic principle involved in the design of all types of levels in general is the transmission over the distance of the horizontal beam necessary for its practical application. This principle is applied through the implementation of the relationship between geometric conditions and the optical system in the design of the device. Apparently, the method of measurements using this instrument received its name, namely geometric leveling .
Optical levels allow us to:
- measure the elevation between points relative to the horizontal beam passing through the sighting axis of the pipe;
- determine the deviation from the horizontal beam of the measured planes and all kinds of surfaces;
- set elevations of points relative to the reference coordinate system (absolute, conditional).