Hammer rivets have been an integral part of every builder's kit for quite some time. At their core, they are a kind of rod, on top of which there is a special head, which can be made in the form of various shapes (the most common are round).
Types of rivets
There are not as many varieties of rivets as it might seem at first glance:
- A simple general purpose rivet in accordance with GOST 10299 80. They can be easily distinguished by their mushroom shape, also called a system with a closing head. This rivet is characterized by high strength and durability under any load;
- A blind rivet is used to “join” two sheets of metal in cases where access to the joined sheets is possible only from one side. Parameters and description are determined by GOST 15973-2005;
- Threaded rivets are considered to be the most technologically advanced; they are more convenient to use and allow you to create a collapsible connection, DIN 7338
.
Important ! Materials for riveted joints must have a certain plasticity and toughness, therefore low-carbon steel, copper, and aluminum wrought alloys are used for their manufacture.
Countersunk rivets
Similar elements have other names - impact, driving. Riveting with this part is carried out in several cases:
- when welding is prohibited;
- when joining non-metallic materials.
Rivets can be riveted overlapping, end-to-end, as well as using the chain and staggered method.
For more information on hammer rivets, watch the video below.
A rivet is one of the simplest types of fasteners for creating permanent connections. In the general case, this is a rod or tubular part that has a supporting “embedded” head of a certain shape at one end. It is installed in the connection, as the name suggests, by the riveting method (as well as shrinkage, rolling, broaching, explosion).
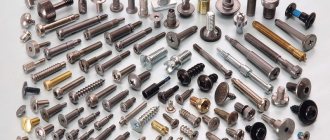
Based on their shape, rivets can be divided into several main types:
- Rivets with a closing head (there are solid, hollow and semi-hollow)
- Rivets with broaches (also called tear-off or pull-out rivets)
- Threaded rivets (also called riveting nuts)
Rivets with locking head
Historically, rivets with a closing head were the first to be invented, which is why they became the most widespread. These rivets have a head on one side. The second head, called the closing head, is formed using a rolling or riveting tool: riveting hammer, pliers.
According to the shape of the head, rivets with a closing head are divided into:
They also differ structurally by the presence of a hole inside the rivet:
- Solid rivets - no hole
- Hollow rivets - tubular - have a through hole
- Semi-hollow rivets - for flaring - have a blind hole
Materials for rivets
Rivets with a closing head can be made from a variety of metals and alloys that lend themselves well to plastic deformation.
The most widely used materials are:
- Steels - mainly ductile high-boiling steels 03kp, 05kp, 08kp, 10kp, 15kp, 20kp
- Stainless steels - austenitic steels 12Х18Н9, 08Х18Н10, 03Х18Н11, 12Х18Н10Т
- Aluminum alloys - the most applicable alloys are AD , AD1 , aluminum-magnesium alloys AMg2, AMg5, AMg5P, AMg6, alloys AMts, V94, V65, D1, D16, D16T, D18, D18P, D19P are also used
- Brass alloys - mainly L63
- Copper - grades MT, M3
Marking of rivets by materials
Rivets can be marked on the head for subsequent identification. The marking can be convex or concave (branding).
The following is a table with the accepted marking of basic materials in the form of dots or dashes.
Application of rivets
The choice of specific parameters and types of fasteners is determined by three main criteria:
- Ensuring the necessary strength of the connection, taking into account additional parameters and requirements for the seam;
- Technological capabilities of equipment for working with a specific type of rivet connection;
- Economic feasibility of using riveted joints;
Threaded rivet nuts
The connection method using threaded rivets can be called the most universal today. The main idea of the connection is the ingenious idea of fixing the body of the rivet in the riveting hole. For these purposes, a riveter for threaded rivets is used. The threaded structure itself is a hollow sleeve with an internal thread.
When making a connection, this sleeve is inserted into the drilled hole and aligned so that the parts to be joined fit snugly together. After this, the riveter rod is screwed into the threaded hole inside the workpiece. The front wall of the sleeve is fixed by the supporting surface of the tool, preventing the rivet from leaving the hole. To rivet the sleeve, the riveter rod moves with great force towards the supporting surface. At the same time, the sleeve crumples and settles, thereby forming a strong, stationary connection.
The rivet maker rod is freely turned out of the bushing body. The most commonly used rivets are aluminum, brass or copper. The use of the latter is limited by high cost, so they are installed in cases where it is necessary to ensure good electrical contact between the surfaces being connected.
The advantages of a threaded rivet connection include its “low-traumatic” nature. When the rivet rod is in operation, the metal being connected does not experience large loads or deformations. A threaded bushing can be used to easily connect thin-walled metal or a profile of complex configuration. Such fasteners are widely used in the assembly of household appliances, in connecting individual car cladding units, and in the manufacture of various types of structures from corrugated sheets.
Blind rivets
The disadvantage of threaded types of riveting is their high cost and relatively low speed of making connections. Therefore, in cases where the sheets of metal or profile being joined need to be connected using several hundreds or thousands of points, a blind rivet is used.
These can be steel, brass hardware, rivets made of aluminum, aluminum and silicon alloys. Unlike the threaded one, in the exhaust circuit the deformation of the sleeve is carried out using a rod with a thickening at the end, pressed inside the body of the fastening sleeve. As in the previous case, in order to upset the body of the rivet, its end is pressed against the supporting surface of the rivet maker; after alignment, the central rod is pulled out with force by several millimeters. As a result, the walls of the sleeve are deformed, forming a fairly strong permanent connection. The shank of the rod most often breaks off or is cut off at the level of the sleeve cut.
For your information ! The exhaust circuit provides a very good metal riveting speed.
What material should the rivet be made of?
Rivets are usually taken from the same material as the parts being connected - this avoids electrochemical corrosion. Pay attention to strength characteristics. But, as a rule, when connecting aluminum parts, the strength of aluminum hardware is sufficient.
In general, rivets are made from the following metals:
- steel:
- regular - brands St2, St3, St10;
- corrosion-resistant X18N9T;
- galvanized;
When connecting copper parts, it is permissible to install brass and copper. Aluminum is joined with aluminum alloys. Steel sheets - corresponding grades of steel rivets. There are also mixed hardware - from two different metals (chemically non-conflicting). The most common are aluminum-steel.
To install facade elements, slopes, ebbs, metal tiles and corrugated sheets, rivets made of galvanized painted steel are usually used. Painting - matching with details.
| H=0.54d | H≈0.5d+0.1S | |
| H=0.6d | H≈0.5d+0.1S | |
| H=0.8d | H≈0.7d+0.1S | |
| H=d | H≈0.9d+0.1S | |
| H=1.2d | H≈1.1d+0.1S | |
A schematic diagram of the installation of a threaded rivet is shown in the video: Welding is, of course, good, but it cannot be used everywhere. In this case, riveting is used - this is a mechanical connection of parts using special fasteners. These fasteners are called rivets; they are made from different materials and come in different types. | ||
Classic rivet design
The main hardware for riveting sheets in mechanical engineering are steel rivets, standardized by the requirements of the Soviet GOST 10299 80. They most often connect highly loaded steel structures used in construction. For example, in frames and support assemblies. The advantage of the classic form is the ability to connect two sheet surfaces with a thickness of more than 30 mm.
In some cases, GOST 10299 80 allows assembly connections of up to 35 mm. Unlike previous types of rivets, a classic rivet is installed only if there is a supporting surface on the reverse side of the connection plane. This is necessary to compensate for the shock load on the rivet shank.
The riveting technology is performed in the following order:
- The line along which the rivet connection will be installed is marked with dots for drilling holes in the metal being connected.
- Sheets of metal are fixed using mechanical devices such as clamps or even spot welding. Drill the extreme points of fastener installation into which centering metal pins are inserted. In this case, the diameter of the holes is chosen in accordance with the recommendations of GOST 10299 80, approximately 10% larger than the diameter of the shank body.
- The hardware is inserted into the drilled hole so that the head is on the back side of the surface to be joined. The length of the fastener is also selected in accordance with GOST 10299 80. This will ensure the formation of a second head from a shank of normal dimensions after riveting it with a hammer or electric hammer.
For your information! Dimensions selected in accordance with GOST 10299 80 ensure maximum joint strength.
If you choose a rod with a thinner diameter, its strength may not be enough for a rigid connection. In this case, the cutting force in the radial direction is capable of breaking most of the connections in turn. After riveting, the fastener metal should completely fill the holes with a slight interference fit.
The recommendations of GOST 10299 80 should not be neglected when choosing the length of the fastener shank. A shank that is too long will prevent proper deformation and settling of the metal. Too short will not provide the formation of a second head of the required size and strength.
To increase ductility, rivets made of certain grades of steel can be heated to high temperatures before installation, with the heads forged and the fasteners hardened. Before installation, aluminum, copper, and brass rivets can be treated with special liquids that prevent the development of electrochemical corrosion.
Selection of rivet sizes
Rivets are selected based on the thickness of the metals being connected. The following are important: the parameters of the embedded head and the diameter of the rod. The diameter of the rod determines the diameter of the drill, which is used to prepare a hole in the parts to be joined. You can approximately determine the diameter of the rivet by doubling the thickness of the parts being connected. The length of the rod is at least 2 times the diameter of the rivet, and the protruding part must be at least 1.25-1.5 times the diameter.
Rivet diameter 2.0 mm 2.3 mm 2.6 mm 3.0 mm 3.5 mm 4.0 mm 5.0 mm 6.0 mm 7.0 mm 8.0 mm Precision hole diameter 2.1 mm 2.4 mm 2.7 mm 3.1 mm 3.6 mm4.1 mm5.2 mm6.2 mm7.2 mm8.2 mmRough hole diameter2.3 mm2.6 mm3.1 mm3.5 mm4.0 mm4.5 mm5.7 mm6.7 mm7.7 mm8.7 mmHow it works?
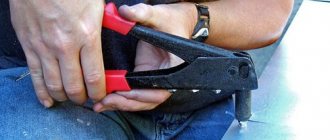
A riveter is needed when you have to repair clothes. It is difficult to do without it when fulfilling large orders (for example, in an atelier). The principle of operation of the unit is elementary. It is shaped like a pistol, and the base is a lever. There are two components to this. One retracts the fastener and is then flattened. As a result, the two parts are fixed, and their thickness can reach up to 10 millimeters.
To expand the range of applications, the kit includes special attachments that allow you to work with different rivets. If something is missing, then it is quite possible to purchase additionally. For personal use, a large arsenal is not required. Before setting a rivet, you need to understand how the device works.
Often it is quite possible to do without a tool, although the quality will be lower. The sales network sells various types of devices that differ in their characteristics, purpose, and operating principle. There are complex mechanisms. They are more expensive and are not necessary for personal use. There are options that are being rolled out. They are convenient to use in hard-to-reach places. The riveting procedure itself is quick and easy. You don’t need to make any special effort, reviews say.
What to focus on
Rivet material
If it is aluminum, then it is easy to work with, so it does not matter which “riveter” you choose. It is more difficult with steel, so the device should be selected more powerful.
Ease of use
Firstly, the instrument can be one- or two-handed. Naturally, the latter can create greater pressure, so it allows you to work with fasteners made of any material, of different sizes. Although in some cases (for example, limited space) you can only use one-handed.
Secondly, the head design. If it is rotatable, then this creates additional convenience. Sometimes you have to rivet in difficult areas (in “inconvenient” places), and this feature of the tool is very helpful.
Thirdly, are there replacement attachments for fasteners of different sizes? There is no need to comment on this.
Hand tools
Before you rivet the rivet correctly, you will have to understand the entire range of products offered. Most often, there are two types of riveters on counters: manual and pull-out. Their operating principle is not the same:
- Exhaust. The basis is traction, due to which fixation occurs. To do this, the element ends up in the device; with simple squeezing and squeezing, riveting occurs. The fastener itself has a special ball that is flattened. Without it, fixation will not occur even with manual influence.
- What does a lever mechanism do? The operating principle is simple, which is why this manual unit has a low price. The action process is similar, but the ball is fixed in the tube when the handle starts to move. It is used infrequently (for things that are too thin). The choice is made by the buyer, assessing the complexity of the work and the activity of use.
Rivets on clothes
But rivets are also used in the manufacture of various types of clothing. Their use began in the 19th century, when, while sewing pants made of rough canvas, which will later be called jeans, one of the craftsmen noticed that if the seam is riveted at the beginning, it will definitely not come apart or tear.
Here rivets are used, for which the name “buttons” is more appropriate. Unlike ordinary ones, they consist of two parts - internal and external. Everything is held together by the fact that the head of one element fits into the cavity of another. Then, under pressure from the riveter, the head of the internal element is flattened (expanded) inside the cavity of the outer element, and such a “super button” cannot be broken, no matter how hard you try. The fabric is more likely to tear. How to rivet these types of rivets correctly?
Mechanism and technology of riveting
Devices are divided into pneumatic, mechanical, pneumohydraulic. Each type has its own operating principle and scope of application. If we summarize all the procedures, then using such a unit will not be difficult. You have to do some basic steps:
- Prepare the components. They must match each other in diameter.
- After which they are placed on a tree and secured. Mark holes for fastening. It is important to be precise so that subsequent steps are error-free.
- Next, using a drill, a hole of the required diameter is made. This step is not always necessary.
- Afterwards, the fasteners are fixed in the sharpener.
- A riveter is placed on the upper part.
- Only after this is a sharp, strong compression done. It happens that nothing works the first time. Then the process repeats.
The procedure seems simple, but many people have problems. What to do if you don’t have such a device at hand? How to rivet a threaded rivet without using special tools? It is quite possible to cope with this, but it is worth taking useful recommendations as a basis.
Removing a construction rivet
It is difficult to call this action dismantling as such. This is removal. To remove the rivet, you will need the regular rivet gun that was used to install it. But since you don’t have one at hand, it’s worth figuring out how to rivet a rivet without a riveter.
You can try to remove rivets in which the head or bent part protrudes above the plane of the riveted parts with a sharp chisel and hammer:
- Place the cutting part of the chisel exactly under the head (or bent part).
- Hit the chisel with a hammer. Some large rivets may take several hits to break off.
- Once the head (or bent part) is torn off, all that remains is to remove the rivet from the hole. This can be done by pushing it out with a nail or other thin object (for example, a screwdriver).
But more often you cannot get to the caps and curved parts, since they are, as it were, in the body of the parts being fastened. At the factory, special grooves are drilled for the caps and expanding parts in the parts, and then the rivets fit into the metal like a glove. How to rivet rivets in such a “tricky” case?
Here a screwdriver (or drill) with a metal drill selected for the diameter of the rivet will come to the rescue. Proceed as follows:
- Using a core, make a notch on the head of the rivet so that the drill does not wander, although some are accustomed to doing without serifs.
- Place the screwdriver bit on the head and drill out the inside of the rivet.
- When the drill goes through, the remains of the head and widened part fall out on their own.
How to work manually?
A rivet is the most basic way of fastening two parts. There is evidence about it even in ancient times. Today they sell a wide variety of types, the assortment is off the charts. To highlight the strength, pay attention to the material. There are several types:
The first three most often act as decorative finishes, but the second two are quite suitable for containment. But before riveting the fastening element, two components from the same material are selected on the clothing.
The simplest option is the overlap of two elements. When the fabric of a garment (for example, a fastener) overlaps another. This method is known to many and is often used in the studio. When making clothes, you will certainly have to use special devices to perform several procedures. But if a part breaks, you can return it to service manually at home.
Why does fastener breakage occur? There are many reasons for this - the fabric was pulled sharply to the right, to the left, impact, load, etc. Before riveting the rivet on the clothing, you will have to remove the deformed part, but carefully, without damaging the fabric. To do this, use any sharp object - a knife or scissors.
However, you need to know that mortgage heads have different shapes. They are mostly semicircular. Having removed the broken structure, you will have to select a new one that matches in size, diameter, and density. It is not always possible to purchase a completely identical one. It consists of two parts - the hole and the head itself with the base.
Different types of drive
The most common are manual riveters, but devices with various drives are also found. They are pneumatic, pneumohydraulic, and mechanical. Of course, each type has its own price. It also depends on the manufacturer - for more well-known brands, the price will be higher accordingly.
Pneumatic and pneumohydraulic tools are mainly used in production, since their design is more complex. At home, it is better to use manual riveters. When purchased with them, they come with removable heads, which allows you to use rivets of different diameters. Also, a head of the required size, as well as rivets for a manual riveter, can be purchased in a store without any problems.
Ticks
Specialized stores sell pliers that are convenient for making clamps; they look like pliers. It is better to make sure that there is a suitable attachment for riveting. Before this, a puncture is made at the fixation site, but a little less than is necessary for the part itself. This is done with a knitting needle or a blade - they are prepared in advance.
The front part fixes the button. Everything is done smoothly so that after fastening there is no shift. A plastic figure is mounted for easy mounting. It is made with two holes (top and bottom). After this, the riveting is carefully placed into the created structure. When using forceps, use maximum force. There should be no fear, otherwise nothing will come of it.
Threaded riveter
During deformation of the fastener, the riveter's task is to maintain the internal thread. If this is not done, then the tool cannot be removed back. The thread riveter can be used not only for metal, but also for plastic workpieces. This is due to the minimal load that the fastener exerts on the material after deformation. In modern practice, manual and pneumatic riveters are used.
Kinds
Threadlockers can be found in the range of many tool manufacturers. The most common riveters are those with a manual locking mechanism. This is due to their relative cheapness. They apply force according to the principle of leverage. Thanks to the elongated handles and mechanism, the force from the user's muscles is transferred to the fastening element. If desired, you can assemble a riveter for threaded rivets yourself, since its mechanism is not too complicated. Among the hand-made specimens there are:
- one-handed;
- two-handed.
The first is suitable for rivets whose diameter does not exceed 5 mm, and the second for rivets with a diameter of 6.4 mm. This is related to the maximum force that can be applied to a particular tool. Pneumatic riveters are often used in manufacturing. They make it possible to increase the processing speed of parts several times. But such a device requires additional modules for normal operation. The main one is a compressor for pumping compressed air.
Method of use
Working with such a riveter does not require special skills and abilities; it is important to simply understand the principle. The first stage is the preparatory stage. Its task is to bring the surface of parts to the required state. In order for the fixation to be reliable, the surfaces must be smooth and adjacent to each other without gaps. In some cases, you will need to use a sander or file to remove paint residue or burrs. The next step is to make a mark in the place where the hole will be located. To do this, you can use a scriber and a punch, which will create a small recess for the drill so that it does not jump out of its place.
Next, a hole is drilled. This is a critical stage, because it must be strictly perpendicular without distortions. If this requirement is not met, then it will be difficult to insert the rivet. It is important to choose the right drill. Its diameter should be slightly larger than the diameter of the rivet. If there is a need to install a rivet with a diameter of 6.4 mm, then the drill should be 6.2 mm. The length of the rivet should be several millimeters greater than the width of the parts that will be fixed. The rivet head is placed inside and the fastener is compressed. The force must be maximum for the fixation to be reliable. An overview of such a tool can be found below.
Self-assembly of the tool
There are no particular difficulties in assembling a threaded riveter with your own hands. To do this you will need a bolt and nut. The bolt thread must have such a pitch and diameter that it fits freely into the rivet. The nut is fixed to the bolt so that it does not jam during operation; you can use a small bearing, which is also placed on the bolt. The essence of use is that the bolt is placed inside the rivet. The nut is unscrewed until it secures the rivet head, after which it is necessary to begin rotating the bolt. As it passes, the rivet will compress and fix the parts. To make it easier to use the tool, you can take a bolt with an internal hex head into which you can insert a lever.
The disadvantage of such a device is the complexity of its use. In some cases, the bolt may become stuck in the fastener and will be difficult to remove. This effect occurs when the bolt is made of a soft material. A homemade threaded riveter is perfect for one-time use. If there is a need to constantly work with threaded rivets, then it is better to acquire factory tools. A video about a homemade riveter is below.
What's next?
Place the pliers as expected, after which you press until you hear a peculiar click. Simple pliers are suitable - a hammer, iron tongs. To prevent tearing of the fabric, a rubber gasket is installed. You should not exclude such additional gaskets, otherwise you will have to redo the work again. The process of sewing and repair will not be complete without such procedures.
Now it’s clear how to rivet a rivet without a riveter. If we talk about clothes, then a rivet is not only fashionable, but also practical. Although breakdowns occur frequently, for this reason you should know the instructions for performing the work. At the same time, not every person implements a project without losses - mistakes are not excluded.
Sometimes it is impossible to rivet a garment without a riveter. In such a situation, they turn to professional studio workers. Although the masters say that with the help of a special tool it will be possible to do the required process correctly. With it you will no longer need to use a lot of effort and technical knowledge. Finding the entire set of required tools for the job is easy.
In Soviet times and in the first half of the 90s, connections with rivets were performed using a bulky tool. In construction, as well as in everyday home conditions, the riveting process was extremely inconvenient and took considerable time. Hammer rivets of this type were used: which were manually riveted from the side on which the head was missing using hammer blows or inserts. At the same time, a stop is required on the side of the rivet head, which significantly reduces the scope of application of this type of fastening. And of course, such a “shock” method can cause damage to the coating of the fastened elements.
As a result, Western fastening technologies very quickly entered our everyday life and such a tool as hand riveters appeared, ideal for performing a number of household and construction works.
Introduction
It should be noted that this mechanism is very easy to use, and the regular model is inexpensive. It can be used to fasten any type of metal, and the principle of operation remains the same.
Of course, you can make a rivet with a hammer, but with a large amount of work it will require much more time and effort. Manual riveters make the work process faster, and the effort required for all operations is minimal.
Today, there are different types of manual riveters, each working on its own principle and having its own pros and cons. Which type of riveter is better is determined by each master himself, but several points must be taken into account, which we will consider below.
Riveter
A riveter or riveter is a tool used for permanent fastening and fixing of sheet metal elements using rivets.
No skills are required to operate this tool. It is convenient and quite easy to use.
When working as a riveter, access to both sides of the parts being fastened is not required. Simply drill a hole in the right place and then secure the rivet. Thanks to this, the riveting process is quite fast and simple.
Manual riveter: how to use
Using hand tools is easy and does not require any special skills. A properly purchased mechanism will do this job efficiently and quickly. The price when buying a tool should not play a big role, the main thing is to choose a good quality model. This will allow you not to worry about the tightness of the connection and the failure of the tool.
You just need to drill the holes correctly so that the diameter exactly matches the diameter of the rivet itself. We have already described the work of the riveter in detail above. After work, all that remains is to process the reverse flattened side of the rivet, that is, remove the resulting excess with pliers.
Rivets
The most commonly used in construction are blind rivets.
. They are available (can be purchased at any hardware store and market), are easy to use and completely provide a reliable permanent connection of materials.
Blind rivets are differentiated by size and type of material used to make the rivets.
The material of the rivet is an extremely important factor. The choice of rivets based on material directly depends on the type of material of the parts being fastened and the environment in which the fastener will be located.
The materials for making rivets can be the following:
- Cink Steel.
- Aluminum. There is pure aluminum and its options: anodized, varnished.
- Stainless steel. A2 - resistant to rust, A4 - resistant to corrosion and acidic environments (used in the chemical industry). Or imported analogues, for example, DIN 7337. Stainless steel is one of the most common and durable materials.
- Copper - Copper rivets are used to fasten copper materials.
- Copper-nickel alloy (Monel). Contains 70% nickel, 30% copper.
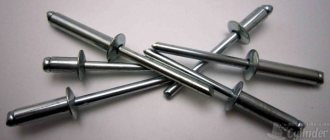
A pop rivet is a tube with a cap. Inside the structure there is a steel rod, one of the ends of which is slightly expanded. The riveter pulls the rod, causing the tube to gradually expand. When the force becomes maximum, the rod is bitten off.
In blind rivets, the process of deformation of the sleeve is carried out using a rod with a thickening at the end, pressed inside the body of the fastening sleeve. In order to seat the body of the rivet, its end is pressed against the supporting surface of the rivet maker; after alignment, the central rod is pulled out with force by several millimeters. As a result, the walls of the sleeve are deformed, forming a fairly strong permanent connection. The shank of the rod most often breaks off or is cut off at the level of the sleeve cut.
Advantages of riveted joints
All connections made with rivets have increased reliability and useful quality - vibration resistance. If an increased load is applied to a part, then it will in no case suddenly burst. This is very different from fastenings with rivets made by welding, which if it breaks, then the whole thing breaks. The rivet will stretch a little at first. Unlike a screw connection, a rivet is very cheap because the rivet itself is just a small cylinder of soft wire. When machines operating in automatic mode appeared, they began to produce wire blanks that look like blanks for riveting.
In the classic riveting process, the rivet must be accessible from both sides. Because you need to put a lot of effort into forging metal. If the part is small, then it rests on the anvil with its finished head, but if the part is large, then it is necessary to place a stop on the side opposite to the forging. Such a process is very inconvenient, and this left the possibility of doing such a thing only to professionals or in industrial production.
But now modern rivets only require work on one side. Therefore, rivet work has become popular and affordable. And now many can learn how to rivet and do it themselves. Thanks to a new rivet design and a new invention - the rivet gun - all this happened. Nowadays, a modern rivet, which is used in construction, looks like a small tube with a finished head on one side. A small wire is inserted into the tube and with a hat on the other side too. If this wire is pulled with force through the tube, the head of the wire will begin to expand the tube. When the head of the wire rests against the part, the wire simply breaks off, and the tube will be flared. In order to connect thin parts, rivets are a must, especially if it is impossible to screw a self-tapping screw into them or make a screw connection.
Types of riveters
Choosing the right model of such a tool can be difficult, because there are several varieties on sale. They all differ in their technical characteristics and cost.
Simple mechanical riveter
The cheapest and most common type of riveter. Widely used in construction and household work.
Riveter Accordion
Applicable for industrial work and not popular for construction.
Two-handed riveter
Considered a power riveter. Rarely used in construction.
Riveter with rotating head
This type is the most convenient for construction work. The rotating head makes it accessible for riveting in various places that are difficult to reach for other types of riveters.
Hammer rivets have been an integral part of every builder's kit for quite some time. At their core, they are a kind of rod, on top of which there is a special head, which can be made in the form of various shapes (the most common are round).
Rivets and working with them
An explanation of how a manual riveter works cannot be complete without considering the types of riveting tools (consumables - rivets).
There are two fundamental types of these parts: monolithic, that is, solid, and tubular.
The latter are usually called pistons.
Solid metal rivets are more like just a piece of thick wire and are used only for the hand-made type of riveting.
Much later than the beginning of the use of the described one, the now more commonly used pistons appeared - the second type (inside there is soft metal that is quite easily flattened when pressed).
Most importantly, these parts are divided into two more subtypes: nut and pull-out. The latter contain two parts: a tube and an interior, the so-called poisson or rod.
On top of such a simple design there is an enlarged part - a cap, which prevents the rivet from prematurely protruding or breaking. The poisson is inserted from the reverse side, that is, from the opposite side - where the head is located.
It turns out that rivets are inserted on both sides, subsequently flattened.
How does a riveter for threaded rivets work?
The principle is the same, but the peculiarity of the rivet material is that, after being screwed (hammered) into the structure, it is bitten off with a special construction tool.
And besides, you can choose any length this way.
If it comes to large volumes of rivets, you need to take the so-called professional mechanism, which allows you to make a larger number of rivets with less effort.
A slightly more complex mechanism (besides the manual one) is called a pneumatic riveter. It works using compressed air.
Pneumatic devices require the use of a compressor. There are professional mechanisms that contain a hydraulic press in their design.
This type of riveter is called pneumohydraulic. As can be seen from the definition, it works thanks to two types of mechanisms that drive the main working element.
To select a tool for making a clear rivet joint between metal parts, including sheet metal and profiles, you need to take into account the thickness of the material being fastened.
More details about the pneumohydraulic riveter are presented in the video:
Noticed a mistake? Select it and press Ctrl+Enter
to let us know.
A manual riveter is a tool designed for fastening sheet materials. Most often, sheets of metal up to 3 mm thick are fastened with rivets, but you can attach a sheet of metal to a profile or corner. We have a pull-out riveter, the principle of its operation is slightly different than riveting with conventional rivets and a hammer. In this article we will look at the main types of hand tools for riveting, how to select rivets and how to use this device.
How to work with a blind riveter
First of all, you need to drill a hole through both sheets to be fastened, right through. The diameter of the hole should be the same as the diameter of the rivets. Then we “charge” the rivet and insert it through both sheets and begin to squeeze the handle (more than one squeeze will be needed). The rivet begins to flatten when the ball is completely retracted into the rivet - the tail of the rivet is bitten off. As a result, we have 2 sheets of metal riveted on both sides. In the photo below you can see the instructions in pictures.
Video - how to rivet correctly
My partner and I made a video for you on how to use a riveter. I hope it will help you understand how and what to do.
What types of riveters are there:
Regular inexpensive model
Take, for example, the cheapest option from Stayer - the very first photo. Its cost is 300 rubles. It supports all rivet diameters (2.4 mm, 3.2, 4 and 4.8 mm), so you can select the most suitable rivet diameter for the materials being fastened.
For example, thin rivets with a diameter of 2.4 mm are intended for fastening sheet material with a total thickness of up to 5 mm. Of course, there is also such a parameter for blind rivets as length. The longer the rivet, the thicker the material that can be fastened.
I bring to your attention a table of the relationship between the size of the rivets and the thickness of the material.
Riveters with a rotating “head”
It differs from the usual one in that the “head” of the riveter can be rotated 360 degrees. This is very helpful when working in hard-to-reach places, where ordinary people cannot reach. True, it costs more, about 350 rubles. We are also considering the Steyer model.
Reinforced models (two-handed)
For people who work as riveters all the time, they produce power versions.
They differ from ordinary ones in that they squeeze it with both hands, which saves significant effort. Imagine that you need to rivet 500 rivets. It will be difficult to complete such a volume of work with a regular riveter, but with a reinforced one you can rivet everything much faster and without strain. What a reinforced one looks like is in the photo below.
Professional models with extended service life
In addition to household models for home work, there are also professional ones on sale. They differ from household ones in better quality and longer service life. For example, a model from kraftool. A regular, non-rotating model, but costs significantly more. In the photo below, the Kraftul riveter - price 400 rubles.
All riveters come with 4 interchangeable fittings for different rivet diameters. They are changed using a special key, which is also included in the kit.
Rivets are usually sold in small packages of 50 pieces. Rivets vary in diameter and length; the thicker and longer the rivet, the more expensive the packaging. For example:
- 3.2*6 mm - price 26 rubles
- 4*12 - cost 35 rubles
- 4.8*16 — 50 rubles
When purchasing consumables, do not forget that rivets are needed for the rivet maker, pull rivets. Otherwise, stores also sell regular ones that are riveted with a hammer.
Riveting parts is a very popular method used today in construction, production and everyday life. To install such fasteners in metal elements, it is used. This is a simple tool, the working head of which has a holder into which a fastening element is inserted. A hole is drilled in the workpieces where the rivet is placed, and when the tool lever is pressed, it is flattened, securing it in the material. Everything is very simple! Someone will say why use this method if there are others for connecting metal elements, for example, welding or fastening with self-tapping screws. But they are not applicable in all cases. Here are some examples.
- It is necessary to connect metal parts without changing their structure.
- Do not heat metal or surfaces located next to the elements being connected.
- It is necessary to connect parts from different materials for which welding is not applicable.
- It is necessary to fasten hard-to-reach structural elements, and the impact of the tool is possible only from one side.
- There is a possibility of a fatigue crack appearing from part to part when they are connected.
Then they use a riveter, which helps solve all these problems. What else is good about this tool? Let's figure it out.
Advantages of joining parts with rivets
This type of fastener has been used since time immemorial; for example, it can be found in military armor. By the way, during the construction of the Eiffel Tower and the cruiser Aurora, rivets were also used, only much larger in size compared to fasteners in armor. Now such elements are used in construction, for example, when installing fences, installing frames of ventilated facades, attaching steel sheets to a profile; in production when connecting metal parts of units, machines, boiler equipment; in everyday life when carrying out repair work. Not surprising, because the riveter has so many advantages!
The tool is easy to work with
Installing rivets is a fairly simple method of joining parts compared to, for example, welding and is much safer. You just need to select a rivet of a suitable diameter and install it in the drilled hole. To get the hang of it, you only need to install a few elements!
The result is a reliable and aesthetic fastening
For example, you need to connect metal and wood blanks. The riveter will cope with this task, and the connection will be very reliable. A rivet installed in a drilled hole firmly fixes the parts, does not deform them and does not allow fatigue cracks to propagate. The fastener rod is bitten off, and a neat cap remains on the front side of the part, which looks very aesthetically pleasing and does not spoil the appearance of the product.
Minimum costs for tools and fasteners
The cost of a riveter is much lower than, for example, a welding machine. An amateur model can be purchased for up to 1000 rubles, a professional one will cost more, but will help achieve higher productivity. As for consumables, the price of rivets is low. For example, a package of 50 pieces costs about 40 rubles
. For comparison, when installing a frame for a ventilated facade per 1 sq. m there are about 20 rivets - you will spend less than 20 rubles on this. And if you take a package of 1000 pieces, the fasteners will cost even less. In construction and production conditions, where large quantities of rivets have to be used, this option will be very profitable.
As you can see, rivet joints are the optimal method when you need to connect metal elements, spending a minimum of money and effort. If you decide that your work requires a riveter, do not rush to buy the first model that you like. There are several types of tools: some are used in private construction, others are designed for intensive loads in production. Let's talk about each in more detail.
Types of riveters
The division of a tool occurs not only according to the “household/professional” principle, but primarily according to how it is designed. There are two main parameters by which classification is carried out.
By food type
- Manual ones
are the simplest devices that are affordable, and besides, they can be used in any conditions: with high humidity and dust, at altitude, when there is no power supply, etc.
Two-handed
riveters have two handles that are compressed with both hands to transfer force to the working head - this is necessary for deforming the rivet.
This tool is designed on the lever principle, so work productivity directly depends on the effort exerted by the user. For a comfortable grip, there are rubber pads on the handles, as well as indentations for the fingers. The most versatile tools are those with a rotating head: they are suitable for working in hard-to-reach places. Rocker-type
models have one handle and a scissor mechanism, through which force is transmitted to the working head - to do this, you need to press hard on the handle. This design is very convenient if you need to install a lot of fasteners. Most often, manual riveters are used in private construction, as well as by installation teams and in small workshops, where the process of installing rivets is auxiliary. - Rechargeable
- they look like a pistol and have a built-in battery that generates the energy for the impact required when installing rivets. Therefore, the user makes less effort when working compared to a conventional riveter - you only need to press a button. Even during prolonged work, the load on your hands is not felt. Depending on the battery capacity, its charge is enough to install from several hundred to several thousand fasteners. Like all hand tools, such models are used in areas where there is no power supply, but like any cordless tool, they are not designed to work in high humidity and dusty conditions. This is an excellent option for use in a workshop or for installation work. - - the most productive type of device, since the energy for installing the rivet comes from a source of compressed air - a compressor. But the design of such a tool is also more complex: in addition to the gun itself with a trigger and a working head, it contains a cylinder for compressed air and a pusher. To operate, the tool must be connected to the compressor via a hose. It is important to remember that pneumatic riveters must match the operating parameters of the compressed air source. The operating pressure and air flow of the tool must not exceed the corresponding parameters of the compressor. As a rule, such models are used in the manufacturing sector, when, during product assembly, the installation of rivets is the main work process and occurs almost continuously. In this case, a manual model will not be suitable due to low productivity, and a battery model will not be suitable due to limited battery charge.
By type of fastener used
- For blind rivets
- the most common type of tool. A pulling force is exerted on the fastener when the tool handles are pulled together or the trigger is pulled. As a result, a riveted head is formed at the base of the element, holding it in the workpiece. The remaining rod from the rivet is discarded. - For threaded rivets
- models that are used primarily in industry. Installation of the fastener occurs by flattening it in the prepared hole, while the fastener is screwed onto the holder. The rivet itself is hollow inside and has an internal thread - thus, the hole in the metal is strengthened due to it, and it is the basis for screwing in bolts and screws.
Based on your own tasks, choose the appropriate tool. For example, if you are planning to build a fence at your dacha, you will attach the corrugated sheet to the pipes. Take a manual blind rivet gun that has two handles. If you are looking for a tool for daily work, for example, in the manufacture of ventilated facades, choose either a manual rocker-type model or a battery-powered one - it all depends on the operating conditions and the scope of work. To equip a production department or workshop, the right decision would be to purchase a pneumatic riveter, with which labor productivity will be much higher.
Pay attention to what determines the functionality of the tool and productivity. Knowing the main characteristics will help you make a successful purchase - you will select the model that best suits your needs and the specifics of the work.
Important selection options
The main characteristic is the thickness of the workpieces being fastened. Decide which metal sheets or profile you will connect - their total thickness should not exceed the permissible value of the riveter. For example, for the model it is 8.5 mm. The next parameter is the size of the rivets used. For example, the tool has 4 interchangeable attachments for working with fasteners measuring 2.4 - 4.8 mm, and 5 attachments for fasteners measuring 3.2 - 6.4 mm. These models are suitable for a wide range of jobs. If you plan to perform one specific task that requires a certain size of fastener, you do not need such a functional model. Don't forget about the tool kit. Many manufacturers include not only replacement attachments, but also maintenance keys. The pneumatic riveter has replaceable jaws and a container for waste materials, which ensures safe work - the rods fly off into the container and not towards the operator. The model comes with a case and a set of rivets to get started.
Don't have a riveter in your arsenal yet? Then it's time to buy it! Once you try it out, you will see that it is very easy to make reliable riveted connections. You can choose the appropriate model on our website and immediately purchase the fasteners necessary for the job. Place your order now - you will receive the product as soon as possible with delivery or you can pick it up at the nearest pickup point.
This very specific tool has a number of other names - “river gun”, “rivet gun”. Manual riveters are purchased mainly for household needs, as they are simpler and cheaper items compared to their “brothers”. However, their range is quite impressive, and the cost of individual products differs significantly - from one and a half hundred rubles to 2 - 3 thousand. Which riveter is better to buy?
The main rule when choosing any “device” is what is it for? After all, it is clear that manual models are inferior to professional ones in both versatility and performance. In other words, you need to clearly define the tasks that will have to be solved.
By the way, if you have to work frequently and use rivets of different sizes, then it is advisable to have at least 2 products in your house that are different in “parameters”. For example – one-handed model + two-handed. But if the business is on stream, it is better not to waste money on cheap products. In any case, the riveter completely pays for itself, just like.
general information
Hammer rivets are used to create a reliable connection. To do this, the builder must have access to all sides of the elements that need to be connected. It is important to note that the holes in the materials being joined must be similar to the diameter of the rivet (possible errors are determined by GOST).
Rivet sizes can vary significantly.
Thus, the diameter ranges from 1 to 36 millimeters, and the length ranges from 2 to 180 millimeters. This spread makes it possible to use parts in various fields to connect materials of different thicknesses. However, at the same time, it is worth remembering that the size must correspond to the loads that the rivets will experience during operation. This is why experienced builders often advise and recommend using rivets with a “size margin” - it is better to take a larger part than a smaller one.
In general, all the requirements put forward for these building elements are specified in the relevant construction GOSTs adopted by the Russian Federation, and are also established by various documents legalized at the international level (for example, the production of hollow rivets is regulated by GOST 12639-80).
Riveting tools
The riveter itself looks like a manual mechanism with a lever system and a large ratio between the lever arms. A drive is made to the collet mechanism, it grabs the wire in the rivet and rests against the finished head, pulls it and breaks it off. There are several types of riveters, they are standard, and sometimes with various additions. For example, there is a collet head that unfolds, which means it helps to reach hard-to-reach places. The rivet set usually comes with a set of interchangeable heads, because rivets come in different lengths and diameters.
The riveting process itself takes no more than a few seconds if there are ready-made holes in the parts for connection. This can be seen using the example of how to rivet rivets.
For example, you need to connect 2 parts that are made of very thin metal, and you can only get to them from one side. You can conditionally attach handles or legs to the barrel. You can’t cook it because the metal is non-ferrous, and the screws won’t be able to hold on because the metal is thin. You can’t solder them either, because the parts are massive. And the attachment will not be very reliable, because adhesives work well only for shear, but not for tearing. And all that remains is to rivet.
- First you need to attach the parts to each other and drill a through hole in them.
- Now you need to insert the rivet into the hole. The rivet tube should protrude from the reverse side no more than 1 cm.
- Now you need to put the head on the protruding wire and press it to the hat, pressing the handles.
- This must be done until the wire breaks, usually 1 time is enough.
Such a rivet will not be completely sealed; if a sealed connection is necessary, then additional measures will have to be taken, this could be the use of silicone, a sealant with non-drying properties, epoxy putty and others.
The head of the wire will remain in the flared tube and can be knocked out using a piece of wire that has come off. After this, a hole from the rivet will appear at the riveting site, which will not look very neat. A similar rivet is sometimes used in threading thin metal. This means that if you need to make a threaded connection on thin metal, then the first thing you need to do is drill a hole, rivet it, and after knocking out the head of the wire, you need to cut a thread in the rivet.
There are a large number of different ways to connect two metal pieces together. Welds are often used. They are quite reliable, but lead to some deformation of the material from heating, which is unacceptable in some cases. This is why rivets are required. Aircraft and other vehicle bodies are completely assembled using rivets. In addition to the usual expansion rivets, there are also threaded steel rivets. They also have wide applications. The types of such consumables and the riveter for them will be discussed in this article.
Material of manufacture
Hammer rivets can be made from various materials. For consideration are the most popular varieties.
Aluminum
This type of building parts is also often called exhaust. Their production is regulated by several domestic standards:
- with countersunk head - GOST 10300-80;
- with semicircular – GOST 10299-80;
- with flat – GOST 10303-80;
- semi-hollow - GOST 12641-80.
The size grid is quite varied: diameter - from 1 to 10 millimeters, length - from 5 to 45 millimeters. Moreover, these indicators may vary depending on the type of rivets (hammer, pull, threaded).
It is also important to note the fact that such aluminum parts can be made from several grades of material. Thus, the most popular raw materials are considered to be aluminum grades D18, V65, AMts, D19P, AMG 5P. They can also be duralumin.
Steel
Stainless steel parts occupy a special place among all hammer rivets. The production of these elements is carried out not only in Russia, but also abroad.
Most often, steel rivets are produced without any additional coating, and their sizes may vary. So, for example, the diameter of the cap can be from 1.8 to 55 mm, the height of the cap can be from 0.6 to 24 mm, the height of the entire element can be from 2 to 180 mm.
Due to such diverse indicators, these parts can be used for connecting sheets made of metal, for fastening facade plates to substructures, as well as for connecting metal structures with parts made of other materials.
Copper
Construction parts made from this material are characterized by several distinctive features:
- due to their antimagnetic properties, they are widely used in the radio industry;
- due to the fact that copper does not rust, rivets made from it are in demand in almost all areas (especially in cases where the materials fastened with them often come into contact with water and air);
- Copper elements are used to assemble apparatus and tools for the chemical industry, as they are quite resistant to the action of various substances manufactured artificially.
Most manufacturers produce copper rivets in standard sizes: from 2 to 8 mm in diameter.
Brass
Brass parts are quite flexible, but at the same time durable. And thanks to their appearance, they can perform not only their direct functions, but also serve as a decorative or design element. Most often, such elements are used in the industrial and instrument-making fields.
The length of brass rivets reaches 4–70 mm, and the diameter is 2–8 mm.
In order to choose the right crimp (mandrel) for brass parts with a semicircular head, you should choose crimps that have:
- long service life;
- uniform hardening;
- working ends are polished;
- Impact heads are inductively annealed.
- this is the production of permanent connections using rivets used in the manufacture of metal structures (trusses, beams, various types of containers and frame structures). A rivet is a cylindrical rod made of ductile metal, at one end of which there is a head called an embed. During the riveting operation
on the second side of the rod, installed in the holes of the workpieces being connected, a second rivet head is formed, which is called the closing head. The mortgage and closing heads are mainly semicircular and countersunk (Fig. 5.14). The need to use ductile metal for the manufacture of rivets is due to the fact that its heads are formed as a result of plastic deformation of the rivet rod. When making riveted joints, the rivets should be selected from the same material from which the parts to be joined are made. This prevents the appearance of galvanic couples, leading to corrosion at the point of contact between the rivet and the part. The riveting process consists of two stages - preparatory and riveting itself.
Preparatory riveting process
involves drilling or punching a hole for the rivet and forming a recess in it using countersinking for the rivet and closing heads, if necessary. The actual riveting includes installing the rivet into the prepared hole, tensioning the riveted workpieces, forming the closing head, and cleaning up after riveting. Depending on the nature of the rivet joint, riveting is performed in a cold (without heating) and hot (with preheating of the rivet to a temperature of 1000 ... 1,100 ° C) method. In practice, hot riveting is used in cases where steel rivets with a diameter greater than 12 mm are used.
Classification of blind rivets
Depending on their technical characteristics, fasteners of this type are usually classified according to the material of manufacture, the strength of the rivet and its compatibility with the base material. In the manufacture of the sleeve and rod, aluminum is often combined with steel or stainless steel; one-component products made from the listed types of metal are less commonly produced. If we arrange the modifications of blind rivets according to the degree of strength of the material used to manufacture sleeves and stilettos, starting with the highest, then the row will be as follows: stainless steel, a combination of stainless steel with aluminum, and in the last positions, steel fasteners due to the high degree of susceptibility of such a connection to corrosive effects.
Technology of using a riveter
The rivet tool is easy to use. It is only important to remember the general principle of operation. The first stage is the preparation of metal parts. They need to be prepared for work: the surface should be leveled so that both elements fit well together. Then both parts are placed on a wooden blank and secured well. First of all, you need to mark on the parts where the holes for fasteners will be located. This must be done very accurately so that in the future the holes on all parts match.
Then you need to drill a hole into which the rivet will be installed. Pay attention to the dimensions of the hole, rivet and drill. If the required hole diameter is 4.8 mm, then the drill should be 5 mm in diameter. At this stage, it is important to check that the fixing skirt fits tightly to the metal around the hole. The length of the rivets directly depends on the thickness of the parts and the load on them. Small rivets are intended for parts that will bear virtually no stress. In this case, rivets with sizes from 2 to 6 mm are suitable. If the parts will be subject to significant load, then rivets up to 16 mm will be needed.
The thin end of the rivet is installed in the sharpener so that the attachment fits exactly. The rivet head is installed in the hole on the part. It is worth considering that the rivet should protrude slightly on the other side, about 10 mm. A riveter is placed on the upper part of the part perpendicular to the main part. Then you need to make a linearly directed clamp - always strong. If the rivet leg does not fall off after compression, you need to repeat the operation several times.
The next stage is broaching using a lever system. For this, steel mounting wire is used. The entire space in the riveted part is filled with metal from wire. Due to the pressure, bulges appear along the edges, which will hold the elements being fastened and prevent them from coming apart. The remaining fasteners are made along the connecting seam. After this, it is possible to make no more than 3-4 points - the wire breaks. Wire scraps must be removed from the tool - this can be done using a slotted screwdriver.
When making a seam, you need to pay attention to the size of the parts, because the quality of the connection will deteriorate if you make a mistake when setting the size. A poor-quality connection will lead to the destruction of the fasteners - they will not withstand the load. The result will be destruction of fasteners and the need for repairs.
| Training manual for training workers in production |
Summary
A thread riveter is certainly a necessary tool if there is a need to constantly work with workpieces that must be connected without the use of a welding machine. If you need a one-time job, you shouldn’t spend money on buying a factory tool; it can be easily built from scrap materials.
A special rivet gun can be useful for joining parts, but not everyone knows how to use a riveter correctly or what safety recommendations exist.
A riveter is necessary for connecting parts.
Features and types of metal riveting in plumbing
Metal riveting and plumbing are two inseparable concepts. Using a riveter, you can connect metal parts of different thicknesses. Depending on the type of fasteners, different technical parameters can be achieved from the finished connection.
Master riveting metal
Metal riveting is a technological process that involves joining parts using rivets. The tool can be manual or pneumatic. Used when parts cannot be welded.
Types of jobs
Experts distinguish two riveting technologies - hot and cold. Each of them is used in different situations.
Hot riveting
Before connecting the parts, the rod of the fastener is heated. The craftsman determines the heating temperature by color - the metal must be red-hot. Rods with a thickness of 8 mm or more are suitable for hot riveting.
Cold riveting
Standard technology used in different situations. More often, cold riveting is carried out at home, in small workshops for the manufacture of products that will not be subject to heavy loads. To perform this, rods with a thickness of no more than 8 mm are used.
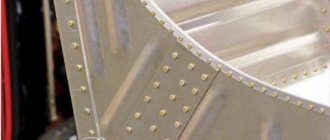
Sheet of metal with rivets
Types of cores and filling heads
Based on the type of shank, rivets are:
- Hollow. Inside the rod there is a free cylindrical cavity. They do not withstand high loads, but are easily riveted.
- Semi-hollow. In the area of the mounting head the rod is solid.
- Solid rod. Rivets are difficult to install, but they can withstand high loads.
Possible types of heads are conical, cylindrical, semicircular.
Rivets for metal (Instagram / stroimarket_erme)
Types of seams
Types of riveting seams:
- Lasting. It is used if you need to obtain a high-strength connection. The finished part will be subject to heavy loads during operation.
- Dense. They are used in the manufacture of sealed containers for storing or pumping liquids. Withstands slight pressure.
- Durably dense. They are used in the assembly of metal structures and products that will be subject to high pressure.
Depending on the location of the fasteners, the seams can be multi-row, double-row, or single-row.
Principles for choosing rivet sizes
You need to choose rivets for connecting metal parts depending on the thickness of the sheets being joined. In this case, you need to take into account the diameter of the rod.
To determine the required diameter of the fastener, you need to double the thickness of the metal blanks that will be connected. The length of the rod should not be less than 2 diameters.
Standard size ranges:
- diameter - 1–36 mm;
- length - 2–180 mm.
The opinion that the larger the diameter, the higher the strength, is erroneous. The strength indicator depends on the material of the rivet.
Riveters and riveter (Instagram / suburbblues)
Tool for work
Tools:
- Set of mechanic's hammers. It must be selected depending on the diameter of the rivets. It is better to use a hammer with a square head.
- Minting. A mechanic's chisel, which has a flat working part on one side.
- It's a stretch. A beard that has a hole in the working part.
- Crimping. Tool for shaping the closing head.
Additionally, you will need a vice, a drilling tool, and a hand riveter.
Stages of work
Stages:
- Preparation of parts to be joined.
- Marking holes.
- Drilling holes.
- Countersinking of finished nests.
- Installation of fasteners.
- Crimping
Before starting the main stages of work, you must:
- Clean surfaces from plaque, dirt, and rust.
- Mark the locations of future holes. Before drilling, they need to be marked so that the drill does not go to the side.
Preparation of metal structures (Instagram / start_blasting)
Drilling holes
You can drill holes in metal surfaces using a drill press or hand-held power tool. It is better to use a drill press because it can drill holes in thicker parts.
When using a hand-held power tool, it is important to accurately control its position when drilling so that it does not deviate to the sides. When drilling, it is necessary to use special coolants. You can only work with a sharpened drill.
Inserting rivets
Stages:
- The fastening element is inserted into the hole with the rod from bottom to top.
- A support is installed under the embedding head. If it is hidden, it is necessary to use flat support.
- The parts are compacted. They are seated at the riveting site. Gaps between metal sheets are eliminated with a hammer.
Formation of the closing head
How to do it:
- Direct method. Hammer blows are applied to the rivet shaft from the side where the closing head is formed.
- Reverse method. The hammer blows are applied to the mortgage head.
Bench hammers (Instagram/inforce_tools)
Recommendations
If the installation of rivets on metal is performed by a beginner, a person without practical experience, he may make various mistakes. Defects and their causes:
- The closing head does not adhere tightly to the metal surface. Distortion during crimping.
- The heads are shifted in one or different directions. The holes were drilled with a slight slope.
- The closing head has ragged edges. Low-quality material was used to manufacture the fastening element.
- The head is shifted to the side. The rod is uneven or longer than required.
When carrying out work, you must adhere to safety rules:
- The pneumatic tool cannot be used until the adjustment is completed. It will be difficult to hold the crimp with your hands due to the powerful pneumatic shock. This may cause hand injuries.
- When riveting, sharp, loud sounds are heard that negatively affect the nervous system and hearing. You need to use thick headphones.
- The tool must be checked before starting work. It must be in good working order. The desktop should not be cluttered with unnecessary objects or tools.
- The parts to be fastened should be fixed in a vice.
There are often situations when it is necessary to first remove old fasteners and then reattach the part to the same place. A sharp chisel can be used to remove the round head of the rivet. The remaining fasteners must be knocked out with a punch.
When riveting metal, you must use protective gloves and goggles. The parts should be secured in a vice or console so that they do not move. When working, do not touch the crimp with your hands. Compliance with safety precautions will help to protect yourself from injuries and perform better work.