Almost every person encounters rivets, even those who have nothing to do with construction. Some of their types are present on clothing, which makes it easier to use. In construction, rivets are most often used to secure two parts together. But there are also rivets that perform a different role. They are called threaded. Why are these elements needed and how are they installed. This will be discussed in the article.
What is it used for?
A threaded rivet is similar to a blind rivet only with some nuances of fixation. Otherwise, its purpose is somewhat different. In some cases, it is necessary to install a product on metal. But its thickness is not enough to cut a thread or there is no way to crawl from the back side in order to substitute the nut. In this case, threaded rivets come to the rescue. Structurally, they are a small hollow cylinder, which already has a thread. The rivet is installed in such a way that it is securely fixed to a metal or other workpiece and provides the ability to install a bolt to fix any module.
Required Parts
There are various descriptions of a homemade device made from various parts on the Internet. For example, you can assemble the tool yourself using the following materials:
- Pieces of pipe from a 20x20 profile.
- A piece of tube 20x40.
- Hardened screws 5 cm long with threads for 8,6,5 and 4.
- One M10 bolt – 10 cm.
- M10 washer.
- Plastic plugs for pipes.
- Thrust bearing.
- Connecting nuts with thread 10.
- Plastic stopper.
You also need to make a case in which the mechanism will fit. For it you will need:
- Pieces of extruded foam.
- Galvanized pieces.
- "Piano" loop.
- Furniture fasteners.
- A piece of wire 4 mm thick.
Varieties
The difference between rivets of this type lies not only in their diameter, but also in other parameters, one of which is the metal of manufacture. The following can be used as a basis:
Each of these metals has its own advantages over others. Regular steel rivets are most often coated with zinc to prevent rust during use. In this regard, stainless steel products benefit, but their cost is slightly higher. They also have greater strength. Copper and aluminum are used in cases where interaction with a similar metal is required, and the rivet will not hold a module that is too heavy. Each element has a head that guarantees fixation on the front side. It can be flat or hidden. The second option will require widening the outer diameter of the hole to hide the sides. Blind rivets are used most often in case of one-sided installation. The latter is carried out in a situation where the thickness of the metal of the workpiece is greater than the rivet and the latter does not have the opportunity to fully compress it. In this embodiment, fixation occurs due to the expansion of the element body inside the hole.
Mounted modules have different pitches and thread diameters, so products are required to match them. That is why companies producing such fasteners are most often ready to provide their customers with rivets that have a diameter from M4 to M8. This applies to nut structures when there is no access to the reverse side of the metal. There is also a collapsible screw type, which is available in sizes from M3 to M16. The cut profile of the product may also be different. Most often, round is used, but hexagonal can also be used. In the second case, making a hole for such a unit requires some effort, but turning it is much more difficult, and in some cases impossible, when compared with the round version.
Threaded rivets can be specialized, so depending on the application, they may have reduced resistance to electrical current. Other elements have increased strength, because they are designed to work under heavy loads. Depending on the shape, the clamps are able to provide a tight connection. The heads of some elements have special marks that allow them to be identified among other products. Vibration-isolating rivets are often used in automobiles. Especially when it comes to mounting on body parts.
Installation process
The algorithm for installing a threaded element can hardly be called overwhelming, but it is important to know certain nuances. If possible, it is better to use a factory riveter. If desired, you can assemble it yourself; one option will be discussed below. The first step is to determine the type of metal on which the rivet will be installed. Next, you need to know what the diameter of the bolt or module that will be fixed thanks to this rivet is. According to the specified diameter, the appropriate rivet is selected. Its outer diameter is measured and a drill is selected that will be one tenth in diameter larger than the rivet. This is necessary so that the latter fits into place without much effort or obstacles.
Electric or cordless drill. The metal is drilled in the required location. After this, the fastening element is inserted into the seat. If it needs to be placed in a certain position, then it is better to hold it with your hands. For hexagonal holes, you can use special punches if we are talking about thin metal. If the thickness of the metal is greater than the length of the fastener, then the hole must be drilled a little deeper than the fastener, but there is no need to make a through penetration. After this, a rivet maker core is selected that fits the thread to the element being installed. The handles are brought together or the bolt is rotated so that part of the rivet is deformed and fixed in the hole.
Manufacturing algorithm
The idea is to insert a square piston into the pipe, which has a large-diameter internal thread, and on the other side a rod with an external thread. A bolt is screwed into the piston, its head resting on the edge of the “cylinder”. As the bolt is tightened, the piston is pulled inward. The rivet must be pushed against the head in order to expand as required when the rod pulls it on the thread. But for different rivets you should make several options for nozzles. You can call them bits.
- The base of the bit is made from a connecting nut with a 10mm thread. A screw is welded to the nut, after which it is ground down with a grinder to a square section.
- The rivet gun body is made from a 20x20 pipe, so the nut should slide freely inside it. The weld seam in the pipe can be easily removed with a file.
- For the long nose of the rivet gun, a piece of thin pipe is suitable. The two elements are joined and welded. The product is cleaned.
- The length of the spout is adjusted so that the rivet is screwed onto the end of its stem.
- The working screw is made from a 10 cm M10 bolt. To reduce the friction of its cap on the body, a support bearing with an internal diameter of 1 cm is used. It is convenient to use a cap from a 1.5 liter bottle as a casing for it.
- The bearing is secured with a cotter pin so that it does not fly off every time the bolt is unscrewed.
- This completes the assembly of the working screw and bits. Other bits for different threads are manufactured in a similar way. You can turn the screw using a ratchet wrench.
- During tightening, the riveter is held using a handle, which is also made from 20x20 pipe. One corner of the handle must be rounded so that it can freely tilt upward.
- The device box can be made from pieces of galvanized sheet, and the seats inside can be made from foam plastic.
- For ease of use and location among other tools, the bits can be wrapped with colored electrical tape, and the riveter itself can be painted.
This simple device will always help out when you need to put a screw rivet on metal, but you don’t have a store-bought device at hand.
DIY riveter
If the installation of threaded elements is required due to duty or work, then it makes sense to purchase a factory product that operates by hand force or based on a pneumatic mechanism. In most situations, the installation of such rivets is rarely required, so you can assemble the rivet gun yourself.
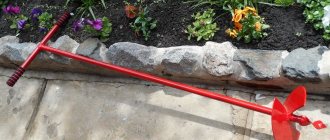
Bolt based
To assemble the entire structure, you will need a bolt similar to the one shown in the photo above. It can be taken from the crankshaft of a car engine. The diameter of the bolt must be such that a hole can be drilled inside it through which another bolt with a thread size that will match that used in the rivet will be inserted. The length of the second bolt must be at least 100 mm. The length of its thread should be as long as possible; if necessary, it can be additionally trimmed with a parallel tool.
Additionally, you will need a nut that will screw freely onto the thread of a bolt with a large diameter, as well as a collapsible bearing. The inner diameter of the bearing must be such that a long bolt, which will be used for clamping, can freely pass through it. The design is quite simple to assemble. To do this, you need to insert a long bolt inside a larger one in diameter. A nut is screwed onto the large bolt, and a collapsible bearing is placed onto the threads of the long bolt.
A rivet is screwed onto the long bolt and must be installed in the hole. You will need two keys to operate. One of them will hold the nut, and the second should rotate the bolt. You can simplify the task by welding a handle to the nut. The bolt rotates until the stop becomes significant. You shouldn't be too zealous. Once the result is achieved, you need to unscrew the long bolt. The bearing in this case is a stabilizer that prevents the bolt from biting inside the structure. There is a video about this riveter below.
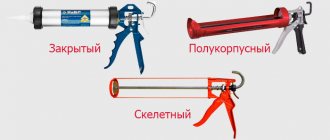
Types of manual (mechanical) riveters
There are three types of manual rivet setters:
- one-handed;
- two-handed;
- harmonic.
One-handed ones are designed for small fasteners - up to 5 mm. They differ in that their working handles are at an angle of 90° to the installation axis. That is, the handles are pointing down. It is convenient because you can work with one hand. The disadvantage is the small “range” of sizes that the device can work with.
Two-handed ones are large in size; they can also install rivets of large diameters - up to 8 mm. You can distinguish them by their appearance - long handles that are in the same plane as the working jaws. It makes sense to choose a two-handed riveter if you plan to use large diameter rivets.
Types of manual riveters: one-handed, two-handed, accordion
Mechanical accordion riveters are often used with large-sized fasteners. The presence of that very “accordion” allows you to install large-sized fasteners with less effort. Such a device usually has a more expensive tool and is more often used by professionals.
Choosing the type of manual riveter is not too difficult. If you need a reliable machine, choose from two-handed models. Their design is simpler, there is almost nothing to break. At normal quality they are indestructible. If you will only install small fasteners - no more than 2-3 mm, then it is more advisable to use a one-handed one. It's more convenient for them to work.
Other types of rivets
In addition to threaded rivets, there are blind and standard types of rivets. Previously, the standard rivet version was more used. It is a cylinder, one of which has an extension. The latter is made in a semicircular shape or with a hidden part. Installing such a rivet requires more effort than with other types. Such clamps are practically out of use. The first step for installation is to fix the two parts in the position in which they will be fixed. Clamps are used for these purposes. After this, the location where the drilling will be done is marked. The diameter of the hole should be 10% larger than the diameter of the rivet itself.
After this, a rivet is inserted into the prepared hole; it must be placed on the reverse side so that the part without the head is directed upward. After this, the parts must be positioned in such a way that there is a good stop for the rivet head. After this, the straight section is riveted, as shown in the photo. To do this, you can use a hammer or a special electric tool. The protruding part of the rivet must be given the same shape as its head. Riveting must be carried out in such a way that the body of the rivet completely fills the hole in the parts. If this does not happen, then under the cutting force the rivet will fail and the assembly will be destroyed. The length of the rivet should not be too long or too short. In some cases, for greater ductility, a regular rivet can be heated with a gas burner.
The type of exhaust fastener is shown in the illustration above. Installing such an element is several times easier, since the entire process is automated. Each fastener has a steel or other rod, which performs the task. The rod is connected to a small ball, which is located at the end of the element. Selecting the diameter and drilling the hole is carried out as in the above option. After this, the latch is installed in its place. The riveter is installed in such a way that the core is fixed in its chuck. As the handles are squeezed, the rod pulls up the ball, which flattens the back side of the fastener and thus fixes the two parts. The rod is cut automatically as soon as the force reaches the limit value.
A simple homemade riveter for blind rivets
A simple homemade riveter for blind rivets can be made from scrap materials. This is especially true in cases where you need to install only a few rivets, and there is nothing suitable at hand. Don’t buy a factory-made riveter for a one-time use.
Many will say that it is much easier to buy a disposable Chinese tool for 100-200 rubles. Nobody argues which is simpler. But sometimes there are situations when you need it here and now, so this version of a quick-made riveter may be useful to someone.
The first step is to cut a piece of thick-walled pipe with a diameter of 57 mm and a length of 3.5 cm. In the resulting workpiece, you will need to drill a hole with a drill with a diameter of 12 mm.
Main stages of work
After drilling a hole in the pipe, weld a nut under the M12 stud. Opposite the nut on the opposite side, drill a hole with a diameter of 2.5 mm. Using a drill with a diameter of 8 mm, you need to make a small countersunk hole.
Using an angle grinder, make a slot in the place where the small hole was drilled. Then, between the two holes, approximately in the middle of the pipe, you will need to weld an M8 bolt.
We screw the handle from a drill or hammer drill onto the stud of the welded bolt. At the last stage, we make a sample in the slot, after which we fasten the previously prepared part from a regular pin and bolt.
In this case, there is a possibility that the rivet leg will break prematurely, but low-quality rivets can be broken even by a factory riveter. For a step-by-step process of making a homemade rivet maker for blind rivets, watch the video on the website.
Rate this post
Source: https://sdelairukami.ru/prostoj-samodelnyj-zaklepochnik-dlya-vytyazhnyh-zaklepok/
Summary
As you can see, each type of rivet plays its role and is necessary. If conventional ones can be replaced with exhaust ones, then threaded ones are unique in their class and make it possible to install additional equipment where it is difficult to use any other method of fixation. The diameter of the clamp is selected depending on the needs. Factory riveters for threaded elements are most often supplied in a plastic case for greater ease of storage. If there is a need to install components of large diameters, then a model with two handles is better suited.
Bonding of metal (and other) parts is carried out using a variety of methods. Using a welding machine is not always possible (for example, in situations with plastics) or impractical, as is cutting threads for screws or bolts with preliminary drilling of the material. Special threaded rivets have virtually no restrictions in their use and provide reliable fixation at the joint. What kind of products these are and what is their feature is the topic of this article.
General procedure for installing threaded rivets
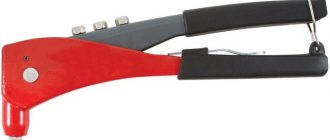
Before riveting the threaded rivet, preparatory work is performed. It is necessary to select a drill whose diameter should be 0.1 mm larger than the outer diameter of the rivet, which will allow it to be easily installed in the hole. After this, a hole is drilled at the location where the fastener is installed. In addition to threaded rivets with a round cross-section, similar hardware with a hexagon-shaped cross-section are also produced. This shape eliminates the possibility of the part turning during installation. To make holes for such rivets, special hexagonal punches are used. However, they are only suitable for working with sheet metal, which somewhat limits the scope of application of hardware of this shape. Manufacturers recommend using a special tool for installing fasteners - a riveter. Therefore, the installer must have the appropriate skills and understand how to install a threaded rivet with a riveter. Such tools can be mechanical (manual), electric and pneumatic. The design of a mechanical riveter consists of a working part and two handles. The working part contains a movable screw mechanism, the end of which has a thread. To make a threaded rivet using a riveter, perform the following sequence of actions:
- The rivet is screwed onto the threads of the screw mechanism of the tool.
- The working part of the rivet gun with the rivet installed is placed in the prepared hole in the metal base.
- The handles of the tool are compressed. This creates a force due to which a shoulder is formed in the inner part of the rivet. As a result, the fastener is tightly fixed to form a reliable and durable connection with the mounting hole for the screw or bolt.
- The working part is removed from the rivet by unscrewing.
The advantage of a mechanical riveter is its simple and reliable design, as well as its low price. However, to install threaded rivets with its help, it is necessary to apply quite a significant force. If it is necessary to perform a large volume of installation work, it is advisable to use riveters with an electric or pneumatic drive. These are professional tools that enable the installation of threaded rivets by tightening a set screw. This creates a force sufficient to form a collar, after which the screw is unscrewed from the hole. The tools are simple and easy to use, so there are no problems with understanding how to use a riveter for threaded rivets.
Principle of operation
The principle of operation of threaded rivets is that after installing such a locking element, a thread is created. A screw or bolt is then screwed into it.
Installation of threaded rivets is carried out very quickly and efficiently, but only when using a special tool. Such devices can be purchased at different prices.
If there is a need to use this type of fastener, then each master can easily choose the most suitable type of riveter for himself.
The video shows the working principle of a threaded rivet:
Scope of application
During construction or repair work, a riveter can become an indispensable assistant. This tool is used to connect two or more parts only when the use of other available devices is impossible.
A riveter for threaded rivets fastens parts together in the most precise, reliable and aesthetically pleasing way. Most often, threaded rivets are used in construction when there is a need to make threads in thin panels or metal sheets.
Tool
Threaded rivet tools can be powered by human muscle power, and can also be driven by electricity or compressed air.
Also available on sale are screwdriver attachments for threaded rivets. With which you can install fasteners using available power tools.
Manual
Manual riveters are the cheapest, but the productivity of such products is not very high. The following models fall into this category of instruments.
1. Gesipa Firefly. A relatively inexpensive and very reliable mechanical riveter that allows you to work with consumables made from various metals.
The tool is ideal for installing rivets in hard-to-reach places, because the product weighs only 900 g. The Gesipa Firefly comes with a set of attachments that can be used to work with rivets of sizes from M3 to M6.
2. AirPro HN-911. Despite the high cost, this rivet model has a number of advantages, which is why it is most often preferred by professionals working with metals.
Among the advantages of the AirPro HN-911 are ergonomic handles, stroke adjustment, and a lightweight cast aluminum body.
Also, using this riveter model, you can install large diameter fasteners. Thanks to the attachments included in the tool kit, you can work with rivets of sizes M4 – M10.
3. Bralo TR-212. Powerful tool for installing threaded rivets.
The length of the riveter is 530 mm, so when force is applied to the handles, sufficient force is created to install large consumables. The range of sizes used when carrying out work using Bralo TR-212 is from M8 to M12.
How to choose a riveter: manufacturers and prices
When choosing a specific model, many rely on prices. But the spread is very wide - there are very cheap ones and almost identical in appearance, but many times more expensive. Even ten times more expensive. It’s worth saying right away that even for one-time work, buying a very cheap riveter is too risky. It may not work at all or work through the stump-deck.
If you only want to rivet a fence, for example, even then you will have to install hundreds of rivets. If you have to disassemble the tool after every 2-3 rivets, you definitely won’t like it
To choose a riveter that works properly, pay attention to the average price range
- Stanley MR 99. Stanley is the oldest American company.
- NOBUS. Inexpensive tool, works reliably.
- Gesipa. A well-known company, but not everyone praises it. There are definitely cheaper ones that work at least as well.
- YATO copes with steel rivets better than Chinese ones with aluminum ones.
- NWS is a German company. The quality of the instrument is excellent.
- Topex. In some models I liked the ability to move the “spout” 90 degrees. Convenient if you have to work in hard-to-reach places.
- KRAFTOOL. All the tools are good and so are the riveters.
If you plan to use a riveter in professional activities, you need to choose a more expensive one. The company - at your own discretion, but from the category of professional or semi-professional models. Perhaps they do not differ structurally, but they have a longer resource and service life. That is, they are made more reliably and efficiently. And this explains the difference in price - more expensive/high-quality materials were used.
Installing the Fastener
Installing a threaded rivet is practically no different from using conventional rivets. All work is carried out in several stages:
- A hole of the required diameter is drilled in the workpiece.
- The threaded rod of the rivet gun is screwed into the rivet and the rivet is inserted into the hole.
- The threaded rod is pulled into the body of the rivet gun and the part of the rivet that does not have an internal thread is compressed, securely fixing the rivet in the hole.
If a large number of installation operations are to be performed, then to increase productivity, it is recommended to first make the required number of holes. And then start installing fasteners.
>