A screwdriver is a tool that is found in almost every home. The most important and expensive part is the battery. It, like any other part of the device, can fail. To independently determine the breakdown, you need to figure out how to check the battery of a screwdriver with a multimeter at home and what needs to be done for this.
The battery is the element responsible for the operation of the screwdriver
How does a screwdriver battery work?
A battery is a device designed as a source of direct current, which is transmitted from batteries. When charging a battery device, energy, on the contrary, accumulates in the system.
The structure of batteries in electrical appliances has the same elements:
- rows of batteries (“cans”);
- temperature sensor;
- 2 power, 1 control and 1 service contacts.
The energy of the batteries is stored and transferred through their series connection to each other. A characteristic feature of the “cans”: the same dimensions and voltage of the individual elements.
When a screwdriver battery breaks down, as a rule, only one or more batteries fail.
The user just needs to figure out which part of the circuit has the problem and fix it.
In addition to batteries, battery performance is affected by damaged contacts. Power allows the device to receive charge and release energy. The temperature sensor protects the screwdriver from overheating. And the service wire equalizes the charges in all elements.
In addition, the type of batteries affects the operation of the device.
Signs of a malfunction when diagnostics are required
A newly purchased cordless power tool does not create any problems. The batteries charge within an acceptable time, hold a charge for a long time even under load, and deliver sufficient current in difficult conditions. But after a certain period, the user begins to notice that after a full charge the battery lasts for a shorter period. The battery begins to charge faster, but also releases energy faster. And this is the first call. Then everything will only get worse, until the moment when the tool becomes impossible to work. Other unpleasant phenomena may also occur:
- reduction in torque (especially under load);
- the battery may stop charging to the rated voltage (can be determined by the charger - after a long time of replenishing energy, the charging end indicator does not light up);
- other signs indicating a problem with the battery.
All this means that the battery requires diagnostics and, based on its results, action taken - replacement or repair.
Types of storage devices in batteries and their properties
Batteries are based on the electrolysis process. It is based on the transformation of energy through reduction and decomposition reactions. Occurs using the anode and cathode.
Depending on the main components, there are three types of batteries:
- nickel;
- lead;
- lithium-ion.
Nickel
Popular in screwdrivers, household appliances, mobile phones, as a replacement for AA or AAA drives. They have a large capacity and self-discharge ability. Among them, 2 options of “filling” are used in screwdrivers: nickel in combination with cadmium (Ni-cd) or metal hydride (Ni-mh).
Nickel-cadmium batteries. The most common type. The specific electrical energy of each battery is 65 kWh/kg. Charges quickly. Reliable and durable (number of charge-discharge cycles - 3500). The voltage is usually 1.2 V. Among the disadvantages of Ni-cd: “memory effect”.
Lead
Used in UPS, automotive systems with a voltage of 12.7V. They have a smaller capacity, 2-4 times less than their nickel counterparts. They last longer than all the others. Capable of withstanding heavy loads.
Disadvantage: toxicity.
Lithium
The most expensive options. Used in screwdrivers of the makita and bosch brands. The basic principle of operation is the process of decomposition of matter into ions, which is why batteries are called lithium-ion and are labeled Li-lon.
One of the common types of lithium batteries is labeled 18650. The name of this battery indicates its dimensions (18×65 mm). Capacity 1.6-3.6 Ah. Voltage - 3.7V.
Before checking the battery, you need to eliminate the “memory effect” that appears in the battery due to improper charging and self-discharge. This is the property of batteries to accumulate crystals that prevent them from being fully charged.
The self-discharge effect of Ni-cd reaches 20%, Ni-mh - 30%, Li-lon - 8%.
To eliminate the “memory” of the battery, you need to carry out 3-4 discharge-charge cycles. This can be done through a load. It is provided using a regular 12V incandescent lamp connected to a multimeter and battery (instructions for correct connection are described below).
When the operation is repeated many times, the battery restores its original performance if the reason was insufficient capacity and the “memory effect”.
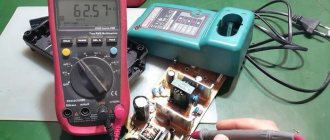
Verification Tools
A multimeter is an indispensable tool that is often used when testing batteries.
Every person who is going to check the performance of a battery should familiarize themselves with the list of necessary documents. To carry out the work you will need the following:
- voltmeter with a constant voltage of 15 V;
- tester;
- multimeter;
- ammeter.
In some cases, the following tools may be needed:
- soldering iron;
- knife;
- straight or Phillips screwdriver;
- pliers.
It is better to prepare all this in advance so that everything you need is at hand.
How to check a screwdriver battery with a multimeter
For the very first diagnosis, you need to determine the voltage and strength of the battery while charging the screwdriver. Normally, the device should show 13V 30 minutes after connecting to the network. After 1 hour the value will change to 0.5V.
The maximum voltage of the screwdriver should reach 17V.
When connected to the network, the current strength of a well-functioning device should reach more than 1 ampere in 1 hour.
The multimeter itself is switched to DC mode to check the battery voltage. At the same time, the mode switch must be set to 20V. This means that the voltage value on the screwdriver will not exceed 20 volts.
When measuring the voltage of an already fully charged screwdriver, the value should be equal to the number of “cans” multiplied by the voltage of each battery.
If the value is below this level, the drive is faulty.
Typically, the number of batteries in a device is 10-12 pieces. With a nickel-cadmium battery voltage of 1.2V, the required value will reach a maximum of 14.4V.
“Memory effect” and what to do about it? + (Video)
If we are talking about ni cd batteries, then for them there is such a thing as the “memory effect”. This “painful symptom” is defined quite simply. When the battery, after going through a full charge cycle, quickly discharges, and after a short pause continues to function again, then this is a correct diagnosis, which, with proper skill, can be cured.
What needs to be done to cure the “memory effect”?
First, the battery is fully charged (preferably at low currents). A small load is then applied to it in order to achieve complete discharge. This simple technique allows you to activate the internal plates of the battery as fully as possible. As an example of a successful load, you can use a regular 220 V incandescent lamp with a power of 60 W. The process of slow charging and discharging should be repeated at least 4-5 times. The result of these measures will be the return of the original battery capacity to 80%.
By the way, if you carry out work on a disassembled battery, where “weak” batteries are already known, then shocking them with a large current can return them to service. If there is electrolyte in the battery, then you can always restore the battery using this method.
How to check the battery capacity of a screwdriver with a multimeter
The main property of a battery is capacity. This value shows the accumulated energy, that is, the current strength for 1 hour. Measured in A/h.
How to check battery capacity with a multimeter?
Algorithm of actions:
- Disconnect the battery from the screwdriver.
- Charge the battery to 100%.
- Using a multimeter, a resistor and a light bulb, measure the time it takes for the lamp to go out and the voltage at the battery output.
- Calculate the capacity of the device using the formula /
- Compare the results obtained with those indicated in the screwdriver operating instructions.
Formula for calculating capacity:
E=M/N*t,
where E is capacity,
M is the power of the light bulb,
N - screwdriver voltage,
t is the battery discharge time.
Let's say the battery voltage reaches 18V. With an incandescent lamp power of 10 W, the battery discharge time should reach at least 2.3 hours.
If the connected light bulb goes out after 30 minutes, the calculated battery capacity will be:
10 Watt / 18 V * 0.5 h = 0.28 Ah
This value is significantly lower than the values of, for example, a 1.3 Ah nickel-cadmium screwdriver battery.
Screwdriver design
Appearance
The first visible difference in the design of cordless and corded screwdrivers is the power source. Corded tools are powered from an outlet using a cable connected to the base of the screwdriver. Battery analogues have contacts on the sole to which the battery is attached.
The body of each screwdriver is plastic. Most appliances have holes to provide ventilation in the motor area. A torque adjustment clutch is attached to the front of the body, followed by a chuck (usually a quick-release clutch).
Under the gearbox area there are 2 or 3 buttons: a through slider (reverse), a start key lock and the key itself. On some units, the reverse slider and trigger lock are combined. At the top of the housing there is a gear switch. Usually it has 2, in rare cases - 3 modes, differing in spindle rotation speed.
Internal structure
The gearbox is located behind the ratchet, which regulates the torque of the screwdriver. There are 2 types of gearboxes: classic (1-speed) and planetary (2-speed). The second mode provides a higher rotation speed of the chuck, therefore it is suitable for using the unit as a drill. The cartridge is threaded onto a spindle located in front of the gearbox.
Behind the gearbox there is an electric motor. The latter consists of a stator, on which there is a winding, and a rotor (armature). Motors are divided into brushed and brushless. The former work using carbon brushes and a commutator, and are common in corded and most cordless screwdrivers. Secondly, the collector contacts have been replaced with an amplifier, which increases service life by eliminating friction and sparking.
Screwdriver device
In the area of the handle there is a structure with an electronic board, due to which the buttons associated with it function:
- the trigger is responsible for turning the engine on/off;
- the reverse slider is responsible for changing the direction of rotation of the cartridge;
- some models have a round button that locks the switch in the required position.
The electrical board is connected by wires to the motor.
Battery device
The battery has recesses for screwdriver contacts, through which energy is subsequently transferred from the battery to the tool. Inside the battery there are lithium, nickel-cadmium or nickel-metal hydride cylindrical cans. They are all connected to each other. The voltage of one element is from 1.5 to 4 volts.
It should be noted that nickel-cadmium banks have a memory effect, as a result of which it is recommended to charge such a battery only when deeply discharged and at full power.
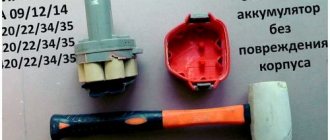
Disassembled battery
Prices in online stores
Measuring battery bank voltage
The battery consists of 10 or 12 cells, 1.2 volts each. First they look at the quality of their connection to each other. Sometimes some of them come off, causing problems in the operation of the tool.
Screwdriver battery diagram
If there are no problems with the contacts, measure the voltage of each part of the drive, which should not be less than 1.2. Solder the contacts with a soldering iron. Batteries must not be connected to the sensors. Connect the probes to the poles. If the voltage is less than normal, replace them with new ones.
It happens that the test does not find faulty components. Then repeat the process under load. Connect a 12 volt light bulb through a 10 ohm resistor with a power of 25 watts. The internal resistance level is calculated by dividing the voltage by the current, subtracting the load resistance. Turn on the light bulb for 2 minutes. The brightness should not change. If it goes out quickly, the storage capacity is insufficient.
Related video: How to check the battery of a screwdriver
Checking the load
There is only one drawback of the preliminary test - it does not allow you to accurately determine the battery capacity, and therefore the charging time. A load test will help you evaluate this parameter. The latter must be trimmed in accordance with the technical characteristics indicated on the battery case.
When this data is not available, use a consumer (load) equal to half the current. In most cases, it is enough to take a 12-volt light bulb with a power of 40 watts. Both automotive and regular halogen lamps are suitable.
The circuit looks simple: a lamp is connected to the negative terminal of the battery. The second wire from it is connected to the “plus”. In parallel mode, readings are taken with a voltmeter. Next, the battery is turned on for 2 minutes. If the brightness of the lamp has not decreased within the specified period, then a preliminary conclusion is given - the battery is functioning normally. The voltmeter reading confirms the result. Ideally, it will output 12.4 V. If the voltage is lower, but still remains within 12 V, one of the battery elements is not working properly.
In addition, a noticeable decrease in the brightness of the light bulb also indicates a malfunction of individual cans. The fact that the entire battery is unusable is indicated by its rapid extinction.
Express testing method: measure U at the battery poles
This method is even simpler, but with its help you can get an initial idea of whether the battery is ok. If we measure U without connecting a load, we get an indicator equal to the “idle speed” of the tool.
For example, if we have 12 cells in the battery with a voltage of 1.2 volts each, and the operating U is 14.4 volts, the “idle” U will increase to 17 volts. If the “idle” voltage is less than specified, this means that there are “banks” in the combination that have failed and need to be replaced. Also, a decrease in idle voltage may mean that the battery is not fully charged.
First stage of testing
Checking the screwdriver battery at the first stage is the simplest; current and voltage readings are taken from the battery while it is charging.
Readings are taken several times, at certain time intervals:
- 30 minutes after charging has started, U will be about 13 volts ;
- another 30 minutes U will increase to 13.5 volts ;
- two hours after the start of the process - 14 volts ;
- a fully charged battery will produce a voltage of 17 volts .
As for the increase in current (amperage) during charging, if the operating condition of the battery is in order, then the current increases steadily during the first hour. In addition to the voltage, measure the current an hour after the start of the process. If the indicator has passed the “mark” of 1 ampere, your battery is in good health and does not need to be disassembled and repaired.
Frequent causes of breakdown
The main reason for the breakdown is that nothing lasts forever. Any electronic components fail sooner or later.
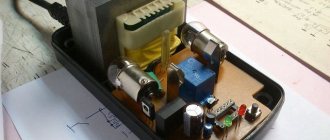
Traces of oxidation on the board due to high humidity.
You can speed up the process by storing the charger in unsuitable conditions:
- High humidity causes corrosion of solder joints, connecting tracks on a printed circuit board, component leads, and destroys the insulation of winding parts (chokes, inductors, pulse transformers).
- elevated temperatures aggravate the effects of humidity and accelerate the aging of insulation;
- low temperature due to differences in thermal expansion (compression) coefficients can lead to separation of leads from the soldering area, microcracks in conductive tracks and housings of electronic components (especially in SMD versions).
An annular crack at the solder joint on the board.
The life of the charger is also affected by its handling. If you allow frequent mechanical impact (shocks, falls on a hard surface, high vibration), this will also lead to the appearance of microcracks or damage to the connectors. The same result can be achieved by careless (using force in different directions) handling of the connectors when connecting the battery.
A crack on the board resulting from mechanical damage.
But even careful storage and operation of the charger does not guarantee failure due to the manufacturer using low-quality components and assembly technologies. This is especially true for little-known manufacturers from Southeast Asia.