The most famous carpenter, Papa Carlo, used to say that working with wood does not tolerate fuss and haste. It is for the soul and should bring peace.
A correctly selected hand plane helps with this - a carpentry tool that is used for planing wood. Its purpose is to give the surfaces of wooden elements the desired shape, eliminate roughness, chamfer and adjust parts to size.
The history of the hand plane goes back to ancient times, and primitive variations of it were discovered during excavations in the city of Pompeii.
What is and what does a plane look like?
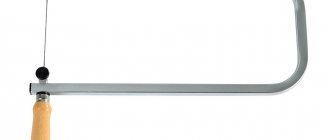
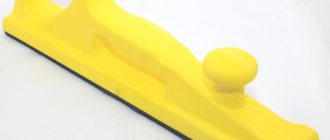
A plane is a very simple tool, consisting of a flat sole with a sharply sharpened knife and a block with two handles. During operation, the device is passed over a securely fixed wooden workpiece and neat layers are removed from it. The main grip falls on the front handle, while the rear handle helps make pushing movements more comfortable.
The block of a hand plane can be not only metal, but also wooden
What is a wood plane used for and how does it work?
The planer is designed to give the wood the required shape and thickness. Using the tool, you can remove excess layers from the workpiece and cut carpentry joints in it.
Structurally, the manual device consists of the following parts:
- pads with soles;
- two handles - front and rear;
- clamp with screw;
- steel knife.
When using the plane, the blade extends through a through slot in the sole. The sharpening angle of the knife depends on the specific material to be processed.
Advice! When choosing a hand plane, it is especially important to evaluate how smooth its sole is. If the tool is even slightly bent, it will not be possible to achieve the desired results with it.
How a manual and electric plane works
The operation of the manual device is very simple. A knife is installed on the product, positioned parallel to the sole, and secured with a screw or cam clamp. The tool is placed on the surface of the workpiece and pulled forward with force. The pressure should be placed first on the front of the device, and then on the back. Planing is carried out parallel to the wood fibers - this allows you to get even chips without unnecessary effort.
The purpose and design of an electric planer are almost the same. The difference is that the tool is equipped with a motor and runs on mains power. When turned on, the motor transmits rotation to the drum with knives, which protrudes through the sole. The blades, in motion, cut chips of the required thickness from the wood workpiece without forming depressions or grooves on the surface.
Types of hand planes for wood and their names
The plane is one of the main carpentry tools and comes in many models. Simple devices are intended for rough work, others are used in finishing. Before choosing a tool, you need to study the types of wood planes and their names.
Single
The single hand plane is a simple design with a straight blade. The edge of the knife is slightly rounded, so when processing a workpiece, no grooves are formed on the surface of the workpiece. The device is used mainly for planing wood after cutting or using an ax.
A single plane helps remove rough edges, humps and other irregularities in wood.
Double
The design of the double plane is almost identical to the single one. But its distinctive feature is an additional knife for breaking chips during the planing process. The tool is used in finishing workpieces; with its help, you can achieve good smoothness of the wood and minimize the subsequent use of sandpaper.
A double plane can be used to clean the ends of workpieces from burrs and other irregularities.
Sherhebel
This type of device is equipped with rounded blades set at an angle of 45 degrees relative to the side of the sole. It has a wide clearance for chip removal, suitable for fast rough processing of wood. It does not provide a perfectly smooth surface, but it allows you to plan workpieces not only along the grain, but also across it.
After using Sherhebel, the wood is additionally sanded to remove nicks and rough spots.
Jointer
The jointer has an elongated block and is especially effective at removing protruding parts of the workpiece. Used for treating large surfaces. The cutting edge of the tool does not touch the recesses when moving, so it can be used for finishing grinding.
The effectiveness of a jointer directly depends on its length; the longer it is, the better.
Zinubel
A plane of this type is equipped with a single knife, the blade of which, on the side opposite the chamfer, is covered with small notches that form teeth. During the planing process, the moving edge of the tool creates grooves on the surface of the wood.
Tsinubel is used for rough processing of workpieces before finishing cleaning. The tool also helps prepare hardwood elements for gluing, since grooved surfaces adhere much better to each other.
Most often, tzinubel is used together with other types of planes.
Figure planing
Figure planing on wood is an art. To create unique products with a profile section, it is necessary to use a special material - wood of the highest quality, which must have a minimum number of knots, and it itself must be straight-grained. At the same time, such high-quality material must be processed with a special-purpose tool. Such tools may include:
- Kalevka - this type of plane is used for shaped processing of objects. It has a multi-level sole and special edges on the knife. Perfect for making carved door/window trims, baguettes and cornices.
- Tongue and groove - used for making grooves, holes in boards and tongue and groove joints, as well as other tongue-and-groove joints. Consists of securing and guiding blocks held in place by screws.
- Primer – it is designed for cleaning grooves in the form of a trapezoid along the grain of the wood.
- Zenzubel - it is used for making grooves and quarters and then cleaning them. The knives of this device are shaped like blades, and the body is equipped with a special hole for discharging chips.
- Falzgebel - used for stripping and selecting quarters, has a stepped sole.
- Humpback - its plantar base has a convex shape, which is very convenient for working with cylindrical, semicircular or concave surfaces.
Types of electric planes
An electric plane is a universal tool that is in demand in roughing and finishing wood. Depending on the number of attachments, it can be used to perform rough planing of workpieces or grinding. It is customary to distinguish two types of devices based on power.
Domestic
Tools with a power of 500-1500 W are intended for home use and use in private workshops. They help to quickly cope with planing work in the countryside, are lightweight, have a comfortable grip and are low in cost.
Using a budget electric plane at home is much more practical than using a hand tool. However, such devices are not intended for long-term continuous use.
A household electric planer works well on soft wood
Professional
The professional category includes instruments with a power of 1000-2200 W. Such electric planes are used in furniture production, in the manufacture of window frames and doors.
Premium motorized tools support wide planing depth settings, ensure good wood smoothness after a pass, and cover a large area. The disadvantages of the models include high cost and large weight. Long-term use of the tool tires your hands.
Electric professional planes are equipped with precise adjustment and additional attachments
Rating
The TOP 10 rating of modern electric planers for the home with a work surface width of up to 110 mm and above includes the following models from the best manufacturers:
- Interskol R-82/650.
The best inexpensive planer model with a 650 W motor powerful enough for domestic conditions, a cutting width and depth of 82 and 2 mm, respectively, for short-term work.
Pros:
- Molded sole.
- Low price.
- Ejection of chips on both sides through nozzles.
- High quality processing.
- A complete set of durable knives.
- Rotation speed 16 thousand rpm.
Household electric planer Interskol R-82/650 Source cdnmedia.220-volt.ru
The disadvantages are associated with a short cable - you will need to use an extension cord, and the need to initially fix the knives and set up the platform.
- Whirlwind R-82/1100.
A budget category tool with a 1.1 kW motor and a processing width of 82 mm. Equipped with overload protection. The main functionality is limited to setting the cutting depth and cutting out the quarter.
Pros:
- Great power.
- Safety system.
- Light weight.
- Parallel type stop.
- High build quality.
The disadvantages are caused by its limited functionality and the inability to use the device for long-term work.
- Makita KP0800.
A mid-price manual electric planer with planing width and depth parameters of 82 mm and 2.5 mm, respectively. Equipped with a 0.8 kW motor with a rotation speed of 17 thousand rpm. There is a groove for chamfering.
How to use an electric planer on wood
The design and principle of operation of an electric planer are quite simple. Before using the tool, you should read the instructions and pay attention to preparing the device for use.
Setting up the plane before work
An electric plane is more complex than a manual one. Even minor malfunctions of the device or minor defects can lead to tool breakage, damage to the workpiece, or injury to the operator. Before using the device you must:
- Carefully inspect the tool and make sure that there is no physical damage to the body and knives.
- Check the movement of the mechanisms and make sure they are not clogged.
- Securely fix the cutting elements of the device.
- Place the wooden piece motionlessly on the work surface.
- Turn the plane over, rotate the drum and secure the knife in the upper position.
- Use a straight edge to ensure that the front plate and sole are parallel.
If measurements show that the elements of the device are not fixed relative to each other unevenly, adjustments need to be made. To do this, remove the handle with the front sole from the body and remove dirt in the internal compartment of the plane. Then the mechanisms are lubricated, the device is reassembled and the position of the elements is checked again.
Adjusting the cutting edge
The instructions for using the electric planer recommend that you adjust the position of its knives before using the tool. You can usually change the planing depth in an electric device using a special switch on the body. It is set to the desired position depending on the type of workpiece and it is checked that the knives are in a position parallel to the plate.
If the blades deviate slightly from the plane, they need to be adjusted. Usually, this is done by unscrewing the fastening bolts, using eccentrics to adjust the blades in height, fixing them again and checking them.
The minimum planing depth is set for hardwood
Attention! If the electric planer is equipped with several cutting elements at once, each of them must be installed in the same position.
Planing with an electric planer
After checking the electric planer and setting it up, you can proceed directly to operation. First of all, you should choose a comfortable working position:
- Stationary. In this way, the plane is used for planing short workpieces. The tool is securely fixed to the work surface, and then the wooden part is moved along its sole.
- Mobile. The board is fixed on a workbench, after which they begin to move an electric tool manually along its surface. This position is considered optimal for processing long workpieces.
It is necessary to move the device along the surface of the board smoothly, in the direction of the grain of the wood. The same force must be applied on all sections of the workpiece; chips and dust should not fall under the moving plate. If the wood is hard, then it is better to plan it in several stages, removing layer by layer with a small depth. This will help achieve perfect smoothness and uniformity during processing.
When working with a plane, you must avoid jerking and uneven pressing, which leaves defects and roughness.
Stages of preparing the tool for work
To prepare the plane for work, you need to do the following:
- adjust the knife extension;
- adjust the position of the chip breaker (if equipped);
- adjust the mouth gap.
The overhang of the knife affects the thickness of the chips removed, the speed of work and the cleanliness of the resulting surface. For rough processing it should be about 0.5 mm, for finishing - less. The process of setting up a metal plane is not difficult, but it varies greatly between models. In any case, the adjustment is made by rotating the adjusting screw. Typically the screw has a left-hand thread, and when rotated clockwise, the offset increases.
To properly set up a wooden plane, do the following.
- Hit the back of the case a couple of times with a hammer. This will weaken the wedge that holds the blade. Then it must be removed.
- Adjust the knife extension to a shallower depth than required. It is advisable to look at the end of the tool to visually control the position of the blade.
- The knife has a one-sided sharpening. On most models it is inserted into the body with a chamfer backwards.
- Install the wedge.
- Adjust the position of the knife. To increase the reach, hit the upper non-sharp edge of the knife with a hammer. To reduce it, blows must be made at the end of the plane. Using blows on the sides, achieve an even position of the knife and wedge. The tip of the knife should be clearly parallel to the sole of the plane.
If the height of the knife is too low, the blade will not cut, but will slide along the surface. Next we set the position of the chipbreaker. It should be at a distance of 1-5 mm from the sharp edge of the knife. The more, the easier it is to plan, the thicker the chips are and the worse the quality of the processed surface. It is secured with a screw or eccentric clamp. Adjust the mouth gap. The smaller it is, the higher the quality of the product, but the lower the productivity.
Some models allow you to adjust the angle of the knife. It is different for working with different woods.
- 45 degrees – for planing soft wood. Most planes have this angle of inclination.
- 50 – for hard wood.
- 55 – used in profile planes for processing soft materials.
- 60 – in profile planes for hard wood.
The sole of the plane is checked periodically. It should be flat. To check, apply a ruler to it in several directions and look at the clearance. Small gaps are allowed, but not at the “mouth”, not at the beginning and not at the end of the sole. It should be taken into account that these gaps on a metal plane appear larger due to the reflection of light from the shiny surface. In reality they are less than 2 times.
If the sole is not level, do the following:
- remove the blade from the plane;
- attach sandpaper to a completely flat surface;
- Sand the sole until the correct result is achieved.
The quality of the sole is determined as follows:
- if there are many small shiny spots evenly distributed on the sole, it is flat;
- if the shiny spots are large and there are few of them, sanding must be continued.
The main method of verification is the removal of test chips. The chips should be the same thickness across the entire width of the plane. The main thing when working is skillful hands. Therefore, we will tell you how to use a plane correctly.
How to use a hand plane on wood correctly
The rules for using hand tools in general are almost the same as the operating instructions for an electric planer. Before work, the device is carefully inspected for defects and it is made sure that the sole is not deformed, and the cutting parts are located parallel to it.
The process of using a plane looks like this:
- A piece of wood is secured in a workbench clamp and a hand tool is placed on top of it.
- The device is firmly grasped by both handles and begins to move smoothly and with even pressure along the fixed board.
- The body is moved forward along with the tool, with the supporting leg placed forward.
As with an electric planer, when performing complex work, it is recommended to remove layers of wood gradually. This will prevent gross mistakes and protect against the appearance of snags, humps and depressions on the surface of the board.
A hand plane is convenient for planing small narrow boards in small quantities.
Additional parameters
- Soft start allows you to gradually apply the load from the engine to the drum. Thanks to this, you can calmly take the equipment in your hand, stand over the product and accurately move the ski to the beginning of the area being treated by pressing the button.
- The kit may include a small frame that holds the electric planer upside down. This is practical for processing narrow beams. After all, the master holds them in his hands, and the plane is used as desktop equipment.
- Some tools include a parallel stop to help control alignment. This is not important in simple surface treatment for table tops or doors, but in the case of removing a layer from only one edge of the timber for decorative processing or selecting a quarter, this is very important.
Rules and safety precautions when working with a plane
Both hand and electric tools are classified as hazardous and require careful handling. In the process, you need to follow basic safety precautions when working with a plane. Namely:
- do not be distracted by extraneous matters;
- check and adjust the instrument before each use;
- when adjusting the cutting parts, position the plane with the knives away from you;
- hold the tool firmly and prevent it from falling;
- Do not push out chips with your hands while working to avoid injury.
When using an electric planer, you need to remember additional rules. In particular, it is prohibited:
- turn on the tool near flammable objects;
- allow the power cord to come into contact with sharp edges and heated surfaces;
- spill water on the instrument;
- touch the rotating drum with your hands.
An electric or manual plane can only be used on dry wood. Wet workpieces cannot be planed - a high-quality result will not be achieved. In addition, when using a tool operating from the mains, there is a risk of receiving an electric shock.
Attention! When working with an electric planer, it is not advisable to use adapters. But if an extension cord is necessary, then it must be selected in accordance with the power of the tool.