Digging up a garden is the hardest part of the job if you are lucky enough to have a private plot. Often the result of such occupational therapy is a torn back and strained muscles. But if you have a miracle shovel you made yourself (drawings will be in the article), from now on digging will be quick and easy. Why with your own hands? Yes, for the simple reason that, like a good quality shovel, such a unit will cost a lot of money in the store. And every self-respecting home owner will always have materials for homemade crafts, be it old pitchforks, remnants of twigs or corners. With a little magic, they can be turned into the summer resident’s first assistant - a miracle shovel.
Device
Potato diggers, depending on their design features, can be manual or attached to a walk-behind tractor. Using a potato digger is simple. The only effort required is to stick the tines into the ground next to the potato bush and press down on the front arch with your foot. The forks lift the potatoes up, the soil crumbles. In this case, the root crop is not damaged, since the teeth pick up the potatoes from below and from the sides.
Note! The tool is called universal for its versatility. Using a potato digger, you can prepare beds for planting, loosen and dig up the soil.
Let's find out how the miracle shovel works, without video
Above we described the process of working with a conventional spade; now it’s time to shed light on how exactly the ripper in question should be handled. So, the standard factory version with a frame is installed on the ground at the edge of the area that needs to be processed. Lightly lift the tool by the handle and point the forks into the ground. Next, press the frame with your foot (an action that does not require much effort). The teeth easily penetrate the entire length of the soil; now all that remains is to press the handles so that the rods of the working part cut through the soil, loosening it and lifting individual layers. This is where counter teeth are needed. The purpose of this part is to break up clods of earth raised with a fork.
You can figure out how the miracle shovel of your own production works without a video, since everything is simpler here. Firstly, due to the closer arrangement of the teeth on the frame, the working part does not lift large lumps of soil, breaking them during movement . Secondly, in factory models, the hinge of the moving part sometimes becomes clogged with earth, which makes it difficult to turn, and the wooden handles that are inserted into special sockets often break. In a homemade device, the parts are rigidly connected, and therefore breakage and jamming are excluded. There is a possibility of deformation of welding or soldering seams, as well as breakage of plastic parts, if any, but this can only happen after a significant service life of the tool.
Main settings
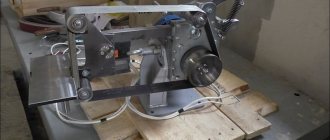
Potato digger for walk-behind tractor
The universal collapsible tool is similar to a regular shovel. The simplest design is represented by rotating forks with a gripping range of 30 cm. The average weight of a potato digger is about 2.9 kg. The material used is high-strength steel. The teeth are made from rods of various sections: square, round or hexagonal.
Manual potato digger
Step-by-step assembly instructions
Making a miracle shovel is a very interesting and responsible business, since the force that will need to be exerted when working with the tool will depend on the quality of your assembly. Follow the instructions so that your creation will delight you for many more years.
Step 1
Let's make a frame.
First of all, we collect it in a heap. If we have a square profile, then we can do without reinforcements, we just weld it. If you have adopted a stroller, then you will need to make oblique struts in the corners from a metal strip or a square profiled pipe. It will be enough to install 8-10 centimeter inserts so that they distribute the pressure exerted on the frame when digging.
Step 2
We make a lever mechanism.
Here we need a U-shaped mount from the wheels of the washing machine. We weld it upside down to the frame, drill an 8 mm, or maybe 10 mm, hole in the sides with an electric drill, so that our super shovel is strong. We weld exactly the same fastener to the handle holder, again drill holes 10 mm opposite. Now we connect 2 fasteners so that the 4 holes are in one row, drive the axle 10 mm inward. We will get a lever mechanism with a force of approximately ½. This will be quite enough for working in the front garden and vegetable garden, even with dense, dry soil. You can additionally strengthen the sidewalls with a metal plate, but this is unnecessary - in most cases such fastening is more than enough.
Step 3
We weld the shear resistances.
The miracle shovel design involves the use of oblique shear blades directed at an angle of 450 to the ground. This scheme allows you to significantly reduce the effort when breaking clods of earth. You can install them horizontally, but in very dense soil they can bend upward, so you should not experiment for the sake of a beautiful appearance of the tool.
Step 4
We weld the rear support.
The relevance of its presence on the tool in general should be questioned, since its main role is to level the depth of loosening, which can be done easily “by eye”. But, since we need a high-quality miracle shovel with our own hands, we will not change the drawings here. We weld the T-shaped fastening in the middle of the frame at the back - the limiter is ready.
Step 5
We make a cutting.
There is no need to worry too much about this operation. We buy the simplest pine cutting and hope that it will not last long. If it breaks, we buy a new one and work again. You can try to buy an oak cutting or larch without knots, but its price is 10 times more expensive, but its strength depends on your luck.
Now we have almost made a shovel for the lazy with our own hands. All that remains is to paint it in a neat color so that only the original parts distinguish it from the new instrument.
Additional functions
Potato digger for MTZ walk-behind tractor
A potato digger is a multifunctional gardening tool that simplifies many tasks. You can replace an outdated shovel and fork using the Harvest potato digger. It allows you not only to dig up root crops, but also to dig up beds and loosen the soil. Design features:
- forks made of tool steel with fine teeth (7 pieces);
- a pedal on hinges that acts as a lever.
The furrow width is 28 cm, the loosening depth is 25 cm, the weight of the unit is 3 kg.
Long pins not only dig up the soil, but also break up clods of earth, making the soil homogeneous. The bush of the plant is easily removed from the ground; the potatoes are not pierced or cut. When moving to the next potato bush, you do not need to lift the tool; you just need to step back and pull it towards you.
Another modern unit is the “Farmer”, which combines 5 tools. They can dig potatoes, harrow, loosen and turn up the ground. In addition, it is used for spreading manure. To activate the “potato digger” function, you need to secure the plates along the arched lever. Pressing the lever raises the forks upward. Shaking the tool by the lever releases the potatoes from the soil.
Design parameters:
- length of teeth and working blades – 25 cm;
- depth of penetration into the ground – 20 cm;
- size – 120 cm;
- unit weight – 3 kg.
There are also potato diggers that work on a different principle. They are a versatile alternative to a shovel. The entire unit rests on one metal pin stuck into the ground. Rotating the handles clockwise moves the curved teeth made of hardened steel. The tubers are picked up along with the soil and turned to the side.
DIY speed shovel – Do it yourself
There is a lot of work in the garden, but the most exhausting work is digging up the soil, cultivating it and removing weeds. They start digging ahead of time, in small sections, since the load is too great.
The miracle shovel will help reduce the complexity significantly and at the same time speed up the process at least twice. This relatively inexpensive and uncomplicated device really works, even on difficult soils.
We study the drawing of a miracle shovel and make it from scrap materials
Don't like digging your front garden? You've just never held a truly cool garden tool in your hands! How to achieve maximum efficiency when working in the garden, and at the same time apply a minimum of physical force? A drawing of a miracle shovel and detailed instructions for making it from scrap materials will help you with this!
We prepare materials for making a miracle shovel
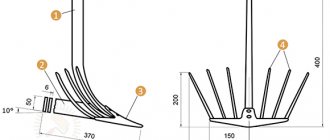
A branded tool, which you can buy at a hardware store, consists of a frame, a counter-cutting element, a working base of 8-9 rods resembling a pitchfork, 2 support posts and a handle holder.
We will now make a similar design with our own hands.
And with the money saved, we will be able to buy seeds for sowing throughout the entire garden, including neighboring plots, since this device costs a lot of money in the store.
Let's start with the frame. It can be welded using a welding inverter from a metal square with a cross-section of 25x25 mm. To do this, you need to make only 4 welds and 3 cuts with a grinder. We measure 60 centimeters and cut 4 pieces of square profile.
Then we cut another 1 with a cross-section of 20x20 mm - we will have it as the middle jumper in the frame, onto which the anti-cutting elements will be attached. If you don’t want to spend a lot of time making such a ridiculous design, you can simply take a frame from a baby stroller or disassemble an unnecessary sled.
Homemade manual potato digger
A do-it-yourself manual potato digger is easy to assemble without a drawing. For the fork you will need a hollow square pipe 40 cm long. You need to weld 6 teeth taken from ordinary forks to it. The teeth can also be forged from wrenches; their length should be about 25 cm. A pipe or a short pipe is welded perpendicular to them.
Homemade manual potato digger
A movable lever on the handle is attached to the metal handle. You need to make holes in two plates for the lever and weld them to the handle. To be able to adjust the height of the lever, it is better to increase the length of the plates and drill several holes in them. A homemade lever is made from a round curved pipe. A stop is welded to the bottom of the lever, which is best made from a corner. Thus, on the handle there is a pair of lever limiters in the form of pipe sections.
The comfort of the handle is ensured by its bend. This shape helps increase leverage. The handle is attached to the handle using bolts and nuts. But it is better to use welding for connection. A homemade mechanical manual potato digger is ready. Homemade tools are inferior in terms of soil loosening to special tools, so the beds have to be further leveled. The advantage of a homemade potato digger is its ease.
There is another way to make a device for digging up potatoes. This device grabs from both sides, pulling root crops to the surface. With the forks in the open position, the digger is placed above the bush. By pressing the crossbar with your foot, the forks are immersed in the soil. By spreading the handles to the sides, at the same time bringing the forks closer together. The roots, tubers, and soil captured by the teeth rise to the top. The soil falls away, leaving clean root crops.
DIY manual potato digger
You can assemble the unit at home according to the drawing. Materials you will need:
- a pair of pitchforks;
- a pair of pipe sections, length from 720 to 950 mm, diameter 27 mm, wall thickness 2 mm;
- metal plate 330 mm long, 50 mm wide, 5 mm thick.
Manufacturing algorithm:
- The pitchforks are freed from the wooden handles.
- At the bottom of the tulika, in the middle of the forks, two “ears” are welded (diameter 11-12 mm, distance 55 mm). A crossbar should fit between them.
- At the bottom of the crossbar, on the short sides, tubes are welded (diameter - 10.5 mm).
- A hinge bolt with a diameter of 10 mm and a length of 70 mm must pass through the tubes and “ears”.
- The pipes intended for the handles must be bent and made comfortable to hold. Pieces of hose are put on the ends of the pipe.
- All that remains is to weld the handles into the forks.
Important! Do not use the tool on wet soil, as its performance will decrease.
A potato digger is a convenient and useful gardening tool. Harvesting can no longer be called hard work, as the process brings pleasure. Each owner can make his own convenient tool for digging up root crops or design a new version. This will improve productivity, save time and money, and protect your health.
0 0 votes
Article rating
Types of universal rippers
Today, there are a large number of miracle shovels on sale, which represent various designs. Some types of products can change the depth of digging, others are equipped with additional functions. In addition, along with a manufactured product, on the shelves you can also see devices made by yourself according to special drawings.
Among industrial devices, there are several most popular models.
- Classic miracle shovel. Often made by gardeners themselves. This device, consisting of the main forks and a back stop, significantly reduces the load on the body. This increases the speed of work. The disadvantage of this design is that it does not break up earth lumps, so you have to additionally use a rake. Also, the tool can only be used for digging up black soils that are processed regularly;
- Plowman. For better labor productivity, manufacturers are constantly trying to improve the design. Thus, many rippers were created, including the Plowman. A special feature of this device is the length of the bayonet, which can reach 15 cm. Thus, the shovel ensures loosening of any type of soil;
- The mole is available with a pitchfork length of about 25 centimeters. It was created specifically to allow deeper digging. In this case, the plants should be planted immediately after cultivating the soil. It is worth noting that digging soil with such a unit is not easy. Compacted earth or alumina are especially difficult to work with;
- There are universal miracle shovels. With their help, you can dig soil up to 20 centimeters deep, but only if the soil is black soil and freezes only to 10 cm. Under more severe conditions, this shovel is not suitable for cultivating garden crops. But it is suitable for decorative digging.
Watch the video! Digging an area for potatoes with a miracle shovel
Summarizing
All these tools are easy to make with your own hands. They make the toughest jobs easier and increase productivity. Flat cutters and miracle shovels should be in the arsenal of every cultivated summer resident. But they are only suitable for land that has already been cultivated - they cannot raise virgin soil. True, most gardeners do not face such a task.
On FORUMHOUSE you can find more smart tools for cultivating land, learn how to make a homemade tractor, watch a video that shows in detail the device of the “Mower” flat cutter, and videos that talk about life hacks that improve the life of a summer resident.
Source
Advantages and disadvantages of the tool
The miracle shovel has proven itself well, since it significantly facilitates work in the field and in the garden. The tool combines digging with loosening, which saves time and effort. Therefore, using such a shovel provides quite a lot of tangible advantages:
However, this tool also has a drawback - it is much heavier than a regular shovel. Although there is no need to lift it when working. The front stop is placed at the beginning of the row, the main forks are pressed with your foot, after which the shovel is dragged (on the ground) one step closer (and so on until the end of the row). Over time, the movement of the tool across the soil will become almost invisible.