A shovel is considered a popular tool for agricultural work in a summer cottage. It will help dig up the beds, remove weed roots, and loosen the soil. There are many types of shovels, but one of them deserves the name Miracle. Its functions are more extensive than those of an ordinary tool, and the cost-effectiveness of physical costs is much higher.
Among gardening tools, a shovel occupies a dominant place. And even progress does not push the tool back. Summer residents do not part with a shovel, although nowadays a lot of equipment is offered for cultivating the site. But it is difficult to use it for small areas. Only with a shovel can you cultivate, dig, loosen the space for beds and flower beds.
This hard work requires a lot of effort and time. After it, the whole body hurts, but the spine suffers especially. Therefore, they came up with a modification of the shovel, an improved miracle tool suitable for all types of agricultural work.
Varieties of miracle shovels
There are several main types of such structures.
Their structure and operating principle are similar, they differ only in some features. Several models are found on sale, and there are even more homemade varieties. Knowing the principle of operation and design, such self-digging forks can be made independently, by welding from a metal profile and additional parts. After gaining widespread popularity, many enterprises began to produce such a device for digging up a vegetable garden en masse. The most common types of structures that can be purchased in specialized stores:
- classic ripper. This type of digger is the lightest because it consists of one segment. It is a working fork with a back stop. With its help, productivity during digging increases and labor becomes easier. It does not break up clods of earth. Additional loosening with a rake is required;
- miracle shovel "Plowman". A modified classic version with an additional component - a second segment, which is stationary and allows you to crush clods of earth. It is not suitable for developing virgin soil, but it copes well with previously cultivated areas. There are different widths of the working part, the length of the teeth varies from 10 to 25 cm. Accordingly, the weight also differs;
- miracle shovel "Mole". It has a device similar to that of the “Plowman”. Only the rear stop differs (in the “Plowman” it is T-shaped, in the “Mole” it is in the form of an arc) and the stationary segment, the front stop of which is raised. The length of the teeth can be at least 25 cm, which allows deeper digging. It is more difficult to work with such a tool, especially in clayey areas;
- miracle shovel "Tornado". An improved version of the Plowman shovel. It is lighter in weight. It has a modern powder coating and more reliable forging teeth. There are various models on sale, differing in body shape and tooth length.
How to choose a shovel
We talked about the best shovels of 2022, and now let's talk directly about the choice. To do this, Komsomolskaya Pravda recorded the advice of a gardener with 30 years of experience, Maxim Bobylev .
About the shape of the bucket
If this is a shovel, then everything is clear - the task is to be as spacious as possible for the soil. Bayonet tools are needed for digging up beds and other garden work. The bayonet itself may not be sharp, but rather end with a straight edge. But it seems to me that this option is not very suitable for the garden. If the bayonet bucket is concave, then it is convenient for them to throw back the earth, but a narrow and straight one is more convenient for digging. Ideally have both types.
Shovel material
In addition to classic steel with admixtures of carbon and other chemical elements for strength, there are also titanium ones. They are more expensive, but lighter. An intermediate option is rail steel. Good strength and reasonable price. It’s great if there are stiffening ribs. This is a plus for durability. If the handle is made of wood and is attached to self-tapping screws, then make sure that there are at least two fastenings, and preferably three.
Cutting
The cheapest options are made of wood, often not covered with anything, but simply sanded. It would be better if it was still treated wood. She's not as bad as she might seem. It's more pleasant to work in winter. The classic length is around 120 centimeters. They are the most convenient to work with. But if you don’t need a particular type of shovel very often, then a short one will do. But working like this for so long is tiring.
This is interesting
The best grass trimmers
Advantages and disadvantages
Despite being somewhat bulky, the miracle shovel is more convenient to use than its classic-type counterparts. It is easy to operate, practically digs itself and amazes with its performance, significantly facilitating the user’s work. The process of soil cultivation is carried out faster and easier with it, which summer residents have already noted. Of course, a miracle shovel cannot replace a mechanical cultivator or walk-behind tractor, but it is many times more productive than the traditional bayonet variety. This is explained not only by the design features, but also by the width of the channel.
On average, using such a shovel you can dig up an area 2 times faster than a regular one. This tool is reliable, multitasking, and durable. This is a device for arable work that can be used for sowing and loosening soil. Moreover, it can cultivate the soil to a depth of 25 cm, which is good for cultivating potatoes. You can also use a miracle shovel to prepare the ground for planting corn and cabbage, tomatoes, cucumbers, eggplants and other crops grown on the site.
However, despite a number of obvious advantages, the super shovel also has disadvantages. For example, it is completely unsuitable for gardening. It cannot be used to carefully dig around trees or make holes. As for working in the garden, there are some nuances here too. One of them is the fact that a simple unit cannot perform figured digging. In addition, it is impossible to dig a hole with a miracle shovel.
It is worth noting that only a user whose weight exceeds 80 kg can use such a shovel, otherwise the work will not be productive. The weight of the shovel is significantly different from the usual bayonet shovel. And although this shovel is lifted during operation only to be installed at the beginning of the row, and then simply moved using the handle, the weight can affect the user’s physical fatigue. Other disadvantages include the difficulty of repair.
Forks with a spade tip
This tool is literally indispensable when digging up heavy types of soil, since its design makes it possible not to exert too much effort during work. The spade fork has, in addition to the usual fork teeth, one bayonet located on the edge. This protrusion differs from others in its greater sharpness and width. The bayonet of this device penetrates the soil layer without much effort, and the remaining teeth can easily be placed behind it.
When digging up potatoes, for example, the fruit will remain on the fork and the soil will slide back. In this case, you don’t have to bend over and pick up the tubers manually. They can be easily transferred from the unit to the wheelbarrow in one movement. In addition, vegetables are not damaged, as happens when working with a shovel.
As a rule, work in suburban areas , that is, people who are not young and do not always have good health, for this reason the question of what is the best way to dig up the earth becomes acute.
When using such forks, there is no need to bend and turn repeatedly. The work mainly involves the muscles of the shoulders and arms, while the lower back is practically freed from the load . For older people this is an extremely important point . The less they get tired, the more work they can do.
The working principle of the miracle shovel
Thanks to minimal physical effort, the instrument can be used by people with spinal diseases and pensioners. The soil is loosened by a pitchfork, and there is no need to turn it over. The back not only does not participate in the process, but generally remains straight, excluding the endless bows and squats characteristic of ordinary digging of a garden.
The algorithm of actions is very simple:
- The cultivator handle is placed vertically, and the fork teeth rise behind it.
- The worker stands with his foot on the stop or the upper bridge of the main forks and presses with his body.
- The teeth stick into the ground and the stalk pulls back. The forks lift a layer of soil that passes through the second forks and is crushed there.
- The worker takes another step back to the uncultivated area of the garden and repeats all the steps again.
At first glance, it may seem that moving backwards is not very convenient, but there is still land ahead, ready for sowing, which does not require additional effort. Moreover, a manual ripper does not plunge a thin fertile layer into the soil, as happens with a bayonet shovel.
Moreover, this amazing invention successfully digs up potatoes, collects leaves and branches from the ground in the fall, and scatters manure. Enterprising gardeners can replace up to five gardening tools with it, without experiencing the excessive stress that was inevitably associated with cultivating land in the past.
How to dig by hand?
It is more expedient to dig a trench manually if its depth is no more than 150 cm. Such trenches are often equipped for laying cables with a voltage of no more than 35 kV, as well as for water supply, gas pipelines and sewerage.
First you need to prepare all the tools, and also have a digging plan in hand. If communications have already been laid on the site, you need to have a diagram of their location so that during the digging process you do not damage the utility networks. You also first need to uproot trees and bushes and remove vegetation along the path of the trench.
There is a simple way to make a trench with your own hands:
Marking . Wooden or metal pegs are used for marking. They are installed around the entire perimeter, with a cord pulled between them. Such markings will help you not to deviate from the work plan and visually show their volume.- Loosening the soil . Using a bayonet shovel, the soil is loosened inside the trench. The blows are applied in a vertical position. To do this, take a shovel with good weight so that it has destructive power. If you come across areas with particularly strong soil, you can use a crowbar.
- Soil excavation . A shovel is used for work. If you need to get a cross-section of a trench, remove the earth by hand. The procedure is carried out only with gloves.
The second and third steps are repeated until the trench reaches the desired size. All the earth excavated from the trench is piled up near the trench. It is better to do this at a distance of 50 cm from the track. The close location of the soil will help to use it more efficiently when backfilling depth.
To achieve a perfectly vertical surface of the trench wall, use a plumb line.
200-300 M2 PER HOUR
And the soil will be loosened to a depth of 25 cm, and the miracle shovels “Tornado” and “Plowman”, which have the same design, will not cause damage to the inhabitants of the underground kingdom. Any of these devices will relieve the back of the load, freeing the gardener from the “duty” of bending over and turning over layers of earth. Stand up straight, press with your foot - the teeth will sink into the ground; press the handle and you can move the tool to a new location. The frequent curved teeth of the miracle shovel finely crush even highly compressed soil.
And the answer is hidden in the T-shaped stop at the back of the working part - and in the ergonomic handle, which easily operates the mechanism. With such a shovel, you will reach the end of the bed much faster and, thanks to two opposing forks, you will make the soil soft and fluffy. The width of the cultivated soil layer is 35 cm, which is half the width of a standard bed. No time or effort is wasted! You will also be pleased with the weight of such an assistant (4.7 kg) - both elderly people and women will be able to work with it in the garden, cultivating 2 - 3 acres of land per hour.
Rules for using garden equipment
Any tool must be used skillfully so that it lasts as long as possible. The operation of a hand cultivator is based on the principle of leverage. By pressing the foot pedal, a person helps to drive the working teeth into the soil. By lowering the lever with his hands, the summer resident forces the earthen layer to rise. In this case, the soil layer is broken by opposing teeth. Without turning over the entire layer, the device loosens the soil without depleting its fertile layer.
The peculiarity of the tool is that it can only be used on wet soils. It will not loosen dry soil. The best time to use unusual equipment is considered to be the beginning of spring and mid-autumn. But too moist soil is difficult to work with a miracle shovel. During the period of preparing the soil for planting, large areas are dug up with tools. In this case, you need to dig and pull it back towards you. It is a pleasure to cultivate loose soil with a miracle shovel, but on dry, rocky, clayey soils the device will be of no use.
You should use the miracle shovel carefully, then it will serve for a long time.
The tool is selected depending on the type of soil with different ripper widths. Soft soil is dug up with a miracle shovel with a working width of 55 centimeters, and hard soil with a working width of 35. But a wide shovel will require the summer resident to use a lot of effort.
Caring for the tool is the same as for gardening equipment. It is stored under a canopy, protecting it from rain. For the winter, clean the teeth from soil and wipe all parts of the structure with a dry cloth. You can lubricate the metal parts of the shovel with machine oil to prevent rust.
Rating of the best models
The modern market offers customers products from different manufacturers that produce miracle shovels for the garden and garden. The issue of choice must be approached thoroughly, since the shelf life and quality of operation of the tool depend on the technological aspects of manufacturing and the quality of the material used. It must be taken into account that the shovel must be made of alloy tool steel. It will be good if it has a high-quality coating and proper sharpening of bayonets
But it is also important that the mechanisms are secured by welding or special hinges. Threaded connections are unsuccessful because they come loose too quickly
From the huge list of modifications, several options can be noted that are in particular demand among buyers.
"Tornado"
The design with a specially designed lever system does not require much manual effort during operation. Loosens the soil to a depth of 23 cm, the width of the processed strip is 50 cm. Suitable for working with rough and rocky soil, uproots the roots of weeds without cutting them. Made from hardened steel and powder coated. A shovel can be used to cultivate even dry soil; it is also suitable for harvesting crops from the garden.
"Vyatka Plowman"
This shovel is a modification of the bayonet shovel; it is used for manual digging of soil for further planting, and in addition, for cleaning shallow trenches. It is asymmetrical and implies calculation for one working leg, although there are options that involve installing a ploughshare under any of the legs. The length of the handle can be adjusted to suit the user's height. This model is suitable for working with dense soil, virgin soil and turfy soil. It is distinguished by ergonomics, is made of STZ steel, and has a bucket width of 30 cm.
"Digger-7"
A tool for the garden with a penetration depth into the soil of up to 25 cm, combines digging and loosening. Qualitatively removes weeds during the digging process. It has two cuttings, 7 teeth and a digging width of 55 cm, due to which it allows you to create a wide bed in one row. Suitable for cultivating rocky and hard soil, copes with a previously treated area during spring or autumn digging, and is relevant when preparing beds before planting. It differs from other modifications in that the stop is located under the frame and perfectly bulges the ground.
"VolBer"
The model with a patented lever system is characterized by an even distribution of the load on the user's back. Does not require tillage of the soil with a harrow, allows you to remove weeds without leaving them in the ground. Can be standard or wide. The first option is distinguished by a processing width of 40 cm, a productivity of 2 hundred square meters per hour, a loosening depth of up to 30 cm and a weight of about 10 kg. Made from steel. The second type is called wide, since the width of the soil in this case is 60 cm. This device is capable of processing 3 acres per hour with a penetration depth into the soil of 30 cm and a unit weight of 15 kg.
Forte QI-JY-50
Miracle auger shovel for snow removal with a blade made of durable plastic. It has a working width of 60 cm and an auger attached to the blade that rotates when the shovel is pushed in front of the user. An effective tool for removing freshly fallen snow. It is characterized by compact dimensions and is designed for use in small areas and hard-to-reach places. Customers like it for its ergonomics, ease of use and ease of maintenance.
"Assistant"
A model from a domestic manufacturer, suitable for digging up land before planting crops or after harvesting. In fact, it is a type of bayonet shovel, has a blade length of 28 cm and a width of 58 cm. The material of the working part is spring steel, the shovel weighs 5 kg. This miracle shovel has no analogues in the world; it is patented and can even dig up turf. The product is distinguished by its simplicity of design and ergonomics. When working with this shovel, the user’s back remains straight, the forces on the hands are equal, and unnecessary steps by the operator are eliminated. The handles can be adjusted to suit the height of the person working.
What other shovels are worth paying attention to?
GARDENA ClassicLine 17051-20 (from 1000 rubles)
GARDENA ClassicLine 17051-20.
Photo: yandex.market.ru On the one hand, the manufacturer was clearly trying to make some kind of lightweight version of the shovel, but this did not bring any tangible results. Two kilograms of the classic instrument. Why do we say “tried” - because the handle here is partially plastic and seems to suggest that the entire structure should be light. But no no. The “shaft” is made of steel inside and trimmed with polymer on the outside for easy grip. Also, the handle is slightly curved closer to the shovel itself. This makes it easier to cut into the ground at an angle. And in order to enter straight at 90 degrees, the shovel has a foot rest - slightly curved ends, which you need to hit with the sole if necessary.
There is a handle at the end - not a single modern model of the best shovel can do without it. The blade is made of aluminum coated with a thick layer of gray enamel. The paint does not lie evenly everywhere, smudges are visible, but for such an impact instrument these are rather insignificant details.
Characteristics:
| Canvas | Stainless steel |
| Cutting | Metal, length 120 cm |
| Weight | 1.98 kg |
One-piece welded construction
Weight
show more
Sibrtech Profi 61474 (from 530 rubles)
Sibrtech Profi 61474. Photo: yandex.market.ru
A tool from a domestic manufacturer with a carbon fiber finish. Although from the characteristics it follows that this is hammer enamel. It resembles gray orange peel because it is baked after coating, which has a positive effect on durability. If you still don’t understand what we mean, then you can look at the doors in the entrance - probably one of the neighbors has a new steel door with a rough coating. This is what it is.
The shovel itself is made of carbon steel. The authors of the product themselves call it rail, hinting at the strength and similar elements in the composition. The design is one-piece, without rivets. The edge was separately calcined in order to increase strength, and therefore service life. But the main feature from other best shovels in our rating is the extended scoop. He is ten centimeters taller than the classic one. With this it is especially convenient to carry out country work.
Characteristics:
| Canvas | Carbon steel |
| Cutting | Metal, length 115 cm |
| Weight | 1.7 kg |
Quality of materials
The long stem is not for everyone
show more
BISON Zavidovo 4-39505 (from 600 rubles)
BISON Zavidovo 4-39505.
Photo: yandex.market.ru The best budget shovel in our rating. This is a country garden “must have” that should be in everyone’s barn. The manufacturer provides a three-year warranty, which is a lot compared to its competitors. The blade of the shovel is classically cast from hardened carbon steel and varnished to protect it from rust. The cutting was planed from oak and “marinated” with wax. The manufacturer suggests using it not only in gardening, but also in construction.
The working part is made in the shape of a pointed trapezoid. This one should easily cut into the ground. For carrying, we didn’t forget about the plastic handle. Its length is classic - 120 centimeters. This should suit most people. We encountered one complaint - the quality of the working part. They say that the metal is fragile, and it is better not to knock on rocky ground again.
Characteristics:
| Canvas | Carbon steel |
| Cutting | Wooden, length 120 cm |
| Weight | 1.9 kg |
Nice price
Complaints about metal quality
show more
7.GRINDA 8-421826 (from 850 rubles)
GRINDA 8-421826.
Photo: yandex.market.ru What are we all talking about bayonet shovels? After all, besides them, there are also soviet and so-called sapper ones. We would like to introduce you to a successful example of the latter type. It is interesting primarily for its ability to fold. The handle, the handle and the shovel itself can be disassembled so that all the parts can be folded into a neat complete case. Just a warning - you need a wrench and a spanner. Don’t be alarmed that such a shovel is called a “sapper shovel.” Summer residents know that such a compact tool is very convenient when planting. Motorists will also appreciate it - it will take up minimal space in the trunk.
The handle is made of nylon. We are used to calling this fabric, which is widely used in clothing. But today the same polymer is also used in 3D printing of plastic products. The working part is made of carbon steel. The German manufacturer (although it makes it in China) reports that it has taken care of the anti-corrosion coating, in other words, against rust.
Characteristics:
| Canvas | Carbon steel |
| Cutting | Made of nylon, length 59 cm |
| Weight | 1 kg |
Compactness
Requires sharpening
show more
8.FISKARS Light 1019605 (from 2200 rubles)
FISKARS Light 1019605. Photo: yandex.market.ru
Above we have already presented one of the best shovels of this brand. We would like to share one more product. Yes, its price is higher than the market average. The trick is in the title. The Light model means "light". This model weighs just over one kilogram. For a length of one meter, this is a good indicator. How did you achieve weight loss? First of all, the material of the handle is aluminum. Covered with plastic in some places. This is necessary for comfortable grip. There is a signature D-shaped handle on top. You can carry it by it or hang it in the barn.
The blade is made of boron steel. Let us remember that this is an alloy with the addition of carbon and boron. It is believed that this type is characterized by increased strength. It itself may be strong, but the attachment to the handle is a weak point in these models. There are many precedents when it falls off and cannot be repaired. So this is not a tool for “dirty” grueling work. Please note that the series also includes other dimensions of shovels. If you don't mind the money and are looking for an easy option, this is your choice.
Characteristics:
| Canvas | Boron steel |
| Cutting | Metal, length 105 cm |
| Weight | 1.1 kg |
Weight
Attaching to the handle
show more
Green Apple GALS6-75 (from 1000 rubles)
Green Apple GALS6-75.
Photo: yandex.market.ru The Chinese manufacturer stamps a distinctive sign on its products - the silhouette of an apple on the handle. For components, he chooses materials that are atypical for most shovels. Let's figure it out together. The working part itself is pointed towards the bottom into a wedge shape. On the other edge there are protrusions that are convenient to press with your foot while working. The bucket is slightly concave so it can be used as a scoop. The blade is made of manganese hardened steel. If the manufacturer correctly calculated the required percentage of manganese in the alloy, this seriously increases its strength.
The handle of the shovel is made of fiberglass - also known as fiberglass. Plastic window frames are also made from it. The handle has rubber and polyester inserts to prevent your hands from slipping. At first, many people wonder why such powerful dimensions are needed - after all, 160 centimeters. Short people definitely shouldn’t take one for work. And for those who, on the contrary, have reached 190-200 centimeters, on the contrary, they will work comfortably. When working, you can practically not bend over. By the way, if you liked the model, but are confused by the length, you can look at a more compact version of 120 centimeters.
Characteristics:
| Canvas | Manganese steel |
| Cutting | Made of fiberglass, length 160 cm |
| Weight | 2 kg |
Ergonomic
The length of the model is not suitable for everyone
show more
Stels 61401 (from 1000 rubles)
Stels 61401. Photo: yandex.market.ru
The manufacturer itself positions the tool as a car shovel - to scatter snow in the winter, so as not to get stuck, take it on the go. This is facilitated by its size - 84 centimeters. But it is quite possible to buy one for the dacha for short gardeners. True, its weight is slightly too large for such dimensions - it approaches two kilograms.
The bucket is sharpened and made of carbon steel. There is a handle. Manufacturers say that it is suitable for digging up hard soil or making building mixtures. To protect against corrosion, it was coated with powder enamel. But its fasteners cause concern. Okay, the handle is screwed on, nothing will happen to it. But the connection directly between the handle and the shovel is also bolted. But you shouldn’t draw any hasty conclusions from this: it’s better to evaluate externally in the store how reliable the fastening seems to you. We found no complaints about him.
Characteristics:
| Canvas | Carbon steel |
| Cutting | Metal, length 84 cm |
| Weight | 1.8 kg |
Good manufacturer
Weight could have been less
show more
This is interesting
The best garden pruners
What is different and what can
- 1 What is different and what can
- 2 Designs 2.1 Soil loosener without front stop
- 2.2 Digger
- 2.3 Lightcop
- 3.1 Materials for manufacturing
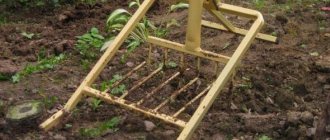
To be precise, this is not a shovel, but a ripper, since it not only digs, but also breaks clods. The miracle shovel consists of two (sometimes one) slats with pins movably connected. Some models also have a back stop - for easier digging of dense, heavy soil. So in reality it looks more like double pitchforks (see photo below).
Miracle shovel and its components
From the picture it is clear that this tool does not have a shovel as such, but the differences from the classic bayonet shovel do not end there. It also has a much higher handle - it should reach your shoulder. It is also convenient if there is a crossbar at the top - you can operate it with both hands.
The miracle shovel performs three operations at once:
- loosens the soil;
- breaks clods;
- “extracts” the roots of weeds without tearing or cutting them (in any case, damaging them much less);
- Digs root vegetables easily - you can dig carrots, potatoes, etc.
But its main advantage is that it greatly facilitates digging the earth, and the main load falls not on the back, as when using a conventional bayonet shovel, but on the legs (driving the working forks into the ground) and on the hands (turning the forks out of the ground). During work, the back is in a vertical position and is almost not loaded.
Another version of the miracle shovel
The only downside to this tool is the weight. It is really much larger than the bayonet one. But the super shovel can be rearranged; there is no need to lift it. Or rather, it is raised only a few times: when it is placed on the ground at the beginning of the row. Then, by pulling the handle, it is simply tightened a little.
There is another very attractive point in using a miracle shovel - it digs the garden at least twice as fast. This occurs due to the wider working part - up to 50-60 cm. Provided there is little physical activity, this is very good.
How to work
Although this design is not particularly complex, working with it has its own characteristics. First, you need to start from the far edge of the bed, then move back, gradually dragging the forks back. Well, the general procedure is this:
- Holding the handle, place a miracle shovel and rest it on the front ripper.
- Stick the pitchfork into the ground. Drive them in until the back stop touches the ground. If the ground is heavy or dense, additional force may be needed - press your foot on the crossbar of the front forks.
- Pull the handle towards you. With this movement, the forks will begin to move upward. As they rise, they pass through the forks of the front stop, breaking up the lumps.
- Pull the device back a little, repeat all the steps (plug, squeeze, pull the handle).
It's actually very simple. It’s worth trying a couple of times and then everything repeats automatically.
Constructions
In addition to the option shown above (called “Tornado”, “Digger” or “Plowman”), there are several more variants of miracle shovel designs under different names.
Assembly drawing of a miracle shovel
Soil ripper without front support
This design also has working and support forks, but does not have a front stop. Because it is less bulky and weighs a little less. But the front stop gives increased stability during operation. And the weight when dragging is not so important.
The handle is attached to the working forks, the back stop is welded to the comb of the second forks. Both of these structures are movably connected to each other (even door hinges can be used).
Ripper miracle shovel for easy tillage
The photo shows one of the implementations, which is made on the basis of a corner and a round pipe. When working, the pins are driven into the ground by pressing on the crossbar, and not on the stop, as in most models.
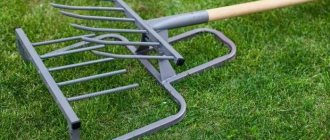
Digger
An option called “Digger” is essentially a wide fork with a stop for easier turning and a high, powerful handle.
Miracle shovel "Digger"
The peculiarity of this design is the stop and the adjustable handle. It is fixed with two bolts and adjusted to the height of the working person.
The emphasis is not stationary, but movable. It is fixed to the frame. When plunging the pins into the ground, press on it with your foot, then, without removing your foot, turn it out by pressing the handle of the fork out of the ground.
Digger in action
The physical load during work is low, the work progresses quickly. But this miracle shovel will not work for hard and lumpy soils: it does not crush the soil. She collapses through the pitchfork under her own weight. But this is only possible on loose soils. On clay or black soil it is better to have a second comb with pins.
How to make a miracle digger, see the following video.
Lightcop
This miracle shovel design is slightly different from the previous one. The stops in it are rounded, the handle is arched, but the basic structure is the same. There is some drawback - there is no way to adjust the handle, but otherwise everything is the same - a movable stop and working forks.
Two options called "Lightcop". The simplest ripper for the vegetable garden, garden and cottage
It’s hard to say whether this variation is better or worse. It would be possible to evaluate only by comparing the performance of both copies on the same site.
If you watch the following video, you will see that with such a miracle shovel you can dig not only loose soils, but also heavy ones. And the second thing you can pay attention to is that for such soil it is better to have a second comb of pins, against which you can crush the inverted lumps.
Kinds
The classic version is a device in which “forks” are located on a metal panel, attached to it using hinged joints. Translational and rotational movements are performed: pointed rods plunge into the ground, digging it up. When the “forks” are pulled out of the soil, lumps remain, which additionally have to be broken up with a rake.
Improved ripper shovels are models that have an auxiliary element in the form of a crossbar, onto which the same pointed pins are welded as on the main part. The “forks” plunge into and out of the ground, passing through the gaps between the crossbar bars, crushing large lumps into small fractions. The roots of the grass cling to the pins; all that remains is to pull them to the surface.
In addition to the “Mole” and “Plowman”, the “Vyatka Plowman” model is known, the drawing of which was developed by the monk Father Gennady. Due to his state of health, the clergyman found it very difficult to work on his personal plot. He came up with a convenient and simple miracle shovel. Its manufacture requires a minimum of parts, and the performance of the tool exceeds all expectations. An arched steel plate is attached to the metal pipe on the left or right (depending on whether it is made for left- or right-handed people) (in homemade devices, the main part of a bayonet shovel can be used instead).
At the end of the pipe there is a pin that immerses the plate to the depth of the soil being excavated. Then a rotational movement is made, the clod of earth is easily thrown to the side with a shovel. If you dig up an area, taking steps backwards in a straight line, a smooth furrow will remain. Potato tubers and root crop seeds are left in it. When the gardener begins to cultivate the next row, the fresh soil will lie evenly in the furrow dug earlier. The homemade shovel of Gennady’s father was taken as the basis for similar models that are now produced by well-known manufacturers. Taking into account the physical characteristics of a person and his state of health, it is not difficult to choose the appropriate version of the miracle shovel.
Shovel Tornado
The design of this tool for digging soil is collapsible, which is very practical and convenient when transporting the device. It includes:
- central metal rod;
- rotating handle;
- working part with sharp teeth.
It is worth noting that the teeth are arranged counterclockwise. Each part of the tool is connected to another or to the base using bolts and nuts.
During operation, the device is placed vertically with its teeth in the soil, after which it is turned a full turn with a handle. In this case, the teeth are completely immersed in the ground, and the effort a person makes is minimal.
Among gardeners, it is customary to call this cultivator a woman’s shovel. This is because it is not necessary to put in too much effort to complete the work.
The Tornado shovel is a multifunctional device for cultivating the soil with your own hands. With this device we can carry out the following work .
- Remove the soil from the garden beds.
- Digging up places for planting.
- Cultivate the soil around bushes and trees.
- Remove weeds from the ground.
- Weed in the middle of rows of beds.
- Clean up flower beds, collect garbage and dry grass.
Kinds
Miracle shovels 1-Plowman 2-Mole
Manual rippers are classified according to the depth of loosening and the complexity of the mechanism. In the simplest models there are only forks and a stop - you can make them yourself. But models with additional parts perform more complex work and the requirements for them are slightly different.
Conventional ones consist of working forks with a stop. They are capable of making work on the ground somewhat easier, but one should not expect much from them. They will plow well-groomed soil well, take some of the load off the worker, but will not be able to break up clods of earth, since they do not have a second segment with teeth. You shouldn’t hope that they will cope with virgin soil. The soil will have to be loosened with a rake.
“Plowman” - they dig up and loosen the soil well, piercing it to a depth of 15 cm. They do not require a lot of worker weight. This model already has a second segment of working forks, however, it will not cope with virgin soil.
“Mole” - removes all the load from the back, which falls on the hands when pressing the handle of the shovel and on the legs when turning out the soil. The penetration depth of the teeth is no less than 25 cm. It is difficult to work with this model at first, but it copes well with plowing. Can work on virgin soil.
Miracle shovels are produced by different manufacturers, so you need to choose a model made of high-quality material, designed for a long service life. It is desirable to have properly sharpened alloy steel forks, which are attached to the shovel by welding or loops - the threads quickly become loose.
If the model does not have a front stop, then the rear one, which replaces it, is attached to the second working forks, and for a model with a front stop, the handle is adjusted to the height of the worker. The emphasis is movable and attached to the frame of the product.
When choosing a hand cultivator, you need to decide on its characteristics: the front stop adds weight and stability to the model. The width of the forks should not exceed 60 cm - the digging will lose quality. The length of the teeth should fit within a gap of 2-3 cm, and the distance between them should not exceed 80 mm. Before purchasing an item, you need to make sure the fastenings are strong.
A unique shovel for quickly digging up (loosening) the garden
Agriculture will never be abandoned by humanity, and agricultural products are always in demand. With the onset of the warm season, a busy time begins for summer residents - preparing the garden for spring sowing, because it is known that only weeds grow on unkempt soil.
Work on the earth continues from the melting of the last winter snow until the first snow of next autumn. And then heavy garden shovels and forks are used for loosening. Noble work ends not only with a well-groomed appearance of the garden, but also with an aching back and a complete breakdown the next day.
It seems that there is no way out of this vicious circle.
Fortunately, human ingenuity does not stand still, and salvation has finally been invented: a miracle shovel for digging the earth.
Four heroes
There are not 3 miracle rippers called “Digger”, but all 4!
Those rippers that are lighter work a little longer, and the heavier ones are controlled faster. Lightweight "Diggers" with 5 and 6 teeth will loosen strips 42 and 48 cm wide, respectively.
If you know how to work with “Moles,” you can also work with “Diggers”: deepen the working part into the soil and lower the handle, thus drawing a layer of earth through the oncoming forks.
If you need to complete excavation work as quickly as possible, take a “Digger” with 7 teeth (digger width - 55 cm) or with 8 teeth (digger width - 62 cm). Manufacturers added the most heroic “Diggers” with a hole for the second handle.
Attached to this “toothy” assistant is a removable crossbar. It can be attached to two handles at the same time - and you will get a U-shaped handle, which will be comfortable to hold with both hands.
DIY garden crafts
Below are other entries on the topic “How to do it yourself - for a homeowner!”
- Forks for digging potatoes with your own hands MIRACLE VIEWS FOR DIGGING WITH YOUR OWN HANDS On…
- Do-it-yourself beds on turf and virgin soil without digging How to make beds directly on...
- Do-it-yourself universal shovel for the elderly Tool for the elderly and…
- Raised beds with your own hands - how to make them from improvised means Raised beds - a plot of land in...
- Do-it-yourself narrow beds + vegetable combination table for them Narrow joint beds are the best…
- The miracle shovel and cultivator-ripper from the advertisement - my reviews Two tools for the garden and...
- Country house decor from old tools - cute and funny How to decorate a country house using...
Do-it-yourself › Summer house garden and vegetable garden › Tools for the garden and dacha › Tool for digging up the garden - the miracle of a pitchfork, the miracle of a shovel, etc. My reviews
A hand cultivator that eliminates hard work
The miracle shovel is a combination of a ripper and the most ordinary forks.
The components of this ingenious tool are extremely simple:
- A handle that controls a shovel.
- Front and back stops that give the tool stability.
- Fasteners connecting all parts.
- Forks for loosening.
- Digging forks.
The forks are connected in such a way as to move towards each other and lock like a lock, and there are stop mechanisms on the sides. The simple design of this new piece of equipment makes it easy to break up clods of earth, greatly simplifying and facilitating work in the garden. The emphasis is placed specifically on the forks of the tool, which perform the main function.
A hand cultivator not only loosens and breaks up the soil, but also pulls out the roots of weeds. It makes it easy to remove root vegetables and potatoes without damaging their integrity.
Alternative drawings or “what can be replaced”
Above we described a drawing of a ripper, but there are also very practical models of shovels that can significantly simplify work in the garden. Such a tool will be especially relevant during harvesting, where you need to turn the soil over, and not loosen it.
If you need just such a miracle shovel, its drawings and dimensions will differ significantly. Firstly, the working area will be a metal plane, rather than pointed segments for loosening.
The counters are removed. All that remains is the mechanism itself for reducing the effort to turn over the earth clod.
That is, its advantage will only be in the absence of back strain - the earth is lifted by pulling the handle of the shovel.
The lever must be made at a height of 45-50 centimeters from the ground - this is the optimal ratio of the lifting height and the effort expended on it. Some models are made with a very high lever, then more effort will be needed to lift, but the scoop itself rises to a greater height - very convenient for construction (digging trenches).
Another very popular miracle shovel design is a tool with a triangular support. Its essence is to significantly reduce the effort when digging out a clod of earth.
Its subsequent transportation is carried out using the spinal muscles, which will not satisfy the requirements of many builders.
This design is perfect for working in very hard soil, where it is necessary to apply very high pressure precisely in the process of undermining the coma.
The working principle of the miracle shovel
Thanks to minimal physical effort, the instrument can be used by people with spinal diseases and pensioners. The soil is loosened by a pitchfork, and there is no need to turn it over. The back not only does not participate in the process, but generally remains straight, excluding the endless bows and squats characteristic of ordinary digging of a garden.
The algorithm of actions is very simple:
- The cultivator handle is placed vertically, and the fork teeth rise behind it.
- The worker stands with his foot on the stop or the upper bridge of the main forks and presses with his body.
- The teeth stick into the ground and the stalk pulls back. The forks lift a layer of soil that passes through the second forks and is crushed there.
- The worker takes another step back to the uncultivated area of the garden and repeats all the steps again.
At first glance, it may seem that moving backwards is not very convenient, but there is still land ahead, ready for sowing, which does not require additional effort. Moreover, a manual ripper does not plunge a thin fertile layer into the soil, as happens with a bayonet shovel.
Electrical devices
An inexperienced person may be surprised how a shovel can be electric, and what is common between an electric and a conventional device.
If we talk about appearance, then there is practically no similarity between a typical snow shovel and an electric unit, if you do not take into account the long telescopic handle (a similar option can be found on a manual scoop). This holder allows you to work without bending too much. However, there is a big difference.
It is difficult to find a shovel , the working surface of which is not a plane, but an auger, which could be replaced with a brush for cleaning tiled paths from dust and dirt in warm weather. To some extent, it can also be considered the working surface of a shovel, at least its purpose is the same - to throw snow aside, but the performance of automation is incomparable to muscle strength.
A shovel with an electric motor is capable of throwing snow from private paths at a distance of up to ten meters, while the clearing speed reaches 136 kg/min. As we see, even the most dexterous and strong person cannot bring such results.
In conclusion, we note that on the modern market there are a variety of shovels for digging soil, as well as other solutions to make the work of gardeners and gardeners easier:
- electrical;
- mechanical;
- manual;
- factory made;
- homemade;
- cheap;
- expensive.
In any case, our contemporaries - lovers of garden land work - will in no case be left without equipment that would greatly facilitate their work. Anyone can choose a tool for themselves, both for its purpose and for their budget.
Advantages and disadvantages
Like any tool, the miracle shovel has its drawbacks, which you should be aware of when purchasing it:
- The device is only suitable for straight areas - it will not work to dig up the soil figuratively. Narrow and curved areas will have to be processed manually.
- For the process to be effective, a person’s weight must be at least 80 kg, otherwise it will not be possible to dig up the ground to a given depth.
- The tool will not be able to dig holes.
- It is impossible to work in low greenhouses.
- If the mechanism breaks, repair will not be easy.
- The weight of the product is much higher than the weight of a conventional bayonet shovel, which can lead to severe fatigue at the end of the job.
Manual rippers are classified according to the depth of loosening and the complexity of the mechanism. In the simplest models there are only forks and a stop - you can make them yourself. But models with additional parts perform more complex work and the requirements for them are slightly different.
Conventional ones consist of working forks with a stop. They are capable of making work on the ground somewhat easier, but one should not expect much from them.
They will plow well-groomed soil well, take some of the load off the worker, but will not be able to break up clods of earth, since they do not have a second segment with teeth.
You shouldn’t hope that they will cope with virgin soil. The soil will have to be loosened with a rake.
“Plowman” - they dig up and loosen the soil well, piercing it to a depth of 15 cm. They do not require a lot of worker weight. This model already has a second segment of working forks, however, it will not cope with virgin soil.
“Mole” - removes all the load from the back, which falls on the hands when pressing the handle of the shovel and on the legs when turning out the soil. The penetration depth of the teeth is no less than 25 cm. It is difficult to work with this model at first, but it copes well with plowing. Can work on virgin soil.
If the model does not have a front stop, then the rear one, which replaces it, is attached to the second working forks, and for a model with a front stop, the handle is adjusted to the height of the worker. The emphasis is movable and attached to the frame of the product.
When choosing a hand cultivator, you need to decide on its characteristics: the front stop adds weight and stability to the model. The width of the forks should not exceed 60 cm - the digging will lose quality. The length of the teeth should fit within a gap of 2-3 cm, and the distance between them should not exceed 80 mm. Before purchasing an item, you need to make sure the fastenings are strong.
Dance in the future garden bed
The name of the ripper is “ Lightcop”
” clearly states what miracles this instrument is capable of. But its working part is massive, its width is 60 cm, but that’s why you won’t spend much time digging up the beds.
Don’t be afraid to operate such a colossus: the ergonomic U-shaped handle and the U-shaped mobile stop, which is attached behind the working part, will help you.
The pointed and slightly curved teeth easily plunge not only into soft, but also into compressed soil and loosen it to a depth of 25 cm. You can even refine turfed and compacted soil.
To do this, you need to step on the crossbar with one foot, dig the teeth into the soil and press down on the handle with your hands. Meanwhile, the “Lightcopper” will rest on the back stop and push out the loosened layer of earth and will not forget to bring the weeds along with the roots to the surface.
The device weighs 6.5 kg, but when you dig, there is no need to lift it. You can simply pull the tool behind you as you loosen the bed, taking one step at a time backwards. The height of the “Lightcopper” is 135 cm, so it will fit comfortably into the hands of a gardener of any height.
The best models of the domestic market
Today's market for wonderful shovels is quite diverse, but it is worth noting the models that consumers choose most often.
"Tornado"
The tips of the forks are capable of plunging into the ground up to 23 cm and leaving a strip of about 50 cm behind them. Capable of uprooting weed roots, works with rough or dry soil. Suitable for both autumn harvesting and preparing for planting.
"Digger-7"
The tool combines hoeing and digging, removing grass in the process. Excellent cultivation of rocky soil, ideal for a well-kept garden.
"VolBer"
Capable of processing up to two hundred square meters per hour, weighs up to 15 kg. Excellent for removing weeds from the soil.
Forte QI-JY-50
This miracle shovel is designed for snow removal. It is small in size and works on large areas and in hard-to-reach places.
"Assistant"
The model prepares the land for planting crops in the spring and puts it in order before the arrival of winter. Even turf is accessible to her. Simple in design and yet very effective.
Homemade shovel-ripper
Dneprodzerzhinsk resident N.M. Mandrigel proposed his modification of the priest model. Its main difference is that used parts can be used to manufacture the structure. To make a miracle shovel at home, you will need:
- bicycle handlebars - for handles;
- a pipe made of stainless steel - for the handle;
- steel shovel - instead of an arcuate plate;
- a movable steel pin or with a spring - for easy immersion of the main part into the ground (its height is adjusted depending on how deep the earth is dug).
It is possible to make a shovel in several stages. If desired, it can be made in 1 day.
- The steering wheel is leveled. It will be easier to apply pressure with your hands. You can stretch pieces from an old hose onto the ends.
- The pin from below is pushed into the pipe with its sharp end facing out. To give it a static position, a 2.11 M8 bolt is used.
- The steering wheel is welded to the pipe (to the opposite end from the pin).
- A shovel is attached by welding at the bottom left and right.
The person applies light pressure on the handles, the pin plunges into the ground, and behind it is the shovel. The steering wheel makes a rotational movement to the left or right, and the clod of earth rushes to the side along with the shovel.
How to make it yourself
To independently produce the frame of a miracle shovel, you will need simple materials. Basically, craftsmen use an ordinary steel pipe or its profile analogue. The optimal cross-section is 30 mm and the wall thickness is 3 mm. Alternatively, you can use a steel angle. But then the handle will have to be made of wood or pipe.
Drawing of a homemade miracle shovelSource vmasshtabe.ru
The main emphasis is on the digging teeth. Therefore, you need to consider how to make a miracle shovel using available materials. As a rule, to create teeth they use:
- Already finished pitchforks. In this case, the rods are cut off and welded onto their structure.
- Spring suspension. It is necessary to straighten it by heating it over a fire.
- Car springs. The part is sawn into the required sections.
Since the second forks, which are responsible for crushing the soil, do not carry a significant load, you can select a steel bar of suitable diameter for them.
Drawings of a miracle shovel for digging a vegetable gardenSource etokengu.ru
What and how to make it from
The designs, as you have seen, are different, but the set of materials will be approximately the same. Their number differs, but the cross-section and characteristics remain unchanged.
You can use a round or profiled pipe, metal rods or “parts” from forks
Materials for production
They usually start with making the frame. It is often made from a profiled pipe, the optimal cross-section is 30*30 mm or so. The wall thickness is important - at least 3 mm. Some models used a corner. The shelf width is also about 30 mm, the metal thickness is at least 3 mm.
The handle can be made from the same profile pipe, or you can use a round one. The thickness of the walls is also important. In principle, having made a latch, you can use a wooden shovel holder. Some purchased models provide for the installation of a wooden holder.
Corner frame
The main attention should be paid to the material that is used for the teeth of the working forks. It must be good structural steel. The forks are made from a rod of at least 8 mm in diameter.
What craftsmen make them from:
- They cut it off from an ordinary fork and weld it onto a miracle shovel.
- Straighten the suspension springs.
- Car springs are sawn into narrow strips.
If you can find a good rod - round, square or hexagonal - it doesn't matter, it will be much easier for you. Not a bad option, by the way, with a pitchfork. But you have to buy good ones, and this is not cheap. And one more thing: calculate the dimensions of the miracle shovel so that the working forks have 8 pins. Then you will need to buy two jokes of ordinary pitchforks.
If the design is chosen with two forks - working and thrust, you can place pieces of a suitable length of metal rod on the thrust forks. The loads here are not so high, so the strength should be enough. The diameter of the rod is 10 mm; you can use ribbed reinforcement, which is used to reinforce the foundation.
Dimensions
Most companies that produce miracle shovels have a range of sizes for this product. Our people are different in build and physical fitness. For men, you can make more massive models, and for women and older people, smaller and lighter ones. The average sizes are:
- The width of the working part is from 45 cm to 60 cm. There is no need to do more: it will be difficult to dig and productivity will only decrease, not increase.
- The length of the working fork pins is 220-300 mm.
- The distance between the pins is 70-80 mm.
- The length of the handle is according to your height; it is more convenient if it ends near the shoulder. The dimensions of the miracle shovel can be selected “to suit you” - it is important that it is convenient to work
All other sizes are selected depending on the design and material used.
Blueprints
Miracle shovel working forks
Detailing of the stop and forks
Full design with front stop
Option with single forks and rear support frame
Other dimensions of the digger and different design of the stop
Lightweight digger with solid bent handle
Alternative drawings or “what can be replaced”
Above we described a drawing of a ripper, but there are also very practical models of shovels that can significantly simplify work in the garden. Such a tool will be especially relevant during harvesting, where you need to turn the soil over, and not loosen it.
If you need just such a miracle shovel, its drawings and dimensions will differ significantly. Firstly, the working area will be a metal plane, rather than pointed segments for loosening. The counters are removed. All that remains is the mechanism itself for reducing the effort to turn over the earth clod. That is, its advantage will only be in the absence of back strain - the earth is lifted by pulling the handle of the shovel.
The lever must be made at a height of 45-50 centimeters from the ground - this is the optimal ratio of the lifting height and the effort expended on it. Some models are made with a very high lever, then more effort will be needed to lift, but the scoop itself rises to a greater height - very convenient for construction (digging trenches).
Another very popular miracle shovel design is a tool with a triangular support. Its essence is to significantly reduce the effort when digging out a clod of earth. Its subsequent transportation is carried out using the spinal muscles, which will not satisfy the requirements of many builders. This design is perfect for working in very hard soil, where it is necessary to apply very high pressure precisely in the process of undermining the coma.
Watch the video: Digger for the garden
https://www.youtube.com/watch?v=YKQQZxygNXo
Anyone can make such a helper shovel with their own hands using drawings and videos. Parts from an old bicycle and other scrap metal are suitable for its manufacture:
- Hollow stainless steel tube.
- A piece of stainless steel for the blade.
- Bicycle handlebar.
- Metal rod.
Using drawings, a lazy person's digger is made for different heights of people, so that the handlebars are at chest level so as not to bend the spine.
Drawing of a digger for the lazy
The disadvantages of this weapon are:
- On chernozem and clayey soil, an inverted layer of earth should be immediately broken up, and this is inconvenient to do with such a shovel.
- It is more convenient to cultivate an area without a large number of weeds.
- When digging up virgin soil, intertwined roots of weeds create difficulties.
- The maximum rotation of 180° does not allow, if necessary, to turn the soil layer over so that the roots of the plants being dug up are on top.
- Digging up potatoes is not very convenient due to the insufficient degree of rotation, which is why some of the tubers remain in the ground.
Useful video: how to make a miracle shovel
In general, it is advisable to have implements of various modifications on the farm that will help ease the hard work of the farmer. In particular, the Tornado manual cultivator is very suitable for loosening the soil, with which you can remove weeds, replant strawberries, and loosen the soil.
We recommend reading: Do-it-yourself shovel for the dacha for clearing snow
You can make your own digger for the lazy at minimal cost, and after watching a video with an example of how a miracle shovel works, you will definitely want to have such a wonderful tool in your household.
Advantages of superwheels
How necessary this item is in the household can be judged by analyzing all its pros and cons. Here are the main positive aspects that occur when using this miracle device:
Ease of use.- Reducing physical stress on the body.
- Increased tillage speed due to the width of the unit.
- Ease of use.
- Applicability in all types of soil.
- High reliability indicators.
As you can see, such a tool really has many advantages.
Principle of operation
The work consists of pressing the bucket (blade) of the shovel into the ground and turning over the layer of earth, turning the handles to the right. The earth turns over in a neatly cut layer and lies on the right. The back remains straight, there is no need to bend, a bayonet is stuck into the ground, thanks to which the blade of the shovel enters the soil under the weight of the leg. On light soil you can work with one hand. The spine performs only a rotational movement; without the use of force, with the help of a lever, the work of cutting, removing and turning over a layer of earth is performed.
You can plant potatoes with this “magic digger” as if you were using a plow. You need to dig one furrow (stepping back), put potatoes in it, and when digging the second furrow, even and neat digging occurs. Moreover, you can place fertilizer in the second furrow and bury it while going through the next furrow. With a bucket width of 30 cm, you will get a very even planting of potatoes, with 60 cm between the bushes.
What is a miracle shovel?
Tillage is a key operation on which further results of site operation will depend. Usually this is the main treatment (up to 40 cm deep) and additional treatment (to a depth of 12-14 cm).
The first case includes plowing, loosening and milling. Then the next option is carried out - an additional one. It consists of leveling the surface, loosening it, compacting the soil, aeration, weed control, etc.
The simplest and long-known tool is an ordinary shovel. However, its use requires significant physical strength and a lot of time.
Today you can buy a miracle shovel, which will be an excellent replacement for the usual one. This tool has a special lever-type mechanism, thanks to which the load on the back and arms disappears.
When using it, you do not need to lift the soil and turn it over. In addition to the fact that the miracle shovel digs up the earth, it also loosens it at the same time. This means that a rake will not be needed to break up large lumps and level the area. This tool can safely be given a second name - garden ripper.
Another plus: the width of the processed surface (and therefore the tool) is much larger than when using a simple shovel, and ranges from 35 cm. And all this is reflected in productivity (up to 2 acres per hour).
What is the structure itself? It consists of simple “forks” that have stops on both sides (T-shaped at the back and in the form of a frame with runners at the front). All elements are made of steel, but at the same time the structure is lightweight due to the hollow pipes.
This device was invented in Yekaterinburg, and its price is more than affordable (from 1200 rubles). An example is the miracle shovel “Plowman”. It can dig up the soil to a depth of 23 cm, and the width of the treated surface is 35, 43 cm, depending on the model.
The miracle ripper “Mole” is very common, which has a width of 38, 42 and 55 cm, depending on the selected variety.
If you still doubt its beneficial properties, read numerous reviews, the vast majority of which are only positive.
Ripper shovel - description, operating principle of the ripper shovel Mole and Plowman, video
For quite a long time, tools for cultivating land have been improved only through the use of more durable materials.
For hundreds of years, the appearance of a garden shovel has remained virtually unchanged, and the process of cultivating the soil remained quite difficult and labor-intensive.
The advent of the ripper shovel made it possible to make work in the garden and vegetable garden simpler and more accessible to children and the elderly. The only condition is that the work should not be carried out on virgin soil or dry soil.
Description and principle of operation of the lawn seeder.
On this page you will learn everything about the largest tractors in the world.
Device design
The new tillage unit is a structure consisting of levers and at least two frames on which metal pins are placed, similar to a fork. The presence of a stop and articulated joints allow you to work with the ripper without applying much effort for digging.
To loosen the soil, just pull the lever and with the help of the frames, the layer of earth is crushed, along with the weed roots located in it.
It looks like this: at the beginning of work, you need to immerse the forks in the soil to the required depth.
Then, using a lever, lift a layer of earth, which, when it meets the teeth of the second frame, is crushed, forming lumps of soil several centimeters in diameter.
For the next operation, the device must be moved back the length of the working surfaces. Now you don’t need to bend down and turn over a layer of earth, as happens when digging with a shovel.
The simplicity of the design of the device and the ease of its use were appreciated by many users and even gave it a name - a miracle shovel ripper.
Less effort - faster work
Depending on the model, the loosening depth can reach 30 cm, but this indicator is influenced by the condition of the soil. On dry soil or virgin soil, the depth is significantly lower, and sometimes it is impossible to work with a ripper on such soil. Therefore, it is recommended to use it only on already treated areas.
In this case, productivity can be 2-3 hundred parts per hour without applying significant effort. The working width varies depending on the model and can range from 350 mm. up to 550 mm for factory models. Depending on the dimensions, the weight of the product may vary, sometimes reaching 5 kg.
Rules for choosing a ripper shovel
The weakest points in the design of rippers are the joints and the materials from which the working surfaces are made. Despite the fact that the applied force is insignificant, the load that falls on the ripper links and hinge joints remains quite significant. Which leads to rapid wear and breakage of the tool.
Therefore, when choosing a tool, it is worth checking what material it is made of. As a rule, tool steel is used in manufacturing. Thus, the manufacturer of the ripper shovel Mole claims to use tool steel in its products. The desire to strengthen the structure leads to its weighting, which causes inconvenience in work.
Prices and most common models
There are many models of ripper shovels on the market, which differ from each other in the size of the working part and some design features. Thus, one of the first models of “Plowman” ripper shovels has longer stop arms that protrude beyond the working part of the tool.
Unlike the ripper miracle shovel “Plowman”, another common model “Mole” has a large area of support on the ground, without stop levers.
Prices for the device vary depending on the size and manufacturer and range from $20-30. However, due to the simplicity of the design, you can make a ripper yourself.
The video shows the Mole ripper shovel in action.
Learn how to make a homemade tracked all-terrain vehicle with your own hands.
By looking here you will learn how to repair a walk-behind tractor with your own hands.
On this link you will watch a video of the Patriot Garden walk-behind tractor.
Your own designer
You can make a miracle shovel from scrap materials. The only tools you need are a welding machine. Most often, metal pipes and steel rods are used to manufacture the device; PVC pipes are less commonly used.
The simplest design is a frame with levers and welded teeth. More complex designs require hinged joints and two working frames. The main advantage of making a tool yourself is that you can make it, as they say, “by your own hand,” and not waste time searching for the required model.
Source: https://SpecTechZone.com/tekhnika/selkhoztekhnika/pochvoobrabatyvayushhaya/lopata-rykhlitel-rychag-perevernuvshi.html
What are its advantages and what does it represent?
To call it a shovel, of course, would not be entirely correct; the name soil loosener is more appropriate for it. It is a bunch of one or two original villas, intelligently connected to each other with additional supports for the feet, for more convenient cultivation of the land, and a small handle. It is advisable to make (or buy) a handle in such a way that it is up to your shoulders, otherwise when working in your summer cottage it will be uncomfortable for you, or the meaning of such an invention will be lost.
Its purpose includes such things as:
It’s enough to just dig up various root crops. It’s easy and without any problems to get various kinds of weed (without destroying it into small parts, which is important) And also breaks down and loosens the soil
One of the disadvantages of the miracle shovel is its weight. But don’t worry about the fact that you will constantly drag it around your summer cottage; you will only have to get it onto the soil once and move it along the way with small pulls using the handle. If you compare it with the load that you apply when using a simple shovel, then you will spend 2 times less force on the same area. However, it is impossible to dig a hole with this shovel.
There is another type called “digger”
At first glance, you will immediately notice that you see very large forks with a large handle, to some extent this will be true. They are three times wider than ordinary forks; their powerful handle makes it easy to turn out the earth. The footrest of such a tool is very convenient, since you can stand on it with both feet, which makes it easier to drive it into the ground. If desired, such a digger can be quite easily made with your own hands. But if you decide to purchase a tool, one of the advantages is that the level of the handle can be adjusted according to human height. For this purpose there are special bolts installed on the iron “handle”.
Including there is another version of the miracle shovel called “Lightcopper”
It can be compared with the previous version, since they are almost identical, at first glance, it looks like a large fork, but only with a modified handle. It is made in the form of an arc and does not have the ability to change the height of the handle, which can be attributed to its negative features. Well, as you can see, from the name it is quite easy to use when working on the ground.
The principle of making a miracle shovel at home according to drawings or videos
If you decide to make a miracle shovel with your own hands, then the first thing you need to do is make a frame base. To do this, you need pipes with a diameter of approximately 30 mm and a wall thickness so that they are not less than 3 mm, otherwise the frame will not be rigid and will constantly sag or break. In addition, when making a miracle shovel, you will need hard corners with a thickness approximately the same as the pipes for structural strength.
All you have to do to the prepared frame is to weld the teeth with which you will plow your plot. Many self-taught people use ordinary pitchforks for this, which are first cut and then welded onto the finished structure. The main thing when choosing is to rely on the fact that the pins are quite strong and powerful, preferably with a diameter of at least 8–10 mm. There will not be much difference if the pins are round or in the form of another geometric shape. On average, you will need eight or ten pieces for them, depending on the width of the frame you make, rely on the fact that there should be an approximate distance of 65–75 millimeters between the pins.
First of all, when making a miracle shovel, rely on your capabilities and dimensions, adjust all sizes individually. Don’t forget that the miracle shovel for digging the earth with your own hands is designed to make it easier to spend time at your summer cottage; try to make it with your own hands as suitable as possible for your size.
If you are not a lazy person, then it will not be a particular problem for you to make it the most convenient for digging your garden plot.
Miracle shovel: main features, drawing with dimensions and list of components
When the summer season begins, it means that it is time not only for relaxation, but also for active work in the garden.
Any summer resident wants to make his task as easy as possible when it is necessary to cultivate large areas of soil. For this purpose, various equipment is manufactured or purchased.
Recently, a miracle shovel that you can make yourself has become very popular.
Characteristics of the device
Many owners of a summer house or private house would like to have at their disposal a universal shovel for digging a vegetable garden, made with their own hands. And this goal is quite achievable.
The classic version of the miracle shovel (haydamak) is a bayonet design, with which you can very efficiently cultivate land of absolutely any complexity. This structure is a combination of a lever and villas, thanks to which the pointed parts penetrate the ground very easily.
Of course, you can use an electric walk-behind tractor, an electric cultivator, or order a tractor, the device of which is equipped with a special plow. But in order to carry out all these actions, you will need to spend a fairly large amount of money to purchase or hire equipment. This is why gardeners prefer to work with their own hands using homemade devices.
The miracle digger is notable for the fact that its pointed teeth will penetrate the soil very easily, and since a special lever in the form of a long handle is installed on it, you can lift very large pieces of soil, which will be loosened by hitting the second part of the fork located on the surface . Depending on the various elements and depth for loosening, the tool is divided into several types:
- The usual one, which is called “plowman”.
- A more advanced one with the name “mole”.
An ordinary shovel (Archimedean) can be made at home without much effort. It consists of one reliable stop and teeth.
To use the tool, you will not need to exert much physical force, but the speed of work will increase.
It is worth noting that if there are large blocks of earth on the site, then a shovel will not cope with this task. Usually it is used exclusively for frequent cultivation of chernozems.
The miracle shovel “plowman” is used not only for digging the ground, but also for good loosening. The length of the teeth is approximately 10 or 15 cm, thanks to which you can work on a variety of soils, and the teeth will stick very deeply and easily into the ground, even when a person weighs only 60 kg.
The depth of the “mole” bayonet will be approximately 25 cm. It is used to carry out deep digging of the surface. The length will be sufficient to plant some kind of vegetable crop. To use such a tool, it will be necessary to make some effort, especially if you have to work on alumina and soil that is very well compacted.
How to eat Kiwano fruit correctly, the taste of the fruit
There is a third type of shovel, which is considered universal. The bayonets on it will be 15–20 cm long. They can be very conveniently used in those regions where the soil freezes heavily. And also if the main soil is chernozem.
If the climate of a certain zone is very harsh and the ground freezes more than 10 cm, then even this depth of bayonets may not be enough to complete the task efficiently.
Operating procedure
It is necessary to point out the great conveniences that can be achieved by using a miracle shovel. With its help, you will not need to perform various bendings, and therefore the risk of back injury is reduced. Making such a shovel is especially important for those people who suffer from radiculitis. With the help of a miracle digger, you can reduce physical effort, and this will speed up the work.
The operating procedure for the miracle shovel is as follows:
- You need to press your foot onto a specially installed pad. This way the shovel will go deeper into the ground.
- The foot still remains on the court, and the other foot takes one step back. In this case, the shovel should be tilted to the back, and the soil will end up on its teeth.
- Next, you should make small shakes with your left and right hands. In this way, soil will be removed from the surface of the implement and loosening will be carried out.
- To turn over the soil, you need to make a sharp upward movement and move the shovel about 15 cm to the rear. After several approaches have been completed, you need to take a regular rake and use it to break up the stones in the area.
Previously, this type of shovel was called a “spade.” This word was formed from actions during work. It was necessary to step or step on the shovel. In this way it was possible to press on a metal bayonet. The principle of operation has not changed at all since then.
There are also factory models of similar shovels. But they have a certain drawback: the earth will very often stick to the moving parts. Because of this, the work will take much longer and become more complicated. In addition, the shovel is equipped with a wooden handle, which often breaks. The cutting must be inserted into special sockets.
If you want to make a homemade tool, then you should make sure that all the parts are very securely connected. That is why various jams and breakdowns are practically excluded.
But this does not mean that the miracle digger has no shortcomings at all. You can accidentally deform the weld seams and break plastic parts, if any.
But usually such malfunctions occur only after several years of active use.
Tornado for weeds: instructions for use and dosage
Necessary materials
It is worth noting that to assemble a shovel, you need to pay attention to certain points . Do not neglect this information, because without it the shovel will be unreliable:
- The length of the bayonet that will enter the soil will depend on the depth to which the soil is frozen. If the shovel is used only as a loosening agent, then the length can be made 10 cm. But if there is a desire to plant vegetables, then the entry into the ground needs to be made deeper. In this case, the teeth should enter the layer of frozen soil 15 cm or even deeper.
- The width of the shovel should depend on the area covered by the ground. But it is worth noting that the width should not be made more than 50 cm, since then the tool will become too heavy, and this will complicate the work.
- When searching for the necessary materials, it is worth considering that you will need to make a type of tool that has not three teeth, but more.
To create a tool, you need to use the following materials:
- Fittings.
- A pipe having a square (preferably) cross-sectional shape of 110 mm.
- A metal pipe with a diameter exceeding 50 mm.
- Welding machine.
- Angle grinder.
- High quality drill.
- Sandpaper.
All this must be found for production. But if you have some of your own developments, then you can use them and improve the shovel yourself.
Manufacturing instructions
Before you start making a miracle digger yourself, you need to study the design features of the tool.
Typically, the forks are fixedly mounted on a frame that is positioned horizontally. It must be supplemented with a special stop, which is located in the back.
You will need to pass rods between the teeth, which will very much resemble a regular rake.
Several handles can be attached to a tool, but in most cases only one handle is used.
It is not necessary to use exclusively a wooden handle, since it can quite easily break off during operation. Instead of wood, it is best to attach a metal pipe.
If a wooden handle breaks at the very base, then the piece will be very difficult to remove. It will need to be drilled out.
You can make simpler models that consist solely of a frame, which is also a stop located at the back of the working part. The teeth must be fixed to the front rod, which must also have fasteners. You can attach handles to them.
How to plant and grow green onions
First you need to make well-sharpened bayonets. The fittings are ideal for this. They must be cut to the required length. The ends of the segments must be sharpened at an angle of 30 degrees. But if the ground is not solid, then the angle does not have to be set as indicated. It is quite possible to reduce it to 15 degrees. But due to such manipulation, the cutting part will often become dull.
Once the bayonets are made, the supporting bar can be created. It needs to be made from a square pipe. You will also need a pipe that will replace the wood and be used as a handle. All elements must be welded according to the drawing.
The drawing and dimensions of the miracle shovel are as follows:
Advantages and disadvantages
Before you start making a miracle digger, you should clearly understand all the pros and cons of this design. Sometimes the negative aspects are so significant that it is simply not advisable to use a shovel for a certain area.
The equipment is convenient to use for the following reasons:
- You can significantly reduce physical stress while working.
- The processing speed of the area will increase.
- The shovel is quite easy to use.
- Can be used on almost any soil.
- Has great reliability.
But any device also has certain disadvantages. The Miracle Digger is no exception:
- If the structure breaks, it will be quite difficult to repair.
- It is impossible to perform figure digging.
- You cannot dig holes with this shovel.
- To work productively, a worker must weigh more than 80 kg.
This tool will be ideal for plowing a plot, loosening the soil efficiently, or sowing. 15 or 25 cm bayonets will be enough to plant cabbage, potatoes and other vegetable crops.
But tomatoes, cucumbers and peppers need to be planted as seedlings, and for this you will need to use other tools to make holes. It is also worth noting that a shovel will be completely useless in the garden.
Because with its help it will be impossible to dig around trees and create holes.
From this we can conclude that a super shovel for digging a vegetable garden is ideal for those areas where vegetables are grown. The area of the site should be quite large, otherwise all the work can be done much easier using a regular shovel.
Source: https://nasotke.pro/ogorod/chudo-lopata
Stages of tool manufacturing
- Before you begin assembling the device, you need to prepare all the parts. First, we take pre-prepared steel rods and cut them to length. We make bayonets from them, and then sharpen their ends.
- cut off the supporting strip from a square pipe.
- A metal pipe will be needed to make the base of the cutting.
- A thrust strip is also made from the pipe. It needs to be given an arched shape and attached to the supporting bar. All parts of the product are assembled using welding.
You can additionally mount a ripper to it, with which you can break up large lumps of earth. The design of the ripper is the same as that of the main forks. Two devices are attached to the moving mechanism. In this case, the miracle shovel will be able to dig soil in areas with a slope. In addition, it will be able to efficiently crush even small lumps of soil.
To complete the creation of an amazing device, you need to select a suitable cutting. If the product turns out to be too bulky, then the handle can be replaced with two metal pipes, which are welded to the tool; they are connected on top by a transverse one, forming two handles, which will greatly facilitate working with such a miracle shovel.
Watch the video! Do-it-yourself miracle shovel (drawings). Testing the miracle shovel in practice
Using the fixture
It should be noted that this unit is very convenient to use: you don’t have to bend over, which significantly reduces the risk of injuring your back, which is very important for those who suffer from radiculitis. In addition, the degree of physical effort exerted also decreases, while the speed of work increases significantly.
The shovel works as follows: you need to press your foot on a special platform, plunging the tool into the ground. Then, without removing your feet from the platform, you need to take a step back with your free leg, while tilting the shovel in your direction. Thus, a lump of earth falls on the teeth. With light hand movements you need to shake off the soil, thereby loosening it. You can also turn it over, thanks to a sharp upward movement of the hand, while moving the tool back by 10-15 cm.
After treating the area in this way several times, it is worth walking over it with a rake, breaking up lumps of earth.
It is interesting to know that in the old days a shovel was called a spade. This name was born from the nature of the action - to step on the foot, or to step in, which means pressing on a metal bayonet.
It is noteworthy that factory-made models of shovels are often clogged with earth and perform their function worse. In addition, wooden handles inserted into special sockets also tend to break. Unlike these devices, in home-made units the connection of all parts is usually more rigid , which is why jamming and breakage occur extremely rarely.
However, this does not mean that a shovel made at home does not have its drawbacks. The possibility of deformation of sealed or welded seams, as well as breakage of plastic parts (if any), cannot be ruled out. However, the good news is that such flaws can only manifest themselves after many years of active use of the instrument.
What is different and what can
To be precise, this is not a shovel, but a ripper, since it not only digs, but also breaks clods. The miracle shovel consists of two (sometimes one) slats with pins movably connected. Some models also have a back stop - for easier digging of dense, heavy soil. So in reality it looks more like double pitchforks (see photo below).
Miracle shovel and its components
From the picture it is clear that this tool does not have a shovel as such, but the differences from the classic bayonet shovel do not end there. It also has a much higher handle - it should reach your shoulder. It is also convenient if there is a crossbar at the top - you can operate it with both hands.
The miracle shovel performs three operations at once:
- loosens the soil;
- breaks clods;
- “extracts” the roots of weeds without tearing or cutting them (in any case, damaging them much less);
- Digs root vegetables easily - you can dig carrots, potatoes, etc.
But its main advantage is that it greatly facilitates digging the earth, and the main load falls not on the back, as when using a conventional bayonet shovel, but on the legs (driving the working forks into the ground) and on the hands (turning the forks out of the ground). During work, the back is in a vertical position and is almost not loaded.
Another version of the miracle shovel
The only downside to this tool is the weight. It is really much larger than the bayonet one. But the super shovel can be rearranged; there is no need to lift it. Or rather, it is raised only a few times: when it is placed on the ground at the beginning of the row. Then, by pulling the handle, it is simply tightened a little.
There is another very attractive point in using a miracle shovel - it digs the garden at least twice as fast. This occurs due to the wider working part - up to 50-60 cm. Provided there is little physical activity, this is very good.
How to work
Although this design is not particularly complex, working with it has its own characteristics. First, you need to start from the far edge of the bed, then move back, gradually dragging the forks back. Well, the general procedure is this:
- Holding the handle, place a miracle shovel and rest it on the front ripper.
- Stick the pitchfork into the ground. Drive them in until the back stop touches the ground. If the ground is heavy or dense, additional force may be needed - press your foot on the crossbar of the front forks.
- Pull the handle towards you. With this movement, the forks will begin to move upward. As they rise, they pass through the forks of the front stop, breaking up the lumps.
- Pull the device back a little, repeat all the steps (plug, squeeze, pull the handle).
It's actually very simple. It’s worth trying a couple of times and then everything repeats automatically.
A hand cultivator that eliminates hard work
The miracle shovel is a combination of a ripper and the most ordinary forks.
The components of this ingenious tool are extremely simple:
- A handle that controls a shovel.
- Front and back stops that give the tool stability.
- Fasteners connecting all parts.
- Forks for loosening.
- Digging forks.
The forks are connected in such a way as to move towards each other and lock like a lock, and there are stop mechanisms on the sides. The simple design of this new piece of equipment makes it easy to break up clods of earth, greatly simplifying and facilitating work in the garden. The emphasis is placed specifically on the forks of the tool, which perform the main function.
The miracle shovel plows the ground shallowly (up to 20 cm), which makes it simply an indispensable device. With its help, you can care for both large and small areas; even difficult soil is subject to it. She does not have a conventional bayonet shovel, which means that monotonous digging in a half-bent position is eliminated. Moreover, the handle of the tool is generally at shoulder height and does not allow for tilting in principle.
A hand cultivator not only loosens and breaks up the soil, but also pulls out the roots of weeds. It makes it easy to remove root vegetables and potatoes without damaging their integrity.
Expert opinion
Kuznetsov Vasily Stepanovich
The miracle shovel was invented and patented in our country. It is believed that it was invented by a priest and made into a mass product by businessman A.N. Bessonov. These products are produced in Chelyabinsk, on, and Volber developed Krota.