A convenient, reliable knife is an indispensable assistant when fishing, hiking, hunting, in the home or professional kitchen. The service life of the product, its maneuverability and aesthetic appeal depend not only on the quality of the steel in the blade part, but also on the properties of the handle. If the knife handle fails, it can be replaced with a homemade one.
Large selection of knife handle options.
Types of materials for knife handles
It is possible to make a handle for a knife from various materials: plant, animal or chemical origin.
Trees of various species, bones and horns of mammals, as well as various wastes of the oil industry in the form of polymers. It is possible to classify materials suitable for making a knife handle. Let's look at the most popular of them.
Leather handle
Leather.
Leather products have considerable wear resistance. Low thermal conductivity and a pleasant-to-touch handle are made exclusively using the push-in method. When using genuine leather, the user must keep in mind that it absorbs odors well. It should not be used for a carving knife.
It is more suitable for a marching version or a hunting blade, but it is not worth skinning prey. The material is affordable, but also quite capricious to store. It is necessary to dry it thoroughly after use. And then soak it with special oils or protective agents.
Birch bark handle
Birch bark.
Birch bark is the top layer of birch bark. It is not forbidden to remove the material from a living tree; there will be no harm to it.
They often use bark from fallen trees, soak it, dry it, and the material for an excellent horse-mounted handle is ready. Natural tar prevents rotting and protects the product from moisture.
Low thermal conductivity will allow you to work with the knife for a long time in the cold. By balancing the weight of the blade with the handle, it is easy to achieve a floating effect. If the knife falls into the water unsuccessfully, it will not drown. It is necessary to take into account that birch bark strongly absorbs odors; fish and carcasses should not be cut with a blade.
Wooden handle
Tree.
Hardwoods are used for making. There are a lot of them in our area: birch, ash, plum, cherry, oak, maple and natural resources of similar hardness.
The availability of the material is the most versatile and widespread as a blank for knife handles. Without a dry wooden block at hand, the knife handle can actually be made from a parquet board.
Having bought one plate at a hardware store, it will be enough for several handles of various types. In some characteristics, wood is slightly inferior to synthetic products. But the aesthetic beauty of living wood and the excellent grip on the palm make it an excellent material. And if the master wishes, it is possible to make a carved pattern on it.
Metal handle
Metal.
The handle is made at the blade forging stage, or in production during casting. The weight of the product becomes considerable, which contributes to rapid hand fatigue.
Working in the cold with your bare hand is a bad idea. Sometimes the handle is attached to the shank using an overhead method, or welded with a welding machine. Then, it is finished on a grinding machine to the required appearance.
Plastic handle
Plastic.
It is unlikely that you will be able to make a knife handle with your own hands at home. Such products are manufactured in a factory using molds.
A pouring pen option is possible by heating the plastic and pouring it onto the shank in the mold. But this is quite labor-intensive and flammable.
And then bringing the handle to normal condition will cause a lot of trouble. Forget about making such a knife handle with your own hands if you don’t have special equipment. Non-absorption of moisture, odors, low thermal conductivity and the convenience of the blade in the hand are the undoubted advantages of the material.
Synthetic fiber handle
Textolite.
A very practical material with unique characteristics is textolite. Wear-resistant, not afraid of aggressive environments and mechanical damage, a truly eternal handle is made from this material.
It doesn’t mind moisture, it doesn’t slip in the hand, it doesn’t require drying after work, and it doesn’t absorb odors. In all areas the performance is excellent. There is an opinion about its lack in aesthetic terms.
But it all depends on the master. It is used as an overhead mounting and then polished on a machine. Properly selected rivets and machining will give excellent results in terms of the beauty of the product.
Synthetic fibers help make the knife handle reliable and practical. They are used as a winding for a finished handle. Or they are wound on a metal shank with holes. Cheren takes on an ennobled appearance and is pleasant to grip with the hand. The thread is always easy to replace, and in survival conditions it is quite suitable for other purposes.
Making a handle with your own hands step by step
The simplicity of the design of the knife and its handle makes it easy to make this tool with your own hands.
For example, if you have a high-quality blade with a damaged handle, you can easily update it by making a handle from scrap materials according to the algorithm given in our article.
Required Tools
As a rule, most craftsmen make knife handles from wood, although other natural and synthetic materials are also suitable for this purpose.
Based on the selected material, the tools for the job are selected. For example, for wood processing you will definitely need special impregnations (for example, linseed oil), which will protect the finished product from moisture and other negative environmental factors.
To process the material you will also need special tools. The easiest way to process wood is with a cutter, chisel or rasp, but to work with metal you will need a special vice and abrasive stones. Power tools can also be useful for processing materials of increased strength: drills, jigsaws, chisels, etc.
Requirements for size and shape
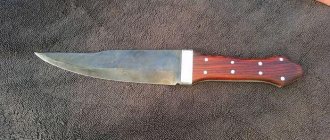
There are no clear requirements for the size of hunting knives: everyone is guided by considerations of personal convenience and the functions that the blade will perform (Figure 4).
The optimal blade length for a hunting knife is 10 cm. With the help of such a tool, you can cut up game and use it for planing wood or other purposes.
Figure 4. Variety of sizes and shapes
The minimum length of the handle of a quality knife is 11-13 cm, while the width of the finished product is determined individually, depending on the personal preferences of the future owner. As for the shape of the blade, an oval or convex handle is considered optimal for a hunting knife, which ensures the convenience and efficiency of using the tool.
Types of materials used
The types of materials for making knife handles are very diverse. For this purpose, both natural materials, such as wood or leather, and synthetic materials, such as metal, plastic or rubber, are used.
The final choice of material depends on your skills, capabilities and personal preferences. To make it easier for you to make your choice, we will provide more detailed information about each type of material that can be used to make the handle of a hunting knife.
Tree
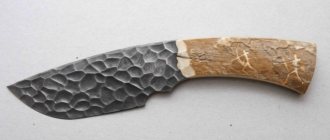
Wood is considered one of the most popular materials for making a hunting knife handle. Typically, hardwoods such as walnut, ash, birch, beech, cherry, hornbeam, oak or maple are used for this purpose (Figure 5).
If you want to make a wooden knife handle with your own hands that is not only durable, but also original, you can use exotic types of wood. Breeds such as merbau, amaranth, bubingo or zebrano do not grow in our latitudes, but have sufficient strength and attractive appearance, and are ideal for making knife handles.
Figure 5. Options made of wood
If you don't have a suitable piece of natural wood, you can always use parquet pieces. This flooring is made from durable wood that is ideal for making hunting knife handles.
Of course, in some respects natural wood is inferior to synthetic materials in terms of wear resistance and durability, but it also has certain advantages. For example, this natural material is easy to process, it has a unique texture, and also provides reliable grip on the palm and allows you to work outdoors for a long time, even in severe frost.
Birch bark
A handle for a hunting knife can also be made from birch bark. This material is one of the simplest and most affordable, and working with it requires a minimal set of tools. The obvious advantage of birch bark handles is that they contain natural birch tar, which protects the finished product from moisture and rotting. In addition, birch bark has low thermal conductivity, so working with a knife with such a handle will be comfortable in both heat and cold (Figure 6).
Figure 6. The procedure for making a product from type-laid birch bark
To make a birch bark handle, the top layer of birch bark is used, which is cut into small pieces, glued with epoxy resin and compressed into a briquette using a vice. Thanks to such a simple design, the handle can be made in just one day. The only drawback of such a handle is that birch bark absorbs odor very well, so if you use a knife to cut game or fish, the handle will absorb these odors and it will be extremely difficult to get rid of them in the future.
Leather
Genuine leather is also a suitable material for making the handles of Finnish and other knives. As a rule, the same typesetting technology is used to produce the workpiece as for the manufacture of birch bark handles (Figure 7).
Figure 7. Leather products are comfortable and durable
Along with the obvious advantages of natural material - wear resistance, low thermal conductivity and comfort, and leather handles, there are also certain disadvantages. As with birch bark, genuine leather absorbs odors very well, so it is usually used for making tourist or camping knives that are not used for processing game or fish. In addition, if you use and store such a knife incorrectly, the leather may begin to rot and the handle will have to be replaced. Therefore, experts recommend that after each use, thoroughly rinse and dry the knife, followed by treating the handle with special protective agents for the skin or natural wax.
Plastic
Modern composites are much superior to natural materials in their performance characteristics. High-quality plastic does not absorb moisture and odors, has low thermal conductivity and fits comfortably in the hand, allowing you to wield the knife for a long time without fatigue.
Handle decor
A homemade knife handle can be made unique - any material suitable for such use can be decorated. In this case, you can show your imagination and accuracy - real handmade work. An engraving sketch or photo is prepared in advance, calculating the size of the handle. You can apply such a pattern to all materials except typesetting, but each has its own technique:
- Burning a design is suitable for wood, plastics, rubber and composites.
- Engraving is more versatile, but such a design requires a tool and a fair amount of perseverance.
- Etching is only suitable for metal handles, but other parts need to be protected.
- On soft materials, different patterns can be cut with a carpenter's knife, but such work is difficult.
If there are no such opportunities or desires, then we make the drawing with paint. You can decorate the handle using a paracord braid or leather cord. Simple options do not look unique and are quite common, but there are patterns with interesting patterns that need to be woven according to the instructions. Examples of braids that will add grace to the handle:
- snake knot;
- Turkish head;
- ear;
- cobra.
By combining several individual options and colors of cord, you can get a new beautiful type of weaving. Paracords for braiding come in two or three colors from the very beginning, which will give the pattern greater depth - you just need to show your imagination and work with your hands for an interesting result. A braided handle will slip less, and the cord can absorb sweat and other foreign liquids. Some craftsmen weave an interesting pattern directly onto the shank of the blade and fill it with epoxy resin or make artificial amber as a base for the handle.
Making a knife handle with your own hands is not difficult from start to finish. The simplest way is to braid the shank of the blade with a cord or carve it out of a wooden block. But the choice of material depends on general aesthetic views and the required strength. Depending on the manufacturing and fastening method, the handle must be fixed with adhesive compounds. After the work is done, the finished handle is decorated with ornaments, covered with leather or braided with cord.
Materials and tools
When choosing a material for turning a knife handle with your own hands, you need to look at the intended purpose of this tool. You can choose from plastics, metals, leather, synthetic fibers, birch bark and wood. The latter are more often chosen due to ease of processing and high prevalence. The material for the knife handle is selected from the following types of trees:
- oak;
- nut;
- sea buckthorn;
- maple;
- beech;
- Rowan;
- acacia;
- cherry;
- ash.
Among the exotic and expensive varieties, amaranth, wenge or rosewood are purchased - they have a special texture, color and high strength. You don’t need a lot of lumber, but be sure to take into account the supply that will be irretrievably lost. When making a handle, you need not only a sized wooden block and a knife blade, but also a processing tool with additional materials:
- holdfast;
- chisels;
- oblique knife;
- durable wood glue;
- Grinder;
- sandpaper or paper;
- needle files and files.
Birch bark is also classified as a wood material, but this name does not mean ordinary birch bark. It is more like a moisture-resistant composite, which is cheaper than natural wood. The material is made from finely chopped birch bark, tar and epoxy resin under pressure. If you make a handle for a knife from birch bark, you need to supplement the set of tools with others, as in the case of other options.
Making a knife from a 9HF saw
In this article we will not focus on the shape and design of the blade, the type and width of the sharpening, etc. We believe that we already have a finished project or sample and will focus on the production itself
In order for a homemade hunting knife to meet the basic requirements for such blades, it is recommended to make it from high-carbon alloy steels. For example:
- 9ХФ – tool alloy steel, used for the manufacture of frame, band and circular saws, punches, trimming dies and a number of other tools. Usually saw blades are used as blanks;
- Р6М5 – high-speed alloy steel of high strength. It is used for the manufacture of many types of cutting tools, drills, saw wheels, the latter can be used to make a workpiece;
- 65G – spring steel, with high wear resistance, can be blued and blackened. They make springs, springs, gears, etc. In addition to sheets, rear springs of trucks are used for blanks. Considered one of the cheapest knife materials;
- X12, R3M3F2 and a number of others are also suitable.
The material for the workpiece can be taken from the above products, although now on the Internet you can order a plate for the workpiece from almost any steel. As a recommendation, take a pendulum saw blade for metal, the usual dimensions are 400x30 mm, thickness 2 mm, rough surface, color black or gray.
If you want to make a homemade knife at home, in addition to the material for the workpiece, we will need:
- Angle grinder (grinder)
- Wheels for it, cutting wheels for alloy steel, for example inox A54S BF, sharpening and grinding.
- Drill or drilling machine
- Vise
- Pobedite and other special drills
- Files and diamond file
- Emery machine (very desirable).
The knife making process will be as follows:
- Based on the drawing or sample, we cut out a blade template from cardboard.
- We place the template on the canvas and trace it with a pencil; if necessary, the outline can be drawn with a carbide scriber.
- So, a start has been made. We put a cutting wheel for alloy steel on the grinder and start cutting out the workpiece.
- We cut the workpiece slowly so as not to overheat and not let go of the edge of the blade. We are absolutely satisfied with industrial hardening in terms of hardness and elasticity. To do this, we cut strictly the end of the disk into the end of the metal, then it can be released.
- When the workpiece is cut, we put a sharpening wheel on the grinder, and with it we process and polish the entire contour of the workpiece, align the lines, and remove the handle. At the same time, we do not linger in place so as not to overheat the metal.
- Then we install a flap sanding disc on the grinder and remove the blade slopes. For the steel used, the optimal height of the descents will be 9 mm. Subsequently, the blade is ideally positioned into the lens. Let's not rush, remember about overheating. If you have an emery machine, it is more convenient to do this on it.
- After the blade is completely formed, polish it using an appropriate wheel.
The handle of the knife can be wound using paracord or made of wood; in the latter case, we drill holes in the handle according to a template, according to a sample or drawing. Holes are drilled using special drills with accompanying cooling using oil. It is more convenient to do this on a drilling machine.
To simplify the process, holes are first drilled with small diameter drills and then gradually drilled out to the desired size.
Recommendations for design and finishing
Decorating the handle with patterns or ornaments will help make your knife truly unique. Here you can show unlimited imagination. You can decorate the handle using braiding, engraving, or covering it with patterns based on a ready-made sketch (Figure 13).
Figure 13. Design options for the finished product
If the handle is made of wood, a suitable design can be burned or painted with permanent paint. The main condition is that before any decorative treatment of the product, the surface must be degreased so that the ornament remains bright and noticeable for a long time.
Detailed instructions for making a knife handle with your own hands are given in the video.
Share
- 40
26.12.2018 40 937
Choosing wood for an ax
When choosing materials, preference is given to hard rocks:
- oak;
- ash;
- maple;
- acacia;
- birch.
Most often, the templates are based on birch. 80 cm is the required length to carve the handle. The girth width of the tree varies from 40 to 60 cm. With a smaller value, the fibers will be unreliable and the handle will quickly break. If the trunk is too wide, you can get rotten material.
The wood is thoroughly dried so that the ax head does not become loose. The wood is harvested a year before the handle is produced. Oak takes 3 or 4 years to dry.
It is important that the room is ventilated. Otherwise, mold forms and the process of rotting begins.
Maple breed
Canadian maple looks beautiful. An ax handle made of this material is easy to polish and dry. The texture is different:
- hardness;
- strength;
- elasticity.
A maple ax handle is an excellent solution.
Maple ax handle.
Jatoba tree
Jatoba wood.
Increased impact resistance makes this breed indispensable in the manufacture of handles not only for axes, but also for knives. The wood is stronger than oak. Is different:
- hardness;
- viscosity.
Jatoba lends itself well to processing. The breed is considered one of the most expensive and beautiful. Suitable for those craftsmen for whom appearance is important.
hickory tree
Handles are made from it for:
- ax;
- knife;
- hammer.
The tree is resilient and durable.
Not particularly used in our country. This is due to the high cost.
- Canada;
- North America.
Oak and beech trees
These breeds have in common:
- easy processing;
- inexpensive cost.
The disadvantages of an oak ax include:
- heavy weight;
- severe drying of hands when working.
By increasing the length of the oak handle, the friction force is absorbed. A shorter handle is easier to cut from solid timber. Each ax handle shape has its own differences.
The porous texture of beech has a smooth and beautiful surface. It's easy to cut. However, this breed is not resistant to moisture absorption. The wood needs to be double impregnated with oil. Thus, hygroscopicity is reduced.
Blank for an ax handle.
Birch
This is an ideal option for producing high-quality pens. The only drawback is the long drying time. The minimum period is 1 year, the maximum is 2 years. Birch is hygroscopic. At the same time, a pattern can be easily cut out of it. Cheap material is often used to make homemade handles.
Birch ax handle.
Birch or walnut burl
A growth on wood with deformed directions of growth of wood fibers. Usually found in the form of a rounded growth on a trunk or branch, filled with small woody nodules of dormant buds. Burls produce a very unusual wood with a complex fiber texture, one of the most prized for its beauty; its rarity makes it even more expensive. Advantages: — appearance — each cap has a unique pattern; — impact resistance – the burl is a very durable material; during the growth process, the wood in the unit is compacted and pressed; Disadvantages: - due to its high hardness and strength, it is difficult to process.
Types of knives
There are differences between types of knives in the geometric shape of the blade. The purpose of a particular knife depends on the shape. With some weapons it is more convenient to make piercing movements, and with others it is more convenient to make slashing movements.
Hunting knives have the following types of blades:
- straight edge at top;
- the upper edge (Drop Point) smoothly descending towards the centrally located tip;
- an upwardly extending edge and a blade located at the top relative to the axis of the tip (Trailing Point);
- a blade in the form of a Bowie knife, which has a straight, sharp upper edge with a steep descent at the tip (Clip Point);
- with a straight spine and a bent cutting edge (Skinner);
- with a double-sided wedge-shaped blade, like a dagger.
According to the type and size of the design, hunting knives are divided into the following groups:
- Classic. Standard length - from 10 to 13 cm. Blade width - 3-3.5 cm. Weight - from 120 to 180 g. Blades of any type are allowed, except double-sided sharpened. The purpose of classic knives is long-term work on cutting carcasses and skinning.
- Big ones. Size - from 13 to 17 cm. The blade can have any shape. Weight - from 180 to 300 g. A large mass must be accompanied by an appropriate guard and a thick handle. Large knives are used for slashing. They are not very suitable for other purposes.
- Foldable. Sizes vary. Folding knives are equipped with one or two blades. They perform best when performing small, short-term work.
In order for the blade to gain sufficient rigidity, grooves are made in the metal. They also have another name - valleys. The presence of fullers not only increases the rigidity of the blade, but also reduces the weight of the knife.
The best option for a hunter is to have two knives. One is designed for finishing off large game and cutting up carcasses. It should be long and heavy. The second is for cutting small game and utility work (for example, cutting branches in the forest).
Characteristics of a hunting knife
In order to make a hunting knife, you need to figure out how it differs from other types.
So, in addition to performing regular cuts, it must cope with the following tasks:
- finish off a wounded animal;
- skin;
- cut up the carcass.
Based on this, we can highlight the characteristic design features:
- Straight butt for a powerful blow during finishing. For finishing, a separate blade with a central tip is often used; it is also called a hunting dagger.
- Blade length 100-150 mm.
- Use of harder steel grades.
- Handle made of wood, birch bark or non-slip artificial materials, with moderate relief. It should be comfortable for cutting towards and away from you, as well as piercing movements.
- Lack of additional devices in the design.
So, how to make a hunting knife?
Workflow Description
Before starting work, it is necessary to determine what type of handle will be used in this case; there are two main options.
Types of handles
Everything is quite simple here:
Mounted type options are used for blades with a narrow shank. As the name implies, assembly consists of securing the blade in a cavity that is made at the end of the handle. The advantage of such solutions is that the handle turns out to be one piece without any joints.
Mounted handles are used mainly for knives with small blades
Overlay options are used for blades with wide shanks; this is a more common option, which differs in that the handle consists of two halves that need to be perfectly aligned with each other to ensure the best comfort of use.
Product assembly
The work is carried out differently depending on the type of shank; first we will consider the mounted option:
A workpiece is taken and given a certain shape, this is done using any available means - a hacksaw, a jigsaw, cutters and other devices. When you get a rough version, you need to bring it to perfection using sandpaper, but you can also use a wood sander.
The finished handle should be perfectly smooth
- Next, a hole is drilled in the end, the depth of which should be equal to the length of the shank on the blade. If it is necessary to widen the hole, this is done using a needle file. As a result, the shank should fit freely on the handle.
- Now let's look at how and with what to impregnate a wooden knife handle; for this we use a water bath, i.e. Place a small one in a large saucepan with water, into which linseed oil is poured. The handle is lowered into it and held there until air ceases to be released from the material, after which the elements are removed, wiped and left to dry and cool for a couple of hours.
Some people impregnate the handles after assembly, but it is better to do this in advance.
After the handle has dried, you need to prepare epoxy resin (the instructions will tell you how to do this correctly). The composition is mixed with fine sawdust and the prepared cavity is filled with this mixture, after which a blade is inserted into it. Don’t forget to check its level position, then leave the product for a day, then you can use the knife.
After the epoxy hardens, the structure can withstand even significant loads
Overhead options are done a little differently:
- The workpiece is cut lengthwise into two halves. To do this work yourself, you will need to secure the wood in a vice so that you can accurately control the work process. The halves are brought to perfect condition in the same way as described above. To do this, use any tools and devices convenient for you, and the surface is brought to perfection using sandpaper.
- Next, you need to drill holes for the rivets; to do this, the handle is securely attached to the shank and drilling is done through all the elements at once, so you are guaranteed to get perfectly aligned holes.
- After this, you need to make blanks for the rivets, their diameter must match the holes, and the length must be equal to the thickness of all elements.
- The oil impregnation process is described above; you can do this after assembly, but it is better to do this in advance so that the elements are processed as efficiently as possible on all sides.
You decide what to impregnate a wooden knife handle with; it can be linseed or hemp oil, as well as other compounds.
- Epoxy resin is prepared, the internal parts of the handle halves, the metal shank, and the rivets are lubricated with it. All elements are assembled into a single whole, after which they are wrapped in a piece of rubber and wrapped with tape for tight fixation.
- After a day, the product is inspected and, if necessary, excess epoxy is cleaned off. Oil treatment can be repeated if the surface had to be heavily cleaned.
The finished product will not be inferior in reliability and quality to the factory versions, and the price will be much lower
Notch
Before the final stage of processing the wooden handle, you can make notches on it. And only then coat it with varnish or impregnation. The notches are made in different directions and at various depths. A small file or wood cutters will help in this matter.
For the best result, it is recommended to first draw a sketch of future notches on the handle with a pencil. And only after that take up the cutters and file. Finally, the handle is sanded with fine-grain sandpaper.
Handle decor
Decorating the handle of a knife is a separate specificity of the work. There are several ways to decorate a wooden knife handle:
- Drawing with fire - pyrography. Most men are familiar with wood burning from school;
- Scrimshaw is a special burning technique in which a person literally works by touch. The pattern appears later, after painting the product;
- Carving is a figurative work with which you can recreate Celtic themes, ancient Phoenician writings, and runes.
The decor can be combined. There may be inserts of precious stones, leather trim, or the use of several techniques simultaneously. All this allows you to recreate exclusivity. Moreover, handmade is always a work of art.
Pyrography
CarvingScrimshaw
Braid
Nothing better than paracord cord and leather cord for braiding has yet been produced. At first glance, it may seem that braiding is a rather monotonous option for decorating a knife. However, this is not so - there are many braiding patterns that create different textures and patterns of the product:
- Dense and ordinary windings;
- Weaving "Turkish head";
- Popular weaving "Cobra";
- Technique "Spike";
- "Snake Knot"
Leather trim
In general, leather knife handles are original and durable. Craftsmen offer several ways to decorate a knife with leather. Some wrap the product with a narrow leather strap coated with epoxy. This technique allows you to recreate a special relief. In addition, after processing, the knife lies comfortably in the hand.
To fit a wooden handle, you need to clean and degrease its surface. Then apply shoe glue and let it dry. A piece of leather is wrapped around the handle with an overlap of 1 cm. Glue is immediately applied and dried. After this, you should heat it over the stove, tighten it on the handle, placing that same overlap on the side of the axis. Use a sharp blade to remove any scraps and carefully align the edges of the leather. If the technology is followed correctly, the joint between the edges will be invisible, and the product will last for many years.
Suitable tree species for knife handles
Everyone knows that a knife consists of two most important components - the handle and the blade. The second can be purchased ready-made. But for the handle you should choose a type of wood of decent quality.
There are many types of trees, they have different mechanical and physical properties.
The following trees are mainly used: acacia, walnut, oak, boxwood, wenge and birch. It doesn’t matter which tree you choose, the main thing is that it is well dried. At the final stage of making the handle, craftsmen impregnate it with oils, wax or drying oil.
This protects against external negative influences and significantly improves the decorative qualities of the material. Thus, the life of the product is extended. Exotic trees are used to make expensive handles.
Birch wood for knife handle
The material is very good and easy to work with. But its only drawback is its lack of expression. The knife handle will look quite simple. But this material perfectly emits ivory. Lightness and affordability are the most important advantages of raw materials.
Birch knife handles.
Oak wood for making a handle
This material is very resistant to external irritants, has good strength and will last a long time. Oak is more difficult to process than some other tree species. But this matter can be corrected with modern equipment of the master. The raw material has a very beautiful pronounced texture.
Oak handles.
Additional accessories
Such devices most often include a trench and a sharpener, as well as secret holes in the back of the knife and pockets on the sheath.
Trenchik
A special loop for attaching the sheath to a belt. When making a trench coat, various materials are used: rope, cord, strip of leather. Making a sheath with your own hands allows you to make a trench coat from any available material.
The trench coat can be glued, sewn, attached with a screw from the inside of the sheath, the main thing is to make a loop with a margin for any belt width. The length must be selected individually.
Sharpener
A small, fine-grained block of stone used for sharpening a knife. The sharpener is attached to the sheath and is necessary when using the blade for a long time.
Pockets
Making a knife and a sheath with your own hands allows you to fully equip it to your taste. But it is worth carefully considering the necessity, and most importantly, the practicality of this or that pocket.
When making handles for knives, some craftsmen leave a cavity in the back, into which small objects can also be placed.
How to attach a blade to a knife handle
It will be necessary to attach the blade to the handle of the knife if the latter was made from a single piece of material. In this case, you need to perform the following manipulations:
- Mark the handle and drill a hole in the middle. It is advisable to make it a “wedge”, that is, perform several forward-reciprocal movements with a drill.
- Clean the hole with a thin file and blow out any remaining dust.
If the blade shank is not narrow/thin, but wide, then you will need to drill several holes in the wooden handle as close to each other as possible (the width of all holes corresponds to the width of the blade tail), then use a drill to remove the remaining partitions and clean the hole from dust and shavings.
All that remains is to insert the blade into the handle of the knife (into the prepared hole) and fix it there with wedges so that the metal is stationary. The voids are filled with epoxy glue mixed with sawdust and left to dry - from 1 to 24 hours (according to the instructions).
Horse handle
Treat the pre-selected tree with an antiseptic.
Mark and drill a hole of the required diameter and length slightly larger than the blade shank. Dilute epoxy resin in a ratio of 100:13, mix with sawdust and pour the resulting mixture into the hole. Insert the shank of the blade, previously wrapped with tape to protect it from contamination. Now press the semi-finished knife into a press and wait 1 day for the resin to dry.
If the handle has grooves for the fingers, then a deeper recess should be made for the index finger. Using plasticine, you can make a visual shape so as not to make a mistake on the tree. Next, use a cutter, rasp and sandpaper to bring the workpiece to the desired appearance.
Then perform impregnation, for which the oil or drying oil is heated in a water bath and the knife handle is immersed in the heated raw material for 1 day. When ready, there will be no air bubbles on the surface of the oil. This is followed by drying, preferably in the sun.
Carry out the final finishing treatment with a “zero” finish.
Mix rosin, turpentine and wax in a water bath and cover the handle with the resulting mixture. Finally, polish the handle and remove the tape from the blade.
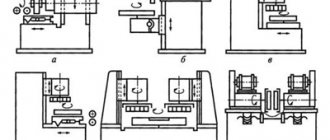
Mounting according to view
There are several options for attaching the handle to the knife blade. The most popular are the mounted and overhead handles. Each of them is designed for specific knives.
Horseback
Mounted fastening technology provides for a narrow knife shank. The handle will be made in one piece. This mechanism provides resistance to damage. The design will be lightweight compared to riveted technology. This predetermines when used in long and voluminous work. If the manufacturer has chosen the mounting technology, epoxy resin and wood sawdust will be needed for excellent adhesion. The work is carried out according to the following scheme:
- Selected types of wood are treated with an antiseptic;
- A blank with suitable proportions is made from the block. The cutting angle is taken into account in order to achieve a beautiful cut;
- Marking is carried out and a hole of suitable diameter is drilled;
- You should dilute the epoxy, combine it with sawdust, and pour it into the hole;
- At the same time, you should insert the blade, which was previously wrapped with tape to protect it from dirt;
- Place the semi-finished product in a vice or press and wait until it dries completely (a day or two).
You can make such a handle with grooves for your fingers. To do this, make a recess under the index finger. You can practice performing the correct form on plasticine, only after that you can move on to wood. After this, you should use a cutter, rasp and sandpaper to sand the workpiece. Soak the product in heated drying oil and dry it in the sun. After this, treat the handle again with a zero polish. Complete the production with a coating of rosin, turpentine and wax, melted in a water bath, which should be used to polish the handle.
Marking the piece of wood
Mark the groove on the front end according to the size of the shank
We drill with a wood drill with a diameter of 6 mm.
We drill further with a drill, marking the required depth with electrical tape.
We turn the block over and cut a groove with a Dremel and a 1 mm thick disc cutter.
We drill a series of holes in the groove with a drill with a diameter of 1 mm.
We cut the groove with a sharpened hacksaw blade.
We wrap the blade with rare fabric insulating tape.
Invoice
Such a handle provides for the presence of a wide shank, which is necessary to determine the contour of the created handle. It is assembled from two wooden blocks, united by metal rivets. This method of fastening does not affect the dimensions of the product in any way, thanks to this it is possible to balance a wide or elongated blade. The overhead fastening option is popular among the manufacture of kitchen knives. Main stages of work:
- The prepared wood is treated with an antiseptic and placed in a vice, where it is evenly divided into two symmetrical parts;
- The surface of the shank is carefully cleaned and polished to avoid gaps;
- Future fastenings are marked to connect the two parts;
- It is necessary to prepare a rod of copper or brass and drill holes in the markings in accordance with the diameter of the rod;
- Make rivets; their length should be greater than the thickness of the finished handle.
Before doing the work, you can practice rough assembly of parts. After assembly is completed, the handle should be processed using a cutter and sandpaper. The halves must be attached symmetrically. You also need to saturate the wooden halves on the side adjacent to the shank with epoxy glue or resin, and add toner to give the desired shade to the product. Next, you need to wrap the knife blade with tape and connect the workpiece, cut off the pieces of rod and protruding rivets. Place the finished knife in a vice again, after wrapping the handle in oiled rubber. Allow the finished product to dry (a day or two).
Soak the handle in heated drying oil and dry in the sun. After this, treat it with zero. Polish the product with a mixture of rosin, turpentine, and wax, melted in a water bath. Instead of this product, you can use ship varnish.
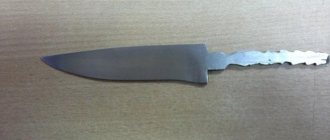
Preparing parts for a new handle similar to the old one
Adjusting the handle to the size of the blade
Finishing the handle with a file
Grinding chamfers
Handle mounting type
The methods for attaching a knife handle to a blade are not very diverse. There are only two of them: mounted and overhead. However, no matter what method is chosen, the production of the handle will in any case be carried out according to a template so that the finished product fully complies with the wishes of the future owner.
Since mounted and overhead handles differ from each other in many respects and have their own design features, we will look at the characteristics of each method in more detail.
Horseback
The mounted handle is also called a "rat tail". This name very accurately explains the technology of attaching the handle to the blade of the blade (Figure 2).
A narrow shank is made on the knife, onto which, like a rod, a handle is placed and secured in any available way.
If you decide to make a hunting knife with a wooden mounted handle, you should familiarize yourself with the advantages and disadvantages of such a design in advance.
The advantages include:
- Aesthetics:
mounted handles look more attractive in appearance, and they are often made from several types of wood at once to increase decorativeness. - Practicality:
this type of fastening allows you to create and attach a handle of any shape and size to the blade. - Ease of use:
Mounted handles are generally light in weight, which is an obvious advantage for hunters who have to move around a lot. In addition, such handles have low thermal and electrical conductivity, which is also an obvious advantage of their use.
Figure 2. Mounting the mounted model
It should also be noted that handles with a similar form of fastening are much easier to repair. Mounted handles have only one drawback - the method of attaching them is less reliable compared to overhead models.
Invoice
Knives with overhead handles have a slightly different design. They have a wide shank that completely follows the shape of the handle. Plates (linings) are attached to it on both sides and secured with rivets or screws. As a rule, this method is used for the manufacture of all-metal or folding knives with two handles (Figure 3).
Among the advantages of the overhead handle are ease of manufacture and high strength of connection of structural elements. However, it should be borne in mind that this mounting option also has disadvantages. Firstly, there are certain restrictions on the shape and size of the handle. Secondly, the finished product weighs much more than a model with a mounted handle. In addition, knives with applied handles have high heat and electrical conductivity. This means that you are unlikely to be able to operate such a tool for a long time in the cold without gloves.
Figure 3. Manufacturing of the overhead version
At the same time, the reliability and durability of such knives completely outweighs their shortcomings, which is why many hunters and fishermen prefer to use edged weapons with applied handles.
General information about the scabbard
A sheath is a product designed for carrying and storing edged weapons. They protect the owner and surrounding people from accidental injury from a sharp blade and prevent the appearance of rust on the metal. If you need to organize the storage of collectible, expensive, exclusive models of knives, then the sheath can be made with decor from precious stones, gold, and silver.
For the manufacture of sheaths, various materials are used, which will be characterized by increased strength - genuine leather, hardwood, metal, thick fabric, plastic.
Materials you can make with your own hands
You can make a sheath with your own hands from the following materials:
- a natural skin;
- wood - hardwood only;
- plastic.
| Material name | Advantages | Flaws |
| Genuine Leather | The material is dense, will last a long time as a finished product, affordable | Working with leather is difficult (requires some skills), requires specific care, remains soft |
| Wood – beech, oak, walnut | Reliability of the finished product, it is possible to decorate the sheath with decor or paints | Working with hard wood is very difficult; for fastening you will need to make hinges from leather |
| Plastic | Waterproof, has a long service life, can be washed even with aggressive agents, inexpensive | To carry out the work you will need a professional construction hair dryer |
Types of fastenings
Depending on what the knife is intended for, the types of sheath mounts differ:
- traditional (worn on the belt);
- combat (shoulder, hip);
- special (suitable only for those who want to hide the presence of bladed weapons);
- image (applies only to folk traditions and the conditions for observing attire at ceremonial parades).
On the thigh
Combat knives are worn below the waist on the hip - this is typical for the military, but is also suitable for professional hunters or wilderness survivalists. In this case, the sheath is fixed to the thigh with a belt or cord at the lower end; the upper part can be additionally secured to the belt - this is especially true for large cutting tools.
Carrying a knife this way is quite specific: it is inconvenient for an untrained person to remove it, and there is a high probability that a leg injury will occur.
On the belt
A knife is attached to a belt by both amateurs and professionals - this method can be called a belt method and is considered universal. In this case, the weapon can be worn on the left or right side, for which the scabbard is structurally provided with left-handed/right-handed hangers; there is also an option for a double-handed hanger - you can place the knife on any convenient side. The latter type of fastening allows you to carry the cutting tool on a belt both at the back and at the front.
The disadvantage of this type of carrying is the difficulty of removing the knife from the sheath while sitting or lying down.
Shoulder
The shoulder sheath mount is most often used for combat knives. It is a wide cord that is threaded through a loop in the sheath and fixed on the shoulder or forearm. The knife is worn with this mount only with the handle down.
Only specially trained people can safely carry knives with a shoulder mount; amateurs are better off not taking risks - and taking out a weapon without specific skills is extremely inconvenient, and the risk of damage to the skin, soft tissues and even the periosteum is very high.
To the fisherman's vest
On the fisherman’s vest, the place for attaching the knife is pre-thought out, because this tool can save a person’s life - for example, if a fisherman fell into the water and became entangled in his own or someone else’s nets, then a quickly removed knife in his hands will solve the problem.
The weapon must be attached to the fisherman's vest with the hilt downward - this way it will be convenient to take it out. If the vest does not have a special pocket-compartment for weapons, then you will need to attach it to the sheath on special loops.
Watch the video on how to attach a knife to a fisherman’s vest:
Which ones are suitable for a dagger, hunting knife
For a hunting knife and dagger, you should choose a belt mount and here's why:
- the easiest and most affordable way;
- the knife/dagger is located on the right or left side (where the “working” hand is located);
- the weapon is positioned with the blade down.
If the dagger is an element of traditional clothing (for example, Cossacks or Caucasian warriors), then it is worn according to the rules, for example, in a sheath on a hanging belt hanging down on the hip.
Shape and properties of a knife handle
No blade, no matter how strong and sharp, will serve its purpose if it is equipped with a poor handle. Due to its shape and properties, balancing, convenience and ease of use, and maneuverability of the tool are achieved.
For example, the straight handle is universal and suitable for both kitchen and fishing knives. The oval shape of the handle is considered more ergonomic and therefore suitable primarily for tourist varieties, as well as for cutlery - that is, it is used in cases where you need to hold the tool in your hand for a long time. The cone-shaped handle provides a secure grip and is therefore considered the safest.
Handle shapes
The design of every knife, from hunting to carpentry tools, is simple - blades and handle. The remaining parts - the flow mechanism and decorations - are not the main ones and are not present in every instrument. When buying, most people pay attention to the quality of the blade, but not everyone thinks about the convenience of the handle. The shape of the handle often indicates the area of use, and it should fit well in the hand:
- Straight - such handles are more common on the cheapest kitchen knives. The brush gets tired after prolonged use and when used for other purposes.
- Oval - this handle shape is considered one of the most convenient and is used for the production of hunting and table knives. It is easier to hold the tool in the palm of your hand for a long time.
- Conical - the handle has a narrowing on the side closest to the blade or edge. The second option is more common - the hand gets tired less and slips off the tool less often.
How to make a handle for a knife: step-by-step instructions
Frequently used knives are prone to handle breakage. Drying out, the appearance of microcracks during operation, uncalculated loads or an accidental impact - all this is not good for the handle.
Don’t rush to throw your sharp-nosed comrade into the trash, because he is ready to serve for many years after restoration. Remove the old worn or damaged handle and create a knife handle with your own hands.
Required tools and materials
Making a new blade or restoring an old one requires certain skills and special tools. Let us describe a method for making a wooden handle. The tools and materials you will need are non-supernatural:
- hacksaw or jigsaw;
- drills and drills;
- grinder;
- needle files;
- chisel and sandpaper;
- a block of reliable wood;
- pencil, paper;
- epoxy glue;
- stain, impregnation or wax.
The purpose of the blade and its shape determine the type of handle installation. Let's consider the mounted option.
Handle installation
Having little experience in making a knife handle with your own hands, you need to make a sketch of the future product. This will help a beginner get his bearings and visualize what to strive for:
Installation diagram.
- Having selected a block of wood for the knife handle that is suitable for the length of the shank, you need to mark it on the outside. All manipulations will take place according to this sketch.
- Having marked the hole, drill the block with a drill to the required depth. Try on the shank, you need to achieve a suitable recess. It shouldn't hang out in it. Needle files will come in handy for this work.
- After making sure that the pieces fit tightly, coat them liberally with glue and glue them together. The parts must be allowed to dry. For reliable gluing, professionals use a special longitudinal press. An amateur just needs to install the structure vertically and press it on top with a heavy object.
- The glue dries for 24 hours, after which time you should start working on the external treatment of the handle. Rough finishing can be done with another knife or jigsaw. Then process it on a grinding machine in accordance with the markings. Finally, sand it down with sandpaper.
The wood must be saturated with a special impregnation or wax. Depends on the purpose of using the blade and the wishes of the master.
What characteristics should a tree have?
Craftsmen rely not only on the decorative qualities of wood, but also on the properties of the material. The following points are considered the main and most important:
- The strength of the raw material is very important. The handle of any knife is subject to constant stress. The wood should not warp or crack during operation;
- The moisture resistance of wood is considered important. The master should pay special attention to this. The knife will inevitably end up in a damp environment.
Handles made from various types of wood.