Metal products made using forging have long become very popular due to their beauty and sophistication. Such decorative elements are quite expensive and it is not always possible to order all the desired decorations for your interior or country house. But, in addition to the hot type of forging, which is needed in order to create metal decorative structures, there is a cold variety. The last option can be implemented independently; for this you will need to build a cold forging machine with your own hands, after which you can begin to implement all your plans and ideas.
DIY hodol forging machine
- 1 Types of machines 1.1 Video on making a machine for cold forging with your own hands.
- 2.1 Video review of a manual machine for forging metal
- 6.1 Video instructions
Devices for bending metal elements “Snail”
To bend workpieces according to certain parameters, auxiliary conductors are used, called “Snail”. They serve as a special template that allows you to reproduce dozens and, if necessary, hundreds of similar parts. The “Snail” machine for cold forging bends parts without additional heating.
The work is based on the deformation of metal according to a certain principle. To bend, you have to put in a lot of effort. Therefore, craftsmen quite often equip “Snail” devices with an electric drive. Geared motors help to develop significant forces with a limited shoulder of force application. The torque in the processing area can reach several tens of kilograms.
If such work is performed only due to the physical strength of the blacksmith, the worker will get tired quite quickly. Its productivity will drop to zero. And with a mechanical assistant, hundreds of workpieces can be produced per shift.
It must be taken into account that bending of workpieces is an intermediate stage in the manufacture of complex structures. They still need to be installed in the right place and welded. Only then will an intermediate result be obtained. Then the product will need to be painted and installed at the place of order. All operations will require not only time, but also the physical strength of the master.
Structurally, the device can be:
- Non-separable, then it will be used to bend parts only to certain lengths. The resulting spiral has certain limitations in use.
- Prefabricated (there are additional fragments to increase the bending time), and the device can be used to bend long parts. Large sized parts will be received.
To work with parts from small profile pipes, some make manual devices. They involve the use of levers to help move the workpiece around the mandrel. The finished parts are removed from the end, slightly loosening the tension.
Most often in such cases I use square bars □8...12. Some craftsmen manually bend profile pipes 15·15 mm with a wall of 1.5 mm. For larger products, a mechanical drive is required.
Manufacturing technology of the “Snail” device
In a simplified way, the technological process of making a “Snail” machine with your own hands can be represented as a series of sequential operations.
- A profile of the product to be manufactured is drawn on a sheet of paper. When drawing, the dimensions of the product are maintained. The drawing is needed only to obtain the profile of the part itself. Attention! When processing, the thickness of the workpiece is taken into account. A gap of at least 3...4 mm is needed, then the product can be removed after bending it in the device.
- For most machines, a central stop is made. It will record the beginning.
- Different craftsmen use their own fixation techniques, so their products can be distinguished by their handwriting.
- A support plate is cut from a steel sheet. The center will be welded to it, as well as the spiral. The thickness of the plate must be at least 3 mm, as significant forces will be applied. The size of the plate in the future will also determine the parameters of the curl.
- Using the spiral drawing, the workpiece is bent from the strip. When bending it, the parameters are controlled. The more accurately this element is manufactured, the easier it will be to manufacture elements for forging products. Attention! If it is necessary to make curls with more than one turn, you need to cut the spiral strip diagonally. Therefore, a strip of much wider width is used. The minimum size corresponds to the height of the profile that is going to be bent on the machine.
- The device is placed on a special rack to make it easier to form finished products. For small parts it is convenient to place them on a vertical stand.
- To make the job easier, weld the handle. It is installed on the reverse side so that it does not interfere with the installation and removal of workpieces.
Cold forging method
The method involves using an important property of metal - plasticity.
With the help of various mandrels and mechanical devices, the rod is bent in different directions, twisted, and forms various three-dimensional shapes. As additional processing, welding and metalworking operations are used to connect parts of workpieces. Entry-level machines are quite simple and are driven by the muscular strength of the master working on them. The minimum set of forging equipment for cold forging of metal includes:
- Bending machines, or Gnutiki, are used to bend workpieces at a given angle and radius.
- Twisters, or torsion bars, are used to twist a workpiece (or group of workpieces) around the longitudinal axis
- Wave - used to create periodic bends in different directions.
- Snail forging machine - used to create spiral-shaped curls at the end of a rod.
Is it possible to master cold forging yourself? Yes, it is enough to have basic skills in metalwork, design and machining.
Many home craftsmen have made a snail - a cold forging machine on their own, without using expensive components.
Pros and features of the process
Cold forging is a popular type of work due to the fact that it can be used to create unusual parts of various shapes and sizes.
Using a cold forging machine, you can make a fence for a flower bed, a decorative lantern, an unusual fence, railings or handles for a bench and other elements.
Another advantage of cold forging is that it is quite easy to make a machine with which you can create such parts with your own hands. This will help you save on the purchase of expensive equipment.
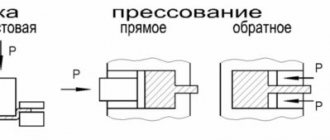
The cold forging process consists of three main elements: bending, pressing and welding of parts. The equipment needed for this process is quite simple and compact, you can do it yourself and it will not take up much space in your workshop or garage.
You can start learning metal processing with cold forging, because... this process is easier and safer because you don't have to deal with high temperatures like other types of welding.
For this process, a ready-made template is usually used - that is, blank parts.
Of course, cold forging has its own subtleties, they mainly consist in the fact that the part is easily damaged or deformed during the process: forged elements often break, and the defect cannot be corrected, so forging must be done very carefully.
However, using a high-quality machine and a drawing of the future part, you can easily learn how to create products with twisted, wavy and other unusual shapes. You can see the options in the photo above.
The process of processing blanks through cold forging occurs in several stages. The first step is to create a template or drawing of the future design.
It is necessary to calculate the dimensions of the product in order, firstly, to purchase the required amount of material, and, secondly, to properly configure the machine.
Different machines provide different possibilities for creating patterns - this depends on the complexity of making the tool.
For example, the simplest do-it-yourself machines can only bend products, while with the help of more complex models you can create patterns, etc.
After the template or drawing is ready, you need to buy the required amount of material in accordance with your calculations. For cold forging you will need iron rods, you can buy them in the store.
Rods for cold forging should not be too thick, otherwise they will be difficult to bend. The next stage is making the parts yourself:
The most important thing here is to set the settings correctly so that during operation of the machine the parts are not damaged or deformed, because it will be impossible to fix the problem.
Lastly, the completed parts are secured to the frame. This happens by welding.
You need to be especially careful when welding with your own hands with thin-walled tubes, because... It’s easy to burn through them, and then the design will become faulty and you’ll have to do it all over again.
You can watch the entire forging process in the video before you start working on your parts.
But before you start cold forging, you, of course, need to make the machine that is necessary for this. The “Snail” machine is the most common apparatus for processing metal products using the cold forging method with your own hands.
You can see all the stages of creating the machine in the video - there is nothing complicated about it, and almost everyone will be able to cope with this task themselves.
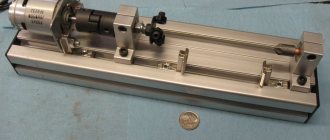
Step-by-step manufacturing of a small-sized manual machine for making curls
A small machine is designed for the production of curls from rolled strip with a width of 20...30 mm. It's easy to make it yourself.
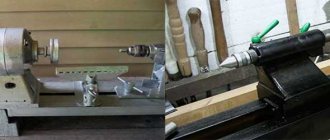
Center
First the center is made. To do this, a small fragment of round timber is sawed off. The workpiece is fixed in a vice and the cutting line is marked. Using a cutting disc and an angle grinder, the workpiece is sawed off.
It has a diameter of 38 mm. The side surface is not further processed.
The center length is 28 mm. A little more is possible, but this is enough to bend a strip 30 mm wide.
A hole Ø 8 mm is drilled on a drilling machine. It is placed eccentrically. This situation is due to the fact that it is necessary to make a clamp for the end of the workpiece.
A profile is drawn, which should be removed using cutting and cleaning discs installed on the grinder. The workpiece is secured in a vice and excess metal is removed.
The flap discs protect the surface so that there is a smooth transition between different surfaces of the clamp.
To make it easier to fix the end of the workpiece in the future, you need to drill a hole. It is placed on the radial surface of the center. A hole is drilled for an M10 thread.
Using a set of taps, the internal thread is cut. A headless screw will be used here. After fixing the workpiece, it will hide inside the metal of the center.
The center is welded to the 4 mm thick base plate. This completes the work of its production.
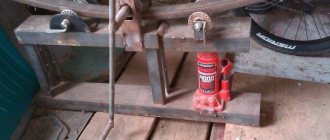
Making a fixture
To make it easier to work with the device, a shaft is welded to the back side of the plate. By rotating it in a special mandrel, the snail will rotate.
The outer surface must be ground so that the welds do not interfere with the free fit of future workpieces.
The future spiral is drawn on the plate. A contour is created where it will be welded later.
A spiral is bent from a strip 4 mm thick. It must correspond to the project.
After checking the spiral against the template, the excess is cut off, and the spiral itself is welded to the plate and to the center.
A 40×40 mm profile pipe with a 3 mm wall is used as a stand. Holes are drilled on it for attaching machine elements. Using support platforms, the prepared parts are fixed.
The handle is visible on the reverse side. It was secured to the shaft using a bearing. The prepared “Snail” can rotate.
A performance check is being carried out. The handle turns the spiral around the center axis.
Making a simple part on a machine
The strip steel workpiece is cut to the required size. This size is usually clarified by drawing the finished product and its component elements.
The free end is placed in the center of the spiral. The workpiece is secured using an internal screw.
The “Snail” rotation is performed. The workpiece is pressed tightly against the guides. This requires some effort to obtain the desired product profile.
By turning the device further, a curl is made. If necessary, insert the other end of the workpiece and make a closed or open curl.
Usually the other end does not stay straight. It is also bent. Therefore, a distinction is made between internal and external reverse curls. Marks are made on the device itself using a marker or chalk. They are used as a guide when making curls with the required parameters.
As you can see from the step-by-step guide, using a simple set of tools, a homemade curl maker is easy to make. How much does it cost? Its price is determined by the cost of the blanks. Often the price is minimal.
Buy or make
It is better to pose the question in a different way. Do you need a large, high-quality batch of reference parts or just need to bend a couple of pipes? It’s still impossible to create a machine with minimal deviations using artisanal methods. And in terms of service life it will lose to the factory one. But for performing periodic (this is the key point) work, a homemade option is quite suitable. If the final parts do not require the highest dimensional accuracy. Otherwise, all that remains is to buy the necessary equipment.
Step-by-step technological process for making a reverse curl on the “Snail” machine
The rolling rollers perform sequential crimping of the pipe. Protruding ribs are formed, and the weld remains inside the layer, offset to the center.
The pipe ends are compressed on parallel eccentric rollers. It becomes like a stripe. In this form it is easier to fix it on the machine.
The shank is formed in a special device. Now the workpieces will be fixed on the machine in one movement.
The workpiece is fixed in the center. There is a groove that secures the shank. It can be seen that the spiral has a uniform descent in height.
After fixing the shank, the electric motor is turned on. Forming of the part begins.
The loop is formed when the workpiece touches a special support element. It is more often called the support shaft. To reduce the force, it is equipped with a bearing. The part rotates freely around the support.
Part of the spiral is formed. But if it is necessary to process for a longer length, a removable element will be installed.
A blank is also formed from the other end. Here the master determines in which direction to bend the part.
To continue work, a removable element of the “Snail” assembly is installed.
Now you can form the bend of large parts.
Even long workpieces are easily bent to specified dimensions. Marks are made on the work items. They are used to guide how much to bend.
On the reverse side, additional bending of the part is performed.
The product is being finalized on both sides.
The finished part has a finished appearance. If necessary, the shanks will be sawed off. Then no one will guess how the workpieces were fixed.
If you need to make a small part, then use another “Snail”. Experienced craftsmen have several of them.
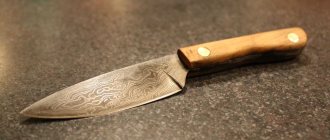
Examples of products with curls
Original canopy over the entrance to the building:
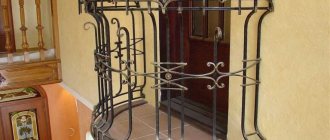
When decorating a French balcony, original curls give an openwork look to the entire product.
On a flight of stairs, the curls look very original.
Using only curls, they make supports for the bench, and also create a grate for the fireplace in the same style.
The hand of an excellent craftsman is visible on the spiral staircase. Not everyone will be able to make such a product.
The gate leaf contains elements made on the “Snail” machine. The heavy product acquired a special lightness.
Light staircase in high-tech style. It can decorate not only a country house. Modern palaces with minimalist design can have an excellent appearance.
The scope for creativity is unlimited. Many blacksmiths are true artists. They decorate the world around them.
Video: “Snail” – do-it-yourself cold forging.
What is produced using the cold forging technique
That is, where we can direct the result of our work. And, as practice shows, there are not so few options. Especially if you live in a private house or have your own dacha.
- All kinds of furniture for your garden. From small and cozy benches to large fences on terraces, consisting of branched forged ornaments. Various barbecues, chairs and more.
- Fencing of all types. Moreover, both for the external type, along the perimeter of the territory, and for the internal purely visual gradation.
- Coverings for gazebos.
- Sports equipment of different types.
- Frame buildings for growing crops.
As you can see, if you have a drawing to make a cold forging machine with your own hands, then it is possible to subsequently acquire a huge number of extremely useful things for the garden and home. As they say, there would be a desire.