> Tool
Almost only from plywood, a small number of screws, and driving nuts, you can make a folding table with your own hands for a hand router and jigsaw. In principle, if you have a circular saw, then you can use this table with a circular saw. If you really fanatically approach this table, then it can also be endowed with the functions of a workbench, then this table-workbench was practically no different in function from the Wolfcraft master cut 1000
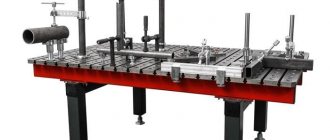
. I don’t argue that a lot of functions is good, but you shouldn’t increase the number of functions at the expense of their quality. Wolfcraft just got caught up in the fact that there are a lot of functions, but most of them are not of particularly high quality. A homemade workbench for a jigsaw has already been described, so this article describes a more universal table in which you can install a router. Plus, this table's legs can be folded. But these seemingly advantages can also be disadvantages: folding legs are usually less stable. The universal angle stop discussed in this table article is less cruel. General view of the table.
Folded table.
Making the table base
First of all, you need to cut out the base of the tabletop and strips to strengthen the tabletop from plywood. We drill holes in the plywood strips to assemble a box on which the tabletop will be installed.
We glue plywood squares into the corners of the box; they will add rigidity to the box.
We cut a hole in the tabletop so that the jigsaw and router installed on the tab can easily fit into it.
We fasten the tabletop to the box with screws.
We cut out the top part of the tabletop and cut a hole in it for tabs with power tools.
Glue the top of the tabletop to the base. Please note that the surface of the tabletop consists of two strips of plywood, and between the strips there is a recess into which the corner stop will be installed.
We drill holes in the tabletop for attaching the rip fence.
We hammer nuts into the holes.
DIY jigsaw table - Metals, equipment, instructions
An economic person who is used to doing housework on his own, rather than looking for specialists on the side, usually has a good workshop. It doesn't matter if it's a large room, a separate room or a garage. For lack of free space, this could be a small nook in the pantry. The main thing is the tools, each of which has a use.
Do-it-yourself desktop jigsaw
One of the rather necessary tools is a jigsaw. This device is especially appreciated:
- residents of private houses;
- those who have a summer cottage;
- lovers of working with wood.
Conventional hand jigsaws, which were in use in the past, have changed significantly over time. A modern desktop jigsaw is convenient and quick to use, not to mention a better result.
There is a category of people who independently do all kinds of work around the house or their summer cottage and can make working tools with their own hands, and not only for reasons of economy.
A handmade electric jigsaw can compete with a factory one in both price and quality. After all, your product will best meet your requirements, having all the necessary functions.
A homemade jigsaw will give you the opportunity to make all kinds of products from plastic, wood and other materials at home, without making much effort and without spending extra time, as would be the case when working with ordinary hand tools.
A tabletop jigsaw has a number of advantages. It is especially convenient because it is stationary - the jigsaw itself is fixed to the work surface. As a result, your hands are free and you can unfold the work material without any problems.
The file relative to the table is fixed in a vertical, stationary position, and the movement of the material can be controlled manually. There is no need to constantly hold the tool in your hands, thereby making the work easier.
To avoid chipping the seams when sawing and get a better result, it is recommended to install the file from bottom to top.
Jigsaw table
Creating a design with a tabletop jigsaw is easy. Initially, there must be a platform for installing the jigsaw and for maneuvering materials when cutting, in other words, a tabletop.
Each master determines its dimensions individually for himself, taking into account the tasks that will be assigned to it. It is necessary to take into account the dimensions of the parts being manufactured so that the table is not initially too small or large.
The height of the machine is also important; ease of use depends on it.
If you still decide to create a homemade desktop jigsaw, prepare the necessary tools:
- screwdriver and caliper;
- screwdriver and electric drill;
- hammer and hacksaw;
- file and grinder;
- chisel;
- taps and guides.
To make a tabletop for an electric jigsaw, you can use a sheet of plywood measuring 50 by 60 cm and 10 - 15 mm thick.
On one side of the sheet, retreating from the edge to 20 cm, a drill is used to drill a hole for a file with a diameter of 20 - 25 mm.
Turning the sheet of plywood over, you need to mark the holes that need to be drilled for further fastening of the jigsaw itself. When marking, make sure that the file fits neatly into the previously prepared hole. Otherwise, by securing the jigsaw slightly to the side of the hole, you will deprive the file of mobility.
Often, factory-made electric jigsaws have holes on the sole for fastening to the surface. If they are not provided initially, you should contact specialists who have the ability to make the necessary holes on a drilling machine. Or do it yourself if you have the necessary equipment.
The jigsaw is attached to the tabletop from below with bolts, where the file is brought up through a hole made in advance.
If you have a workshop with machines or large work surfaces, the resulting structure can be mounted on a workbench or table, not forgetting that part of the plywood sheet with a jigsaw should protrude beyond the edge of the tabletop.
If it is not possible to secure a board with a jigsaw to a workbench, you can turn this plywood sheet into an independent table. Attaching metal legs at the corners.
They are easy to make yourself, if you have steel strips about 0.5 cm wide. When preparing the legs, it is worth considering that their length should be several centimeters longer than the size of the jigsaw.
Otherwise, when installed on the legs, it will rest against the surface.
Complete stationary design
If you plan to often work with a jigsaw, it is better to provide a full-fledged stationary structure. You can make a simple table yourself using a sheet of particle board, two sides and a back wall.
It is better to take chipboard for the tabletop with a thickness of 15 - 20 mm, a board for the back wall 70 - 80 cm wide, two side walls 50 cm wide. The height of the table directly depends on the height of the master who is going to work at it. Standard machines are made 80 cm in height.
You can assemble the frame of the future table using corners or wooden beams. Since working on the machine can be difficult, and the materials for sawing are heavy, it is better to strengthen the walls by attaching wooden jumpers at the top and bottom.
As in the previously discussed case, for the tabletop you can use a plywood sheet 70 by 100 cm and up to 15 mm thick. An electric jigsaw is attached similarly from below. It is worth considering that during operation the saw may vibrate, thereby reducing the quality of work.
To avoid this, you can use a simple device - guide the file between two bearings measuring 10 - 15 mm. The bearings can be secured to the table using a metal strip.
It is recommended to install moving guide rails on the working surface of the table, secured with clamps at the end of the table.
This device greatly facilitates the work of any master. Knowing the principles of operation, it is not difficult to make it yourself.
Working on a device you created yourself will not only give good results, but will also bring moral satisfaction from the work done.
Making table legs
Let's move on to making the support for the future table. We cut out the legs. Please note: the two legs are slightly shorter, this is necessary so that the table can fold properly.
We cut out the jumpers and cut out decorative ovals in them.
Smooth out the edges and corners.
Drill holes for screws in the legs.
We fix the legs.
Screw on the plywood spacer strips.
The same goes for the bottom of the legs.
Now we cut out and screw the longitudinal jumper in place.
To make it easier to remove the jumper during disassembly, we use wing nuts instead of regular nuts.
Table assembled.
Jigsaw attachment
Installing a jigsaw in a table greatly simplifies the process of sawing thin materials, but the cutting accuracy drops when it comes to thick bars. Due to the flexible structure of the saw blade, when it turns in a large mass of wood, the end of the file bends and lags behind the central part. In this case, it will not be possible to obtain an exact 90-degree angle. At least, without a special jigsaw device that holds the file strictly perpendicular to the surface.
To cut material more than 3 cm thick without fear of beveled edges, you just need to adapt a simple device to your mini-machine. The essence of the element’s operation is to fix the end of the file between two freely rotating rollers. To make such a jigsaw device with your own hands, you will need the following materials:
- Bracket for fastening metal structures (as in the photo)
- Pair of bearings: 11mm radius
- Bar: 600x40x40
- Square of thick plywood or chipboard: 100×100
- Mounting bracket: 2 pcs
- Bolts with washers and nuts for fastening to the table and installing the bracket: 5 pcs.
- Screws with washers and nuts for fixing bearings: 2 pcs.
- Wood glue
By instruments:
- Drill with a set of drills for wood and metal
- Saw
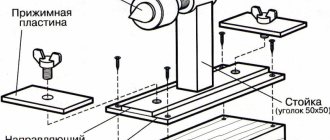
First of all, we will outline the main nuances in the manufacture of the saw stop itself. To do this you need a suitable metal bracket, as in the photo below. You can find one in a specialized fastener store or try your luck at the nearest construction market. If the search is unsuccessful, this element can be replaced with any L-shaped metal plate into which the rib of the saw blade can be rested.
We measure and drill 2 holes for the bearing screws. Their location should be equidistant from each other, at a distance equal to the thickness of the jigsaw file.
Having finished constructing the stop, we move on to assembling and installing the lever. To do this, we make 2 pieces of timber of the required length, and connect them at an angle of 90° using PVA glue and metal corners. We combine the resulting structure with a bearing guide and press it against the side wall of the table with a plate with 4 screws. This fastening technique allows you to change the height of the lever to work with massive materials.
At this point, the guide to assembling a jigsaw table with a file holder is considered complete. The assembled device is a neat and very compact mini-workbench for convenient cutting of materials of various thicknesses. We hope that the author’s product will become a visual example for you or at least give you a couple of ideas for assembling your own table.
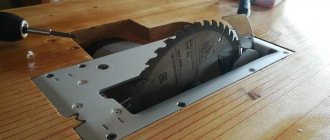
We produce inserts for power tools.
According to the size of the opening in the top sati of the tabletop, you need to cut out rectangles from plywood and round the corners.
Drill and countersink holes for attaching tabs in each of the 4 corners.
We put the tab into the table top and drill holes in the bottom of the table top.
Now we place a router in the center of the tab and mark the holes for the router and the router fasteners.
We make a similar tab for a jigsaw. We drill holes for the jigsaw fasteners and make a cut for the jigsaw file. In order to be able to cut at different angles with a jigsaw, the saw must take into account the inclination of the file.
How the process works
In order to construct a basic table, you must prepare drawings. A correctly drawn or selected diagram will make your work much easier. Use a plywood board up to one cm wide as a work space. If the elements are small, you can take a smaller board. At the same time, step back from the edges up to twenty cm and make several holes. Don't forget to mark the places for fastenings at the bottom of the board.
If the jigsaw stand does not have holes, they must be made in four copies. Using the prepared marks, make holes in the plywood. Please note that steel legs must be attached to the board. In this case, the height of the legs depends on the body of the device itself. In this case, the planks are bent at an angle of 90 degrees. To do this, holes are made for fasteners. The device is secured under the plywood element so that the saw looks out through the hole.
Such an ordinary table can be installed on the same workbench or desktop. At the same time, such a table does not need legs, but is fixed at the edges of the workbench. The device should be outside the table. This product attaches perfectly to wood pieces up to three cm thick.
https://www.youtube.com/watch?v=7Y_GfS0ayso
As you can see, making such a table for a jigsaw is not at all difficult. All you need is a little attention and concentration. And, of course, do not forget to strictly adhere to the scheme.
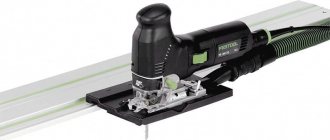
Making an angle stop
First of all, we mark and cut out a protractor from plywood.
We make the bar and stop.
We cut the aluminum profile according to the depth of the workbench.
To attach the protractor to the profile, drill two holes.
We collect the emphasis.
This is what the assembled stop looks like.
Install a limiter.
Useful tips
As mentioned above, you shouldn’t delude yourself - even though it’s no longer easy
but still not a band saw. Here are some tips:
- In a band saw, the saw blade moves in only one direction - from top to bottom, due to which the workpiece is pressed against the table by cutting forces. On a homemade table, it is possible for the workpiece to explode upward, since the pendulum of the jigsaw also makes a return movement. Therefore, the workpiece must be pressed well against the working surface of the table and the most important thing is to feed (move) the workpiece as slowly as possible.
Note! More revs and less feed are much better than the other way around.
- When working with a jigsaw (with or without a table), it is useful to remember that the stroke of a jigsaw is usually about 15–20 mm; you need to read this value for your tool in the instructions or determine it yourself. Material thicker than this value should be sawed only with teeth set. Otherwise, the chips will not be completely removed, which can lead to overheating and jamming of the blade.
- You can lay a sheet of thick rubber between the working surface of the table and the sole of the jigsaw, after making a cut for the file. Assemble the table and let the blade run idle for a while so that the blade “gets used” to the slot in the rubber. This will protect the moving components of the inverted jigsaw from a large number of sawdust for which it is not designed, because in normal operation the tool designers clearly did not count on such a quantity.
- Safety glasses are required. It is also necessary to organize the device to be turned on via a pedal or to provide another way to instantly turn off the instrument. But this is a topic for another article.
- Don’t be afraid to think creatively and improve your tools, because any idea is just a starting point for creativity, and there are no universal solutions.
As mentioned above, you shouldn’t delude yourself - although this is no longer just a jigsaw, it’s still not a band saw. Here are some tips:
- In a band saw, the saw blade moves in only one direction - from top to bottom, due to which the workpiece is pressed against the table by cutting forces. On a homemade table, it is possible for the workpiece to explode upward, since the pendulum of the jigsaw also makes a return movement. Therefore, the workpiece must be pressed well against the working surface of the table and the most important thing is to feed (move) the workpiece as slowly as possible.
- When working with a jigsaw (with or without a table), it is useful to remember that the stroke of a jigsaw is usually about 15–20 mm; you need to read this value for your tool in the instructions or determine it yourself. Material thicker than this value should be sawed only with teeth set. Otherwise, the chips will not be completely removed, which can lead to overheating and jamming of the blade.
- You can lay a sheet of thick rubber between the working surface of the table and the sole of the jigsaw, after making a cut for the file. Assemble the table and let the blade run idle for a while so that the blade “gets used” to the slot in the rubber. This will protect the moving components of the inverted jigsaw from a large number of sawdust for which it is not designed, because in normal operation the tool designers clearly did not count on such a quantity.
- Safety glasses are required. It is also necessary to organize the device to be turned on via a pedal or to provide another way to instantly turn off the instrument. But this is a topic for another article.
- Don’t be afraid to think creatively and improve your tools, because any idea is just a starting point for creativity, and there are no universal solutions.
Making a rip fence
We cut out strips of plywood, mark the grooves through which the stop will be pressed against the tabletop.
We cut out the grooves.
We make a side strip for the stop, a rectangle to reinforce the stop, and drill holes in them for assembly.
We make boxes for connecting a vacuum cleaner.
We assemble the two stop strips together.
Mark the holes in the stop for the cutter.
We glue the reinforcing rectangles and the box for connecting the vacuum cleaner to the parallel stop.
Using nuts pressed into plastic handles, scraps of pins and glue are used to assemble clamps for the stop.
Furniture for working with thin saw blades
The jigsaw table in this case must have a saw tension system. A homemade device will help with this.
Tension is provided by a spring-loaded rocker arm. A bracket with a transverse pin is installed on the tabletop.
One end of the spring is secured to a pin, and the other end is secured to an adjusting screw. A slot is made on the rocker arm into which the end of the file is inserted. Using clamping plates and a screw with a nut, the saw is secured to the rocker arm.
For ease of use, the table can be equipped with a foot switch. The simplest device is based on attaching a hook to the jigsaw button, which is connected to a homemade pedal. This pedal is made of two spring-loaded metal strips. The movement of one strip relative to the other must be at least 10 mm.
A more complex foot switch design is based on the use of a sewing machine switch. In this case, the jigsaw button is bypassed, and electrical power is supplied through a foot switch.
Figure 4. Diagram of a tabletop jigsaw.
Still, the jigsaw file is not well suited for cutting complex shapes from plywood. A thin file is ideal for this. But it can also be installed on a hand-held power tool by making an original device. It is shown in Figure No. 4.
Currently reading: Disassembled jigsaw
The hand jigsaw is still attached to the tabletop, but the thin blade must be taut, since it is not enough to simply attach it to the pendulum. To tension the file, a rocker arm is made from a block. The tension of the web is provided by a spring. Its lower loop is hung on a transverse pin. The upper loop is inserted into the adjusting screw, which changes the tension force of the damper. The wooden parts of a homemade machine are made from hardwood.
The jigsaw does not provide the ability to attach a thin blade. To do this, you can adapt a piece of an old file by drilling a hole in it and completing it with a clamping plate and a screw with a nut. A vertical slot is made in the rocker arm into which another steel plate is inserted.