As you know, in the production of furniture a large number of components and connecting parts are used. Today, the main part of the furniture is made of chipboard and fiberboard, requiring connections using screws and self-tapping screws. Such connections, as is known, require a large number of holes, matched and positioned relative to each other with high precision. Doing this manually is problematic and time-consuming, so manually making holes has been replaced by special drilling and filler machines that make a large number of them with maximum precision.
In furniture production, the work of a drilling and additive machine occurs according to “additive cards” - special drawings indicating the number and placement of drilling points, while modern machines independently take measurements and create holes.
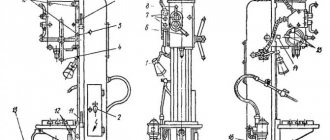
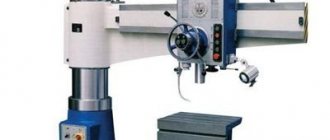
Drilling attachment machine design
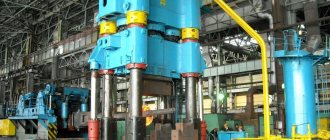
In its design, the drilling and additive machine is in many ways reminiscent of its distant relative - a multi-spindle machine for drilling frames. This device is used by beekeepers to make frames for honeycombs. Its design allows for a maximum of 5 holes. Machines for furniture production have the ability to simultaneously drill 21 and even 27 holes.
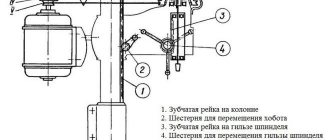
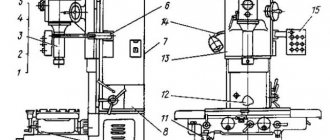
The basis of the drilling and additive machine is a massive bed. A drilling head and a clamping device are installed on it. In the classic version, pneumatic cylinders are used to fix the workpiece on the work table, but the drilling head can have several design options - it can be stationary, multi-profile, located vertically or horizontally. In the most advanced devices, the position of the drilling head can change, even be installed at an angle.
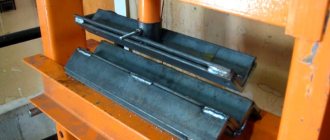
The most important element of the device is the drilling head. Essentially, this is a rail with holes, inside of which collets are mounted on bearings into which drills, countersinks or reamers are inserted. On the reverse side, the collets have a drive - a belt, chain or gear drive. This structure is driven by an electric motor.
To correctly orient the workpiece relative to the drilling head, a work table with a coordinate grid or rulers is used to set templates. To ensure that when manufacturing several similar products there are no deviations from the sample, stops are provided in the design.
The control unit allows you to select the spindle rotation speed; in most industrial designs, the speed can be selected in the range from 1 to 2700 rpm.
The simplest models have mechanical adjustment of the drilling height and depth, while devices with a hydraulic system have an electronic adjustment system.
Purpose
In the woodworking industry, with the beginning of conveyor furniture production, not only new materials, but also equipment for their processing began to be used. One of these types of equipment was the drilling and filler machine. Its main purpose is to drill holes in slab materials for installing fasteners. When using hand tools, it would never be possible to drill an exact size hole in a chipboard or MDF board for tenons, confirmation, hinges or handles. In addition to high precision, the drilling and filler machine made it possible to unify the installation dimensions of individual elements and increase productivity.
The production of cabinet furniture from panel materials today is impossible without the use of this type of equipment.
Sequential stages and sizes for additive
The additive scheme consists of several successive stages. First you need to do some preparation. The working surface must be flat and free of dirt. You can place a rubber sheet, stretch film, or polyethylene foam under the door. To prevent the facade from changing position, you can use clamps. Before applying the additive, you should take care of safety precautions
It is important to wear protective gloves and goggles
Marking
Next comes the marking. This is an important event that determines the accuracy of installation and functionality of the door. You can take a ready-made drawing of the door for the hinges or independently calculate the position of the fittings.
If you calculate the dimensions for the additive yourself, you need to rely on several rules. So you need to retreat 1.1-1.2 cm from the edge. This is an important accuracy criterion that must be observed. The first and last fasteners should be located at a distance of 7-15 cm from the sides of the doors. The number of hinges is determined by the dimensions of the facade.
Installation
After marking is completed, they proceed to drilling. It is prohibited to use high speeds when performing manipulations. The optimal amount is 1500 rpm. Otherwise, the material will begin to burn and the cutter will become dull. If a hand drill is used, the movements should be smooth and of small amplitude. This will help improve sampling efficiency.
The depth of the hole can only be controlled manually. For this reason, you need to periodically stop the drilling process to measure the depth. The optimal depth is on average 1.2 cm.
Then they move on to the simplest stage - fixing the loops. The fastener is inserted into the prepared hole. Then the bowl is leveled using a square. Places for fastening are marked with a marker. Fixation is carried out with two self-tapping screws. It is necessary to perform core punching first.
If you have experience with additives, you can screw on the fasteners without preliminary marking. An experienced craftsman can use a square for work.
This primitive, simple additive can be done with your own hands in a quiet home environment. Mechanized work requires special equipment and skills to work with professional tools. You can make a special machine for additives yourself or purchase a cheap vertical type option. Working with such equipment will reduce time and labor costs. It will be possible to perform the additive faster and better.
Types of filler machines
There are several classifications of drilling and filler machines. Depending on the number of spindles on the working head, they can be classified into:
- With one spindle;
- Multi-spindle.
If we consider how the drilling head performs the work, the equipment can be divided into:
- Manual - the movement of the head is carried out using the movements of the worker;
- Electric – the work is performed by an electric motor;
- Hydraulic – movement is carried out by a hydraulic cylinder;
- Pneumatic - movement is carried out by a pneumatic drive.
If we take into account how the workpiece is processed, today there are 3 main types of industrial filler machines:
- Positioning devices;
- Passage;
- Equipment with numerical program control.
The simplest are pass-through machines. They have a simple design and are capable of performing one or two operations. When working with this type of equipment, the operator plays a big role; it is he who sets it up and ensures that the workpiece is laid evenly on the work table. The drill head then drills the holes.
Despite the high labor intensity of working on such equipment, they are very popular because they do not require large costs and special knowledge of personnel, but at the same time have high productivity.
The through-hole drill and filler machine provides higher productivity because it uses conveyor elements. The large dimensions of the work table allow you to work with large workpieces. Before drilling, the workpiece is fixed with hydraulic or pneumatic clamps and only after that the holes are drilled. In this case, the workpieces move along a roller belt, which allows increasing the flow of processed parts.
A CNC additive machine allows for maximum speed and quality of parts processing. The electronic control unit ensures the accuracy of marking and drilling, while the spindle can change position depending on the drilling point. Thanks to the use of computer technology, reconfiguring the device takes only a few seconds, and the precision of processing allows you to assemble furniture of the highest quality. In addition to high operating speed, a CNC drilling and adding machine equipped with several drilling heads can simultaneously carry out vertical and end drilling, make holes of different diameters and purposes.
Advantages and disadvantages
Homemade furniture machines, like any other tools, have advantages and disadvantages. The benefits include:
- ease of use;
- simple design does not require special skills when working;
- obtaining holes without defects;
- increase in productivity;
- relatively low cost of production;
- The equipment does not require much space to operate; a small area of the desktop is sufficient.
Drilling on a machine
Despite its positive aspects, homemade equipment has disadvantages:
- the ability to use only one type of drill;
- low speed during tool operation;
- there is no possibility of multifunctionality; processing requires the use of additional equipment;
- insufficiently automated device;
- You cannot switch modes.
The disadvantages of drilling devices are not noticeable when making furniture at home, since in this case it is not necessary to produce large volumes. The equipment ensures smooth holes, resulting in high-quality and durable furniture.
Making a furniture unit with your own hands is not difficult; you do not need to have special knowledge and skills. Everything is done from improvised means. The result is drilling equipment, which is indispensable when creating structures for your home yourself.
How to choose the right drilling and filler machine
The main criterion for choosing equipment is economic feasibility. If we are talking about small-scale production of cabinet furniture, then it is better to use a regular electric drill with several templates. For small production, one multi-spindle device with a head rotation function will be sufficient. For a small furniture factory, the assortment of which will include cabinet furniture, sofas, beds and office furniture, it is better to immediately pay attention to program-controlled equipment.
How to make it yourself
There are a lot of options for making homemade drilling devices for working with slab material. Drawings of many such devices are freely available online. You can also get ideas on how to make a homemade additive machine for furniture from advertising videos posted by manufacturers on the pages of their websites.
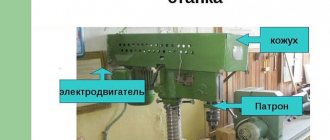
But today the most popular are devices assembled on the basis of electric drilling machines. Hand drills are essentially a ready-made drilling and attachment machine, although it has only one loop. It’s another matter if you assemble two identical electric drills into a single unit and install them on movable slides, so that the drilling movement is simultaneous.
The design can provide for both vertical and horizontal arrangement of working chucks. True, with a vertical arrangement it will be quite difficult to make a structure so that the drills fall strictly vertically. With horizontal feeding, this can be done much easier by using drawer guides in the design.
An option for constructing a device for drilling for a hinge may be to use industrially manufactured stands for a hand drill. In this case, all that remains is to take two racks and fix them at the required distance, providing a mechanism for synchronized lowering and raising of the heads. And in order not to drill through the workpiece, you can use a regular stop, which is included with the hand drill.
Features of manufacturing a frame facade
We do the nuances of making a high-quality furniture jig with our own hands. To make a frame facade, a series of sequential actions are performed.
- Vertical and horizontal slats are sawed with some margin, so that later on an angle machine you can make cuts at an angle of 45°.
- When cutting out the final size, the exact size of the frame is maintained.
- Using a manual filler machine, holes are prepared for the final assembly of the facade.
- The chipboard core is cut out on a format-cutting machine (glass is cut to size on a glass cutting table and a reinforcing film is glued onto it).
- The work of assembling the facade is carried out on the table. To ensure that right angles are assembled, a jig is made. In it, the guides converge at an angle of 90°.
- Connect one pair of profiles, check the angle. It should be exactly 90°. Before assembly, the dowels are lubricated with polymer glue.
- Connect the second pair of profiles.
- Glue is applied to the edges of the filler, and then the filler is inserted into the first assembled corner.
- A second corner is mounted on the reverse side, and dowels coated with glue are first installed in it.
- With light blows of the mallet, the entire frame is finally assembled.
- The finished façade is put out to dry. Typically, polymer adhesives are completely polymerized within 24 hours.
The corner from the profile is assembled onto two dowels, as in the photo below. For them you need to drill two holes on the mating surfaces. For this you need an additive machine.
Operating rules
First of all, when starting work, you must remember that a drilling and additive machine is a highly dangerous item, so it is imperative to adhere to all safety rules and regulations when working on this equipment. You can only operate a drilling and additive machine wearing special glasses or a protective mask.
The setup is carried out with the engine turned off and the power turned off. For customization, blank templates that are made by hand are used. On multi-spindle devices, it is necessary to correctly select drills with right and left feed. To orient the direction of movement of the spindle, patterns are applied to the head.
Drills, countersinks, and reamers are installed in collets taking into account the drilling depth. After installing all the necessary cutting tools, a control measurement and test drilling are done.