There are situations when the purchase of mounted snow removal equipment for some reason impossible or unprofitable.
Therefore, you have to make it yourself .
Businesses have much more power than ordinary people.
Therefore, the equipment can do more:
- powerful;
- complex.
We will tell you:
- how to independently make various options for mounted snow removal equipment;
- about all the pros and cons of using such devices.
Do-it-yourself Chevrolet Niva blade drawings
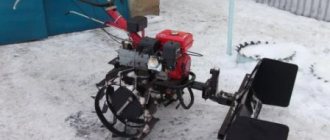
In winter, the owner of a large farmstead, a farmer, or someone simply living on a farm has to deal with removing large amounts of snow and clearing the road in front of the house. To make this labor-intensive work easier and many times faster, it is enough to equip your car with a special attachment. It can be installed on various modifications of the Niva (21213, 21214, 2131), and can also be adapted for cars of other brands with a 4x4 wheel arrangement - GAZ-67 (69), UAZ-469, LUAZ-969 M. In the proposed version The design is based on the Niva-21214 vehicle.
Ears for attaching the blade to the car
This is the eye for attaching the blade to the Niva in the end; I was able to bend it, so I left it as is.
- (1) - this is the factory eye
- (2) and (3) - I drilled for the bolt
- (4) - welded additional eye
- (5) - the bolt that holds the eyes is screwed into the Niva spar
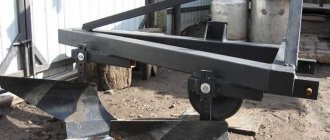
After fitting the shovel to the machine, I added a few more jibs from a tube with a diameter of 20 mm, you can make them from the same profile pipe, I had the tube in stock. Blue arrows indicate the jibs, red arrows indicate where they are welded. It should be noted that I tried to attach them to the spring, because it is a shock absorber and shock absorber. Only the farthest one in the photo is attached to the rod itself, there was no possibility of attaching it to a spring, and the load is maximum there. without it, the right corner would have been turned over by a snowdrift.
Features of manufacturing a snow plow
Let's consider another option for making a shovel, which is not too different from the previous one. For the blade itself you will need a 3 mm steel sheet, and for the racks that provide additional rigidity, you need to take thicker steel. It is necessary to make holes in the racks for attaching the shovel to the rods. It is very important to ensure vertical placement of homemade attachments in relation to the front of the power unit.
- shovel;
- rods;
- bracket for attaching the rods to the walk-behind tractor;
- craving.
Scheme of a walk-behind tractor with a blade
Snow plow options
Clearing snow and mud is a labor-intensive job, so to make it easier, equipment is widely used: an SUV, an ATV, a walk-behind tractor. There are different options for ready-made snow plow designs on the attachment market. To minimize the cost of purchasing a tool, it is easy to make it yourself.
Read also: How to make a twisted wire from a straight one
Snow blowers are divided into three groups.
For SUV
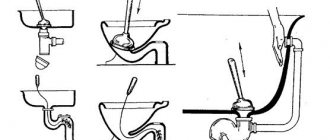
The device can be installed both on a domestic car and on an all-wheel drive foreign car. Convenient when the blade is disassembled. In this case, it can be easily dismantled and placed in the luggage compartment of the car. The snow blower is equipped with an electric winch, which provides control of the tool directly from the SUV's cabin. Depending on the amount and density of precipitation, the shovel is positioned at a certain angle.
Snow blade for "Niva"
For ATVs
The choice of device design for mounting on the frame depends on the vehicle model.
There are the following types of installation equipment:
Description
A plow blade for a walk-behind tractor is an attachment that is widely used at any time of the year by owners of personal plots. Review, application, use - we will talk about all this in this article.
Using a blade you can perform the following work:
- clear snow along roads, sidewalks, in the yard and adjacent areas;
- level soils, screenings, sand;
- rake - shovel away garbage;
- if the blade is made in the form of a bucket, perform loading operations.
We make the dump ourselves
Making a snow plow with your own hands is not difficult if you have a welding machine, a drill, a tape measure and a grinder on your farm.
Here is one simple version of this design for ATV owners. You won’t have to search for a suitable metal for a long time, since a regular 200-liter steel barrel is quite suitable for this. By carefully cutting it into 3 parts, we will get curved segments for a shovel. Weld two of them along the contour, and the resulting 3 mm thickness of the metal will be quite enough for rigidity.
The lower part of the blade needs to be reinforced with a knife. To do this, you will need a steel strip 5 mm thick and a length equal to the width of the scraper. You need to pre-drill holes in the knife with a diameter of 5-6 mm and a pitch of 10-12 cm to attach the safety rubber strip.
The most complex and critical parts of the entire structure are the mounting frame and subframe, which connect the blade to the ATV. Therefore, it is better to buy them so as not to have to laboriously take pictures of installation dimensions under the car. It is much easier to adapt a homemade snow plow to factory fasteners and this work can be done “on site”.
For a walk-behind tractor, the fastener design is much simpler and can easily be made in a home workshop. To do this, a 40x40 mm square pipe needs to be welded to a dump welded from two halves of a barrel for reinforcement. Then a thick steel semicircle with three holes is welded to the pipe, which are necessary to fix the angle of rotation of the shovel.
After this, an L-shaped holder is welded from the same pipe, one side of which is inserted into the mount on the blade, and the other is attached to the walk-behind tractor frame with bolts. To regulate the lifting height of the shovel, two bolts A and B are used. They are screwed into holes drilled in a piece of square pipe welded to the coupling device and placed on an L-shaped holder.
How to make your own dump
To create your own front plow for snow removal, you will need :
- steel barrel (200 liters);
- steel corner with a shelf size of 10–15 millimeters;
- steel corner or square measuring 30 millimeters;
- corner or square with a cross section of 50 millimeters;
- 2 any hinges for a breaking frame;
- 3 small double-sided hydraulic cylinders;
- 2-3 any hinges (you can use garage hinges by drilling holes in them and inserting grease fittings);
- fitting;
- hoses;
- control panel and (if necessary) hydraulic pump;
- conveyor belt 20 millimeters thick;
- bolts and nuts of different sizes;
- riveter and rivets.
Place the barrel and measure its circumference.
Divide the resulting value by 3, this will be the height of the blade.
Mark the barrel with three vertical lines at equal distances.
Cut the barrel into three equal parts.
Then cut off the cover from each element on both sides and use pliers to bend all the edges at a distance of 3-5 mm to make them safe.
From a corner of 10–15 millimeters make amplifiers whose shape corresponds to the trimmings of the barrel. To do this, cut one of the sides of the corner in 1 centimeter increments. Carefully bend the cut corner so that it takes the shape of a barrel. Then weld the cuts.
If the width of one barrel trim is not enough for a dump, then make it from several. In this case, adjacent sheets should overlap at a distance of 20–25 cm so that they can be strengthened with reinforcements.
Place the amplifiers like this:
- 2 at the edges;
- the rest are at a distance of 20–25 centimeters from each other.
Connect the amplifiers to the barrel scraps with rivets, the pitch between the rivets is 3–5 centimeters. Cut a piece of conveyor belt 5 centimeters wide and use bolts to attach it to the bottom of the blade.
Do not use rivets because they will not hold the tape in place effectively.
At a distance of 5 centimeters from the bottom of the blade, weld a 50 mm square or corner along the entire structure and cut off another similar corner. This will be a rotary joint that changes the angle of the blade.
Install hinges between them.
If you use door hinges with grease fittings , then place them so that they need to be pulled in different directions to separate them.
Weld the same corner or square on top.
Then weld an extension to it - a piece of the same corner 30–40 centimeters long, installed perpendicularly.
Weld braces that will strengthen the extension cord. Then install a hydraulic cylinder between the lower and upper (located after the hinges) corner. It will adjust the tilt of the device .
Make a system for lifting and turning the device in different directions using:
- swivel joints;
- corners of different sizes;
- hydraulic cylinders.
Attach the entire structure to the car frame. Do not attach the blade to the bumper , a strong load will tear it off and damage your creation.
Connect to hydraulic cylinders:
- fittings;
- hoses.
Then route the hoses into the cabin and install the control panel there.
It can be removed from any decommissioned equipment equipped with various hydraulic devices.
Connect the hydraulics to the truck's hydraulic pump or connect a separate hydraulic pump to the PTO.
It is not advisable to connect the hydraulic pump directly to the engine using a belt or chain drive . In this case, you will not be able to disable it if necessary.
Make sure that:
- the entire homemade structure is assembled correctly ;
- is mixed up or loose anywhere .
Check the condition of the entire hydraulic system, first when switched off, then when:
- running engine;
- connected hydraulic pump.
If there are no leaks anywhere, check the operation of the control panel.
After making sure that everything is working correctly, test the snow removal unit in real conditions by clearing some area of snow.
SNOW PLOW WITH YOUR HANDS - PHOTO
Photo 1. General view of the snow plow and the method of attaching it to the car
Photo 2. The blade is assembled from simple and affordable materials
Photo 3. Metal ears with bolts for attaching the bracket
Photo 4. Metal profile and towbar for making a bracket for attaching a snow plow to a car’s tow bar
Photos 5 and 6. Attaching the bracket
Classification of blades for walk-behind tractors
No matter how simple this attachment may seem at first glance, there is variety here too.
Awnings are different:
- by shape (design);
- according to the method of attachment to the walk-behind tractor;
- by the location of the working body relative to the walk-behind tractor;
- according to the shape of the coupling;
- according to the type of lift.
Video of the blade operation
Well, a video of working with the blade, as you can see, the blade shovels quite a lot of snow, and is limited only by the Niva’s cross-country ability, so far the tires are ordinary, studded road tires, the Niva is not very passable on it, but this is enough to clear snow from the road.
Further operation of the dump on Niva
In general, it performs its functions 100%, the height of the shovel itself is satisfactory , it is not necessary to lower it, because it will throw snow onto the car, the angle from the car is also normal, but you can increase it a little, they also installed an additional PTF on the roof, because the blade blocks the headlights, and they become useless.
They cost 100 watt halogens, there is a separate topic about how they shine, they shine over the blade onto the road, one closer, the other further away.
What not to do
Now about why the blade had to be repaired, this nuance should be taken into account by absolutely everyone who wants to make a blade for the Niva with their own hands, the fact is that with short rods of the blade to the Niva, you risk getting this kind of embarrassment
The car is fine, the skirt is a little wrinkled. but the blade got it and broke off the long rod. Acceleration was in third gear. on a reduction gear, I wanted to break through a packed pile of snow, in general I suffered from garbage. It turned out this way because the shorter rod (the right one) was slightly shortened after a minor repair (on the same day).
The blade successfully served faithfully for several months, then during an impact this left link was broken off and welded literally 5 centimeters closer to the car, resulting in a short arm, and as a result, the blade went under the car.
In the photo above this is the minimum shoulder, its size is 60 cm, but it is better to make it larger to be sure that the blade will not turn down under the car in case of a strong impact.
Factory models
Any company that manufactures walk-behind tractors can also offer a range of snow plows. There are popular models on sale from such manufacturers as Centaur, Neva, Zirka, etc. The only big advantage of a factory design over a home-made one is that they are made of high-quality steel and are more difficult to damage. Moreover, such models last longer than homemade ones. But, on the other hand, they cost a lot.
There are a lot of options for factory dumps, so you should check before purchasing whether this model is suitable for your existing walk-behind tractor. At the factory, snow plows are not equipped with spring mechanisms due to the low speed of movement. If the speed of the walk-behind tractor is low, then the protective mechanisms for contact with the ground lose their meaning. Moreover, the factory models do not have mechanisms for lifting and turning the unit. In this regard, the price of the factory design is reduced.
For higher performance, it is recommended to replace conventional rubber wheels with factory or homemade lugs. This will speed up the work process.
Prices for snow blowers may vary. Basically, the cost of these varies from 4 thousand to 6 thousand rubles.
Tools and materials
You can install a snow blade on the frame of any motorized cultivator that has a power of more than 4 hp. and weight not less than 50 kg. The heavier the unit, the better it will cope with the consequences of a snow storm.
It is best to equip the domestic Neva walk-behind tractor with a shovel. This equipment has high performance characteristics and is adapted to work in the most severe weather conditions with maximum load.
A shovel for a walk-behind tractor is made with your own hands using the following devices:
- roulette;
- welding machine;
- grinder with discs for cutting and grinding metal;
- electric drill;
- set of wrenches;
- screwdriver;
- paint, paint brush.
After preparing the tool for work, it is necessary to decide on the material from which the shovel blade for the Neva walk-behind tractor will be made. You can make a shovel from various metal products that have a sufficient margin of safety.
The blade for the Neva walk-behind tractor can be assembled from the following materials:
is impossible for some reason.
or unprofitable
.
Therefore, you have to make it yourself
.
Businesses have much more power than ordinary people.
Therefore, the equipment can do more:
- powerful;
- complex.
We will tell you:
- how to independently make
various options for mounted snow removal equipment; - about all the pros and cons of using
such devices.
Using homemade mounted snow removal equipment has not only numerous advantages
, but also extremely serious disadvantages
.
The main advantage
such snow blowers is a serious reduction in costs associated with:
- purchase;
- transportation.
After all, most of the details
Can:
- remove from decommissioned equipment;
- You can buy it for pennies at a scrap metal collection point.
Another plus
The point is that you can make non-standard equipment that is ideal for certain specific tasks.
The main disadvantage
self-production of attachments are problems with the insurance company and the traffic police that arise after driving on public roads.
Indeed, in most cases, employees of these structures perceive the installation of any attachments as changes to the design
.
Therefore, after installing the unit, the machine must undergo technical inspection
, on which they will carefully check:
- compliance of
new equipment
design
; - the condition
the car
itself .
Often the decisive factor
that leads to a ban on the operation of a municipal vehicle with homemade attachments is the lack of various documents and certificates for the equipment.
Therefore, before installing homemade attachments, it is necessary to probe the soil at the traffic police
.
After all, the inspector can not only prohibit, but also suggest the right organization
, where all documents will be completed correctly.
Making a rotary auger snow blower for a walk-behind tractor with your own hands
To independently manufacture a mounted homemade auger snow blower (auger rotor), you need to think about the placement of the main elements of the equipment, as well as link the dimensions to the existing walk-behind tractor. Therefore, first of all, a layout diagram of the device is created.
Necessary materials
To make an auger-rotary snow blower, you need to purchase:
- roofing galvanized sheet, it will be used for the manufacture of auger and rotor housings, as well as a snow ejection pipe with a deflector;
- an equal-field corner of 40 or 50 mm, it will be used to make the frame;
- a sheet of steel 2 mm thick, from which the auger and rotor blades will be cut;
- a profile pipe will be needed to make brackets;
- bearing housings and the bearings themselves for installing the shaft;
- a pipe or circle with an outer diameter of 30 millimeters or more will be used as shafts;
- pulleys, sprockets and other transmission elements;
- hardware for creating detachable connections.
Making a homemade auger-rotary snow blower
An approximate procedure for manufacturing a mounted auger rotor for snow removal:
- Parts of the auger body are cut from roofing sheet. They are bent according to a suitable cylinder. The frame of the auger body is welded from a rolled angle or profile pipe. The body and frame are connected into a single unit.
- Screw parts. To do this, segments are cut out of sheet steel, and then blades are formed from them. The auger shaft needs to be adjusted to accommodate the installation of bearings, so on a lathe the surface is machined to fit the fitting size of the supports, as well as transmission elements. The blades are welded to the shaft, forming an auger converging towards the center.
- The bearing housings and the bearings themselves are installed. The auger element of the snow blower is being assembled.
- The housing of the snow removal rotor is cut out of roofing sheet metal. Using suitable items, the final shaping of the rotor housing is carried out.
- Rotor parts. Rotor blades are cut from sheet steel. The rotor shaft is adjusted to accommodate the installation of bearings and transmission elements. The blades are welded to the rotor shaft.
- Balancing is necessary, since the rotor rotates at a fairly high speed.
- The frame of the rotor housing is welded from a corner or profile pipe. The bearing housings and the bearings themselves are installed. Assembly: the rotor assembly is assembled.
- A homemade frame is made on which the rotor and auger assembly will be placed.
- The working part of the machine is being assembled. Transmission elements are installed.
- Brackets are adjusted to connect the working tool to the walk-behind tractor.
- Bench tests are carried out, based on the results of which defects and shortcomings are determined. After eliminating the shortcomings, they begin testing the auger-rotor type snowblower under operating conditions.
All that remains is to use the manufactured rotary snow blower on the walk-behind tractor for its intended purpose.
Category: Attachments
Self-production
Find ready-made drawings
and the description for making one or another homemade mounted snow blower for a specific machine with your own hands is very difficult. After all, the unit is installed in some special way for each type of vehicle.
The mounting methods and location also differ.
mounting holes.
Therefore, in most cases you have to:
- take drawings and methods for manufacturing a device for one machine and adapt it to another;
- draw up a drawing yourself, using a unit installed on another car as a sample.
In addition, the parts for which the drawing is drawn up are not always available.
Therefore you have to:
- draw up a new drawing;
- do it the old way, making changes as you go.
are three main conditions to know
for self-production of good mounted snow removal devices are:
- availability of skilled and experienced craftsmen
; - access to the necessary equipment
; - good lawyers
who can obtain the necessary documents and legalize the units.
If you decide to make some kind of snow removal equipment yourself, then make sure that all three conditions are met.
Can be made
required equipment:
- from a not very suitable drawing;
- no drawing at all;
- looking at the finished unit.
such specialists
can cope with this
, How:
- welders;
- turners;
- locksmiths;
- hydraulics.
Also make sure they have all the necessary equipment
.
Then talk to:
- traffic police officers;
- lawyers or companies involved in automotive technical expertise and legalization of various changes made to the design of the vehicle.
Perhaps, after calculating all the costs, including payments to these companies or lawyers, you will decide that you will purchase a ready-made unit
with all permissions:
- easier;
- cheaper.
SUV plow
If you own an SUV, then there is no need to buy a self-propelled snow blower to keep the area in perfect order. Snow plow devices can be installed on a domestic Niva, UAZ or all-wheel drive foreign car without any problems and by one person.
It is especially convenient that they have a collapsible design, so they can be easily dismantled and placed in the luggage compartment of a car.
The snow plow is controlled directly from the SUV's cabin using a special electric winch that comes with it. The angle of rotation of the shovel is set in three different positions, which allows you to fine-tune it to remove snow of different thicknesses and densities.
Prices for simple snow plows for SUVs range from 25 to 35 thousand rubles. Their shovel width ranges from 1.25 to 1.8 meters. Imported units designed for powerful frame-structure jeeps are significantly more expensive (from 60,000 to 250,000 rubles)
First fitting on the car
We adjust the blade directly in the field, there are no jibs yet (I found several photos of the manufacturing process), but the fastenings are already in place. You also need to maintain the parallelism of the blade relative to the hood so that the shovel does not become askew.
The blade should be on the same level as the Niva, in general it should be on the same level as the wheels (something like this)
Now the blade is attached to the Niva using the standard eyes, they just need to be modified a little, or rather, drill a hole for the bolts that will hold the entire structure through the silent block, which stands in the jet thrust. The blue arrow indicates the hole. I took them off for this purpose and painted them from a can for the occasion.
The Niva's eyes initially look like this, and are attached to one bolt, see photo (not mine), someone replaces them with a channel to secure the blade on it, I just welded another ear , the welding place is shown by blue arrows, red lines a square of metal (you can see it in the photo above), then drilled a through hole in them to insert a bolt.
Scraper on wheels
From a friend I saw a convenient and practical scraper for cleaning the yard. I really liked the idea and decided to make the same device for myself.
1
. I welded a stand perpendicularly to the wheel axle from an old garden cart (see photo item 1) from a profile pipe with a cross-section of 60×40 mm and a length of 40 cm and reinforced the connection with triangular gussets (2)
2
. At the end of the crossbar (stand), I drilled two holes d 12mm at the same level at a distance of 50mm from each other. In the first hole, a blade holder (3) made of 2 mm thick sheet metal was secured with a bolt. On the arced edge of the latter, I drilled several holes d 12 mm so that each coincides with the second hole on the crossbar when the holder is rotated in different directions.
3
. At the level of the axis, I welded a unit (4) to the base for attaching the handle, which has an adjustable angle of inclination.
4
. From sections of pipes (profile section 25×25 mm and round diameter 25 mm) I made a stop handle and secured it with a bolt in the holder.
5
. From a metal barrel with a volume of 200 liters, I cut out a rectangular blade (5), processed the edges with a file and screwed the part with M8 bolts to the holder (3).
6
. The entire structure was primed and painted with a double layer of exterior paint. 7
. Before cleaning the area, I set the handle and blade to the desired position, secure them with cotter pins through the holes and push the scraper. It turns out quite quickly and easily.
With the arrival of winter, clearing the courtyards of private houses from snow drifts becomes the most pressing task to ensure comfortable living. Manually shoveling snow has long since sunk into oblivion, and almost every homeowner has at his disposal a compact walk-behind tractor, which saves time and effort when digging up gardening and home areas, collecting and transporting crops.
Manual snow shoveling is a thing of the past.
Purchased or homemade snow shovel
A snow shovel, designed for mounting on a walk-behind tractor, is a mounted iron blade in the form of a bucket or an arched shovel, and consists of three elements:
- Base;
- Attachment point;
- Shovel rotation angle regulator.
The principle of operation of such a snow blower is to mount it on a tractor - mechanical or automated, in the case described in the article - on a walk-behind tractor.
Shovel with fastening mechanism
The factory equipment of the snow plow includes the following elements:
- A bucket (shovel, blade) attached to the base of the electric motor;
- Handle for height adjustment, often telescopic;
- Electric motor located under the body, with attachments for attachments.
Walk-behind tractor with lug-mounted blade
The nozzles that are equipped with factory models of snow-throwing devices can be made in the form of corded rubber plates, as well as metal knives. Such devices, mounted on the lower wide edge of the blade, efficiently remove snow and level the ground. They can be made and mounted on a homemade snow blower on your own.
Comfortable! Wheeled snow removal equipment such as a walk-behind plow is especially preferable for use by the elderly and people with poor physical health.
The design allows for variations in blade angle rotation:
- 30º to the left;
- 30º to the right;
- no turning (forward only).
Changing the angle of rotation ensures that the shovel is fixed in this position using an L-shaped fastening, which increases the convenience of clearing snow.
Blade painting
The dump was restored in three hours and partially painted. We're not expecting any more snow this year, so we didn't put it back on the car.
Dimensions of the Niva blade for snow removal
I took the dimensions of the blade after the fact, perhaps it will be useful to someone, the width of the blade is 2 meters, taking into account the fact that it is placed at an angle to the car in order to shovel the snow to the right, but if you do it straight, you simply push the snow forward (for example, push it out of yard), then do it according to the width of the Niva
Side view of the plow with dimensions, it pushes snow off the road to the right
View, if you look to the right of the car, the nearest curved tube, 60 cm in size, became like this as a result of a breakdown, it was bent like that, there is no need to bend it specifically.
The dimensions are given in the direction of travel, in a straight line.
I got these dimensions of the blade, I didn’t make any drawings before making the blade, I just did everything by eye, and then just measured it, maybe these dimensions will help someone imagine approximately what a do-it-yourself Niva blade should look like.
Homemade dumps
Nowadays, many people prefer to live in their own homes, and accordingly the surrounding area occupies a large area. To work on a personal plot, motor cultivators, walk-behind tractors and mini-tractors are purchased.
In winter, snow removal turns into a competition to see who can beat whom. And owners who have motorized equipment prefer to remove snow with its help. Attachments for a walk-behind tractor are not cheap, so craftsmen prefer to make them themselves.
The domestically produced walk-behind tractor "Neva" is widely used. It has standard places for hanging devices and rubber wheels that are suitable for driving on loose snow. Most of the homemade dumps were made for the Neva.
On the Internet you can find many descriptions and drawings of a shovel for a walk-behind tractor with your own hands. But before manufacturing, you should familiarize yourself with the characteristics of the dumps. Product composition:
- executive (working) body;
- rotation mechanism;
- mounting bracket.
Rotation angles:
Turning the shovel to the side allows you to remove the snow mass while moving. By going to websites for amateur craftsmen, you can find a lot of information on how to make a blade for a walk-behind tractor with your own hands.
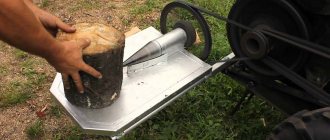
Blade from a cylinder
One of the available materials for making a dump is a gas cylinder. Its height is just over a meter, and the recommended shovel width is 1000 mm. Manufacturing work proceeds in the following sequence:
- Release excess pressure from the cylinder, if any.
- Trim both sides of the lid so that the width is equal to a meter.
- Cut the resulting pipe lengthwise into two halves
- Using a welding machine, connect these two halves so that the height of the blade is about 700 mm.
- The mounting bracket is made as follows. Cut a scarf from thick metal. Drill several holes in it to rotate the shovel in different directions. Weld a piece of pipe to the gusset.
- Weld the resulting device to the shovel at the height of the bracket on the walk-behind tractor.
- Installation is done using a thick finger.
The thickness of the cylinder is sufficient and no reinforcement is required. But the lower part can be equipped with dense rubber, which will remove loose snow and not spoil the compacted road. To do this, you need to take hard rubber from a rotary conveyor.
The width of the rubber sheet is 100−150 mm. Use an electric drill to drill holes in the blade to secure the rubber. To securely fasten the canvas you need a metal strip 900x100x3 mm. Drill holes in the strip and in the canvas, first marking them along the blade. Secure with bolts.
Sheet steel blade
Some craftsmen prefer to use new material rather than used elements. This way you can make a homemade dump shovel from a steel sheet 3 mm thick. To strengthen the structure, take strip steel with a thickness of at least 5 mm.
The material is cut according to the drawings. The blade of the shovel itself has four parts: frontal, lower and two side. The welded structure needs reinforcement. To do this, elements cut from the five are welded in the vertical direction.
Next, the rotating mechanism is manufactured. It is an ear with a hole for an axis. The ear is welded to a corner that is attached to the blade. The axis is fixed at one end of the pipe, and the other end is fixed to the walk-behind tractor. The required angle of rotation is fixed with a finger (dowel).
3 mm - the thickness is small, so reinforcement is required. Cut a strip of 850x100x3 from a 3 mm sheet. You can secure it with a bolted connection, but you will have to first drill or weld the strip.
As you can see, to carry out the work you will need:
- working material;
- grinder with discs;
- electric drill with drills;
- bolts with nuts;
- welding machine with electrodes;
- spanners;
- round or profile pipe.
If you have certain skills, the job is not difficult. And the resulting structure can be used not only in winter, but also in summer. Level the site after construction work, level out a place for a children's sandbox and much more. Which design to choose is up to you.
Do-it-yourself plow on a walk-behind tractor video collection
Related Posts:
- Do-it-yourself disk hiller for a walk-behind tractor, photos and drawings Homemade reversible plow for a walk-behind tractor, drawings, photos, setup and adjustment
We make attachments for walk-behind tractors with our own hands, photos and drawings What are the types and how to choose attachments for a walk-behind tractor Salute
is impossible for some reason.
or unprofitable
.
Therefore, you have to make it yourself
.
Businesses have much more power than ordinary people.
Therefore, the equipment can do more:
- powerful;
- complex.
We will tell you:
- how to independently make
various options for mounted snow removal equipment; - about all the pros and cons of using
such devices.
Using homemade mounted snow removal equipment has not only numerous advantages
, but also extremely serious disadvantages
.
The main advantage
such snow blowers is a serious reduction in costs associated with:
- purchase;
- transportation.
After all, most of the details
Can:
- remove from decommissioned equipment;
- You can buy it for pennies at a scrap metal collection point.
Another plus
The point is that you can make non-standard equipment that is ideal for certain specific tasks.
The main disadvantage
self-production of attachments are problems with the insurance company and the traffic police that arise after driving on public roads.
Indeed, in most cases, employees of these structures perceive the installation of any attachments as changes to the design
.
Therefore, after installing the unit, the machine must undergo technical inspection
, on which they will carefully check:
- compliance of
new equipment
design
; - the condition
the car
itself .
Often the deciding factor
, which leads to a ban on the operation of a municipal vehicle with homemade attachments, is the lack of various documents and certificates for the equipment.
Therefore, before installing homemade attachments, it is necessary to probe the soil at the traffic police
.
After all, the inspector can not only prohibit, but also suggest the right organization
, where all documents will be completed correctly.
Blade installation
To install the grader you will have to resort to using brackets mounted on the frame of the power unit used. Additionally, the blade is attached to the walk-behind tractor using two rods, which, when inoperative, make it possible to unload the walk-behind tractor brackets. The knife, made of a steel plate 850x100x3 mm, is mounted on the lower horizontal edge of the grader using a bolted connection.
Now, after the dump is ready, you need to install it and you can start clearing snow drifts, removing debris or leveling the earthen area on your site. A do-it-yourself walk-behind tractor blade is a universal piece of equipment that can be used to perform various jobs. And making it yourself will give you the opportunity to get a multifunctional device tailored specifically to your needs.
In order for the walk-behind tractor to last as long as possible and resist corrosion, it should be treated with a special primer or protective paint.
The rubber strip attached to the working edge of the shovel should protrude beyond the steel plate.
How to make it yourself
To make a blade, you need tools and equipment that are available in every home workshop.
To work you will need:
- welding machine;
- Bulgarian;
- electric drill;
- roulette;
- square;
- durable knife;
- adjustable wrench;
- core;
- sandpaper;
- paint brush.
Necessary materials:
- steel barrel 200 l;
- 2 springs from UAZ or GAZ;
- profile pipe 20x40 mm;
- iron corners 30x30 mm;
- hardware (bolts, washers, nuts);
- car tire;
- acrylic paint.
To make a blade for an UAZ with your own hands, drawings should be prepared for 4 components of this product: an installation device, a subframe, a knife and a lifting mechanism.
The work sequence is as follows:
- Making a shovel. It is cut out of the barrel, half or a third of it is used. Along the perimeter and in the middle, the workpiece is reinforced with a steel angle, which is welded or screwed to it. The width of the shovel can be in the range of 100-200 cm, and the height - 40-80 cm. A knife made of a 100x20 mm steel strip or a cut tire is installed on the lower part.
- Installation kit. It can be central or frontal type. It is preferable to choose the second type, which is more durable and reliable and allows you to evenly distribute the load across the shovel frame. 2 brackets are made from a profile pipe with eyes for fastening. A rotation mechanism is provided.
- Stretcher. Made from durable metal. Designs are made of removable or stationary type. Removable mounts are attached to the bumper, while stationary mounts are rigidly screwed to the car frame.
- Lift. To adjust the height above the ground, a standard or separately purchased electric winch is used. A simpler solution is a manual winch, but you will have to leave the cab to lift it. The simplest option is to attach steel skis with level adjustment to the shovel.
After the individual components are manufactured, they are assembled and installed on the machine.
Making a dump from a barrel
For a ladle, you need to select a barrel with thick walls. The best option is a stainless steel product. If you don't have a strong barrel, you can use a regular one.
The work is carried out in the following sequence:
- Markings are applied to the barrel. Along the bottom and sides it is divided into 3 identical sectors of 120º. After this, the object is cut with a grinder. The remaining parts of the bottom are cut along the chord. The end parts are needed to give rigidity to the bucket.
- If the tin is thin, then the 2 parts are folded together and fastened. It is advisable to lubricate the parts with hot bitumen before joining. This will prevent corrosion, increase the weight of the bucket and reduce noise from metal hitting rocks and curbs. The parts are fixed with rivets or bolts.
- The perimeter of the resulting bucket is reinforced with a steel strip no less than 3 mm thick. Fastening is carried out using welding, bolts or rivets. The upper and lower parts of the bucket are reinforced with semicircular inserts from the scraps of the barrel.
- A conveyor belt is attached to the bottom of the bucket. The width of the protruding part should be within 3-10 cm, depending on the conditions in which the snow blower is planned to be used. The belt should be removable in order to use the blade for working with bulk materials.
- The finished product is cleaned of rust, deposits and scale. It is treated with anti-corrosion agents and painted.
A similar method is used to make a ladle from a gas cylinder. Since its walls have sufficient strength, their additional reinforcement is not required.
Since the steel on the dump will constantly wear out and become thinner, it is advisable to immediately make a replacement blade. As soon as the service life of the first-stage product expires, a replacement can be immediately installed in its place.