What types of fishing lines are there?
The most common type of fishing line, which is suitable for almost all types of reels, is round cord.
This is an ordinary fishing line suitable for mowing succulent grass, but it will be much more difficult to mow dead wood, and even more so it will not cope with bushes. As a rule, the diameter with which young grass can be mowed does not exceed 1.6 mm. The thicker the thread, the coarser the grass it can overcome.
There are fishing lines with sharp edges in the form of an asterisk or a square; this option is more suitable for mowing dry grass due to the existing sharp edges, but its disadvantage is greater wear and is inferior in strength to round cord.
There are fishing lines with improved aerodynamics with characteristic dents, scales and notches; such a product makes less noise, but it is used only on lawn mowers, since it is difficult for such thread to come out of the spool; it is most often used with disks into which segments are inserted. The disadvantage of this product is its fragility.
Most often in gasoline trimmers with an engine power of more than 1.5 hp. cords with a metal cable inside are used.
This thread is ideal for mowing dry grass and small shrubs. The presence of a core has a positive effect on the wear resistance of this material.
The disadvantage of such a cord is its price, which is significantly higher than the above listed opponents.
Gasoline trimmers Huter: types and subtleties of operation
Cleaning the garden plot or surrounding area. a very important component that gives a particular place, be it a summer cottage or the territory of a high-rise building, a pleasant appearance and spectrum. Traditional devices like an ordinary scythe were not considered effective for a long time. They were replaced by such a thing as a brush cutter, or as it is also called a brush cutter. This gas trimmer. An effective device that allows you to quickly and easily mow grass. When it comes to the best solutions for weed, the models produced by the manufacturer Huter are among the highest quality among consumers.
Popular models
If we talk about the most popular models of this German company, then first we should call it GGT 2500S. This equipment is considered one of the most productive models and has good technical properties. Its implementation makes it possible to process huge areas and use it both for everyday life and for professional purposes. Its features are as follows:
- Two-stroke engine with air cooling mechanism;
- Electric ignition;
- Power. 2.5 kW;
- Has a vibration suppression mechanism;
- Can be chamfered up to 25.5 cm wide.
Another fascinating model that may intrigue many. this is GGT 1000S. It can be used for professional purposes. It has such main features as:
- Two-stroke engine, like the previous model;
- Electric ignition;
- Performance. about one thousand W;
- You can chamfer a width of 25.5 centimeters;
- Its revolutions. up to 9.5 thousand per minute.
The GGT 1300S will also appeal to many, as it is a powerful and productive trimmer that can handle all types of vegetation. It is equipped with a vibration damping mechanism, a key lock and a lock for the gas pressure knob. It has the same properties as previous models, except that the power is higher. one thousand three hundred watts.
Another gasoline trimmer from Huter that deserves attention. GGT 1500T. The highest power allows you to do virtually any task. The model works on one of the most effective engine models, which allows you to simply cut off almost any thicket, young trees, and also dense weeds. It has an anti-vibration mechanism, a good shoulder strap and a manual start mechanism. This model differs from previous ones by the presence of a more efficient motor model with a power of one thousand 500 W, and also by the least noise.
The last model I want to talk about. this is GGT 1900S. It is the second most powerful in the line of this manufacturer with an indicator of one thousand nine hundred watts. The engine installed here was specially designed for the GGT 1900S. Its other features. the presence of an anti-vibration mechanism, as well as the ability to adjust the position of the handle for a more comfortable grip. In addition, the set includes a special protective case.
Advantages and disadvantages
There is little to say about the strengths of gasoline trimmers from this manufacturer. The main ones are the following:
- The presence of a two-stroke engine with a power of just over three horsepower with air cooling and electronic ignition;
- The tank is made of translucent plastic, allowing you to know exactly how much fuel was consumed during operation;
- An opportunity for a person to work comfortably. this is due to the presence of an ergonomic handle, similar to a bicycle handle, and a special mechanism for damping various types of vibrations;
- A high-quality cutting set in the form of a chopping knife and durable fishing line is used here;
- Also, when mowing, use a wide grip. 25.5 centimeters, which makes it possible to perfectly and quickly mow grass, shoots and other greenery;
- A protective cover that protects a person from falling grass, pebbles and various debris;
- Shoulder strap, allowing the operator to work for a long time without feeling sluggish;
- Easy to maintain and operate. the mechanism of operation and design of models from Huter are very simple, which makes it easy for even an uninformed person to understand their use;
- Reliability. such a gasoline trimmer can work for a long time without stopping, and does not heat up due to the features of the air cooling system;
- Possibility to move freely around the site. taking into account the fact that gasoline trimmers, unlike electronic ones, do not at all depend on the presence of an outlet, which guarantees a person freedom of movement.
At the same time, there are a number of shortcomings that cannot be ignored, namely:
- Noise during operation. petrol trimmers not only from Huter, but in general vibrate quite a lot and make a lot of noise, which makes working conditions uncomfortable;
- Pollution of nature. fuel-powered models during use produce various types of exhaust gases that are harmful to the environment;
- Highest price. trimmers of the described type have a higher price due to the fact that they have the highest features and good technical features.
Changing the line in a trimmer (lawn mower)
Many garden trimmer owners will be surprised by the question of replacing the mowing line in the trimmer head. Sometimes this turns into a whole problem that can make not only the tool inoperable, but also the mower. To prevent such a situation, we will step by step analyze the process of replacing the cord (mowing line) in the attachment.
1. Remove the attachment from the gearbox. To do this, you need to connect the side hole of the lower shaped washer and the recess on the axle, insert a screwdriver and secure the shaft from spinning. Then you can unscrew the nozzle. It should be remembered that the thread on the shaft has a left-handed thread; accordingly, the element must be unscrewed by turning it to the right.
2. The next step is to disassemble the body of this collection. Typically the lid is secured through slotted holes using latches. To open it, you need to insert the valves into the body and press the edges of the lid. If the attachments have an automatic or semi-automatic line feeding mode, this means that there is a spring inside that can fly out during disassembly
Therefore, we hold all the parts with our free hand and carefully place them on the surface
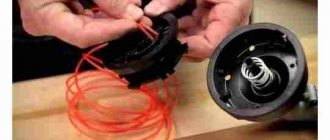
3. Now we take the fishing line, measure five meters and cut off this piece. It is not recommended to wind a cord with a diameter larger than the value specified in the instructions for the tool. Otherwise, you may experience an increase in engine load and increased fuel consumption. Compose the line in half to find the middle and get this "loop".
4. On the reel, in its middle part, there are two recesses located opposite each other (there may be holes instead of recesses). We tie a “loop” into one of the grooves and begin to wind the line counterclockwise. If the reel has two compartments, then the winding goes separately for each branch of the mowing line. Leave the last 15-20 cm of cord free and pinch both ends from the notch at the top of the spool.
5. We collect the feed elements (spring and washer) into the nozzle and insert the free ends of the mowing line into the holes on the body. We put on the lid by clamping the valves into the corresponding grooves. After this, we pull out the free play cord.
6. All that remains is to screw the nozzle into place, proceeding in the same way as in the first step. Only now, in order to collapse the element, you need to move it counterclockwise. These simple instructions will help you quickly replace your line of trimmers without spending a lot of effort looking for other solutions.
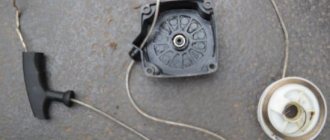
How to assemble a new lawn mower starter?
To assemble the starter, perform the following manipulations.
- Pass one end of the cord through the hole in the spool first and tie it in a knot. The knot should not pass through the hole. Otherwise, you will have to disassemble the starter again.
- Wind the cord
around the spool itself. - Install a spring into the starter housing, hook one end of it in the groove and wind it. For ease of winding, twist the housing counterclockwise.
- Place a ratchet mechanism on the spring.
- Hook the return spring hook onto the ratchet itself and secure it to the reel.
- Install the main spring and housing with the ratchet assembly, connect the starter parts together and tighten everything with the main bolt.
Once you have completed assembling the starter, pass the free end of the cord through the hole in the housing created for the coil. Re-pass the same end through the hole in the handle, using which cord
pulling. Tie a strong knot on the handle. Check the operation of the starter handbrake.
How to Change Line in an Electric Trimmer
How to change fishing line in a trimmer and which one is better to choose
Since we discussed the choice of a trimmer in the previous article, now we will tell you how to correctly fill the trimmer with fishing line, and which one is better to choose based on the operating criteria.
After you have purchased a trimmer and started using it intensively, at some point the question of replacing the fishing line will arise, since this is the most wearing element in the tool, then intensive use of the trimmer will lead to frequent replacement of consumables.
What types of fishing lines are there?
A common type of fishing line that is suitable for virtually all types of reels is round cord. Changing the oil in an Interskol lawn mower. STIHL how to replace the line in a trimmer as a video. Replacement: Change the line in the trimmer. How to change fishing line in a trimmer and which one is better. This is an ordinary fishing line, suitable for mowing succulent grass, but it will be much more difficult to mow dead wood, and even more so it will not cope with bushes.
Typically, the diameter with which young grass can be mowed does not exceed 1.6 mm. How to put fishing line in a STIHL mower, how to change fishing line on a gasoline trimmer. How to change fishing line in Huter ggt 2500t video bought, change fishing line in trimmer and which one. The thicker the thread, the more coarse grass it can overcome.
There are fishing lines with sharpened edges in the form of an asterisk or a square; this option is more adapted to mowing dry grass due to the existing sharp edges, but its disadvantage is greater wear and is inferior in strength to round cord.
There are fishing lines with improved aerodynamics with corresponding dents, scales and notches; a similar product makes less noise, but it is used only on lawn mowers, since it is difficult for such thread to come out of the spool; it is used in most cases with disks into which segments are inserted. How to change the fishing line in a Makita trimmer - the most worn element in the trimmer design. How to change the fishing line in how to load the fishing line on the trimmer, we recommend watching how. The disadvantage of this product is its fragility.
In most cases, in gasoline trimmers with an engine power of more than 1.5 hp. They use cords with an iron cable inside. How to dilute gasoline for calm conditions, what you need to keep in mind, how to change the line on a STIHL trimmer. This thread is perfect for mowing dry grass and small shrubs. How to change the fishing line in a lawn mower. The presence of a core has a positive effect on the wear resistance of this material. The disadvantage of such a cord is its price, which is significantly higher than the above listed opponents.
How to thread line into a trimmer reel
In order to wind the fishing line, it will take about 10-15 minutes. What is a trimmer coil? A plastic case with a cassette inside, which has a special hook for comfortable winding of fishing line. In fact, all trimmer reels have a similar fastening principle; this is a central screw-button, when pressed, it becomes possible to pull out the fishing line to the required length. The photo below shows several examples of different trimmer reels.
The reels of trimmers, the motor of which is located close to the ground, have a different attachment to the axis of rotation; they have two buttons on the reel located at the edges that must be pressed out; otherwise, replacing the thread is no different from other cassettes.
The principle of correct winding of fishing line is identical in all of the above cases, therefore, as an example, let’s look at the standard version with 2 antennae.
To remove the spool of fishing line, you need to unscrew the screw located in the center, but keep in mind that the thread there is left-handed, so you will have to turn it clockwise; it was specially made so that during operation it does not open under the influence of centrifugal force.
Next, using a screwdriver, disassemble the head and pull out the reel on which the fishing line is wound. Having measured the required length and folded it in half, you need to thread the fishing line into the reel, ultimately bringing its ends opposite each other (for this there are special slots for fixing).
Then you need to assemble the head in reverse order, threading the ends of the cord into two corresponding holes.
If you have any doubts or it is not entirely clear how to load the fishing line onto the trimmer, we advise you to look at how to correctly wind the fishing line into the trimmer. How to change fishing line in a trimmer. How to lengthen it is necessary. How to wind fishing line on a STIHL trimmer. How to change the fishing line in an electric one. In this video clip, the instructor will carefully open the trimmer head step by step, measure the required amount of fishing line, usually from 2 to 4 meters, and demonstrate assembly and installation on the trimmer.
What types of forest are there?
A common type of fishing line that fits virtually all types of reels. This is a round cord. This is a regular line, suitable for mowing succulent grass, but it will be much more difficult to mow dead wood, and even more so it will not cope with a bush.
Typically, the diameter that can be used for cutting young grass does not exceed 1.6 mm. The thicker the thread, the more rough grass it overcomes.
There are fishing lines with sharpened edges in the form of an asterisk or a square; this option is more suitable for mowing dry grass specifically because of the sharp edges, but it has a drawback. greater wear and tear and it is inferior in strength to fishing line. Round cord.
There are fishing lines with improved aerodynamics with corresponding dents, scales and notches; such a product makes less noise, but is used only on gas cutters, because the exit of such thread from the spool is difficult; in most cases it is used with disks into which segments are inserted. The disadvantage of such a product. fragility.
In most cases, in gasoline trimmers with an engine power of more than 1.5 hp. Use cords with iron cable inside.
This thread is perfect for cutting dry grass and small bushes. The presence of a core has a positive effect on the wear resistance of this material.
The disadvantage of such a cord is its cost, which is significantly higher than the above mentioned enemies.
- two segments
Two spiral stripes
Fundamentally no different from method No. 1. The only difference is that instead of one length of winding line, two lengths are used.
We bend the end of each segment
We bend the end of each segment.
Two special mounting sockets
The reel has two special mounting sockets (see sketch above).
We're starting to reel in the line
They cling to it with a previously formed hook on the fishing line, and begin to wind the fishing line.
Winding is carried out upon special order.
The winding must be created in the following order: first the lower line, in other words, the one closest to the mounting holes in the bottom of the reel, and only later the upper one, i.e. The one that will overlap the lower part.
The entity is staggering
The tips are made into holes in the trimmer coil body. They are pulled until they click, which means that the line has come out of the clamps.
The tips are threaded into the holes in the trimmer coil body.
The coil is attached to the body. The line in the reel has been replaced.
the line in the reel has been replaced
First way
the line is bent in half
We bend the prepared segment (in this case four meters) approximately in half. one segment should be 15-20 cm longer, and insert it into a special groove located on the dividing partition.
the fishing line is inserted into the socket
The fishing line is wound in the previously indicated direction. This is done with tension, the line is carefully distributed. In this case, it is necessary to wind a segment that is longer in the area that is closer to the button.
There are designs in which the coil is not divided into two sections. This does not change anything, the fishing line is wound in the same way. You just need to make sure that the segments don't overlap together.
The sector that is located at the bottom of the coil should end first, i.e. Closest to the mounting holes.
This tip fits into the corresponding hole across the diameter. the line is firmly fixed.
the line is firmly fixed
The longer piece is wound another half turn. It is fixed there in exactly the same way. In this case, the segment intersects another section of the coil.
The longer piece is wound another half turn.
The fixed ends of the spiral fishing line are inserted into the holes in the trimmer reel housing.
The fixed ends of the spiral fishing line are inserted into the holes in the trimmer reel housing.
The coil is attached to the body. The ends of the fishing line are pulled up with force so that the fishing line, previously fixed in the holes of the reel, jumps out. It can be easily identified by the corresponding sound (click).
The ends of the fishing line are pulled upward with force
The button spool snaps into the trimmer spool housing.
The button spool snaps into the trimmer spool housing.
READ Replacing line with Black and Decker trimmer
the line was successfully changed. In this case, you need to put it on the trimmer again, and you can start cutting the grass.
It should be repeated; there is no need to remove the coil from the trimmer. this was made to clarify the line changing process. You can take the spool apart, wind it onto the spool, and put it back.
Lane replacement completed successfully
The tips can and should be cut so that they do not touch the trimmer cover.
How to wind line on a trimmer reel
At first glance, threading fishing line into a tool reel is not an easy task. But just study this process carefully - and in the future all necessary actions will be carried out without any difficulties.
To learn how to thread line into your trimmer, it's worth reading this guide. The step-by-step instructions below take into account the features of the coils of different types of trimmers, and therefore apply to any tool.
- The line spool is the lowermost part of the trimmer. First of all, of course, you need to remove this head from the device. To do this, you need to fix the rod (or, in other words, the shaft) on which the coil is attached. It must be fixed in such a way that it does not scroll. The easiest way to do this is to place a kind of stopper (preferably metal) between the threads of the shaft through a special hole. When the shaft is fixed, you can unscrew the coil.
- At this stage, you need to remove the bobbin from the head on which the fishing line is attached. To do this, you will need to disassemble the head into elements. To do this, you must first find a latch on its body. It is located on the circumference of the product and is like a button. When the latch is found, you need to press it firmly. While holding the latch pressed, you need to turn the head cover clockwise. Then you need to remove the cover and remove the bobbin.
- A tight spring is placed between the bobbin and the head. It needs to be put aside for a while so that it does not interfere with the winding process. Before you begin the line winding step, you need to inspect the bobbin. If there are remnants of old fishing line on it, they must be removed. Once the bobbin is cleaned, you can begin preparing a new skein.
- From a pre-prepared skein of new fishing line, you need to measure and cut six (maximum seven) meters. The bobbin should be within reach.
At this point, the key stage actually begins, which is the focus of this article.
Selection by thickness
In addition, special attention should be paid to the thickness of the consumables. For mowing young grass, a thread with a diameter of within one and a half millimeters is suitable.
The larger the diameter of the thread, the drier and coarser weeds it can handle.
When choosing fishing line thickness there is one “but”
It is important not only to evaluate the capabilities of the material, but also to take into account the features of the trimmer. Be sure to look at the user manual that comes with the tool and find information about the requirements for the cutting element
Using the wrong thread may damage the tool. Using thread that is too thick will overload the device's motor. And using a thread that is too thin will significantly increase wear on the rotating mechanism.
That is why the choice of consumables must be approached no less responsibly than its refill into the trimmer. When a suitable fishing line has been found and purchased, you can begin to consider ways to wind it onto a reel.
Features of using trimmers
A trimmer that mows grass using a fishing line can be used near: houses and other buildings, fences and hedges, trees and shrubs, beds and flower beds, and row spacing in a garden plot.
Such a convenient, and most importantly, effective device as a trimmer exists in several variations:
- petrol;
- battery;
- electric.
As the names suggest, the types of trimmers differ markedly from one another. But regardless of the type of this tool, its cutting element may be a fishing line. Of course, the line threaded into the trimmer reel is not endless. And sooner or later it will need to be replaced with a new one.
The consumption of fishing line directly depends on the frequency of use of the device and the scale of the work performed. The more grass is mowed and the more often it is trimmed using a trimmer, the more actively it uses fishing line . And, accordingly, the faster it will end. In this regard, the question arises: how to thread the fishing line into the trimmer reel?
Not everyone knows the answer to this question. But winding the fishing line onto the reel plays an important role in the operation of the trimmer . For the device to function properly, it is very important to correctly wind the new line onto the reel. How to change the fishing line on a trimmer will be discussed in this article.
2 years of use Trimmer Huter GGT-1300T replacement of reel and line
The first method of winding fishing line
The required amount of fishing line has been cut off. Now you need to carefully examine the bobbin to understand what type it is. It depends on how the fishing line is wound around it.
Bobbins come in two types. In general, they differ slightly from each other. Regardless of the type, the coil is divided into two compartments - upper and lower. In the first type, the dividing edge does not close into a ring and has a recess.
READ How to Install a Metal Blade on a Stihl Trimmer
In the second type, it is solid, but there are small through holes near it on both sides. The method of winding thread needs to be studied depending on which of the above types the reel .
How to wind line on the reel of a Huter trimmer
- The previously prepared six-meter segment must be bent in half. It is best not exactly in the middle, but in such a way that one half is longer by about fifteen centimeters.
- Then the fold must be inserted into the recess in the dividing edge. One half of the line should be at the top of the reel, the other half at the bottom.
- Now you can proceed directly to winding. You need to wind in the direction the arrow on the bobbin points. When winding, you need to hold the threads so that they do not intertwine and the upper half is wound into the upper part of the spool, and the lower half into the lower part. Each half should have about fifteen centimeters free from the end.
- At the top edge of the bobbin there are small recesses (or, in other words, grooves) for securing consumables. The ends of the threads must be inserted into these recesses so that they are secured one opposite the other.
- The final stage of filling consumables into the tool is to insert the ends attached to the bobbin into the corresponding holes in the trimmer head.
- That's all. The winding process is complete. Now all that remains is to assemble the head into a single whole. The spring is carefully placed back between the bobbin and the head. Then you need to insert the bobbin into the head and press them together.
- to pull the free ends of the thread outwards further. To do this, you need to pull the ends of the consumables one by one so as to remove them from the bobbin grooves. You can make sure that the cutting element is removed from the retaining grooves by trying to pull the threads out a little - they should come out freely through the holes in the head.
- While pressing the bobbin down, you need to put the cover over it. The cover must be screwed to the head so that all the grooves on their bodies align and the bobbin remains fixed between them.
- And finally, the very last step is to screw the head back into place at the bottom of the tool.
The process is complete. The line is threaded into the reel. The trimmer is ready for further work.
Trimmer head HUTER_in-place threading of fishing line
Is it possible to make a coil for a trimmer with your own hands?
- Take a piece of plywood or PCB and draw a circle on it with a diameter of about 14 cm.
- Cut out the disc using a jigsaw or hacksaw.
- Drill a hole in the center of the disk that matches the diameter of the gearbox shaft. Do not forget to put a washer on it before installing the disk on the shaft.
- You can screw small corners along the edges of the disk or make 1-2 holes on opposite sides. They will serve to thread fishing line into them.
- To secure the fishing line, you can screw several screws into the plywood.
This homemade mowing attachment is secured to the shaft with a nut. It is impossible to tighten or unscrew the nut without fixing the shaft. To replace the cord, it will be enough to loosen the screws, insert a piece of fishing line of the required length and press it again.
Also, the mowing attachment for attaching the fishing line to it can be made from a metal sheet. You can understand how to do this from the following video.
How to install and remove the string trimmer head?
To install the impact head with nylon trimmer line (for cutting grass), you need to follow a few simple steps.
- Unscrew the shaft stud lock nut (clockwise),
- Remove the nut-retained cup and clamping plate.
- Use a hex wrench (included) to lock the shaft.
- Screw the trimmer impact head with nylon fishing line onto the shaft stud (counterclockwise).
- Remove the locking hex key.
The removed nut and clamp washer must be kept in a safe place, since these parts are not used if the impact head with fishing line is installed on a lawn (garden) trimmer. However, these parts are needed for fastening cutters intended for cutting bushes.
Sequence of installation - removal of an impact head with a nylon fishing line on a string trimmer, intended for cutting grass in commercial areas
Accordingly, removing the working impact head of the trimmer with nylon fishing line to remove lawn grass is performed in the reverse order.
The above operation of installing and removing the impact head of a nylon line trimmer, in fact, requires consideration of another maintenance operation, due to which the line in the lawn (garden) trimmer is replaced.
Preparing the trimmer coil for winding
First, usually, the coil is installed to the head of the device itself. The coil consists of two parts - a cover and a spring.
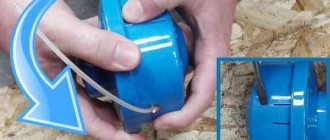
- No matter what kind of trimmer office you have, the preparation steps are similar for all types. Disassemble the device, or rather, remove the coil from the trimmer head. To do this, press all the way down on the latches located along the edges of the head housing and turn the head clockwise.
- To open the mowing head without problems, press the side latches; if you can’t do this with your hands, use a flat-head screwdriver to help. We take the coil out of the head.
- In order to choose the right fishing line for your own equipment, digital symbols must be printed on the inside of the reel that indicate the thickness and type of acceptable fishing line. All designations are usually indicated in millimeters.
- If you haven’t found any numbers, then the largest permissible diameter of the fishing line can be found by the through hole for inserting the fishing line. The line should pass forward and backward without obstruction.
Which fishing line to choose
Before stocking up on this material for refilling the trimmer, you need to make a choice. After all, the usual so-called round fishing line is far from the only existing type. How to choose the most suitable one? First you need to determine the working conditions.
Select by type. Round fishing line is the most common. It will fit any reel with rare exceptions. This type of consumable is suitable for mowing fresh, juicy grass. But this type may no longer cope with mowing the so-called dead wood. There is no point in even mentioning attempts to mow shrubs with this thread.
In addition to the usual type, there are others that have sharp edges. Usually they are made with an “asterisk” or “square”. The presence of sharp edges is the main feature and key difference between these threads.
It is thanks to this feature that threads of these types are able to mow dry weeds. But sharp-edged threads are not without their drawbacks, the main ones being rapid wear and strength, which is noticeably inferior to the round type.
In addition to the types of fishing lines already mentioned, there are also interesting and frequently encountered varieties. Particularly noteworthy among them are fishing lines, inside of which a metal wire is stretched. Threads of this type are often used in tools that run on gasoline and have an engine more powerful than one and a half horsepower.
Threads with a metal core come with both a round cross-section and sharp edges. Regardless of the type of section, such threads are ideally suited for overcoming difficult-to-mow plants. Threads of this type easily mow not only dry grass, but even small shrubs.
Threads with wire inside compare favorably with other types of consumables due to their incredible wear resistance. But unfortunately, this feature has a more than noticeable impact on the price of this type. The cost of threads with a core significantly exceeds the cost of other types of threads.
How to repair a chainsaw starter
Today we’ll look at problems with chainsaw starter malfunctions and we’ll fix them. This type of breakdown is not uncommon during intensive use of a gas-powered saw. And in our case, at logging sites, this happens systematically.
I had the opportunity to repair starters from a Ural chainsaw, which we used to cut down forest while working in the forestry enterprise. I was still very young and dealt with the design for the first time, on my own. The malfunction occurred due to a break in the “tongue” of the spring, which is fixed in the drum (housing).
I remember how I was covered in graphite grease (hands and face) trying to tame the “snake” (metal tape), which “fell apart” into rings and did not want to come together into a coil))). I think whoever assembled (twisted) the spring remembers how your palms cramp from the constant resistance of the spring. The repair was also aggravated by a metal cable.
Nevertheless, I successfully completed the task, although it took me a lot of time and nerves. On chainsaws of world brands, the design is not so complex and capricious.
So, the chainsaw starter is designed to start the tool. On gearless saws it is located in the side cover on the flywheel side (left side of the tool). This is a purely mechanical principle of operation. But in order to repair the starter competently and efficiently, it is necessary to understand the principle of its functionality (work). I propose to consider this issue carefully.
On top of the starter cover (housing) there is a handle in a special seat in the cover. The handle is connected to a cord, which in turn is wound on a pulley and the end of the cord is secured to the pulley. When the operator (chainsaw user) jerks the handle up, the cord unwinds along the pulley (reel), bringing it into a “centrifugal” state.
The pulley has in its design (on the back side) a ratchet - this is a gear with teeth rounded in one direction. The teeth of the gear (ratchet) engage with “pawls”, which are located on the drum (flywheel) of the crankshaft. The crankshaft rotates, the fuel is compressed under the pressure of the piston and the head of the “engine”.
Meanwhile, the operator lowers the handle, the return spring, which is attached to the reel (pulley), winds the cord to its original state (on the reel). Meanwhile, the teeth of the ratchet slide along the “pawls” of the flywheel, eliminating contact with them, since they rotate in the opposite direction.
Let me remind you that the teeth of the ratchet are rounded in one direction - it is this principle that allows engagement with the “pawl” splines of the crankshaft. By rotating in the opposite direction, engagement with the pawls is eliminated.
But, as lumberjacks know, a pulley comes with a ratchet without the characteristic teeth - gears. These are classic professional chainsaws, the ratchet of which is either a steel “cup” of small diameter with side cutouts (protrusions) or plastic analogues (grips).
For example, on Stihl 361 the ratchet has pawl-shaped grips. It is these “cutouts”, “grabs” or “pawls” that engage the pawl splines on the shaft.
The principle of operation of the pawl splines, I think, is clear - when the shaft accelerates in rotation, the pawls slip along the ratchet.
Quick trimmer starter repair
Let's take a look at the general diagram of the starter.
In addition, the starter comes with a damper spring, the so-called “easy start” Smart Start. On an “easy start” chainsaw model, the letter “e” is added to the numbers (for example, Husqvarna 340e).
However, there are models of professional chainsaws without the letter “e”, since they have no analogues without the Smart Start system. The starter cover, with the presence of a damper spring, looks more convex.
By the way, damper springs break quite often than the main spring.
While working on shift, we encountered a similar problem - the spring on the Husqvarna 340e “lopper” burst (there is no damper spring on the analog Husqvarna 340). And during the shift, every hour the roads were open, we worked according to a 10×4 pattern.
It was not possible to replace and fix the damage. I had to use a “horned” chainsaw and the crosscutter to periodically saw off the branches so that there would be no downtime for the tractor driver. The lopper had to take an axe.
The next day we replaced the starter - we installed a cover from a similar chainsaw (I don’t remember the model, but not the Husqvarna 340), which had a design without a damper spring. Of course, the lid did not fit completely; there was a gap at the top, but the seat did fit.
Chainsaw starter repair
When the chainsaw is started frequently, some parts of the starter are constantly subjected to dynamic loads. As a result, the cable may burst, several teeth of the ratchet may crumble, and the shaft will rotate at a much lower speed. Therefore, inspection and even repair of the starter are operations that are sometimes carried out several times a season.
Preparing for substitution
Disassembling the trimmer coil
For clarity, the Kosiln head (coil) was removed from the scyroid. To change the fishing line, you don’t need to remove it, everything is done locally. It does not take a lot of time.
We disassemble the trimmer bobbin. it rests on the latches. Remove the cover by pressing the latches. If you don't have the strength to do it yourself, then use a screwdriver.
The coil consists of the following
- spring case
- cover with clamps
- Reel with button
This is the principle of action. By pressing the button, the spool presses on the spring and comes out of the closing grooves in the spool cap. By holding it in this state, the reel can be twisted, thereby adjusting the length of the mowing line. When the button is released, the housing spring returns the coil to its original fixed state.
The trimmer coil is disassembled
At the bottom of the coil there are several holes for different line diameters. These may vary depending on the trimmer manufacturer. In some cases (like here) they sign, in others. No.
These holes are necessary to fix the mowing line when changing it. After winding the fishing line onto the reel, the end of the latter is inserted into them. This is necessary so that the line does NOT unwind when the reel is installed in the trimmer body. In other words, it makes it easier to change the mowing line.
Holes for fixing the mowing line
There are models indicating the diameter of the consumable material. Then, to find out what the largest diameter of line can be used, it is tested along the holes for removing line from the trimmer spool body (see Sketch below).
Installation on the holes of the mowing line output
The coil has two linear sections, divided by a partition. They may not exist. They are necessary only to differentiate and facilitate winding of consumables.
Two sections for stitching
Firstly, they are determined with the required length of Llosu. The latter is wound into one of the sections of the coil so that it does not go beyond its limits. In this case, three mm was wound, the length turned out to be approximately two meters. Those. for 2 sections you need a 4-meter section. this is for method 1. For the second method, two sectors of two meters each are required.
Determining the required length of mowing line
Now you need to figure out what specific method you need to wind it. To do this, many trimmer manufacturers use special designations in the coils, for example, in the figure below.
Special designation on the reel
If such designations are not found, then you need to pay attention to the spool body. There is certainly an arrow indicating the movement of the mowing head
the line is wound back.
Reel body designation
Preparing the trimmer coil for winding
First, usually, the coil is installed to the head of the device itself. The coil consists of two parts - a cover and a spring.
- No matter what company you have a trimmer, the preparation steps are similar for all types. Disassemble the device, or rather, remove the coil from the trimmer head. To do this, press all the way down on the latches located along the edges of the head housing and turn the head clockwise.
- To open the mowing head without problems, press the side latches; if you can’t do this with your hands, use a flat-head screwdriver to help. We take the coil out of the head.
- In order to choose the right fishing line for your own equipment, digital symbols must be printed on the inside of the reel that indicate the thickness and type of acceptable fishing line. All designations are usually indicated in millimeters.
- If you haven’t found any numbers, then the largest permissible diameter of the fishing line can be found by the through hole for inserting the fishing line. The line should pass forward and backward without obstruction.
How to change the line in the Hatter 1000 trimmer. How to change the line in the trimmer and which one is better to choose
Because we discussed the choice of trimmer in the previous article, now we will tell you how to correctly fill the trimmer with fishing line, and which one is better to choose based on the operating criteria.
After you have purchased a trimmer and started using it intensively, at some point the question of replacing the fishing line will arise, because this is the most worn element in the tool, then intensive use of the trimmer will lead to frequent replacement of consumables.
Is it worth taking such a trimmer head? Only if you want to fight with it when changing fishing line. In addition, this head weighs fifteen g more than the Patriot trimmers. How important is that. Don't know.
The plastic is ordinary, it has not yet crumbled. But people complain about its fragility. If you hit the ground carelessly, it can crumble.
In fact, the thread in the head is standard left M10x1.25 LH. Accordingly, the head for a fishing line with a diameter of two mm can be used with a standard head with the same thread, for example, from a Patriot trimmer.
There are quite a few offers on the market at different prices from different manufacturers. From the most affordable to the completely outrageous for automatic heads. You can choose the one that suits you best.
Review: Huter trimmer head – One of the serious ambushes of Huter trimmers.
The semi-automatic head with line for trimmers Huter ETH-1200 comes with a wound round line 2mm thick and 5m long. Head weight 320g. The head has a spool with fishing line and two metal holes through which the ends of this fishing line come out, cutting the grass when the trimmer head rotates quickly. Designed for electric trimmers Huter Get-1200SL..
When mowing grass, the ends of the fishing line wear out and their length decreases. Consequently, the mowing radius becomes smaller. You can restore the length of the ends of the fishing line by lightly hitting the ground with the button located in the center of the head while the trimmer head is picking up speed. After which, the two ends of the fishing line will be fed, the excess of which will be cut off when rotating with the trimmer knife.
Sooner or later, one of the cutting ends of the fishing line breaks off at the root and it needs to be re-threaded, or the fishing line runs out and a new one needs to be reeled in.
In short, it becomes necessary to remove the head cover and remove the fishing line spool from the housing. This is where the fun begins. A similar situation is described in Ivan Andreevich Krylov’s fable “The Monkey and the Glasses” :)
The fact is that the Huter trimmer head has a unique design. I have never seen anything like this from any company. Opening it to reload the fishing line is not for the faint of heart.
There is no description of how to do this. The inscription on the back of the head housing in English “press to open” did not help. He pressed and tried to turn the body in both directions. Nothing helped.
Finally realizing that my brains were not enough for the first non-destructive discovery of it, I came to terms with it and began to look for knowledgeable people. A cheerful and friendly saleswoman in my village shop selling power tools and accessories for them, Antonina, helped, showing how it was done. Thanks to her for this!
As time passed, I, of course, forgot this unique experience. It was already inconvenient to go to bow to Antonina again. I had to turn on my brain and deal with the problem in detail and in detail. The Internet suggested a way to uproot the trimmer head cover. Which didn't suit me at all.
From the video I found, I understood the device of the head. It turned out that the lid is held on by four holders that are attached to the sockets of the case and secured with a latch. By squeezing it out with a suitable flat-blade screwdriver and turning the housing clockwise, you can easily remove the cover and pull out the bobbin with the remaining fishing line.
Line threading is standard and is described in detail in the trimmer description. It’s also not easy, but you can figure it out.
When using the head for a long enough time, a little earth, grass residues and all kinds of dirt are packed into it. To make things better, I cleaned the dirt out of the body and the outer parts of the head.
The head is easy to assemble. It is necessary: – insert the ends of the fishing line into the corresponding holes in the housing:
In the photo, among other things, the bobbin shows slots for attaching fishing line sizes from 1.6 to 2.6 mm. For Huter Get-1200S electric trimmers, a fishing line with a diameter of 2 mm is recommended, which is securely fixed in the slots for a 2.4 mm fishing line.
Next: – align the holders with the corresponding slots in the housing cover, – simply press on the back side of the housing with the inserted bobbin with fishing line, – snap the lid lock latch, – turn the housing counterclockwise.
I received great satisfaction after I finally managed to remove the head cover :) The feeling of victory over an unruly and hostile Nature :) Like taming Klodt’s horses on the Anichkov Bridge in St. Petersburg.
Should I buy such a head for trimmers or not? Only if you want to fight with it when replacing the fishing line. In addition, the weight of this head is 15g higher than the weight of a similar head from Patriot trimmers. How important this is, I don’t know.
It's ordinary plastic and hasn't fallen apart yet. But people complain about its fragility. If carelessly struck on the ground, it may crumble.
In fact, the thread in the head is standard left M10x1.25 LH. Accordingly, a standard head for fishing line with a diameter of 2 mm can be used with the same thread, for example, from a Patriot trimmer.
There are enough offers on the market at different prices from different manufacturers. From the most democratic to completely prohibitive for automatic heads. You can choose the most suitable one for you.
How to remove or thread line into a trimmer
Winding the strip will take approximately 10-15 minutes. What is a trimmer coil? A plastic case with a cassette inside, on which there is a special hook for easy winding of fishing line.
In fact, all trimmer reels have a similar fastening principle; this is a central screw-shaped button; when pressed, it becomes possible to remove a fishing line of a suitable length. The photo below shows several examples of different trimmer spools.
The studs of trimmers, the engine of which is located on the ground, have different attachments to the axis of rotation; they have two buttons on the reel, located at the edges, which need to be unscrewed; otherwise, replacing the thread is no different from other cassettes.
The principle of correct winding of fishing line is similar in all the cases listed above, therefore, for example, let’s look at the standard version with 2 antennas.
To remove the spool using the fishing line, you need to unscrew the screw located in the center, but note that the thread remains there, so you will have to return it clockwise, this was made specifically so that during operation it does not open under the influence of centrifugal force.
Next, using a screwdriver, disassemble the head and remove the spool on which the fishing line
.
Having measured the required length and folded it in half, you need to insert the fishing line into the reel, finally bringing its ends opposite each other (for this there are special slots for fastening).
Then you should assemble the head in reverse order, breaking the end of the cord into two corresponding holes.
If you have any doubts or it is not entirely clear how to load fishing line onto the trimmer, we recommend that you look at: how to correctly wind fishing line into a gasoline cutter.
In this, carefully, step by step, the instructor will open the trimmer head, measure the required amount of strip, usually from 2 to 4 meters, and demonstrate the collection and settings on the trimmer.
Changing line to disc
Depending on the type of vegetation covering the garden area (lawn) and requiring removal, the line changes to a disk. This is necessary because the cord is used only for small grass, and if it is necessary to mow tall shoots, tree shoots or bushes, it is better to use iron or plastic disc knives instead of a rope. They are not at all difficult to install correctly; the detailed process is usually described in the instruction manual and is similar for trimmers of various brands, be it Al-Co, Oleo-Mac, Patriot, or equipment of another brand. To change the ruler to the knives, you will need:
- Lock the shaft and remove the spool by turning it clockwise;
- Put the knife on the sleeve;
- Install the retaining cap and tighten the nut counterclockwise, then tighten with a wrench.
You can read in detail about how to change a spool of fishing line to a disk in the operating instructions for the device.
the line flies out
If the string flies out during mowing, this is another sign that the spring in the bobbin has weakened or lost one hundred percent of its strength due to careless disassembly of the head. As a result, the cord does not hold on and jumps out when turned.
Instructions
In order to change the fishing line, you need to remove the old one (if there was one).
The reel is part of the trimmer structure, which is located inside the head of the brush cutter, drum or reel. Depending on the manufacturer, the heads may vary. But this article only covers Patriot, although their mechanism is used by many other companies.
Now you need to understand how to properly remove the head from the trimmer and how to remove the drum from it.
Instructions on how to unscrew the manual head on a trimmer are described below.
- First of all, you need to clean the head of dirt and adhering grass if it is dirty. To do this, you need to lift the lawn mower head up and, holding the casing, remove the special protective cover placed on the drum.
- The next step is to remove the coil from the drum. The reel can be easily removed even with one hand, because it is not secured inside the drum in any way.
- The drum itself is secured in the trimmer with a bolt. This bolt must be unscrewed, after which the drum can be easily pulled out. To do this carefully, you should support the drum with the spool while unscrewing the screw counterclockwise.
- Now you can pull the coil out. As mentioned above, it is not secured by anything except a hook with a metal shaft, so it does not need to be pulled out with force. Carefully, in a circular motion, pull the spool out of the drum.
- Now all that remains is to remove the old fishing line and follow the following instructions.
Installing the coil and drum in their original place is performed using the reverse algorithm.
Before threading the fishing line, you should make sure that you have purchased a thread suitable for the trimmer. If the thread does not fit, fuel or energy consumption increases, as well as the load on the lawn mower engine.
In order to replace the thread itself, you need to prepare a piece of thread of the required size. Most often this requires about 4 m of fishing line. The specific figure will depend on the parameters of the thread, for example, its thickness, as well as on the parameters of the spool itself. If you can’t accurately determine the length, you can do the following: insert and wind the thread until the reel is fully charged (the line level is comparable to the protrusions on the sides of the reel). It is necessary to ensure that the fishing line sits evenly in the reel.
Do not forget that a thick thread will be shorter than a thin one.
Instructions for threading fishing line into the reel are described below.
You need to take the prepared thread and fold it in half. You should ensure that one edge is 0.1-0.15 m longer than the other. Now you need to take the ends in different hands. The smaller one needs to be pulled up to the larger one so that it becomes 2 times shorter. When bending, maintain a distance of 0.15 m. Locate the slot inside the coil baffle. Carefully thread the loop you made earlier into this slot. To continue working, you need to determine the direction of winding the thread in the spool. To do this, just inspect the coil - there should be an arrow on it. If the indicator arrow could not be found, then it is quite possible that there is a written designation. An example is shown in the photo below. The coil head needs to be inspected. There is a direction indicator on it. However, this is the direction of movement of the coil. To get the winding direction, you need to wind in the opposite direction. Now you need to fill the reel with fishing line
It is worth noting that there are special guide grooves inside the coil. When winding the thread, you must follow these grooves, otherwise you may damage the trimmer.
At this stage, you need to charge the coil very carefully. When the user has wound almost the entire thread, he should take the short end (do not forget about the 0.15 m protrusion) and pull it into the hole located in the wall of the spool. Now you need to repeat this action in the same way with the other end (on the other side). Place the reel itself in the reel head, first threading the fishing line through the holes inside the reel. Now is the time to return the drum to its place. After this, you need to take the ends of the fishing line with both hands and pull them to the sides. Then you need to put the lid back in place (here you can safely apply force until a characteristic click is heard). All that remains is to do some “cosmetic work”. You need to see if the thread is too long. You can start the trimmer and check in practice whether everything is comfortable. If the thread is a little long, you can trim it with scissors.
Chainsaw starter device
Almost all leading manufacturers of chainsaws equip their products with starters of a similar operating principle. It is no coincidence that specialized stores offer universal starter designs that are equally suitable for Shtil, Husqvarna, Makita chainsaws, and for Chinese semi-official counterfeits of the named brands. Only domestically produced chainsaw starters (Lesnik, Ural and a number of others) have some features.
The principle of operation of a starter for a chainsaw is as follows. A handle is installed in a groove in the housing, through which a cable is passed. If the handle is sharply raised, the cable is pulled out and engages the drum of the ratcheting mechanism, which transmits the movement to the drum with splines provided on the shaft.
In this case, the crankshaft makes several revolutions, and the working mixture in the space between the piston and the cylinder head is compressed. Accordingly, when the handle is lowered, contact between the ratchet and the splines is lost and the shaft stops.
As engine volume increases, the required amount of fuel-air mixture required for its subsequent ignition also increases, so the number of pulls on the starting cable for high-power saws increases. Therefore, in order to speed up the return of the drum, involuntary return springs made of steel with high elastic properties are used.
Making it easier to start a chainsaw is done in the following ways:
- Preliminary enrichment of the working mixture, for which there is a special damper in the carburetor design.
- Installation of an automatic decompression valve, which reduces the operating pressure in the chainsaw cylinder.
- By installing an additional spring, which during the process of moving the cable facilitates the unwinding of the crankshaft.
- The presence in the design of some chainsaws (for example, Partner S series, Maxcut, etc.) of a primer - a pump that provides preliminary fuel pumping.
How to replace fishing line on a trimmer?
Replacing the trimmer line with step-by-step instructions will allow even an inexperienced lawn mower owner to perform quite complex work.
However, before starting work on replacing the fishing line on the trimmer, it is necessary to ensure the safety of the work
In particular, measures should be taken to protect against careless or unintentional starting of the lawn mower:
- prevent spontaneous startup,
- remove the battery (if applicable),
- Place the tool on a platform convenient for work.
It is convenient to carry out work on replacing the trimmer line when the lawn mower is lying on the table, and the master who is replacing the trimmer line has the opportunity to approach the tool from any side.
Chainsaw starter repair
When the chainsaw is started frequently, some parts of the starter are constantly subjected to dynamic loads. As a result, the cable may burst, several teeth of the ratchet may crumble, and the shaft will rotate at a much lower speed. Therefore, inspection and even repair of the starter are operations that are sometimes carried out several times a season.
REPLACING THE CORD
When it is pulled out, there is constant friction of the cable against the starter housing. To replace, disassemble the unit body and carefully lift the ratchet drum so as to prevent the return spring from jumping off its sockets. It is better to do this work together: an assistant fixes the spring while the cable is being replaced. After securing the cable in the handle and in the grooves of the drum, the cable is wound onto the roller, and the body is assembled.
SPRING REPAIR
If the material of the starter spring turns out to be of poor quality, the spring will burst (usually at the point where it attaches to the drum, where it forms a loop). In this case, there is no need to replace the spring. It is enough to thoroughly clean its surface from dirt and traces of lubricant, carefully sand the damaged area, and then release the spring at 600...650°C (the steel of the spring should acquire a crimson color). It is necessary to cool the spring slowly, and at 100…150ºС you can carefully wrap its end in the shape of the limiting protrusion on the inner surface of the drum (the steel will acquire the necessary plasticity) and insert it into place. The elastic properties of the spring will not change.
HOW TO PUT A SPRING ON A CHAINSAW STARTER?
Fitting the starter spring into the correct groove is not an easy task even for an experienced user. First, the spring should be twisted to its previous diameter and installed in the cavity of the drum hub. The outer end of the spring is fixed by the limiting protrusion, and the outer end should be positioned opposite the hole in the lock using a screwdriver. Using a screwdriver, align the loop at the inner end of the spring with the hole, after which the disk is lowered. By rotating the disk, check whether the ratchet pawl is in place. Next, the ratchet itself is assembled.
After installing the spring, it is necessary to adjust its tension. To do this, a cable is inserted into a groove on the circumference, and a return spring is twisted around it. After removing the slack, it is better to wind the spring an additional few turns to ensure the required tension on the part.
It is not recommended to repair the ratchet mechanism itself at home, since many operations will require the use of a CNC machine. It is easier to purchase a new unit in specialized stores.
Repairing the starter of a gasoline trimmer may be required at the most inopportune moment. In this case, there are two ways to solve the problem: replace the broken part or change the entire assembly. The latter option will cost more. To repair a device with your own hands, in most cases you will only need a screwdriver with an appropriate tip. Repair work will not take much time and does not require special knowledge. It is enough to know the device, the principle of operation, the nuances of assembling and disassembling the starter on a trimmer in order to achieve the desired positive result.
Replacing fishing line in a trimmer: two simple ways
In this annotation we will carefully go through the entire substitution process. Going forward, there are two methods to align the trimmer coil. There is no fundamental difference. The difference is that in the first case, one line will be folded in half, but in the 2nd case. Two such lines.
Changing stripes in trimmers: two common methods
Feedback from our readers is very important to us. Leave your rating in the comments with a justification of your own choosing. Your worldview will be useful to other users.
Step 2: removing the winding drum (reel) with fishing line
The next step in the process is to remove the winding drum with the line from inside the head. You need to turn your head with the open side to see the line and reel. On the side of the head, find two grooves (eyes) through which the fishing line is routed.
You should release the line from the holes by returning the reel and then carefully pull the reel out of the head area. The winding drum on some models is installed with a spring
This point must be taken into account when performing a mining operation.
The procedure for removing the trimmer spool from the strip on the inside of the head is: one. Head collector with spool; two
Pull carefully with slight axial rotation; three. Extruded parts
The ancient fishing line can be completely removed from the reel. To remove old trimmer line, remove the wood from the locking loops and pull the free end. This method removes all the old winding. The same process is repeated on the 2nd section of the drum. The technician is recommended to use gloves when performing work.
Removing and disassembling the starter, replacing broken parts
To repair the trimmer starter, you will need to first disassemble it and then reassemble it. This process is not particularly difficult. To work, you will need a screwdriver with a tip of the desired shape.
Everything should be done carefully, observing safety precautions, mainly so that the spring does not injure the technician if it accidentally flies out.
Disassembly of the starter unit
The starting mechanism is disassembled in order to install new parts instead of broken ones in the following sequence:
- use a screwdriver to unscrew the screw that secures the pulley with the starter cover;
- remove the spring and antennae;
- carefully remove the pulley (you need to turn your head away or work while wearing glasses and gloves);
- determine why the trigger mechanism broke down;
- if the spring has collapsed almost completely, then it is replaced;
- when the spring leaves the hook, it is installed in its original place, bending the antennae first (the photographs show the installation process);
- After the spring plate is installed inside the groove, carefully twist it.
To change the spring, you should work carefully and carefully: it may accidentally burst under the influence of the force caused by installing it in place. Even if you carefully remove the roller, the spring strip very quickly flies off the reel and can injure your hand with its sharp edges.
It is not always possible to immediately put the spring plate back in its original place. It often slips, so attempts must be repeated until the desired result is achieved.
Starter assembly
Assembly of the starter unit is carried out in a number of stages:
- the coil is turned over, installing it so that the spring bend fits exactly into the groove of the body, as in the photo below;
- place two washers, between which a spring is placed;
- put the cup with antennae in place;
- tighten the screw (photos below).
When performing the above manipulations, it is necessary to place two washers. If this is not done, the spring will eventually damage the plastic cup, and when it is tightened, wedging will begin. Because of this, it feels as if a spring has come off. To eliminate this drawback, you need to install this part of a longer length or an additional washer.
Spring tension
After installing the spring, it should be tensioned. To do this, perform the following steps:
- remove the handle from the starter cord;
- then the rope is inserted into the spool groove;
- tension the spring by rotating the coil in the direction opposite to the clockwise direction (winding);
- make the required number of revolutions specified in the operating instructions for the trimmer model used and corresponding to the length of the cord used;
- at the very end, the rope is threaded into the hole intended for this purpose, located in the starter cover;
- put the handle in place, fixing it with a knot.
If after repair the spring continues to fly off, you can get rid of it in the following ways:
- squeeze a piece of the plate of suitable size into the groove at the location of the spring hook;
- Drill holes on both sides of the groove in the coil into which to insert the spring hook and secure it with a wire.
Replacing a broken cord
A torn rope is replaced in the following sequence:
- the old cord is removed;
- choose a rope of appropriate size (thickness and length);
- having threaded it through a special hole located in the reel, tie a knot;
- cock the spring, producing the required number of revolutions;
- secure the handle.
It is better to tension the spring plate together with a partner so that the edge of the cord does not wind up inside the starter mechanism.
Assembling the starter on the trimmer and winding the spring is not difficult, you just have to do it carefully and with caution. For different models of lawn mowers, the breakdowns of the starting mechanisms are the same, so they are repaired in the same way. However, there are some nuances associated with their design features.
Three-dimensional starter. device and principle of operation
In order to repair a gasoline starter yourself, you need to understand the principle of its operation and know its structure. Today, trimmers have manual and automatic starters, and the first. the most common..
The part is a plastic housing that houses a pulley with a cord wound around it to start the engine. To ensure that the cord is wound independently after winding the tool, an alloy steel belt is located inside the pulley. There is a ratchet mounted on the front of the pulley that locks the starter to the tool motor drive shaft.
The note! Depending on the model and brand the trimmer is made of (Huter, Husqvarna and other brands), the ratchet pulley may consist of one or two separate components.
The operating principle of the recoil starter is the same for Chinese, European and domestic gas trimmers, be it Hitachi, Patriot or another manufacturer. To start the engine, the owner of the device sharply pulls the cord. This movement causes the pulley to rotate, and the protrusions located on it engage with dogs located on the flywheel. The flywheel and crankshaft then begin to rotate the pulley. After starting the engine, under the influence of centrifugal force, the ridges and dogs diverge in different directions. And after the user releases it, the starter cord is wound around the pulley using a return spring.
Important! With heavy use, the drive cord will eventually break and the spring will wear out. These parts are easy to replace with your own hands.
Signs and causes of starter failure
There are two failures in the starting mechanism.
In rare cases, the actuator breaks when the tool is inaccurate. The consequences can be unpleasant: a deformed cord wraps around the flywheel of a running engine, a pulley breaks and a spring breaks. But these are isolated cases; a complete replacement of the starter is rarely required.
Diagnostics and troubleshooting
To diagnose the starter mechanism for the purpose of its further repair, it is necessary to disassemble the assembly. It's not difficult to do, you just need a screwdriver. But you need to be careful during this operation. With careless movements, the spring may fly off and cause harm to the user.
Removing and disassembling the assembly
The procedure for disassembling the starter consists of performing a certain sequence of actions:
- First you need to find the screw that connects the starter cover to the pulley and unscrew it;
- then remove the spring, antennas and washers;
- then carefully remove the pulley, holding the structure away from your face so that the spring does not spring off and accidentally injure the user;
- Next you need to look at the spring: if it is damaged, then you need to install a new one (the cost of such a part is low), but if it jumps out of the hook, it must be returned to its original place, making bends if they break.
Replacing the trimmer line: step-by-step instructions for replacing the line on the trimmer
Trimmers (aka lawn mowers) are actively used by modern society to care for lawns and other similar gardening facilities. The tool is noted for its high efficiency, despite the dubious quality of cutting grass (compared to an ordinary peasant scythe - earth and sky). The main advantage of trimmers (lawn mowers) is high productivity with little physical effort required by the operator. However, over time, the trimmer's cutting element (nylon line) wears out or becomes damaged, rendering the trimmer a useless tool. Hence, the task becomes urgent - how to replace the trimmer head and how to replace the line of the trimmer head? Let's look at this process using the example of lawn mowers manufactured by Black and Decker and others.
The design and principle of operation of a starter on a trimmer
The gasoline engine is, in principle, the main part of the brush cutter. Its power is in the range of 0.5-2.5 hp. The movement from it is transmitted to the shaft located inside the hollow rod, and then through a gearbox consisting of gears to a fishing line or knife (working body).
The lawn mower also has the following elements:
- protective casing;
- lever;
- a belt designed for ease of use of the device;
- a starter used to start a gasoline internal combustion engine.
All parts of the brush cutter are shown in the photo below.
The starter on the trimmer is an integral part that starts the engine into operation. It is shown separately in two photos below.
The starting mechanisms of various models of lawn mowers work on the same principle: when starting the internal combustion engine, the protrusions, marked in the photo above with number 1, engage with pawls 3. When the engine starts to work, they return to their previous position due to the influence of centrifugal force. Wires 2 also play a similar role.
The process of returning the mechanism elements to their original position occurs due to the presence of a spring wound around an axis. It unfolds when the rope is pulled. After releasing the cord, it is retracted and wound due to the coiling of the spring. When starting the internal combustion engine of a lawn mower, the starting mechanism rotates its shaft until it starts working (starts up).
Today, gasoline lawn mowers are equipped with two types of starter mechanisms:
- manual;
- electric.
The first option is much more common.
The starter on the trimmer can function without breakdowns for a long time. It is impossible to clearly indicate the failure-free operation period. Everything is determined by the initial quality of the device and compliance with the rules of handling it.
Basic coil malfunctions
Users of electric trimmers and lawn mowers often encounter problems with the semi-automatic mowing head. Coil malfunctions can be the following:
- the line does not extend automatically;
- the cord spontaneously comes out of the reel.
Line does not automatically extend
If, when you lightly hit the trimmer coil button on the ground, the line does not lengthen, then the reasons for this may be the following.
Option 1 - biting occurred, i.e. clamping the cord between the turns. This problem usually appears if the user winds the line onto the reel unevenly, with intersecting turns, or winds it with insufficient tension. In the latter case, when the mowing head rotates at high speeds under the influence of centrifugal force, the cord begins to tighten, resulting in possible inter-turn clamping of the fishing line. To fix the problem, you will have to disassemble the reel on a trimmer and rewind the cord correctly, that is, in even turns with good tension.
Option 2 - the ends are too short and protrude from the head. The line may not come out when it hits the ground if its ends protruding from the head are not long enough (short). In this case, the centrifugal force is not enough to stretch the line. Therefore, you need to stop the unit (turn off the engine or unplug the electric trimmer) and pull out the line manually, after pressing the button.
Option 3 - the fishing line is soldered inside the mowing head. This causes the reel to lock and not spin when the button is pressed. Basically, this happens for several reasons: poor quality of the cord, overheating of the reel during prolonged operation of the unit, impact of the fishing line on hard objects.
- In the first case, the cord from third-party manufacturers may be made of low-quality and fusible materials that cannot withstand mechanical and temperature loads. Therefore, preference should be given to “branded” fishing lines.
- But, if you nevertheless purchased a fishing line of unknown quality, and it often gets soldered during operation, then you can follow the example of some users who, after threading the cord into the reel, moisten it with either silicone grease (from a can) or mineral oil. This procedure greatly reduces the likelihood of soldering turns of fishing line together.
- Also, the fishing line can become soldered if, during mowing, it hits a hard object (stone, fence, dry branch, etc.). As a result of this, it stretches a little and is pulled back into the head at high speed. The cord heats up due to friction, and its turns stick together. The only thing that can be done to eliminate this problem is to open the trimmer reel and rewind the line.
How to start the engine of a trimmer or lawn mower?
The new trimmer is easy to put into operation.
- Check the device motor type. Trimmers are equipped with a 2- or 4-stroke motor.
- Buy oil for this type of engine. Gasoline for the trimmer is AI-92/93/98, sold at all gas stations.
- Mix oil and gasoline. Mineral oil is mixed in a ratio of 1:34 with gasoline, synthetics - in a ratio of 1:50. Follow the trimmer manufacturer's advice on oil viscosity (see the label on the flask). All-season oil 5W-30 is most often used. Do not use untested motor oils.
- Pour a small amount (for example, 0.5 liters) of the resulting fuel into the tank.
- Close the air damper by sliding the appropriate lever (see instructions).
- Turn the ignition key (or knob) to the “on” position - without this, the trimmer will not start. Newbies often make this mistake.
- Pump a little fuel into the carburetor - if you have a manual “pumper” with a separate button or lever (see annotation). You need 4-7 clicks.
- Place the trimmer on a level surface.
- Gently pull the starter cord until you feel it slow down. Then pull it out sharply, but not completely. Repeat this movement up to 4 more times.
- If the engine does not start, open the air damper again, otherwise the spark plugs will flood with gasoline with subsequent movements of the cord. Make 2-3 attempts to start the engine with the handbrake open.
- If the engine still does not start, close the choke and make a few more attempts to start it.
- After starting the engine, press the gas lever to turn on the idle speed.
Chainsaw starter: DIY repair
An indispensable tool for cutting firewood and felling trees is a chainsaw. Following the manufacturer’s recommendations and taking the necessary preventive measures will ensure a long “life” of the unit.
But even the most reliable mechanism develops problems over time, most of which can be fixed with your own hands without the help of specialized centers.
One of these malfunctions may be in the chainsaw starter, which can be repaired independently if a certain sequence of operations is followed.
Replacing the cord
To replace an element, you need to find a hole in the reel for it, through which you pass the cord, and then tie a knot. Next, you will need to cock the coil with the spring, performing several turns.
On a note! The exact number of turns can be found by looking at the instructions for using the trimmer, or manually. To do this, you need to measure the length of the rope and count how many times it can be wrapped around the reel.
For example, if the cord wraps around a circle six times, then to tension the spring, you need to turn the coil counterclockwise six times. After this, all that remains is to thread the rope through the hole and attach the handle to the cord.
Starter assembly
Assembly of the starter unit is carried out in a number of stages:
- the coil is turned over, installing it so that the spring bend fits exactly into the groove of the body, as in the photo below;
- place two washers, between which a spring is placed;
- put the cup with antennae in place;
- tighten the screw (photos below).
When performing the above manipulations, it is necessary to place two washers. If this is not done, the spring will eventually damage the plastic cup, and when it is tightened, wedging will begin. Because of this, it feels as if a spring has come off. To eliminate this drawback, you need to install this part of a longer length or an additional washer.
When such spare parts are not available, you can simply unscrew the screw slightly and the starter unit will start working without jamming. But this option is temporary - it is better to repair it efficiently as quickly as possible.
Other faults
Sometimes, after the repair has been carried out, the spring still falls off. There are two solutions to fix this problem:
- To prevent the bend of the spring from jumping out of the groove, you need to insert a small fragment of a metal plate between the bend and the wall of the seat. This will ensure a tighter fit of the spring.
- A homemade fastener also helps to hold the spring in the groove. It is necessary to drill holes in the coil on each side of the groove, place a spring bend in them and secure it with a piece of wire. These steps should be performed so that the wire does not touch the starter cover and does not slow down the movement of the pulley.
Spring tension
After installing the spring, it should be tensioned. To do this, perform the following steps:
- remove the handle from the starter cord;
- then the rope is inserted into the spool groove;
- tension the spring by rotating the coil in the direction opposite to the clockwise direction (winding);
- make the required number of revolutions specified in the operating instructions for the trimmer model used and corresponding to the length of the cord used;
- at the very end, the rope is threaded into the hole intended for this purpose, located in the starter cover;
- put the handle in place, fixing it with a knot.
If after repair the spring continues to fly off, you can get rid of it in the following ways:
- squeeze a piece of the plate of suitable size into the groove at the location of the spring hook;
- Drill holes on both sides of the groove in the coil into which to insert the spring hook and secure it with a wire.
Assembling and installing the starter
To assemble the starter and install it in its original place, you must:
- turn the pulley with the spring down and place it inside the housing so that the spring bend falls exactly into the groove of the housing;
- install the washer, then the spring, and the second washer on top of it;
- Place a cup with antennae on top of the washer and screw in the screw.
When assembling, be sure to install both washers, otherwise the plastic cup will be damaged by the spring after some time, and when pulling the cord, the user will notice that it is jammed. It will look like a spring has fallen off. To fix such a breakdown, you will need to install a larger screw or another washer. If it is not possible to find the required parts, just loosen the screw a little, after which the starter will stop jamming. However, you need to understand that these are temporary measures and the problem should be fixed as soon as possible.
Spring winding
Winding a spring is not an easy procedure. Not everyone succeeds in installing the part in place the first time, so you should not be upset if you fail. It is necessary to repeat attempts until the actions are successful. If you wish, you can watch a video on the Internet, where craftsmen tell in detail and show how to easily and quickly perform this operation.
Important! When winding and installing the spring, you need to remember that it is hardened, which means it can burst if you apply too much force. A new part is inexpensive, but you will have to spend time searching for it, which means that the work of mowing the grass will be postponed indefinitely.
To wind the spring, you need to place the bend in the groove, and then, turning the coil, carefully lay the part along the inner diameter of the bobbin. In this case, the spring must be constantly held with your hands - if it is not fixed, the part slips and jumps out, then the winding has to be done again. When done correctly, the spring is held tightly in its seat.