Motorcycle tackle: types, features, DIY creation
For many years, buying a bike has been every man's dream. Traveling on a two-wheeled beast with the ability to reach incredible speeds, enjoying the whistling of the wind and the cars flashing past, is truly an amazing experience. And if such a vehicle provides its owner with maximum safety and driving comfort, then the upcoming ride will be not only exciting, but also enjoyable.
- Using a motorcycle stand
- Using a lift to repair a fork
- Buying a factory model
- Existing types of tackles
- Features of creating a homemade lift Step-by-step guide
Every motorcyclist must understand that his new “friend” needs appropriate maintenance, which consists of diagnosing and removing all kinds of faults. And in order to successfully carry out repair work at home, you need to equip your workshop with such a device as a motorcycle underride.
Buying a factory model
Before deciding on a specific model, consider the manufacturer’s popularity and consumer trust in it. It is important to give preference to those offers that have appropriate quality guarantees and accompanying certificates.
It is no secret that all factory products are pre-tested for suitability for further use, which ensures maximum safety, both for the motorcyclist and his two-wheeled “beast”. A good tackle must have a GOST certificate.
Types of motorcycle stands
Today, tackles have proven themselves to be very convenient devices for repairing and servicing a bike. Every motorcycle owner who has had to repair their equipment has thought about purchasing such a device. The tackle allows the owner of the iron horse to install it very steadily for repairs. The roller is very convenient when changing a wheel - it allows you to hang the motorcycle and thereby easily remove the wheel.
We can say that a homemade stand is a do-it-yourself motorcycle stand, only without a table. If there are wheels, the lift can easily be moved to a given location for repairs. The small dimensions of the device allow it to be used in places with limited space.
Types of stands:
- rear - for servicing the rear of the motorcycle;
- front - for servicing the front of the motorcycle.
The front type lift comes with an adapter that allows you to hang the wheel for repairs. The adapter is selected for a specific bike model. This tool is suitable for repairing the front fork. A do-it-yourself car tray is ideal for storing cars in the winter. It has a simple design and does not require special knowledge to operate it.
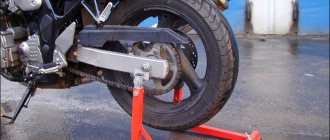
The rear type tackle is a little more structurally complex. It features an L-shaped device with a handle. It is equipped with clamps whose task is to securely hold the wheel. The width of the clamps is selected for a specific wheel. Such tackles are mainly used by repair services, as they allow lifting weights up to 300 kg . With the help of such a tackle, you can hang the motorcycle in such a way that the suspension is maximally unloaded. Thanks to this feature, it is quite easy to replace the chain.
The intricacies of transporting a motorcycle – what else is useful to know?
We talked about transporting a motorcycle in different ways in the previous article, but at this point it is useful to take into account the tools that will be useful for this and several technical steps.
- Presence of a wheel trap
- Additional fixation posts
- Harnesses, cords or straps for fastening
- Carabiners or rings for fasteners
- Case or film
- Removing fragile and protruding parts
- Disabling the alarm and battery
- Insulation of protruding cables and wires
Wheel trap
A wheel catcher, also known as a front wheel lock, is required for almost any type of transportation. This design, often dismountable, has a structure under the wheel, which is screwed to the floor surface and prevents the motorcycle from falling. It can be either an independent element or with a continuation of the strip along the entire length of the motorcycle (usually completed by the pilots themselves).
The trap is used for partial loading when there is no other convenient way to secure the motorcycle. They simply mount the trap to the body, secure the wheel, and there you have it, partial loading of the motorcycle! There are a lot of traps, these can be factory-made or home-made designs. The main thing is that it holds the motorcycle securely and does not injure the wheel.
Often traps are supplemented with tackles for the rear wheel and, of course, strap ties, since if the turn during transportation turns out to be too sharp, then the rear part of the motorcycle can overweight by inertia, if it does not have additional support, slide to the side and damage the front wheel. Not always, but once a year even such a stick shoots.
Additional fixation posts
You don’t have to worry about the wheel trap and make wheel stands along the entire length of the trailer, pickup truck, or car body. They are made from pipes and assembled from wooden beams.
Very convenient for transporting several motorcycles. Attach two parallel pipes and divide it into parts to fit the size of the wheel so that it does not turn.
As a result, we have symbolic traps that can be caught with cords or zip ties.
One interesting benefit of building with wood is that instead of having separate flooring, people use wood flights. The method can be seen in the transportation of motorcycles on a production scale, but for yourself, take a lightweight format. In addition, wood is lighter in weight, it also does not need a welder, the main thing is that the nails do not stick out.
Harnesses, cords and straps for fastening
How..what else can you secure a motorcycle so that it doesn’t fall? It is very scary to take simple harnesses or cords for an hour, because rounded, braided, embossed cords like to leave scratches/scuffs on the body of the bike. One or two modest leans of the motorcycle and there you have a clearing on the new surface!
It is ideal to use flat belts, as due to their width they distribute the load evenly. Personally, I generally like the topic of car seat belts.
Even when they are not in the garage, at any car dismantling center they will most likely give them to you for return just like that.
If they were designed not to harm a person, then they shouldn’t harm a motorcycle either: wide, dense, long - great.
There are specialized belts with loops and hooks. You choose whether to buy ready-made or make it yourself.
The tension should be such that the motorcycle does not wobble. The belts should be attached to reliable parts, such as the frame or roll bars.
Carabiners or rings for fasteners
- Okay, I have belts, but what else should I attach them to besides a motorcycle?
As practice shows, many who do not ask the question of powerful preparation of transport for transportation, attach to whatever they have to. But when you are a perfectionist and once you start, it should be according to Feng Shui... Carabiners are convenient because you can open them and attach them to any other surface that is convenient.
They are mobile. However, there is an obvious disadvantage, their mobility is +5 to the mobility of the structure when there is not enough tension force. All kinds of rings, especially construction rings that you screw into the floor or into a separate plate that you lay down, are static. They are inactive.
You hook the belt and that’s it, the question is settled!
There is a third option, for those who like to rack their brains, but do it perfectly. Parts sticking out from the body sometimes irritate and get in the way; you climb into the body and stumble. What if you make a structure that won’t stick out? It’s one thing when the car body allows you to cling to the side walls so that nothing gets in the way. And when there is no such opportunity?
We return to the covering that is laid on the floor before transportation. This is beneficial from the point of view of cleanliness, since you never know what technical fluids will spill along the way? And so you choose a thicker coating and install it inside.
You make a technical hole with internal fastening, or insert something like hooks or internal rings there, only you direct them not vertically, but into the hole in a horizontal plane. There's a lot of people here.
The main thing is to position the fasteners so that the belts can be hooked inside the plate and only the belt assembly is sticking out from above. And then you can drive further with the coating and carry something else there without clinging to the protruding rings.
Case or film
When transportation is carried out outdoors, without an awning or body, you risk receiving mountains of dust and dirt upon arrival. Do you need it? Still, it’s safer to carry a motorcycle covered with a cover. As a last resort, you can wrap it in film. At least some additional protection. And yes, if you accidentally touch roadside vegetation somewhere, the protective coating will also help!
Removing fragile and protruding parts
Obvious, but let's repeat it just in case. Protruding parts that are terribly damaged or broken off along the road should either be completely removed or the bolt should be loosened and pressed against the motorcycle, for example, mirrors. Remove hanging bags too. Why do you need them now? The pain of dragging a loaded motorcycle into a trailer is an original plan for a masochist. Remove all excess and unnecessary items before transportation.
Disabling the battery and alarm
In order not to stop along the way due to unexpected trills of the alarm, which may go off for some external reason, it is recommended to turn it off during transportation. And the battery is also often removed, because at the moment it is not such an important part.
Insulation of protruding cables and wires
Secure all protruding wires with clamps or something. It is very unpleasant to get caught in the cable when you are bringing the motorcycle to its rightful place for further travel. And it’s even more offensive to get caught on this cable yourself, when it would seem that the matter is in the bag. Likewise for electrical wiring.
Do-it-yourself motorcycle tackle
Motorcyclists among themselves call a motorcycle lift a lift. On websites on the Internet you can find any catalogs with a huge list of proposed tackles. But, firstly, they are quite expensive. And secondly, it is very difficult to choose a tackle for a specific motorcycle model.
Many manufacturers offer universal mounts, but their fasteners to motorcycle swingarms are not suitable for everyone.
And then some motorcyclists, taking into account the high price of tackles, their unreliability and the danger that they will not fit their model, think about making a tackle for a motorcycle with their own hands. A good tackle should lift the bike and hold it.
If you feel strong enough and have the necessary knowledge to make a motorcycle stand yourself, you will save a lot of money and make a device that exactly fits the size of the bike. For many, the most important point is the reliability of the manufactured tackle.
In order to do everything yourself, be patient. Because it will take a lot of time. You will need to select and prepare the necessary parts and tools.
Alternative options
If you have an unnecessary jack at hand, then you don’t have to worry about making a “stool”. To do this, we weld two channels to the jack on both sides of the lift and two more to them. After this, all that remains is to fix the guides and enjoy the finished design.
If the vehicle only needs to be transported or stored in a garage, then rolls can be made. These designs are footrests on wheels. They are installed either on the rear or front wheels. To make such a stand, you will also need a welding machine. You will also need to take measurements as shown in the picture.
The length of the product must correspond to the dimensions of the two-wheeled “horse”, so everything depends on its specific type and model.
Thus, you can save quite a large amount of money and repair your motorcycle without any problems.
A motorcycle is a whole philosophy and lifestyle for a large number of people. It represents to its owners freedom, the romance of the road, exciting and unforgettable travel. But for a bike to last for many years, it requires proper care and maintenance. First, you need to figure out what types they come in and how to make a motorcycle mount with your own hands.
Types of devices
The most popular type is the platform lift. It is quite mobile and versatile - it allows you to service different types of motorcycles. Hydraulic ones are used mainly for servicing heavy touring motorcycles and massive choppers. This type of lift is installed under the motorcycle frame and lifts it using hydraulics. Thus, the motorcycle is left in a suspended state, which allows for comprehensive maintenance and repair of equipment. Tools of this type have many adjustments and settings, which allows them to be used for repairing motorcycles of any type.
Factory or homemade
When repairing and servicing a bike, it is advisable to use both types of tackles - front and rear types. Factory solutions will meet all safety requirements, will be more functional and will have additional accessories, but all this will be quite expensive. On the other hand, homemade options will be several times cheaper, but the safety and functionality of such products will be much lower.
Advantages of factory devices:
- factory tackles are used by professionals;
- they have ideal proportions and geometry;
- can be operated by one person;
- can be installed under the pendulum and slider;
- have many adjustments and settings.
Selecting a Factory Lift
The first thing you should pay attention to when choosing a stand in a store is the manufacturer of the device. The manufacturer must certify its product and provide all quality guarantees for the device. Factory lifts undergo a series of safety and operational tests. Branded products must comply with GOST standards. Good expensive lifts are made from quality materials using modern technologies. Therefore, it is very important to choose the right model.
The motorcycle lift industry is evolving along with technological progress. New production technologies are emerging, new materials for manufacturing are being developed. Competition among manufacturers leads to the emergence of more functional and easier-to-use devices.
Branded tires are increasingly being used by professional riders around the world. The presence of a large number of additional accessories can significantly expand the capabilities of these devices and simplify their work. A modern lift can be operated by one person and allows you to lift a heavy rear end, securing it securely.
Making a stand
First you need to prepare the foundation of the future structure. To do this, you need to install the corners so that they form a rectangle and weld them. After that:
- We install 4 30 mm tubes in the corners and weld them to the base. It is important to ensure that all elements are installed parallel to each other.
- We install smaller tubes (25 mm) into the resulting glasses. They can be pre-lubricated to make them rise and fall easier.
- We measure the height of all the “legs of the stool”. If they differ, then the finished structure will constantly stop.
- Preparing the upper platform. To do this, we adjust the corrugated sheet of metal to the required size and weld it to the ends of the pipes installed in the glasses.
- To add strength, we weld square pipes, angles or channels onto the longitudinal parts of the platform.
- We prime and paint the finished structure.
Additionally, you can weld on guide corners, which will be used as handles for carrying the structure.
After this, all that remains is to install the jack inside the motocross stand and enjoy the homemade unit. The cost of such a design will be no more than 800 rubles, and the functionality is no different from the finished product.
What will it take?
First of all, it is necessary to prepare an approximate drawing of the future structure. You can take a photo of any finished stand as its basis. In our case, it will be a kind of stool with four lifting legs, which will be raised to the desired height using any old jack.
The main thing is to take the necessary measurements. First, let's measure the ride height. For cross-country models it is approximately 32 mm. Accordingly, the minimum height of the stand for storing a motorcycle will be about 26 mm. In order to carry out repair work, the unit must be raised by approximately 40-45 cm. Accordingly, for this you will need to purchase 4 pipes 30 x 30 mm about 20 cm long and the same number of pipes of a slightly smaller diameter (25 x 25 mm) about 25 cm long One pipe should fit into the glass (pipe of a larger diameter) not too tightly, but it is better not to allow the elements to dangle too much. The optimal space between the pipes is considered to be 1 mm, so if you purchase parts of a different size, you should take this into account.
In order for the structure to be a full-fledged lift, when making a stand for a motorcycle with your own hands, you additionally need to prepare:
- a piece of corrugated metal, about 4 mm thick;
- corners 35 mm;
- welding machine.
Healthy! Of course, expensive equipment is difficult to obtain, so if desired, you can fasten the entire structure with ordinary bolts.
After this you can start working.
Motorcycle repair tool
Today, a motorcycle tackle is in great demand; it is a mandatory attribute in the arsenal of every motorcyclist who knows how to properly care for his bike. It is used in the process of various works, when repairing cars. For example, a motorcycle lift is used when it is necessary to lift the rear of a motorcycle and change wheels or tires, or when repairing a cooling radiator.
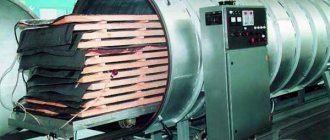
If the owner repairs his motorcycle himself, then buying a mount requires a lot of responsibility. They are relevant both for the home workshop and for specialized repair shops. Thanks to the convenient wheels, the equipment can be easily transported to the required location to perform repairs or other work on the motorcycle. This design is a type of motorcycle lift, but it does not have a table. The small dimensions of the rolls make it possible to install them in chambers where the product is dried or painted. Their service life is almost unlimited and they do not require any special care.
The motorcycle lift is made in two types and, taking into account the part of the motorcycle that needs servicing, it happens:
- Rear;
- Front lift.
Making a stand for a motocross motorcycle
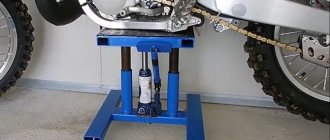
The stand for a motocross motorcycle is made somewhat differently. Since such a vehicle is not mounted under a pendulum or crossbar, but under the lower engine protection, an additional mechanism will be required to raise the stand platform. Typically, the base of the stand is made in the form of a parallelogram, a vertical stand made of squares, a crossbar made of a corner or also made of squares. It is better to make the base with overhangs for greater stability. The squares of the racks must have open internal holes, cleared of burrs. A jack is placed in the center of the base, onto which a lifting platform or H-shaped frame is welded on top. Smaller squares are welded to the platform or frame; they must fit inside the squares of the base, providing the necessary stability.
Fixing the motorcycle in a vertical position
A slight movement of the foot, practiced until it becomes automatic, and the rider leaves the saddle, leaving the motorcycle standing leaning on three points. However, heated asphalt, loose soil or loose soil can play a cruel joke on a motorcyclist, and upon his return he may find his faithful friend lying on his side, in a puddle of gasoline and oil. Experienced riders know about this, some install a custom footrest with a large heel, some carry specially stored plywood with them, and brutal bikers on chrome monsters basically do not use anything other than a flattened beer can.
Photos and drawings of the Naryl tackle on the Internet!
#1 Andreyka
- Group: Members
- Posts: 119
- Registration: 09 October 10
- Up of the page up there ^
#2 maxo
- Group: FB Veterans
- Posts: 1,111
- Registration: 02 April 08
Andreyka (25.2.2011, 18:49) wrote:
- Up of the page up there ^
#3 JJ
- Group: FB Veterans
- Posts: 1,628
- Registration: 16 September 07
- Up of the page up there ^
#4 CyBeR
- Group: Members
- Posts: 42
- Registration: 29 January 09
The photo in its original size had to be uploaded on the radical. There is a check mark there.
There would be a drawing of the front one so that it would be stuck along the lower traverse.
- Up of the page up there ^
#5 sz83
- Group: Members
- Posts: 243
- Registration: 19 August 09
CyBeR (7.3.2011, 19:10) wrote:
The photo in the original size had to be uploaded on the radical. There is a check mark there.
There would be a drawing of the front one so that it would be stuck along the lower traverse.
I brewed one for myself today. On the 954th. I did it without any drawings. (Like the rear one last winter). Everything is elementary there. The turner just ordered a boss for the traverse. The rest myself. Budget - pennies. The work of a turner and a 25mm square pipe. I don’t consider consumables such as electrodes and discs for the grinder. Then I’ll spend a little more on paint (I want to blow it out with a spray gun, with primer, car paint). If anyone is interested, I can take a photo and give you the dimensions.
- Up of the page up there ^
#6 CBRak
- Group: Members
- Posts: 63
- Registration: 02 March 10
sz83 (7.3.2011, 16:59) wrote:
- Up of the page up there ^
#7 Andreyka
- Group: Members
- Posts: 119
- Registration: 09 October 10
maxo (1.3.2011, 18:15) wrote:
- Up of the page up there ^
#8 Garik
- Burn everything.
- Group: FB Veterans
- Posts: 4,097
- Registration: 26 May 07
- Up of the page up there ^
#9 sz83
- Group: Members
- Posts: 243
- Registration: 19 August 09
Here are photos of my “creation”. I did it without any drawings, after looking at a bunch of pictures of tackles. There are no drawings yet - when I have time, I’ll get confused and post it (If only I can show it in a photo).
Material: 25mm square pipe, 6m length (they didn’t sell less, but the rest won’t go to waste) - about 450 rubles. "Boss" 1 pc. — 300 rub. Roller wheels 4 pcs - price: cold. - rolled them from old ones that had been lying around since childhood. Washers, screws, nuts, studs (for 6 wheels: threaded on a nail 200) - 40 rubles. Fork with thread either from the Volga or from the Gazelle 2 pieces - 120 rubles. Consumables - electrodes (I didn’t count), 3 discs for an angle grinder (125x22x1.2). 1 free day.
The boss has such a shabby appearance because... Due to some mistakes, I had to cut it off and re-weld it a couple of times.
A fork with a thread (screwed into a welded nut and locked with another) either from the Volga, or from the Gazelle - I stupidly went to the first car store I came across and bought suitable pieces of hardware, although this hinge unit can be made in any way - for some reason I was so confused, in a welded nut can be screwed into anything.
Rear roll (20mm square pipe, skate wheels)
I plan to then treat the surface and paint it (I just don’t want to use a spray can, but I don’t have time to bother with car enamel and primer yet).
PS: There is no oil on the floor in the garage. Melted ice from a car - spring