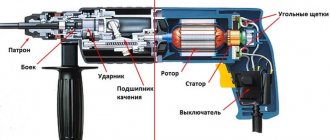
Like any electric tool, a rotary hammer requires periodic maintenance. This is largely due to its mechanical parts that need lubrication. But along with this, various types of malfunctions may occur in the device. It is easier to repair damage or carry out preventative maintenance on a tool when you are familiar with the design of the hammer drill and understand the operating principle of its components.
Diagram of the impact mechanism, its malfunctions and repairs
The impact mechanisms of rotary hammers differ in their design, depending on which family the devices belong to. Therefore, the repair of these mechanisms will take place according to different principles.
Barrel perforators
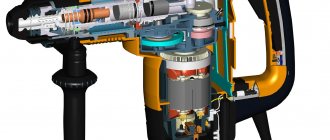
Rotary hammers with a vertical engine usually have an impact unit based on a crank mechanism (CSM). Below is a diagram of this type of impact mechanism.
The following photo shows a section of the device, where you can see the location of the crankshaft.
The impact mechanism of a unit with a vertical motor may have the following malfunctions. The connecting rod mechanism has a separate bearing that is mounted on the cam of the wheel with an eccentric, but sometimes it can be located at the base of the connecting rod. In some models of rotary hammers, a plain bearing (instead of a rolling bearing) may be installed at this location, which requires constant lubrication. If it is not there, or it is already old, then this unit will wear out. During repairs, you will have to completely replace the connecting rod and eccentric barrel.
Another common problem is the firing pin breaking. This malfunction can be calculated if you notice that there is no longer any impact on your hammer drill. To get to the firing pin, you will need to completely disassemble the barrel of the device. It is done as follows.
- Disconnect the barrel from the hammer body, remove the cartridge (see description above). Tap the barrel on the table so that the piston falls out. Take a rubber mallet and knock the barrel out of the housing.
- Remove the retaining ring holding the bearing.
- Remove the bearing itself and lightly tap the table to remove the balls.
- After removing the 3 balls, you can pull out the raster sleeve.
- Also, as in the previous case, remove the balls located on the bushing, just do not confuse them with those that were removed earlier (these balls are smaller in diameter). After removing the balls, you need to insert a screwdriver into the sleeve and push out the firing pin.
In this case, the firing pin is intact. But if it is broken, then replace it with a new one
You should also pay attention to the rubber seals and seals in the barrel body. If they are worn out, they must be replaced
Pistol type hammer drills
The design of the impact mechanism in a pistol-type unit is slightly different from the same-purpose mechanism installed in a barrel-type unit.
Its main difference is that the piston is driven not by a connecting rod, but by a swinging (“drunk”) bearing. Therefore, the most common breakdown of this unit is the wear of a “drunk” bearing that needs to be replaced.
The next photo shows a destroyed “drunk” bearing, which is the reason why the hammer drill stopped hammering.
The swing bearing is removed using a flat screwdriver, which you need to pick up the bracket and remove it. After this, the bearing is easily separated from the gearbox housing.
When replacing a collapsed bearing, you should thoroughly rinse the gearbox, since it is in its housing that fragments of the broken part may remain.
After cleaning and installing a new bearing, apply a thick layer of lubricant to this block.
Also, the reason that the device does not hit can be a broken firing pin. To get it out, you need to remove the retaining ring that is visible in the hole.
Take a small screwdriver, pick up the ring with it, and move it to the right (towards the gear).
Do the same steps on the other side of the part. Next, insert a screwdriver into the hole in the part and push through the removed internal parts of the mechanism.
After this action, you can easily get the locking ring and the housing in which the broken striker is located.
If you disassemble this case, you will see the “culprit” of the malfunction, due to which the hammer drill does not hammer.
Prevention during work
Video about hammer drill repair
The impact-forward device and the gearbox of the device are subject to heavy loads. The components heat up during operation, the seals rub against moving parts and wear out. All this leads to malfunctions. To avoid premature failure of the device, the following instructions must be observed:
- change the gearbox lubricant completely every six months;
- Once every 6 months, remove the brushes, inspect and replace them if necessary;
- after work, blow out the insides with a vacuum cleaner;
- Before work, do not forget to lubricate the rear end of the drill (chisel). If this is not done, the firing pin and seals will quickly wear out.
Tip: Do not put pressure on the tool. When pressure is applied, the stroke of the striker decreases and it begins to strike faster. Because of this, the striker and seals become unusable.
How to replace brushes: work in a couple of minutes
But the drill may not work due to trivial faults - for example, due to brushes inside the motor. This means that you can’t do without repairing brushes, and this work is quite simple - you don’t even need to have special knowledge and tools. To do this, we disassemble the device, remove the brush holders from it and replace parts that are broken. By the way, there are models whose body does not need to be disassembled - you just need to remove special plugs through the installation window, after which we change the brushes .
You can purchase these parts at any hardware store; there are also some models that are sold along with a set of additional brushes. It is important that you do not wait until the brushes are completely worn out - check them from time to time. And all due to the fact that there is a risk of a gap forming between the bristles and the collector. As a result, this part will begin to overheat and eventually fall off - which means you will have to change the entire anchor, which will be much more expensive and more difficult, and it is not a fact that you will be able to solve this issue yourself.
As you can see, there are a variety of breakdowns, many of which will be within your control, others will only be possible for specialists in service centers. And to reduce the risk of such breakdowns, you need to take care of your tool, clean it after work, check the condition of the parts and brushes in order to replace them with new ones in time. However, if you see that you can’t handle it yourself, take the device to a workshop.
About safety couplings
Such devices (safety clutches) are required on all hammer drills of household, semi-professional and professional types. They are used to stop the rotation of the cartridge when the nozzle jams. If the clutch is faulty, then the following consequences may occur when jamming:
- A jammed nozzle increases the current flowing in the rotor and stator windings, which contributes to insulation melting and failure of the electric motor.
- A very powerful hammer drill can be torn out of your hands if the attachment jams, which can result in serious injury.
There are two types of safety couplings:
- The friction clutch is the most common modification of the protective mechanism, which is implemented through the use of a gear mechanism. Discs with teeth are pressed tightly against each other, transmitting rotational force. When the drill jams, the discs slip, which eliminates the occurrence of electric drive overload
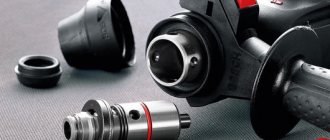
- Cam or spring-claw couplings - consist of two halves with beveled projections that engage with the grooves of the mating part. These halves are called coupling halves, which are connected using springs of appropriate stiffness. As soon as a large force exceeds the spring pressure, the coupling halves disengage. When the coupling halves are disengaged, a corresponding cracking sound is formed, like on screwdrivers. This is how the ratchet works on the power tool in question. Such couplings have one significant drawback - the rolling of the protrusions, so over time the tool is used, a cracking sound occurs even when the drills do not jam. The photo below shows the essence of the rolling problem, which can be eliminated even without replacing the gear with rolled teeth (to do this, it is necessary to eliminate the rolling spots)
- Roller devices are another type of safety clutch. They are also installed in the transmission gear structure, and when the attachment becomes jammed, the transmission gear that drives the chuck begins to rotate. They are called roller due to the use of a blocking key in the form of a roller. Due to this key installed in the groove of the raster bushing, the gear is engaged and rotational force is transmitted. When the load increases (when the nozzle jams), under the action of the spring force, the gear moves along the axis of the barrel, thereby engaging with the locking teeth (blockade) located on the hammer body (on the inside). Once the drill moves freely again, the spring force is reduced and the gear returns to its original position
The photo below shows the details of the hammer drill, as well as the gearbox with an installed roller clutch. To find out which clutch is installed on the hammer drill, you will need to disassemble it. In addition, there are also magnetic couplings, but they are not used on low- and medium-power rotary hammers.
What could be the reason for disassembling the hammer drill?
Tool failures are divided into mechanical and electrical . Repair is impossible without disassembly and subsequent reassembly.
Mechanical failures
The presence of problems in the mechanical part can be judged by the following:
- grinding;
- increased noise;
- strong vibration;
- strange smell from the case.
Such problems include:
- breakage of gear teeth or chuck;
- wear of the unit barrel, as well as the rubber striker and firing pin;
- failure of the impact mechanism, operating mode switch.
Electrical faults
If an electrical fault occurs, the motor hums, heats up quickly, does not rotate, and smoke appears. You may notice an unpleasant odor and sparking.
Electrical breakdowns:
- burnout of the rotor winding, motor stator;
- collector clogged;
- broken power button;
- violation of electrical contacts;
- brush wear;
- inability to turn on the tool.
For faults that appear in the electrical part of the electric motor, a professional is involved.
The principle of operation of a complex system
Considering the principle of operation of a rotary hammer, it is worth noting the operation of a more complex mechanism. Some models use more complex electronic systems. They are called constant electronics. Such a system is designed to maintain a constant, specified energy upon impact.
This system avoids performance degradation if the load increases. This is especially noticeable at low speeds.
Some professional models have an armature rotation control function. If the load increases, reserve power is activated.
Often the master has to drill holes in materials that create a large amount of dust. This leads to rapid wear of the tool barrel and also negatively affects the health of the master. Therefore, many models of modern rotary hammers are equipped with a built-in vacuum cleaner. It collects small abrasive particles from the drilling area, increasing comfort and quality of work.
What else can be made from an old hand drill - a quick-driver
The above describes the process of making a homemade product from an old two-speed drill, which has 4 gears. However, there are also single-speed devices that can also be used to make homemade products. This type of tool can be used to make a screwdriver that can be operated with one hand. This is very convenient when the other hand is busy. This device is called a quick-twist, and the principle of its manufacture is as follows:
This homemade product has one drawback - it is necessary to disconnect the bit from the fastening element in order to return the handle to its original position. An example of such an invention is shown in the photo below.
What is the tool for?
A hammer drill is an electric construction tool for drilling holes in hard materials that can withstand impact loads - concrete, stone, brick, as well as for chiseling grooves and channels in softer materials: plaster, unreinforced concrete, gypsum and cement blocks.
The hammer drill can also be used to remove ceramic tiles and porcelain stoneware, remains of hardened mortar and tile adhesive.
In the slotting mode, a powerful hammer drill can be used as a jackhammer, breaking open concrete floors, cutting off corners and other structures made of stone and concrete.
The working part of a hammer drill is all kinds of drills, drills, chisels, crowns, and other tools designed for rotational and translational motion during use. The decisive type of movement for a hammer drill is still translational. Therefore, drills do not have sharpening, and their heads are equipped with special carbide blades that break the material during impact and at the same time remove it from the hole during rotation.
Some modern rotary hammers allow a drilling mode, but in this capacity rotary hammers are inferior to conventional drills of similar power.
Making a machine for winding coils from a drill
What else can be made from an old hand drill that has been gathering dust in the garage for more than 10 years? Of course, you can make a simple device that will allow you to wind coils. You can wind not only threads and ropes, but also wire, for example, when rewinding electric motors.
The design of such a machine is very simple, and to manufacture it you will need to use the following devices:
A photo of such a device is shown in the photo below. If you attach a sharpening wheel to the chuck, the tool can be used as a hand sharpener.
How does a simple drill work?
The electric motor, using a gearbox, transmits torque to the chuck and then to the drill. The operator creates pressure in the direction of drilling, the drill with its working edges cuts the material layer by layer, going deeper into the hole. This rule works when the material is relatively soft and pliable.
So to speak, if there is something to “cut off”. Otherwise, the operator may not have enough strength for forward movement. This is the main difference between a conventional drill and an impact drill. The indisputable advantage is ease of use and the ability to perform work with high precision.
Hammerless electric drill with speed switching function
The presence of a speed controller adds versatility in terms of drilling various soft and fusible materials.
Electrical Diagram of Drill
If the light comes on, everything is fine with the button, but if you notice a malfunction, it’s time to replace the button.
The simplest diagram, and best demonstrating the principle of operation, is the following. That's all, in conclusion I can say that the method I told you works very well, I have tested it myself more than once.
If the light comes on, then everything is fine with the button, but if not, then the easiest way to fix the problem is to replace it. What's inside Drill repair. This happens very often, do it yourself
If the light comes on, everything is fine with the button, but if you notice a malfunction, it’s time to replace the button. In this case, repairs must be carried out using specialized tools.
More scientifically it looks like this. Since gearbox failure is the most common mechanical failure, we will dwell on its design in more detail.
The most simplified of all the diagrams and the one that best shows the principle of operation is shown in Fig. We connect the device to the contacts on the plug, but the device does not respond, because the start button is not in the working position.
I hope this helps, the drill is good.
If metal parts break, it is better to purchase a new unit.
The drill does not turn on, do it yourself REPAIR.
How to use a hammer drill in different modes
For convenience and proper performance of different types of work, rotary hammers have several operating modes. A toggle switch is provided to switch them.
Most modern rotary hammers operate in three modes:
- drilling;
- hammer drilling;
- chiselling.
Operating modes and their standard designation: drilling, hammer drilling, chiselling. You can adjust them using a switch
Drilling
The mode switch is installed opposite the “drill” designation. To perform drilling work, use equipment with SDS shanks: a removable jaw chuck or hammer drills. This mode is necessary for forming holes in wood, metal and other materials.
Impact drilling
The switch is installed opposite the “drill + hammer” designation. This mode is designed for drilling holes in concrete, brick, reinforced concrete structures and other building elements. The cutting tool performs simultaneous rotational and translational movements. When drilling reinforced concrete structures, the likelihood of a collision with reinforcement should be taken into account; this is dangerous for both the tool and the person. In this mode, drills are used - drills with special carbide tips.
Hammer drilling mode enabled
Chiseling
The switch is installed opposite the “hammer” designation; in this mode, the working tool does not rotate. Used for punching grooves, destroying building structures, and during excavation work
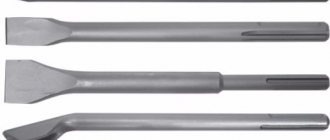
It is important to hold the hammer drill firmly and confidently. For chiselling, special tools are used - chisels, peaks, blades
To make a hole, you need special tools - chisels, picks, spatulas, hammers
Reverse
The reverse rotation mode reverses the direction of movement of the drill or drill. In budget models of rotary hammers, electric reverse is used - the armature of the electric motor rotates in the opposite direction. Disadvantage: more intensive wear of the brushes and braking of the armature. Professional devices use a more complex mechanism - a gearbox, in which the direction is switched mechanically, using gears. This method is more reliable, however, models of rotary hammers with mechanical reverse switching have a higher cost.
Other modes
Some rotary hammer models have additional operating modes. For example, turning the chisel is designed for efficient chiselling. In this mode, the bit rotates a certain degree after each blow.
How to switch and adjust hammer drill modes
Switching hammer drill modes must be performed only after the working mechanism of the hammer drill has completely stopped. In this case, there is no need to disconnect the instrument from the network. You must make sure that the mode switch is clearly locked in the desired position.
An old hand drill - what you can do with it yourself
The hand drill is a trouble-free drilling tool that was extremely popular half a century ago. As soon as electric drills appeared, the demand for hand-held devices decreased, but did not disappear completely. Today, this tool is probably gathering dust in the garage, and everyone wonders what can be done with an old hand drill. You can try to sell the tool, but don’t rush, you will be able to get no more than 100 rubles for this tool, but by making useful homemade products, you will get a unique unit. Let us consider in detail what can be made from the tool in question.
Troubleshooting Methods
Self-repair of a rotary hammer is extremely difficult due to its complex design. Even disassembling the case is often an impossible task for a home craftsman.
In addition to appropriate education, specialists from service centers of leading brands have regular work experience, the necessary tools, and equipment.
In addition, a diagnosis of a power tool is made during the initial inspection, which allows you to plan your budget: invest in an existing tool without guarantees of long-term operation, or spend money on a new power tool with a long service life and a manufacturer’s warranty.
Disassembling the rotary hammer gearbox: 1 – special ring, 2 – releasing sleeve, 3 – ring, 4 – ball, 5 – spring 8 – casing, 22 – closing spring, 28a – switch, 29 – ring, 30 – spring, 31 – latch.
The hammer drill is used in different modes, which significantly reduces the life of the working parts. In addition, specialized companies more often use either slotting (concrete, stone work, restoration of buildings, foundations) or drilling (installation of household and industrial equipment). If in the second case, following the manufacturer’s recommendations on drilling modes, you can extend the service life of the power tool, then in the first option it is very difficult to calculate the load. For example, with a specified maximum concrete drilling of 24 mm, it is recommended to use drills in the range of 18-16 mm. Peaks for breaking concrete, stone, and brick are standard, so the tool experiences different loads.
If the power tool stops hitting, you can limit yourself to disassembling the spindle assembly in the following sequence:
- dismantling the mode switch lever - the parts are usually made of polymers and therefore are quite fragile;
- detachment of the boot - the rubber corrugation must be periodically replaced, since it often comes into contact with destructible materials, wears out, and cracks;
- with a dismountable cartridge, the brushes are first removed; screws are loosened and unscrewed;
- the body is divided into two halves.
Visual inspection in 90% of cases allows you to identify a malfunction and replace the damaged/worn part. Before assembly, lubricant must be added and replaced.
Device for tightening and unscrewing long screws
To unscrew or screw a long self-tapping screw into wood, you will need to put in a lot of effort. If you've tried doing this with a screwdriver or electric drill, you know that it's quite difficult to do. The self-tapping screw will “go” into the wood to a certain depth, but it is almost impossible to tighten it completely with electric tools. It is also extremely difficult to do this manually, so you should call an old hand drill for help.
The tool for screwing or unscrewing long screws does not need to be modified. You just need to clamp a bit in the collet chuck of the device of the appropriate size and get to work. The efficiency of using hand tools when screwing long self-tapping screws is an order of magnitude higher compared to low-power screwdrivers and high-speed electric drills.
According to the type of drive, rotary hammers are divided into five groups.
- Cordless hammer drills powered by batteries are divided into Ni-CD, Li-Ion and Ni-MH. Quite convenient when carrying out facade work. You can read more about batteries in the article about choosing a screwdriver.
- Corded rotary hammers operating from an electrical network are the most popular and are divided into models with a horizontal and vertical engine. A horizontal motor arrangement is more common and is useful when working with walls. The vertical arrangement, in turn, is applicable when working with ceilings and floors. A rotary hammer with a vertical engine can operate in jackhammer mode for much longer.
- Pneumatic rotary hammers powered by a compressor are necessary for safety when working in explosive areas or under water pressure, where there is a possibility of electric shock.
- Gasoline hammer drills are most often used for road work.
- Hydraulic hammer drills are suitable for drilling in explosive areas and will be an effective solution when drilling is required without the use of bulky compressors.
Making a ratchet from an old hand drill
The range of tool capabilities does not end there. You can also make a convenient ratchet wrench from an old and unnecessary hand drill. Moreover, it can be used as a regular wrench, that is, tightened by hand, or in tandem with a screwdriver.
To make the tool, you will need two bevel gears and a drill shaft, as well as steel tubes, plates and a welding machine. The process of making the tool is shown in detail in the video material. The result is a universal hand tool that is definitely stronger than modern ratchet wrenches.
As you can see, a hand drill is a very interesting tool from which you can make various homemade products, expanding your capabilities and also simplifying your work. If you come up with something else that can be done with a hand drill, be sure to share it, as it will help people use an outdated tool to do new things.
Source
Types of rotary hammers
Although the purpose of these units is the same (drilling, drilling, chiselling), they differ in their functionality, which affects their scope of application.
Cordless rotary hammers
Devices powered by a rechargeable battery (AB) can be classified as household power tools.
A cordless hammer drill is convenient to use in places where there is no electricity, but you should know that the tool is designed for a short operating time. With its help you can only make a few holes in the wall. It is not suitable for work on hard materials that require prolonged operation of the device.
The main advantages of the battery-powered device:
- independence from the electrical network - can be used in the country house, in the garage, for roofing work, etc.;
- sufficient power;
- light weight;
- compact body;
- presence of reverse;
- you can drill concrete (maximum diameter 10 mm);
- has a speed regulator.
Disadvantages of a battery-powered device:
- The operating time of the device is limited by the battery capacity;
- inconvenient for frequent use, since it takes time to charge the battery;
- if dropped, the battery is damaged;
- Difficulties arise when purchasing a spare battery.
Network devices
This type of device is the most popular, both for home work and for professional use in the construction industry.
Thanks to constant power supply from the electrical network, the units have good performance and have great power. Network hammer drills are widely used in construction and repair work; they make it easy to tap and drill walls, as well as make openings in them.
Advantages:
- high performance;
- affordable price;
- most devices have three operating modes (drilling, drilling + impact, impact without rotating the chuck);
- anti-vibration system;
- possibility of speed adjustment.
Flaws:
- the power cord restricts movement;
- when the network voltage is unstable, performance decreases;
- During long-term and frequent work, the clamping chuck wears out, as a result of which the fixation of the drill weakens, and the chuck needs to be replaced.
Pneumatic hammer drills
Pneumatic tools are powered by compressed air. For this reason, it can only work in tandem with a compressor.
This type of tool is used in places where power tools cannot be used due to explosion hazards.
Advantages:
- light weight;
- high spindle speeds and high beats per minute;
- can be used in damp rooms and places with increased risk of explosion.
Flaws:
- a compressor is required for operation;
- the length of the hose limits movement;
- high cost of the unit.
Gasoline devices
Units driven by a two-stroke gasoline engine have greater power and high impact force.
- mobility due to independence from the compressor and the electrical network;
- one tank refill allows the unit to operate for about 2 hours;
- swipe;
- three operating modes.
Flaws:
- high price;
- heavy weight;
- the impact force is not adjustable, which can cause unnecessary cracks in the treated surfaces;
- the need for a canister with additional fuel;
- material costs for the purchase of fuel;
- large dimensions.
Replacing the main components of a rotary hammer
the main parts and components before they fail. Otherwise, repairs will take more money and time.
Most often worn out:
- brushes;
- bearings;
- start button;
- cartridge.
Hammer design
Replacing and repairing a cartridge
visually assess the condition of the cartridge after disassembling it. Using a screwdriver, remove the rubber boot, which is tightly seated on the cartridge. Dismantle the locking ring with the washer, carefully releasing the spring so that the locking balls that are located under it do not jump out and roll somewhere. After removing the spring, remove the rear boot. The cylinder is secured with 4 inserts . They pass through the walls of the tool shaft. To remove them, it is advisable to use a screwdriver with a magnetized tip or a magnet. The cartridge is pulled out, the components and the cartridge itself are inspected. Then they decide to replace a single part or the entire mechanism. Assemble the clamping device of the hammer drill strictly in the reverse order.
One of the most common cartridge malfunctions is abrasion and cracking of rubber boots during operation. As a result, dust penetrates into the mechanism. It contaminates the lubricant, causing the internal elements to wear out quickly. Due to the weakening of the locking ring, the spring is released, the locking balls fall out of the grooves, and the drill is not secured.
There are also other malfunctions, this is wear:
- Guide cylinder grooves . Which leads to inadequate fastening of the attachments.
- Springs . Because of this, depreciation deteriorates.
As a result of wear of the locking balls, their diameter decreases and they will not be able to hold the equipment. Springs, retaining rings, balls can be taken from other devices. If you need to change the guide cylinder or anthers, you must purchase original parts .
If the hammer drill malfunctions during operation, the drill is rotated and the clamping element . To do this, it is important to determine its type; the method of fastening the element depends on this. The device can be mounted on a screw rod or spindle. If the part is firmly fixed, tap the screw head with a hammer, the fixation will loosen. Using a screwdriver, unscrew the screw rod. The part fixed to the spindle is clamped with a key, rotated and the chuck is removed from the hammer drill.
Bearing replacement
The bearing should be changed if, upon inspection, lubricant stains , and when turned by hand it makes a cracking and crunching noise . To dismantle it you will need a special puller. It consists of a screw part, as well as a device that grips the bearing sleeve housing. By tightening the thread, a force is created that allows the bearing to be removed from the shaft.
A new bearing is installed on the workplace by hammering it with a wooden or rubber hammer. It is important that the bearing axis is not skewed relative to the shaft axis. After installation, it is necessary to apply a lubricant .
Replacing the start button
To replace the start button, remove the cover that covers the electrical parts of the tool. Disconnect the contacts of the wires that are connected to it. The button body is pulled out from the seat. Instead of the non-working one, they put the purchased one, connect the contacts and assemble it in the reverse order.
Replacing rotary hammer brushes
Replacing brushes
You can tell that it’s time to change the brushes if their holders heat up quickly , a lot of sparks form in the area of the motor commutator, and a burning smell appears. When the brushes are not yet worn out, sparks are visible only under them.
Sparking around the commutator indicates:
- burnout of the rotor or stator or failure of their insulation;
- bearing wear;
- burnout of the collector plates.
If the stator burns out, sparks will appear only under one electrode . The rotor and stator are checked with a tester, measuring the resistance on them in turn. Identical values on 2 windings indicate that the stator is working. If the stator or rotor fails, the hammer drill can only be repaired by experienced specialists. They know exactly how to assemble a hammer drill gearbox.
change the brushes yourself. To get to them, disassemble the case or simply remove the cover located at the back. Underneath you can see the brushes, which are fixed in holders specially designed for this purpose.
Different types of brushes can be installed on rotary hammer motors:
- Coal . They wear out quickly. But they easily rub against the commutator and provide good contact.
- Graphite . These are durable, but very hard elements, so they do not rub in so well.
- Carbon-graphite . The best option for parts. They mix two components that complement each other.
Experts do not advise escalating the situation to such an extent that the electric motor sparks. It is necessary to change the brushes when their wear level is 8 mm ( 1/3 of the nominal value ). Even if only one part is severely worn out, two are replaced at once.
When installing new elements, you need to look at the condition of the spring and the contact fastening . A spring that flies off during operation of a hammer drill will significantly damage the motor. A weak spring is unable to provide good contact.
Before you start replacing the brushes, the stator and rotor must be cleaned; no carbon or graphite dust . For this purpose, medical or industrial alcohol is used. The electrodes are fixed in holders, they are ground to the commutator by placing fine-grained sandpaper on the commutator. Then, by rotating in different directions, the electrode is ground in. Do this until the contact pad becomes slightly round. Then the electrode will better rub against the collector plates.
How to choose a hammer drill for home or work
The technical characteristics of a rotary hammer are determined by the tasks for which it was created. Choosing the right hammer drill will not only speed up and simplify your work, but also make it more enjoyable and safer.
Also, when choosing a hammer drill, you should pay attention to ergonomics and appearance.
Impact energy
Perhaps the most important characteristic is impact energy (impact force). This indicator is measured in joules
- Small models have an impact energy of up to 2 joules. These models are lightweight and maneuverable, making them ideal for drilling small holes (5-8mm) or when working in hard-to-reach areas (such as ceilings).
- Rotary hammers with an impact force of 2 to 4 joules are an excellent choice for those who need to drill holes with a diameter of 6-14 mm, as well as carry out minor dismantling work.
- Rotary hammers with an impact force of 4-8 joules are ideal for drilling large-diameter holes, dismantling work, as well as drilling with impact bits (ring cutters).
- Rotary hammers with an impact force of more than 8 joules are designed for drilling large-diameter holes (52 mm and more), working with large impact bits (100 mm and more), as well as dismantling work of varying degrees of complexity.
The higher the impact force, the larger the diameter of the equipment the hammer drill can work with and the more holes it can make. Moreover, unlike a drill, the impact force will not depend on how hard the operator presses the tool. This is due to the peculiarity of the structure of the impact mechanism, which we have already discussed above - the impact force will be constant even with a slight pressure on the hammer drill.
Beat frequency
The speed of drilling or dismantling depends on the number of impacts of the piston on the striker. Along with impact energy, this is one of the parameters directly responsible for the performance of the hammer drill. The impact frequency depends on the number of engine revolutions, but is inversely proportional to the impact force. The higher the rotation speed and the number of blows, the lower the force of each individual blow. This is due to the structural feature of the impact mechanism.
Hammer power
Power directly affects the operation of the hammer drill under load. At the same drilling speed and impact force, a more powerful hammer drill will experience less load and, as a result, heat up less. If you choose a hammer drill with insufficient power, then even with short-term operation it may overheat or fail.
Availability of several operating modes
Depending on the type and purpose of the hammer drill, it may have the following operating modes:
- drilling without impact;
- drilling (drilling with impact);
- chiselling (impact without drilling).
Depending on the tasks assigned, you need to select the required operating mode:
- drilling - for holes in brick, concrete, stone and other mineral bases;
- drilling - for holes in metal, wood or plastic;
- chiselling - for dismantling work.
A tool that has three functions at once is called a three-mode hammer drill.
You can also select another mode - the mode for adjusting the angle of the equipment. In this mode, you can align the chisel in the required plane for ease of work. In some models, the drilling mode is combined with the mode for adjusting the angle of the equipment.
Some rotary hammers can be equipped with a reverse function - rotation in the opposite direction. This function will be useful when removing jammed equipment, threading and other work.
How to connect a power tool without a diagram
Sometimes, when repairing or restoring the functionality of a power tool, it becomes necessary to connect the device to the network while maintaining all the functionality that the power tool originally had, but only wires stick out from the body, quite a lot of them (in my case 6), and the electrical circuit can’t be found anywhere . What to do? In fact, everything is not so scary and difficult.
A distinctive feature of a commutator electric motor is the commutator unit.
It is not at all necessary to know what and how was done initially. In order to connect the electric motor of the tool, you need to do the following:
- Find the supply circuit.
- If necessary, connect capacitors.
- Connect the switching device.
Method for finding power wires
In hand-held power tools for any purpose, as a rule, a universal commutator motor (UCM) is used. This versatility is very conditional and only means that the engine can theoretically operate on direct or alternating current. In practice, during repairs, this feature cannot be used; it is more important to know the circuit diagram of the UCD. By looking at which you can draw an important practical conclusion.
One of the bundle of wires entering the motor housing must certainly be connected to one of the stator windings, and through it to the contact pad of the brush.
To make sure of this, you need to unscrew or remove both plugs of the brush holders and remove the brushes. Then, touching one multimeter probe to the contact pad of one of the brushes, use the other probe to ring all the conductors in sequence. If the desired wire is not found, move to another site. In the end, the right guide will definitely be found.
In this case, it is convenient to use a multimeter with an audio signal. Depending on the design features of the device under study, the resistance in some circuits may be very small and this can be misleading.
Where is the vibrating tip used?
To begin with, it should be noted that vibrators come in two types - submersible or deep and surface. Submersible ones are used exclusively when pouring concrete walls, pillars and other similar structures. Surface devices are designed to compact liquid concrete poured horizontally, that is, onto the floor or ceiling.
Before you make a vibrator for concrete using a hammer drill or a drill as a driving tool, you need to understand the use of this simple and useful tool. First of all, the nozzle is used in the construction industry when concrete structures are poured. This specialized tool is also used in the following cases:
The devices in question have found their application not only in industrial, but also in home construction. Vibrators are used to build foundations, formwork, as well as pour posts and other similar structures. If in industry it is rational to use specialized tools, then for household purposes it is not at all necessary to buy such devices. If you have a hammer drill or a drill, then you can make an appropriate attachment for it, using available tools for this.
What you need to know before working with a homemade vibrator
For your home, it is not at all necessary to buy a factory tool, the cost of which is at least 3-4 thousand rubles. It is much more rational to make an attachment for a hammer drill or drill yourself, using improvised means. However, after production, the following factors must be taken into account:
It is clear from the material that making a vibrator from a drill and a hammer drill is not at all difficult, and there are many options for this. These options will help anyone and everyone who is wondering how to make a concrete compactor attachment at home. If you compare a homemade device, the cost of which does not exceed 50 rubles (for electricity during welding work), with Chinese factory vibrators costing 3-4 thousand rubles, then do-it-yourself models work even much more efficiently.
Source
A simple vibrator for compacting concrete using a rotary hammer and drill
Often in a household there is a need to pour a concrete or reinforced concrete structure. To do this, you will need to build a formwork into which the liquid concrete mixture will be poured. To build a reinforced concrete structure, not only a solution of a mixture of cement and sand is used, but also metal and crushed stone. In order for the liquid solution to densely fill the entire space of the formwork, you will need a specialized tool - a vibrator. It is not profitable to purchase a full-fledged tool, since it is expensive, so there is a need to make a vibrator with your own hands, a hammer drill or a drill. How to do this, and what is needed for this, we will consider in detail.
How to quickly and easily make a deep-well vibrator for a hammer drill
Making a vibrator for a hammer drill for compacting a concrete mixture with your own hands is not difficult if you approach this issue correctly. A homemade design is no worse than a factory tool. To make the design highly effective, you will need to prepare the consumables from which the nozzle will be constructed.
Why is a hammer drill used as a driven tool? This is an ideal tool for making a vibrator as it has a powerful electric motor with high torque. The shock mode of operation contributes to the creation of high-frequency vibrations. This vibration does useful work by compacting the concrete. So, there are no restrictions when making a vibrator for a hammer drill. You can use a variety of consumables that are available on the farm. To make a device with your own hands, you will need to know the following:
To make a homemade device with your own hands, you will need to perform the following steps:
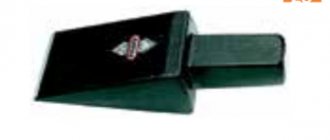
There is another option for manufacturing a simple device. To do this, you will need a steel plate measuring 8x8 cm and 3-4 mm thick. The shank from the faulty drill should be welded to one side of the surface of the plate, and the result is a device of the following type, as shown in the photo below.
The principle of operation is that the surface of the nozzle acts on the outer part of the manufactured formwork. The impact on the formwork walls leads to leveling of the poured concrete mixture. This is the simplest and fastest option for making a vibrator attachment for a rotary hammer with your own hands.
If the floor is poured with concrete, then to level and remove air from the inner surface, you can use a hammer drill with a drill fixed in a cartridge, as well as a shovel. By acting on the surface of the shovel on one side with a hammer drill in impact mode, the concrete base will be leveled and compacted.
Not only from a hammer drill, but also from a regular drill you can also make a vibrator. Moreover, the design of the vibrator will be different. Many craftsmen even recommend using a drill rather than a hammer drill as a drive mechanism, but it all depends on the consumables available.
Homemade hammer drill: concrete vibrator and hole drill
When pouring concrete, each layer is compacted. This is done manually by punching the mixture laid in layers with rods made of different materials (metal, wood). All work can be done much faster with the help of special devices - vibrators. But a factory-made vibrating plate purchased for home use is not always an economically viable option because it is expensive. It doesn’t make any sense to work on it several times and then leave it to just lie there. In this case, you can make a vibrator for concrete from a hammer drill with your own hands. A homemade product will speed up the compaction process and improve the quality of the work.