One of the popular tools when carrying out construction and finishing work is a laser level. It's no secret that such levels are used to obtain markings on the surface of walls, ceilings, and floors. Constant use of the device may cause damage. To fix a breakdown or malfunction, you will need to repair the laser level. We will find out how to do this further.
Common faults with laser levels
1. Deflection of rays (the device fell). Common malfunction. If the laser level falls (impacts), the pendulum on the suspension may move. If your device suddenly begins to deviate significantly from the vertical and horizontal, most likely it was dropped. Do not think that the device in the case, with the lock turned on, is protected from the pendulum shifting when dropped - this is not the case. Just try to avoid falls and bumps. Correcting the displacement of the pendulum on the suspension for a device with a significant number of emitters is a painstaking, expensive job that requires some knowledge, skills, special tools and devices. Due to the nature of the damage, the case is not considered under warranty.
2. Instability, the instrument readings deviate in one direction or the other. Less common problem. Fixing this requires (usually) replacing the suspension bearings and subsequent adjustments. The work is the same as in the previous case, only spare parts are also required. The cost of repairs is relatively high. The occurrence of such a defect during the warranty period is practically impossible; this case is considered under warranty only if there are no signs of tampering, falling or violation of the operating rules of the device.
3. One or more rays do not light up. The malfunction is usually caused by a break in the flexible wiring to the pendulum. Repairs are relatively inexpensive. If no traces of tampering are detected, then the case is considered under warranty.
4. Keyboard malfunction (one or more buttons do not work). The buttons need to be replaced accordingly. If no traces of tampering are detected, the malfunction is repaired under warranty. If the device uses a membrane-type keyboard, then it is necessary to change the design of the device and install conventional clock buttons; such repairs are more labor-intensive and, accordingly, more expensive.
5. Glass is broken. Replacing glass is an inexpensive and easy job, but glass does not break on its own. As a rule, the repair does not end with just replacing the glass; it requires adjusting the lines, and sometimes correcting the position of the pendulum on the suspension, as after the device fell (repair according to item 1.). Additionally, if the appliance has been used with broken glass, the inside of the appliance will need to be cleaned. In extreme situations, construction dust penetrates the bearings, then repairs are carried out as in paragraph 2. Broken glass is not a warranty issue.
6. Malfunctions of devices with electronic leveling systems and rotary levels are relatively rare; elimination requires certain knowledge (including the manufacturer’s service instructions), tools and devices. The cost of the work is high. If no traces of tampering or violations of operating rules are found, the malfunction will be repaired under warranty.
7. The laser emitter shines very dimly. As a rule, the laser burned out. Replacement of the emitter and subsequent adjustment of the device is required. If no traces of tampering or violations of operating rules are found, the malfunction will be repaired under warranty.
Therefore, for those who like to buy laser levels on Aliexpress and in other dubious places without a warranty of at least 1 year, you should think a hundred times because... Repairs may cost more than the actual level!
Other malfunctions encountered in practice are not typical and there is no need to describe them here.
The procedure for handing over the level for repair
1. Transfer of the device and paperwork Transfer to us the level to be repaired in a way convenient for you. Upon receipt, an acceptance certificate will be drawn up. For repairs under warranty, you also need a warranty card. 2. Coordination of timing and cost Our specialists will conduct diagnostics and inform you of the timing of the repair and its full cost.
3. Payment You can pay for repairs in two ways:
- Cash in our office.
- Cashless payment.
4. Receiving the device after repair To receive the level after repair, you will need a completed acceptance certificate. Legal entities who paid by bank transfer will also need a seal or power of attorney from the organization.
This is interesting: How to use a level - instructions for use
Laser level repair: common breakdowns
One of the popular tools when carrying out construction and finishing work is a laser level. It's no secret that such levels are used to obtain markings on the surface of walls, ceilings, and floors. Constant use of the device may cause damage. To fix a breakdown or malfunction, you will need to repair the laser level. We will find out how to do this further.
Level verification: what is it and why is it necessary?
Often device failures are hidden, that is, the level projects planes correctly, but at the same time they are distorted and inaccurate. Such a malfunction is not detected immediately, and you can perform a large amount of work, and only then discover that the laser level is “lying.” To prevent these types of malfunctions, verification should be performed regularly. In this case, you will not need to take the tool to a workshop or service center for verification, since you can complete the task yourself.
How to check a laser level yourself? First you need to turn it on, and then perform a number of the following simple manipulations:
- Place the level closer to the wall in the room and project the beam onto the opposite side
- Unfold the device and make a mark on the wall near which the level is located
- Move the device closer to the opposite wall and align the laser beam with the mark
- Once the laser beam is aligned with the mark on the nearest wall, you should turn it and check whether the projected line coincides with the marking on the opposite wall
The device is considered accurate if the beam falls exactly on the mark. A slight deviation is allowed, which may indicate an instrument error. The error depends not only on the cost of the level, but also on the range of measurements taken. The further the device is from the surface on which the beam is projected, the greater the inaccuracy value.
This is interesting! If verification shows that the device has a large error, then operation cannot be continued. First, the level must be adjusted, which you can do yourself if you have adjusting screws. Otherwise, you will need to take the device to a specialized center.
Main types of defects
It is possible to repair a laser level in some cases, but first you should make sure that the warranty period for the device has expired. Warranty cases include:
- If, during the operation of the tool, irregularities appear on the laser line when projecting horizontal marks.
- In case of violations in the suspension system of prisms, which leads to the disappearance of sections of light lines.
- When violations of vertical rays occur, which leads to a difference between the level readings and the true readings.
- If during operation any element of the control board fails. Violation of any element of the board will certainly lead to a malfunction of the entire device.
- If a phenomenon such as sticking of buttons and switches occurs. This makes it impossible to turn the device on or off, or to switch between different functions.
- If a luminous beam does not appear when the level is turned on.
While the tool is new, it is handled with care, but over time, during active use, the device may fall or various types of aggressive substances may come into contact with it.
Advantages and disadvantages of optical and laser devices
Among the main advantages of optical levels are their autonomy, reasonable price and high quality measurements. To operate the device, you do not need batteries or a power outlet. On the other hand, you won’t be able to take measurements alone. To operate this type of level, two people are required. One fixes a special ruler for a level with a 10 mm scale marked on it, while his partner takes all the necessary measurements, simultaneously writing down the necessary information in a notebook.
The numbers on the staff are marked in increments of 10 cm, and the values from zero to the end of the staff are in decimeters. For convenience, the five centimeter marks of each decimeter are also united by a vertical strip, so that the entire strip is marked with signs in the form of the letter “E”, straight and mirrored
Working with a level in this category is not particularly difficult, since the device is not picky about weather conditions; usually such devices are made of durable materials and are moisture and dust protected. The main thing is to understand how to use the level and staff.
As for laser devices, they are more suitable for household work. What is a laser level, and how does it differ from an optical level? They do not require the participation of third parties, they are universal and easy to use. The only drawback is the need to connect to the mains electricity or use batteries. In this case, the built-in automatic shutdown feature can be useful. It is programmed by the user for a certain period of time, after which the device turns off.
DIY laser level repair
No matter what brand is on the instrument - “Made in the USSR” or “Made in China”, no matter how sad it may sound, they still do not last forever.
Our assistants are breaking down, passing the baton of everyday work to a new generation, ready to constantly bring order to the chaos of construction. However, the motley composition of loyal allies experience the hardships of construction in different ways. The life of a simple hard-working hammer drill is spent in constant clashes with bricks, concrete and his other eternal enemies. He is unpretentious, constantly ready for a fight and pays little attention to the careless attitude towards his person. But the laser level is not like that - like an emo boy, a slight slap on the head causes him unbearable mental torment. But if the existence of the latter does not bring any benefit, then the laser level sets guidelines for construction work. It’s also not cheap and is instantly addictive. His failure, in addition to ruining his mood, takes a toll on his wallet. Therefore, today we will talk about the most common malfunctions of laser levels and how to fix them. 1. LARGE MEASUREMENT ERROR
Why do we love laser levels? Marking with it is done quickly, conveniently and, most importantly, accurately. If the first two statements do not cause any complaints, then the last paragraph, like a footnote in fine print in a loan agreement, is fraught with not very pleasant surprises. The insidiousness of such a laser level indicator as “accuracy” is that it is impossible to immediately, “by eye”, determine a 1mm error there for 5 meters, or all 5mm. And most people don’t even check the device before buying. And it is necessary to check, because... Level accuracy is a man-made indicator, and these hands are not always straight. The long and winding route to the shelves also often contributes.
And, of course, first of all, a careless attitude. Fell, hit - without subsequent recovery procedures, the career level as a measuring instrument can be given up.
In any case, this problem is solved by adjustment. To put it simply, to adjust the accuracy, the screws securing the emitter to the pendulum structure are used. I have seen many videos on YouTube where it is proposed to reduce the error using counterweight screws. This method has significant limitations both in terms of level models and in situations in which it can be used, so there is no point in considering it.
So, the order of manipulations with the fastening screws depends on the design of the laser level. It can be used:
1) diodes in a metal case;
2) laser diode tube.
As you might guess, they are configured differently.
But if in ordinary buckets the arrangement of screws for fastening the emitter is the same, regardless of the model and brand, then in 3D levels there are several such configurations. In the last picture, the best combination of them in terms of adjustment is when there are 4 adjustment elements and they are paired. For comparison, there are 3 of them in the Fukuda 3D laser level, they are placed on the sides and adjusting this level is a real punishment.
2. RADIator DOESN'T WORK
Another common failure of a laser level is the refusal of the emitter to fulfill its direct duties - to build lines. There are several reasons for this disobedience:
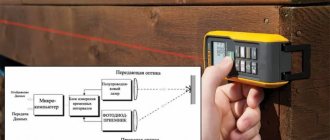
Principle of operation
The basic element of any device whose name includes the word “laser” is an emitter of highly targeted monochromatic (one-color) radiation. The phenomenon is based on forced radiation, which, depending on the power, is perceived differently.
Low-power laser emitters based on red, red-orange, yellow-orange and green diodes make it possible to produce a point or beam of light.
At a high level of pumped energy, a laser beam can turn into a weapon - it can set fire to materials that absorb radiation well.
Devices used in everyday life and construction and repair work operate on laser diodes of the red, yellow-orange and green spectrum; blue and violet ones are much less common (such models are much more expensive). To concentrate light radiation, biconvex lenses are used, as well as other optical devices that allow the beam to be converted into a plane.
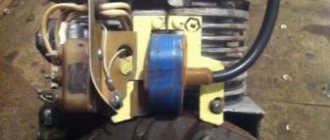
Household appliances have a standard circuit shown in the illustration. Design variations are related to the power of the emitter and additional accessories.
Laser-based level and level design
Laser levels and levels use the principle of directly indicating a target - a point or line on a surface. They can be tracked directly (in relatively low light) or through the eyepiece of the device.
- In addition to a point or line (the trace of the intersection of a light plane with a solid opaque surface), levels and levels allow you to obtain a cross-shaped pointer, as well as simultaneously use two or more emitters.
Due to the scattering of the laser beam into a plane, such devices are often called “laser plane builders”. In general, the set of functions of the device depends on the number of emitters and optical devices for concentrating or scattering the beam.
Substitutes for professional equipment
In homemade devices, a special laser emitter is replaced with a conventional laser pointer.
With sufficient power and quality, as well as the presence of two or more attachments that allow you to transform the laser beam, such a pointer is quite suitable for making a laser level with your own hands.
You just need to take care of sufficiently strong and convenient fastening and installation of the pointer in a strictly defined position with the possibility of displacement.
As can be seen in the illustration, a telescopic tripod with a convenient mount that allows the holder to be rotated is used to mount the professional device.
Since such tripods are often found in the households of amateur photographers, they can be easily adapted to make a tripod for a laser level with your own hands.
If you don’t have a tripod, you can make a simple stand based on a stick or timber with a support at the bottom, use a container of water or a hanging mechanism. These options will be discussed in detail below.
If you have a tripod and a construction bubble (“spirit level”) level, creating a device comes down to installing a tripod and attaching a level to it with a laser pointer fixed on it. The illustration shows a level with an existing groove for the pointer, but in fact the fastening is simply done using clamps, wire or even tape.
The most difficult part is the correct orientation of the laser beam. To do this, it is advisable to insert a piece of hard rubber or foam between the pointer and the surface of the level, securing it with clamps or elastic bands, as shown in the diagram.
Here 1 is a pointer, 2 is a piece of dense and moderately elastic material, 3 is clamps or elastic bands. After setting the bubble level strictly horizontally (this can be done on any flat surface), the laser pointer turns on.
By cutting the insert and tightening the clamps tighter or looser, we carry out a kind of adjustment of the level (of the future).
Once parallelism between the horizontal plane and the laser beam has been achieved, you can mount the resulting device on a tripod in any convenient way.
Support in the form of a rod, float device or suspension
As already mentioned, in the absence of a tripod, we use improvised means - a barbell made from a broom handle, a shovel or just a piece of timber, or a container of water.
The structure of the rod is very simple: a beam or stick is attached to a piece of board or OSB board (plywood) strictly vertically and so that the structure is stable.
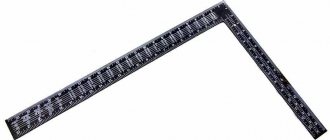
You can check the angle between the support and the rod with a building square, but it is better to use a regular building level. Spacers can be used as support, as shown in the diagram below.
A block the size of a bubble level with an attached pointer is mounted to the top of the rod - and the device is ready.
If you place a large container on the floor, filled almost to the brim with water, and place a level with a laser pointer on a flat piece of foam, you will also get a quite suitable support for a homemade level. In addition, in a container with water, the device can rotate freely, “drawing” a plane along all the walls of the room.
Interestingly, for such a “float” level you don’t even need a bubble level. With an even piece of foam plastic on which the pointer is rigidly and strictly horizontally fixed, the laser beam will move only horizontally - due to the impeccable evenness and horizontality of the water surface.
Simple steps for making such a laser level with your own hands and its operation are shown in the video.
The suspension is even easier to install. A beam is attached to a chandelier hook or other similar mount on the ceiling of the room using a rope or thin wire.
A laser pointer is fixed on the beam so that the light beam is directed toward the floor (if floor markings are needed) or toward the walls. Next, by rotating the resulting level from the pointer, we obtain a light point or line on the desired surface.
Device design
In appearance, the level is designed simply, but its individual parts are technically complex structures. Therefore, in most cases, it is not possible to repair a laser level on your own; this requires special equipment and professional knowledge.
One of the main elements of the device is light sources. They have built-in laser LEDs. They are placed in a plastic case, which has a protective function. It has fastenings that fix the device in the right place and also allow you to adjust the direction.
The simplest versions of a laser level set the direction parallel to the body of the device, but before that you need to set it up using a regular bubble level built into the device. Professional models are capable of firing 2 or more beams at once. They are self-adjusting, the beams are mutually oriented.
Level with compensator
Correct operation of a level with a compensator is characterized by the horizontality of the sighting beam of the telescope to the level surface of the earth (angle i) within the range of action of the compensator.
If the verification reveals a deviation of the mesh of threads, then adjusting the level with a compensator consists of loosening the screw fasteners of the mesh and bringing the plate with the mesh of threads into the correct position: the horizontal thread of the mesh should be perpendicular to the axis of rotation of the level, and the vertical thread should coincide with the plumb line. It is recommended to check the serviceability of the compensator each time before starting work.
Frequent breakdowns of the laser level
Sometimes it happens that the device does not work correctly or does not output a beam at all. Laser level repair is carried out in the following circumstances:
- when the device draws an arc instead of a horizontal line. Its ends can be either lowered or raised;
- when incorrectly displaying a vertical line that is noticeably different from the true vertical position;
- the output of laser beams is difficult due to a breakdown of the emitter suspension system;
- failure of the control board. It contains microcircuits and other complex elements and is connected to connectors. If one thing “burns out”, the device will stop working;
- refusal to operate or sticking of buttons;
- failure of the emitter when the light is not output or the luminous flux is too weak.
Repair is usually required after the device has been dropped - in almost every such case, the structure of the emitter system breaks down. This directly affects the accuracy of the level readings.
Level with compensator
Correct operation of a level with a compensator is characterized by the horizontality of the sighting beam of the telescope to the level surface of the earth (angle i) within the range of action of the compensator.
If the verification reveals a deviation of the mesh of threads, then adjusting the level with a compensator consists of loosening the screw fasteners of the mesh and bringing the plate with the mesh of threads into the correct position: the horizontal thread of the mesh should be perpendicular to the axis of rotation of the level, and the vertical thread should coincide with the plumb line. It is recommended to check the serviceability of the compensator each time before starting work.
How to check the level
Malfunctions are detected when checking the laser level. To do this you need to do the following:
- install it in any corner of the room;
- Direct the laser horizontally to the opposite corner (diagonally);
- along the line issued by the device, make 6 marks along the entire length;
- move the level to the corner where the beam was directed;
- align the laser line with the marked points - it should rush to the opposite corner.
In the same way, correct operation in the vertical plane is checked. If there are deviations, the device is not working properly and needs repair.
Reception and delivery
Bring the device to our service center and pick it up yourself when ready. Call a courier who will pick up the device at the specified address and deliver it upon completion of the repair.
- Cost within the city - 500.- *
- Cost outside the city - from 500.- *
* Reception of goods by courier and delivery are paid separately.
By region:
Send the device by any transport company to the legal address of our service center.
DIY laser level repair
Complex laser equipment must be repaired by a professional using special equipment. But you can actually do some things yourself. Minor damage may occur due to a shake or fall; if handled carelessly, the tripod or mounts may break.
If there is an inaccuracy in the readings, you can try to correct it. To do this, the housing is removed and a tendril is located inside the structure - it is used to adjust the laser head. It is adjusted using a regular bubble level.
In addition to the antenna, the correctness of the reading depends on the setting of the internal weight. It is located at the bottom of the structure. To get to it, you need to unscrew the plastic bolt. Under it there will be a screw with the letter “A” - this is a load. When it rotates, the position of the emitted rays is adjusted.
You can repair the case yourself - replace the glass or install a new tripod.
Repair: practical recommendations
You should know that it is not only the displacement of the tendril that can cause the stated problem and repair. The cause may be a failure in the load settings. And you can solve it by following these steps:
Diagram of an optical level device.
- Remove the sticker from the surface of the case. Opening the device will void the warranty in any case.
- Below you will find a plastic screw. When you open it, you will see a screw called “A”. This is the load. Carefully inspect the platform. You will immediately notice deviations.
- Rotate screw “A” to find the desired position. This can be achieved by hanging a plumb line on the wall.
- Check the position of the horizontal and vertical beams. They should be fine.
- Check frontal roll.
- Finally, to adjust the platform, you need to slightly loosen the screw located in the middle, and tighten those on the edges. This is to move it lower and tilt it forward. If you want to raise the platform, do the opposite. Loosen the outer screws, and tighten the one in the center. The process requires the utmost care.
If the glass of the laser level breaks, you can replace it yourself.
To do this, purchase material. Then make a mark on its surface that will correspond to the shape of the damaged one. Glass should be purchased with a width of about 2.5 mm. Replace when finished.
How to deal with the problem of buttons sticking
One of the most common causes of laser level failure is faulty buttons. This happens when construction dust gets inside or they are pressed too hard during use.
Repairing a laser level in such a situation is simple: you need to disassemble the housing and solder the loose contacts in place. In this case, it is recommended to use special solder with flux - with it the connections will hold tighter.
If the buttons stop functioning, they can be replaced with new ones.
In case of other malfunctions, it is necessary to give the equipment into the hands of specialists, otherwise there is a risk of completely ruining it. To avoid breakdowns, you need to carefully carry out operation, transportation and storage. After opening the case yourself, the warranty on the level disappears.
Where can I get my level repaired?
Once the option of repairing the device on your own has disappeared, it’s time to think about taking it to a professional workshop. They are located in almost all major cities of our country.
In addition to repairs, they can adjust the instrument and check it.
- The cost of repair will primarily depend on the location of the workshop.
- The further away it is, the more expensive the repair will be, since there will be additional costs for shipping the necessary parts and components.
- Secondly, this is influenced by the model of the tool itself.
Budget models will cost less than models from well-known brands, such as:
- "Bosch"
- "DeVolt" and so on.
- So the parts on them are much more expensive.
- And finally, the malfunction itself and its severity will also affect the cost of repairs.
In order not to make a mistake and not fall for unscrupulous craftsmen, you should choose only specialized workshops, which you can find out about on the Internet or through friends.
If the level malfunctions, there are two ways to fix it - do it yourself or take it to specialists. Before rushing to the workshop, you should figure out the situation yourself and only after it cannot be repaired can you take it to a specialized center.
Where experienced professionals will identify problems and be able to solve them quickly, and most importantly, efficiently.
By whom and how is the adjustment carried out?
If careful reading of the instructions and attempts to independently configure the device did not lead to the desired results, you should contact specialized metrological service centers that have certificates and licenses to perform metrological procedures such as verification and adjustment.
Licenses and state-issued certificates of admission to a certain type of work in geodetic activities confirm the quality of the work performed and services provided, as well as compliance with the requirements and state standards of the material base used and the qualifications of specialists required to carry out the work.
Self-adjustment
You can perform the simplest procedure for checking and adjusting a laser level yourself using the 180 degree method. Marking along the beam path is carried out in a certain way at different positions of the level: normal and rotated 180°. If the edges of the beam and the markings made coincide, then there is nothing to worry about - the device is in perfect working order. Otherwise, it will need to be adjusted.
All that can be done in terms of independent settings is:
- by rotating the screw, shift the center of gravity of the level;
- adjust the frontal and lateral roll of the planes with the platform screws;
- Using a plumb line and adjusting the screw, achieve the ideal position of the pendulum.
Other, more precise settings can only be performed by qualified specialists from specialized companies.
Mechanical subsystem malfunctions
A fairly common reason leading to displacement and defocusing of the beam (provided that the optics are clean and the alignment is correctly performed) is the deviation of the worktable surface from the horizontal plane. You can check this with a construction or laser level.
Having identified the presence of such a problem, it should be eliminated by adjusting the support legs of the machine. If their movement is not enough, place a shield or slab.
A problem well known to all owners of laser machines is the inaccuracy of the cut, when the contour “leads” during processing. There may be several reasons for this.
Most often, this is an uneven surface of the workpiece. This can be eliminated by timely adjustment of the focus.
If inaccuracy occurs only in specific modes, there may be a problem in the program (reprogramming should be done), or the processing speed should be changed.
If the latter does not help, the reason may lie in the uneven tension of the drive belts (for each of them the indicator must be within a certain range), be the same.
When inaccuracies occur only when moving the laser in one direction, the reason most likely lies in incomplete perpendicularity with respect to the processing surface of the optical axis of the laser emitter. Eliminated by adjustment.
How to use an optical level when building a foundation
The algorithm of actions is almost identical to preparing the foundation, with the only difference being that in this case the foundation is already ready, if only it needs to be leveled. So, the sequence of work:
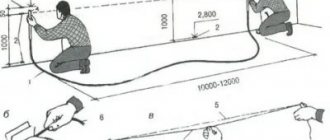
- Position the level so that you can clearly see each corner of the foundation in a relatively narrow field of view (90° or less). This will help get rid of errors associated with turning the level at large angles. To minimize error, install the level as low as possible over the foundation.
- With a helper holding the staff, shoot the outer corners a, b, c, d and record their heights. In our example, the highest angle is b.
- From the height of the highest corner, subtract the heights of the remaining corners and write down the difference - this will be the thickness of the spacers.
- Using shims, bring the corners to the level of a high angle with a tolerance of ±1.5 mm.
- Pull the string between the corners. With the cord stretched horizontally, place steel shims between the joist and the foundation under all joists, beams and point loads.
- To roughly fit the harness to the cord, place pads in the right places.
These are general recommendations when working with a level at different construction stages of building a house.