Often in carpentry there is a need to measure angles other than 90 degrees. This need also arises in construction, for which a simple tool called a malka was invented. In construction, this tool is used mainly when installing window sills, but not every craftsman knows how to use the tool. The goniometer will also be an indispensable tool for those exceptional cases when it is necessary to level the baseboards on the floor or ceiling.
Do-it-yourself small goniometer
A goniometer is a fairly affordable tool that can be bought at almost any hardware store, but the master does not always have time for this, and the device may be needed urgently. In this case, you can do it yourself. To do this you will need:
- A block of wood from which the block will be made. A small piece of up to 30 mm will do.
- A piece of plywood, the thickness of which should be more than 3 mm. It is better not to take plywood thicker than 5 mm. The moving part of the device is made from this material.
- A bolt and nut can be used as fasteners.
- Using a drill, you need to drill a hole for the bolt.
You need to start assembling the goniometer from the block. To do this, measure 10 cm on the workpiece and saw off the required length. After this, you can proceed to making a slot for the feather, which will require cutting the block from the end.
The feather of the instrument is made of plywood, and if it is not available, then you can use a material of similar size - for example, a sheet of plastic. Marks of 20-40 mm are made on the sheet: these will be the dimensions of the pen itself. They can be changed at your discretion. If you did everything correctly, the feather and the cut in the block will form an acute angle when folded. The parts are bolted together at an angle of 90 degrees; the pen must be able to move. The excess needs to be cut off and cleaned.
What to do when the level is not at hand
When using a bubble building level, you should adhere to some rules for working with it. Among them are the following:
- Do not apply the level to the working surface with its side or top.
- Do not use the tool without first adjusting it. To do this, you need to prepare a level, pencil, ruler and nail:
- Perform adjustments on as level a surface as possible. This can be the left corner of the wall with convenient access to it;
- retreat from the corner 3-5 cm;
- drive a nail into the wall;
- bring one side of the level to the nail, resting it against the surface of the wall;
- draw a line on the wall;
- lean the other side of the level against the nail;
- draw another line.
If the lines completely match, this indicates that the level is set correctly. If the lines diverge, a mark must be placed at the place where they intersect. After this, repeat the application procedure again. In this case, it is necessary to tighten the flask little by little. The adjustment should be repeated until the lines match completely.
- You should not buy levels that cannot be adjusted. There is a misconception that manufacturers produce tools to certain standards, which eliminates the need for customization. Each purchased building level requires preliminary configuration.
- Do not use the tool without checking that it works correctly.
- It is better not to buy levels whose design does not have adjusting screws located near each flask, 2 on each side. The screws should have wide heads: this makes adjustments easier and faster.
- It is not recommended to store the level without a cover. Foamed polystyrene foam is suitable for its production. In this case, you can be sure that the level flasks will not be damaged.
- The level should not be allowed to fall from a height. This may cause the bulb to crack or the instrument to become out of tune.
- It is better not to buy a level whose body is made of fragile material. Experts advise giving preference to levels whose body is made of wood, aluminum or durable plastic. The duration of use of such levels is several orders of magnitude longer.
- It is not recommended to buy inexpensive models of instruments. The period of their use will be short, and their data will not be accurate.
READ MORE: How to choose a wood sander
A construction bubble level is a tool without which it is impossible to carry out construction and installation work.
Construction level in a mobile device is a practical and convenient application. Now the mobile gadget will have one more function. Like a traditional measuring device, the telephone can be used during repair and construction work, when installing a tripod on a video camera, refrigerator or washing machine.
One of the valuable construction tools available to users of the Android OS (a similar application is pre-installed on the IPhone and is called “Roulette”). The application is equipped with rich functionality. With it you can measure:
- plumb line;
- length;
- surface slope;
- angle sizes.
Using powder for plastering
With this small tool you can easily and efficiently perform not only plaster, but also putty.
First of all, you need to form the same “dawn angle” for all slopes. We install the block on the edge of the window frame, for example, and use a pen to determine the angle along the edge of the slope adjacent to the wall. We secure the resulting result with a screw.
Now you need to check the entire slope around the perimeter of the small wall. The result should be the same everywhere. If there are deviations somewhere, then we remove the excess and check again. You may have to change the angle on the fry a little if there are large errors. The malka we made using a simplified scheme works in a similar way.
The next stage is preparatory work and plastering, puttying the slopes. The entire sequence is described in detail in the article plastering slopes. Here's a device for you - it seems like a very simple tool, but when used, the slopes are formed quickly and efficiently with a given opening angle, symmetrical and even.
I offer a short video where the small one is a very simple template made with your own hands.
Homemade protractor from a smartphone
Tool Today we will make a device for using a smartphone as a protractor, and at the same time we will check the suitability of our smart devices for measuring (or rather, determining) the angle of inclination. Traditionally, there will be a video version at the end. So. Due to the nature of my hobby, I sometimes think about purchasing such a wonderful tool as an electronic protractor. On Aliexpress, they are presented in an assortment. Take this one, for example.
2. Second stage. Huawei Mate 10 is a completely different price category. I hope it has an appropriate accelerometer.
Hmmm... As a result of several “measurements” I got 0.6-0.7 degrees. In short, I screwed up and won’t use my smartphone for accurate measurements. As a result of this experiment, I realized two things: - cheap and expensive smartphones apparently have very low-cost accelerometers that are completely unsuitable for any accurate measurements; — it looks like we need to conduct a similar experiment with a real inclinometer (although to be honest, I believe that inexpensive models have the same budget accelerometer sensors as smartphones, but this is just a guess), although I don’t have one yet.
But Linux lies very smoothly! Just a standard, not a cat! )) This is a bonus for those who were not too lazy to read to the end))
Video of making a homemade protractor
Thank you all for your attention! I hope the experiment was not useless for you. See you!. Homemade file handle - How to make a file handle with your own hands
Review HUSKVARNA 135 - Chainsaw for the garden. Mini Lathe - Benchtop Size Lathe Review
Homemade file handle - How to make a file handle with your own hands. Review HUSKVARNA 135 - Chainsaw for the garden. Mini Lathe - Benchtop Size Lathe Review.
All by yourself and with your own hands
How to use malka?
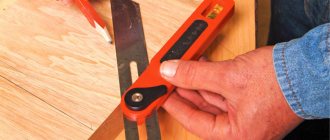
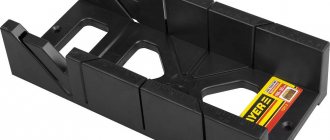
If we are talking about a pure transfer of an angle to a workpiece, then there is nothing to describe here: set the angle specified by a template or sample, or a drawing (possibly scaled), fix the relative position of the pen and the block and transfer it where necessary. In this case, it is absolutely indifferent to us what the magnitude of this angle is in degrees, radians or segments of any size. But, if you need to calculate the angle of conjugation of two connected elements, when it is different from a straight line, or a pair or three of others present on some miter box, then, perhaps, you cannot do without a small tool. Let's look at an advertising image of one of the digital cards.
The tool showed the wall bevel angle down to tenths, but did not bring us even 1/10 closer to a practical solution to the problem of accurately joining the plinth sections in such a strongly “wrong” angle. It is clear that by dividing 135.4° by 2, we get the angle at which the skirting boards should be cut, but marking them accurately and then cutting them is not an easy task. With the help of malka, these issues can be solved as easily as possible:
- Place the bait in the corner, pressing the block and feather tightly against both walls, and fix the turn of the corner.
- Transfer the resulting angle to a sheet of paper, drawing it with a pencil or pen.
- You cut out the resulting corner, although you can simply bend the sheet along the marked lines.
- Bend the resulting segment in half from the corner.
- You align the plinth by aligning its back part with one of the sides, and the end with the top of the corner.
- Combine the cutting tool with the second ray of the angle and make a cut. If you have doubts about the verticality of the cut, place a block with an exact right angle behind it and cut along its edge.
The video shows a slightly more complex way of transferring an angle taken from a scale drawing.
But its relative difficulty lies in maintaining extreme accuracy, because even minor deviations in the overall length of the structure can result in decent linear deviations in size. What can we say about such metal-plastic window systems, which are shown in the photo. If memory serves, their dimensions are: 5000 x 4000 x 3500 or so.
Can you imagine the consequences of an error in cutting the welding corners of the upper bevel of the structure? But everything was marked with impeccable accuracy using a small marker. A rectangle of 5000 ? was drawn on a flat floor in the workshop. 3500 with checking the diagonals, then one of the sides is extended to 4 meters and this point is connected to the second upper corner. Next - everything is as described in the example with the plinth, only the necessary values for welding are added to the nominal dimensions. For some types of work, special baits are created - double ones. They are used to transfer the angles of rotation of the bay window and similar tasks.
There is confidence that after what has been described above, there is no particular need to explain in detail how such a tool works. It is only necessary to emphasize that the grooves in the unit, which replaces the block common to both feathers, allow the fry to be moved apart in width, increasing its functionality. It is also obvious that this is a homemade small machine, and its design is significantly simplified, even in comparison with the simplest commercially produced one. But it does its job no worse than the factory one; you just need to be more careful when handling such not very durable structures. But making even a more structurally complex piece of work is not a problem for a person who knows how to use simple carpentry tools.
The main tasks of this tool
The main purpose of the grinder is to measure the existing angle and then transfer it to the workpiece or a more accurate measuring device. They are extremely popular when installing window sills. Using this tool, the angle of repose is measured, after which it is transferred directly to the workpiece, which allows you to cut the required size as accurately as possible.
The adjustable bevel is also used to determine the “dawn angle” during the installation of window slopes.
Malki are also called protractors, which today come in various types, shapes and sizes. Protractor meters with a size of 300 mm are popular, which allows you to measure different lengths of angles. Protractors are also made of wood, plastic or metal. You can measure angles using a protractor, but this is very inconvenient and time consuming. Recently, an electronic protractor has appeared that allows you to measure angle accuracy up to 1 mm.
Malka do-it-yourself protractor
Sometimes there is a need to use a protractor, but it is not at hand. It can and even needs to be purchased, but if a one-time job is being performed, then it is quite possible to make the tool in question yourself. For manufacturing you will need the following materials:
- A wooden block, which will serve as a block or a fixed ruler. If plywood or plastic is used, then use the thin part of the tool.
- A piece of plywood or plastic, but it is best to use old wood; their thickness should not exceed 3 mm. These materials will play the role of a moving element.
- To connect these two materials, you will need to drill holes in them, and then connect them together using a bolted connection with a “lamb.”
Marks of 20-40 mm are made on a sheet of plywood or plastic. If you use a ruler, then there are already markings on it. After this, you will need to combine the prepared materials, resulting in a homemade protractor. The video below shows how to make malka with your own hands in the simplest way.
How to use malka: step-by-step diagram
Not many craftsmen know that you can use malka in your work. In this context, there is not just a transfer of an indirect angle to the workpiece, but a direct calculation of the conjugation of the two elements being connected. Let's consider the features of using the tool in question using the example of window slopes.
Using a hammer, you can perform proper plastering based on standards. A step-by-step diagram of the correct use of the tool is as follows:
- The “dawn angle” is selected. We decide on the bevel under which the plastering will be carried out.
- A. To do this, we pick up a protractor, after which we proceed to measurements. The fixed part of the tool is applied to the edge of the window frame, and the movable part determines the angle from the edge of the window opening from the wall side. To fix the obtained value, you need to screw the “lamb” on the tool. From the wall side, we fix the result obtained directly at the top and bottom points.
- Slope leveling. To make the angles for the slopes ideal, you simply need to install a rail or strip to the wall around the perimeter of the window. The goniometer determines the location of the edge of the rail, after which we fix it with self-tapping screws. The rail must be checked using a building level, since it must be strictly vertical.
- Applying mortar and sealing slopes. The solution is applied to the slopes with a reserve, and the excess is removed using the rule. In order for the slope to receive the direction of the angle, you need to set the rule with the edge towards the window frame, and then draw it along the slope from bottom to top. The rule will remove excess mortar and also level the surface.
- Finishing is the addition of a final layer of plaster mortar (if needed) to complete the leveling of the slope. It is not advisable to seal slopes with large layers of plaster, since it will simply “float” without having time to dry. Finishing also involves the use of a protractor, with which the check is carried out.
Using the example of window slopes, the use of a protractor was considered
It doesn’t matter what kind of small tool you used to level the slope angles. The main thing is that the master uses a small tool to perform these actions, and also knows how to use it correctly
Protractor protractor
This is one of the popular DIY tool methods that can be found online. Even a child can do it. A minimum of materials will be required.
Necessary materials
For manufacturing you will need the following materials:
- Stationery protractor (in the shape of a semicircle, preferably made of transparent plastic);
- Laser pointer;
- Strong thread (can be replaced with thick fishing line);
- Fishing sinker with an eye (you can use a nut);
- Superglue and baking soda;
- Matches or lighter, needle.
The cost of such a protractor is literally 50 rubles. And this is taking into account the cost of the laser pointer and batteries required for operation.
Important! Matches and a needle are needed to make a small hole in the protractor. This can be done more accurately using a Dremel type grinder and a thin drill.
Manufacturing instructions
So, a protractor is made according to the following scheme:
- A small hole is made exactly in the center at the bottom of the protractor. The point will be on a line drawn perpendicular to the base from a mark of 90°. The hole can either be drilled or made using a hot needle. The latter is only needed for plastic devices - this is what it is advisable to use.
- A fishing sinker is tied to the thread. She will be like a pendulum. The recommended weight of the weight is 5 grams or more.
- The thread is threaded through the hole in the protractor. A knot is made at the threaded end so that the resulting thickening allows the thread not to slip out of the hole. You can fix the pendulum using superglue, but you don’t have to wait until it hardens - just add a pinch of baking soda and this mixture will instantly harden.
- A laser pointer is attached to the bottom edge of the protractor. You can also fix it with superglue and baking soda. If there are any irregularities on the pointer body, it is better to remove them or completely rub them with a file.
If possible, you should check the accuracy of the protractor using a building level (you need one that has a spirit level).
Usage
If everything is done strictly according to the instructions, then such a homemade protractor will have a maximum error of only 1-2 degrees, no more. To measure the angle you will need:
- Stand on a flat surface;
- Raise the structure to chest level, turn on the laser pointer;
- Point the laser point at the plane from which the angle is measured (preferably it should be a flat plane perpendicular to the ground);
- Fix the position of the protractor and thread;
- Look at the mark on the protractor that the pendulum thread points to.
Please note that you will need to subtract 90° from the indicated mark on the protractor. Naturally, such a homemade product will not replace a full-fledged building level, but in critical cases it will be enough to take measurements.
We make slopes without problems
Most often, a goniometer is used when constructing window and door slopes. Using this tool, you can achieve not only even corners, but also properly plaster the surface.
It is important that the corners have the correct angle of dawn and are symmetrical relative to each other. It is almost impossible to achieve this by eye: the difference between the slopes is immediately noticeable
How to get even slope angles? First of all, you need to prepare the walls for work. To do this, they are plastered, removing all visible irregularities. Areas of future slopes are cleaned of dirt and dust and primed. If there are traces of polyurethane foam on the window, its protruding parts are cut off.
Then you need to choose the right sunrise angle. To do this, you need to decide at what angle the plaster will be applied. This can be done using a goniometer. Its block must be placed on the edge of the window frame. The angle is determined using a pen; this is done from the side of the walls. After this, the result is recorded, and the remaining angles are checked with a small tool. If there is a discrepancy, another indicator is selected on the device, or excess plaster is knocked out.
In order for the slopes to become identical, their angles need to be aligned. Plasterers usually don't level the plaster near windows and it looks ragged. Before starting work, it is necessary to align these corners. To do this, you can install a leveled rail on the wall. Then the desired angle is set and the solution is applied at this angle.
Before plaster is applied to the slopes, it is necessary to secure the slats to the walls. This can be done using nails or self-tapping screws, depending on what material the walls are made of. After the slats are removed, the holes formed by the fastenings can be filled with putty.
The mixture must be applied in excess to the slope. To ensure that the plaster does not fall off and lies flat, it is applied at an angle; you need to act from the center to the corner. A goniometer will be needed to remove excess plaster from the slopes. Using the same tool, the corner is given the desired direction: to do this, the block must be moved to the window frame. You need to run the block along the frame, directing it from top to bottom. Using a pen, the goniometer leveles the surface and removes excess plaster from it. Sometimes pits appear during the work process. Getting rid of them is not difficult: just put more mixture on the recess. Excess amount can also be removed with malt.
The final stage of slope removal is finishing. For slopes, the normal thickness of the plaster layer is 5 mm. If an inexperienced master worked, the layer may be much thicker. In this situation, you usually want to immediately level the slope, but there is no need to rush into this, since the plaster solution has a large mass and falls off if handled carelessly. In order to avoid having to do all the work again and correct mistakes, it is better to give the plaster the opportunity to set a little in the form that it already exists.
You should wait about a day. After the plaster has set, you will need to use a special grater to clean it. This tool will allow you to remove all the crumbs and depressions that appeared on the slopes while working with them.
If desired, the surface can be made perfectly flat, but you need to work with caution: some craftsmen remove too much layer of plaster and make deep depressions that have to be repaired
The manual sanding method is quite dusty, so it is better to use a protective bandage. Using this method, the master will not have to resort to using additional tools or materials, and the angles of dawn will be the same.
Malka is a convenient carpentry tool. The small scale is used to measure and move any angles.
It is convenient to use when laying laminate, parquet, partially tiles, etc. The mould consists of two elements connected to each other with a bolt and nut. The bolt and nut are tightened a little so that the small can folds and unfolds while remaining in the desired position.
Preparatory work
Before you begin finishing work, you have to complete several preparatory activities. Give them due attention. The convenience and speed of further finishing and the overall quality of the finished coating directly depend on the correct preparation.
It is better if the window sill is installed before finishing begins. Otherwise, in the future you will have to close the gaps that appear between the side window slopes and the mounted window sill.
First step . Ensure reliable protection of the window sill from damage and contamination with the solution. For protection, it will be enough to cover the product with simple thick cardboard or suitable sized drywall scraps, if available.
Second step. Remove old plaster, paint and any kind of contamination from the surfaces of the opening, if any. The wall for laying plaster must be clean and level; the presence of dust and any other contaminants is unacceptable.
Third step. Cover the glass unit with plastic film. You simply need to glue the protective film to the glass unit with tape.
Also wrap handles, heating radiators and all other fittings with film or thick paper.
Fourth step. If you find excess foam (it is assumed that all the cracks have already been filled with this material after installing the window), carefully cut them off with a sharp knife.
The foam should be cut off
Fifth step. Cover the surfaces of the opening with a deep penetration primer mixture. This treatment will help improve adhesion (the setting of the applied plaster mortar with the surface to be finished).
When choosing plaster, focus primarily on the material used to make the window opening. A consultant from a specialized store will help you choose the right mixture.
Coat the surfaces of the opening with a deep penetration primer mixture
Sixth step. Install a vapor barrier layer. To do this, seal the foam seal with a special film vapor barrier material or cover it with a frost-resistant silicone sealant.
Apply the sealant to a previously cleaned and dry surface. Dispose of excess sealant immediately. It is very difficult to remove hardened product.
Without the internal vapor barrier of the foam seal, the foam will constantly become wet from the condensation that forms, lose its thermal insulation properties and collapse. In parallel with the foam, glass and slopes will begin to get wet, a draft will appear in the room, etc.
Seventh step. Make some. You can buy it ready-made, but making it yourself will save you some money.
Malka is an ordinary template used for plastering. Inspect the window slopes. You will notice that they do not have a strictly even shape, but seem to expand slightly inward, due to which the dawn of the window is created. To properly plaster such a surface, a small amount is needed.
Video - Using malka
To make your own fry, the easiest way is to use sheet plywood. The finished template will have a width of about 150 mm, and a length of 50-100 mm greater than the length of the slope. You need to make a cutout on one side of the template. You will move the side with the cutout along the window slope, and the second side along the pre-mounted beacon.
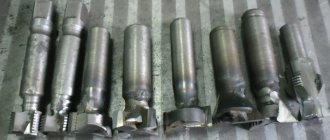
Tool structure
Most often, a goniometer is used in carpentry, but it can also be found in other areas of repair and interior decoration. Externally, the device is similar to, however, the small sample has a moving part, thanks to which you can conveniently take readings.
The tool in question has the following components:
- Block with slot. This is the main part of the protractor, which allows you to find out the inclination of the angle.
- Movable pen. It is threaded through a groove in the block: this saves space and makes the device more convenient to use.
- A wing that serves to secure the tool.
You can find both metal and wooden devices on sale. The wooden version is safer for surfaces and does not leave scratches.
Types of goniometers by method of application
Goniometers were invented quite a long time ago, but now this measuring tool continues to be popular. For different areas of use, appropriate measuring instruments are produced. Let’s find out in detail what they are and how they differ.
- Construction is the most common type of measuring tool that every craftsman must have. The device is intended for monitoring walls, foundations, ceilings, etc. The main feature of this meter is that its parts are at least 50 cm long, which ensures high accuracy of readings
- Carpenter's - used by carpenters in the manufacture of woodworking structures. A carpenter's goniometer is also called a small goniometer, and it is approximate, as it has low measurement accuracy. The main distinguishing feature of a small scale from a protractor is that one part has a graduated scale, and the second is a support leg
- Metalworking - compared to carpentry, it is distinguished by high measurement accuracy. In plumbing, high precision is important, so protractors have a sensitive adjustment mechanism that provides measurements down to the smallest fraction of degrees
- Mountain - in design it has little in common with previous options, but is also intended for measuring angles. It is used to visually determine vertical and horizontal angles in mountainous areas. Such instruments are used today only by amateurs, as they have been replaced by more accurate instruments
- Medical - few people know that medicine also uses a measuring device such as a protractor. The medical meter is used in medicine to determine the operating angles of large, medium and small joints. It looks like a circle with a graduated scale on which the amplitude of movements is analyzed
- Astronomical - has nothing in common in design with all the presented types of inclinometers. This type of instrument is the most accurate, and it is intended directly to calculate the trajectory of the stars in the sky, as well as their speed and size. Typically used in conjunction with telescopes
- Seaworthy - has an individual design, and is intended to identify the geographical coordinates of the vessel’s location. Today, such devices are not used by sailors, as they have been replaced by modern satellite devices. Only every ship must have such a device, which can be used in case of failure of electronic systems
- Artillery or military - serves to install an artillery gun, as well as adjust salvo fire. Today, devices are also practically not used
- Protractor for tightening bolts - a special device that allows you to ensure that bolts are screwed to the required angle of rotation
These are the main, but not the only types of protractors found on the planet. If construction work is being carried out around the house, then the craftsman will definitely need to buy a special protractor. What they are based on the method of measurement is described in detail below.
Where and when to use the tool
This measuring instrument has found its application in various fields, but the most popular area where it is impossible to do without an inclinometer is construction. The protractor is no less popular among carpenters, joiners and installers. When you need to set a right angle, the master uses a square. If you need to connect the parts at a different angle (more or less than 90 degrees), then you will need to use a square.
This is interesting!
The square is used not only to set the desired angle at which parts will be connected or structures will be constructed, but also to check compliance with the specified value. That is why the device is used not only by builders, but also by specialists during inspection work.
One of the simplest examples of using a protractor in everyday life is when you plaster window slopes yourself. If the side slopes are not at a right angle, then to ensure that the two walls are identical, you will need to use a protractor. In addition to construction, tools are used in the following areas:
- Geometry
- Astronomy
- Military direction
- Sailor
- Welding work
Depending on the scope of use, corresponding types of protractors have been developed, which we will learn about in detail below.
What is an analog micrometer and how does it measure?
An analog micrometer is also called a mechanical micrometer, as it has a simple operating principle and design. Based on the simplicity of the design, the device is durable, which is why even today you can often find devices produced back in Soviet times. A mechanical micrometer is resistant to physical impact, and to all the advantages, you can add a relatively low cost, which ranges from 400-500 rubles, depending on the model.
This is interesting!
On all types of micrometers, the clamps are different, and are presented in the form of a lever switch or a moving washer. Both clamping options are reliable, but the main disadvantage of washer devices is that they are not visible when the clamp is engaged.
Varieties
At a distance, different types of models allow you to calculate the angles of parts and structures relative to each other. For example, there is a metalworker's mechanical protractor, as well as its carpenter's analogue. They differ in materials of manufacture, strength and durability. Mechanical modifications, as a rule, are more durable and more resistant to external influences. There are also design differences.
The most common design is the optical type. This is an example of the above system of two rulers connected by a single hinge. A more developed example of a protractor is a vernier. In this form, mechanical carpentry angle gauges are usually produced, designed not so much for physical resistance to loads, but for a wide range of tasks performed. The vernier is a half-disk, the surface of which is also marked. This element is attached to the base of the protractor and acts as its auxiliary tool. With its help, for example, you can mark on a plane, as well as measure external and internal angles.
Making malka yourself
We cut a blank from the board up to 20 cm in width, and calculate the length - a value equal to the depth of the slope plus up to 15 cm, so that it is comfortable for your hand to hold it.
Top view of the slope
To allow the tool to slide freely along the window or door frame, we make a cutout in the workpiece equal to the width corresponding to the dimensions of the door frame or window frame.
In order for the fry to move easily along this guide, you also need a hole through which the loops will “pass.” It is made round in the corner of a cutout made in a board or plywood. The diameter should be slightly larger than that of the loops so that the fry does not touch the loops when moving.
Many people simplify production - instead of all the cutouts, they drive a nail into the end part (then the workpiece should be a little thicker). To prevent it from scratching the surface on which it will move, bite off the cap and wrap it with electrical tape.
In both options, one end of the block with a cutout or nail moves along the window frame, and the opposite side moves along pre-nailed slats, like guides.
How to use malka - step-by-step diagram
Step 1: Preparing the walls and window opening
All walls of the room in which you plan to make slopes must be completely plastered. As a rule, the plaster ends at window openings. The slopes themselves must be prepared, cleaned of dust and treated with soil. Also, if the window was installed using polyurethane foam, the protruding excess must first be removed with a knife.
Step 2: Select the “dawn angle”
Now we need, first of all, to decide on the angle at which it will be carried out. To do this, we install the block along the edge of the window frame and, by moving the pen, determine the angle along the edge of the window opening from the wall side. We record the result obtained on the small scale and check the compliance along the perimeter of the window opening. If, when checking, the selected angle does not coincide with the selected value, it is necessary to cut the plaster from the side of the wall or change the angle on the grinder.
Step 3: Leveling the slope angle
Usually, on a window opening, the plaster ends up in a chaotic manner; even corners are created when working with slopes. In order to make ideal slope angles, you just need to install the rail on the wall along the edge of the slopes around the perimeter of the window. To do this, we use a small tool to determine where the edge of the slats will be located, and fasten it with self-tapping screws or ordinary nails to the wall. Don’t forget to check the rail vertically with a building level; it must be strictly level.
Step 4: Apply the solution, set the angle
When the slats are installed on the corners of the slopes, we begin to apply the plaster mixture. To do this, apply the solution to the slope with a trowel at an angle, preferably with a slight excess. After sanding, remove excess plaster mixture and set the slope to the direction of the angle. In this case, install the block on the window frame, exactly as we did during measurements, and slide the block along the frame from bottom to top. At the same time, the pen will remove excess and level the working surface. If after the work done there are holes on the slope, add mortar and again remove the excess with chalk.
Malka is a convenient carpentry tool. The small scale is used to measure and move any angles.
It is convenient to use when laying laminate, parquet, partially tiles, etc. The mould consists of two elements connected to each other with a bolt and nut. The bolt and nut are tightened a little so that the small can folds and unfolds while remaining in the desired position.
Design and purpose of the fry
The usual, simplest malka consists of two elements:
- pads - a fairly wide block with a slot;
- feather - a thin strip, which, when assembled, hides in the slot of the block.
These elements are connected to each other by a screw pair. The design of the screw pair can be completely different, but there are two fundamental differences: the screw can be protruding, and then, most often, instead of a regular nut, a wing is used to conveniently fix the relative position of the block and the feather, or it can be recessed.
The latter option is more convenient for installing the bait in the right place, but is less practical for fixing given angles and, as a rule, is more technically complex.
Sometimes, but rarely, on the feather, and even less often, on the last, dimensional marks are applied. But the malka is not a measuring tool, but a marking tool. Its task is to fix the size and transfer it to the workpiece, or to workpieces, when replicating identical products. Although, the desire of many manufacturers for universal unification has led to the creation of digital cameras equipped with liquid crystal displays. With memory, zeroing the result in a given position and other attributes of modern digital instruments, but such devices only have a common design, and functionally they are, rather, protractors.
Digital fry
They try to build everything into the small machine - even a bubble of a level, which generally does not fit well with the list of basic work performed with the help of the small machine.
Malka-9
Malka-5
Malka digital
Mechanical improvements are also trying to catch up with digital sophistications, supposedly expanding the functionality of the tool.
Malka-2
Malka-3
Malka-7
Malka-8
In our opinion, of all this abundance of technical solutions, more or less useful is the device of a groove in the feather, which allows you to vary its length, which in rare cases, but still, can be useful. And we will confirm our, for many ambiguous, conclusions with examples of work where malka is truly irreplaceable.
History of creation
The first mention of primitive prototypes of such a goniometric measuring instrument is found in ancient manuscripts telling about travel, the discovery of new countries, stars, and navigation.
Because of its structure, the instrument was called “sextans” (translation from Latin means sixth).
First, the compass was invented to determine the direction of movement. Clocks were used to calculate longitude, astrolabes - latitude, but they did not give accurate results.
Scientists from many countries have been improving goniometric products. But history has preserved only two names of those who invented the sextant at the same time, using the scientific potential of that time. This is John Hadley from England, Thomas Godfreys from the USA.
Independently of each other, in the 30s of the 18th century, they developed the structure of the octant, reducing the scale of measurement to one-eighth of a circle, and Captain Kambel in 1757 improved the product, reducing the dial to a sixth of the circle.
This product began to be called a marine sextant, which became the progenitor of modern goniometric instruments for navigation.
Its principle of operation as a precursor octant is based on the principle of double reflection, invented in 1699 by Isaac Newton.
A reflective optical system consisting of two mirror surfaces or prisms allows for fast, accurate angular measurements.
Different models differ:
- frame structure,
- alidade with axis,
- reading device.
At first, only vernier was used - a plate where the divisions were shorter than on the main scale of the dial. Modern manufacturers equip products with micrometric screws, counting drums, and gear racks.
These models allow angular reading of the angle to be carried out faster, but require a special observation technique and more careful care.
Today, for naval ships, models of instruments with an artificial horizon are produced: IMS, IMS, SNO, SNO-2M, SNO-M, periscope products, the latest design with a sextant illuminator SNO-T tropical-resistant version.
Some sea vessels are equipped with German VEB and Plat models.
Tool
For any task you need a tool. Plastering window slopes is no exception. The set of tools will depend on what materials you use.
In any case, you will need:
- good level;
- aluminum rule;
- pencil;
- fry;
- roulette;
- spatula 5 cm;
- plywood or metal block;
- Master OK;
- solution container;
- water container;
- hammer-pick.
A level that is too long will not work. It may simply not fit between the lintel and the window sill. At the same time, it is inconvenient to work short. Choose the golden mean, it will be a level 1 meter long. For auxiliary work, a gun with sealant and a knife will be useful.
You may also need a can of polyurethane foam to “blow out” the gaps between the window frame and the opening in which it is installed.
If you use cement-based, you need to get a grater and a grater. If using a rotband, a large and small trowel, as well as a 45 cm spatula and a sponge grater.
Overalls and work shoes should be comfortable and not interfere with movement. Since the plasterer's hands are in direct contact with the solution, it is best to get sealed nitrile gloves.
If you have seriously decided to master such a thing as the technology of plastering slopes, borrow or independently put together a normal plaster goat from boards. The work will be more fun, and it will be safer. Plastering from a stepladder or stool is a bad idea. It's very inconvenient and takes about twice as long.
Construction goat
How to make malka at home?
Of course, today all the necessary tools, in our case a small tool, can be bought at a hardware store. But sometimes situations arise when a device is needed now, and there is no time for it, or the necessary tool is simply not available for sale. Let's try to figure out how to make malka with your own hands from available materials. And here is what materials we need for these purposes:
- Wooden beam measuring 20 by 30 mm. We will make a block from it.
- Plywood with a thickness of 3 to 5 mm, it will be the moving part of the tool, the pen.
- Fastening element in the form of a nut and bolt.
- Electric drill and drill bit that matches the diameter of the fastener.
Having prepared all the components of the future instrument, you can begin assembling it. First of all, let's start making the pads. We measure 10 centimeters from the wooden block, more is possible, but you should not exceed the length of 15 centimeters. Use a hacksaw to cut the desired size of the future block. The next step in making the tool will be making a slot for the pen. To do this, make a cut on one side of the end base of the block, and for now put the block aside.
Now let's move on to making a feather, which can be cut from plywood or other suitable material. Let us mark on the plywood the future dimensions of the element, the width of the feather is 20-30 mm, the length can reach 300-400 mm. Advice! All dimensions given in this example can be changed at your own discretion. In the process of making a small tool, you can increase the length of the block and feather, the main thing is that it is convenient for you to work with the tool you have made. The feather is ready, and now it can be more accurately adjusted in the block.
Check the cut at the end of the block again; the feather should form an acute angle when you try to fold the tool, although, of course, this is not necessary in all cases. When everything is ready, you need to install the fasteners in place; to do this, align the parts at an angle of 90 degrees and drill a hole through with a drill. Then insert the bolt and clamp the parts together with a nut. Theoretically, our tool is ready, all that remains is to modify the pen a little. Move it in the block, and further process the protruding corners. The excess should be removed and the cut areas treated with sandpaper.
The best block building levels
Stabila Type 70 ST-022923 500 Here, fortunately, the autobiography of the brand coincides with reality. The German company was founded at the end of the 19th century and has been producing bubble levels since then to this day. This is not cheap, but it is a truly professional tool with high precision. This two-meter level has only two ampoules - one each for the horizontal and vertical. This must be taken into account - when working with such a length, the central location of the ampoule is not always convenient; nevertheless, it would be worth installing two horizontal ones closer to the edges. But the ampoules are displayed perfectly and the calibration is “kept” conscientiously - even when, after years of use under the direct sun, the dye in the liquid begins to fade, the horizontal remains horizontal, and the vertical remains vertical. Therefore, although we will lower the rating a little, we will still keep the leader’s jersey for Stabila. By the way, in the story described in the introduction of the article, it was this level that ultimately corrected the situation. Main advantages:
Minuses:
| 9.8 / 10 Rating Reviews We have been using this level for many years - it works perfectly, it is smooth, durable. |
ADA instruments Titan 100 Plus1 490 Now let's get back to the Chinese. But this time not in disguise: the ADA measuring instrument has completely open “yellow” roots and is sold all over the world, without trying to look “European” in Russia. And this particular meter level is made perfectly - a profile with additional stiffening ribs makes it stronger than ordinary “bars”, there are built-in magnets, an additional ampoule at forty-five degrees, comfortable rubberized handles. It’s a pity that it’s the longest in the Titan line—a meter long won’t always be enough. The magnets inside are powerful - the level is securely held due to attraction to the profiles through the plasterboard sheet. So the handles are not superfluous here; you really have to tear it off the bare metal. But check the accuracy in the store: when installed on the same plane, the eyes should show the same slope in both directions. Main advantages:
Minuses:
| 9.5 / 10 Rating Reviews I really liked the level, it’s well made for the price and doesn’t let you down. |
Malka is a tool that will help you measure the desired angle
If this is your first time encountering a new device, you cannot avoid the question: what is it and how to use it? As already mentioned, this device helps to measure angles, and let's take an angle of forty-five degrees as an example. We take such numbers for a reason, but mean cutting wood at the most popular angle. You can also choose any other value that interests you. Technically, a malka is a tool that can measure an angle from zero to one hundred and eighty degrees. So, let's start taking measurements.
- To begin with, we can find the angle we need already in the finished version and take measurements. You can also use a special device to set the angle to the degree you need.
- Next, fix the result obtained with a fastening bolt, preferably as firmly as possible.
- Afterwards, we apply the resulting angle to the part and draw a line with a pencil.
- Using a wood hacksaw or electric jigsaw, cut the corner according to the markings.