The laser building level is a technological device that replaced the water level. The device gives accurate results , is reliable and easy to use.
Knowing how to work with a laser level and acquiring the necessary skills, you can make construction and repair work easier and faster. The tool is needed to check verticals, horizontals, and apply markings of varying complexity (see other tools and equipment).
What needs to be done before starting work?
A laser level is a simplified version of a level. The action of the tool is based on the emission of light from an LED , forming rays and dots. The beam changes position due to mechanical, optical, electronic changes.
Based on the construction principle, there are two categories of laser levels:
- prism or positional, the beam is based on a prism, a line is projected onto the surface;
- rotary , the beam is formed by a lens, capable of forming control points.
Prismatic laser levels are inexpensive and easy to use, the beam range is up to 20 meters. Rotary measuring tools are used by professional builders, have more capabilities, and the range has been increased to 500 m.
Before starting measurements , you must read the instructions and take care of safety precautions . When working outdoors, take into account the temperature range of the tool and the degree of protection from moisture.
Compliance with safety regulations
Do not use the device in temperatures below 20 and above 50 degrees. This may lead to the device not working correctly. Due to the complex optical design, which is easily damaged, the laser level must be stored in a case. In it, he will be protected from moisture, dust and unnecessary shocks. The bag in which the device is stored must be clean and dry.
Also, after carrying out work, all dirt must be removed from the tool. In this case, pay special attention to the lenses; it is better to treat them with a soft cloth so as not to scratch the surface.
Source
How to bring the device into working position?
Before work is carried out, the device is installed in the working position, fixed, and then adjusted.
The device has several modes:
- building horizontal lines;
- projection of vertical lines;
- cross construction mode. The vertical and horizon lines intersect to form an angle of 90 degrees;
- point projection mode.
Setting the level
The plastic, rubber-coated body of the device can be installed on any surface. Rigid fixation of the device is the main principle of fastening.
Important! During operation, vibrations of the device are not allowed; if it shifts, the results will be distorted.
To install the laser level use:
- smooth horizontal surfaces at hand: chairs, window sills, tables;
- Mounting with a tripod to the wall, rods and tripods.
Wall mounts hold the tool with suction cups or magnets, Velcro . The tripod allows you to lift the device up, the rod is convenient for marking the ceiling. Accessories are included in the kit upon purchase or purchased separately as needed.
Settings
Preparing the device for operation consists of setting the level strictly horizontally , it will depend on the type of laser level, and does not require professional skills.
We recommend: How to make a concrete mixer with your own hands? Step-by-step guide to making your own stirrer
Plug-and-play tools will be ready automatically. Adjustment occurs in the range of 5-10 degrees.
When adjusting the working position, the device emits a sound or light signal.
When turned on, the laser level will project the desired beam according to the set measurement mode.
A bright luminous line, one or more, a dot, a cross will appear on the surface.
When moving the device, the adjustment is always made again !
The laser level is manually adjusted by aligning the bubble in the viewing window of the device to the central position . The position is adjusted using screws located on the housing.
Precautionary measures
Safety precautions for working with the device include protecting your eyesight . Direct exposure of the beam to unprotected eyes can cause various damages and diseases, including retinal detachment.
When working, be sure to use special glasses , avoid the beam hitting those present, and isolate pets. Safety glasses improve the visibility of lines in sunny weather.
Hydraulic level
This level is a structure consisting of:
When working with such a device, you must act in pairs and step by step. As a rule, this method is most often applicable, both among experienced builders and repairmen, and among beginners.
Step-by-step steps when asked how to display the floor level:
How to use?
Laser levels are distinguished according to the following parameters:
- type of power supply , rechargeable or from replaceable batteries;
- the presence of a remote control that switches modes from afar;
- self-leveling mechanism;
- beam dispersion angle , the ability to project marks in a circle.
Comparing the characteristics, choose the most suitable option.
For floor
The laser level is useful for floor installation, starting from installing beacon slats when pouring screed or when installing a self-leveling floor. The projected lines will help you level the first row of laminate or floorboards and check the planes of the walls.
Lines crossed at right angles check the position and quality of the seams of ceramic floor tiles.
For walls
Horizontal lines are laid for tiling with ceramic tiles, installing a suspended ceiling, and hanging cornices . If for some reason it is impossible to place the device high, a parallel line is manually drawn above the projected line using a tape measure and a plumb line.
Vertical lines are convenient for gluing wallpaper, attaching a frame made of metal profiles for drywall, and installing window and door blocks. The circular mode will help when marking interior partitions, as well as for leveling and plastering walls.
Lines crossed at right angles achieve a combination of two operating modes - horizontal and vertical. In this way, the correct installation of ceramic or PVC tiles is monitored.
To obtain inclined lines , as, for example, when marking a flight of stairs on a wall, change the angle of inclination of the device using adjusting screws. The self-leveling mode is disabled.
For the ceiling
Marking single-level and multi-level ceilings is not complete without a laser level.
We recommend: Advantages of a split system for an apartment
Built-in lamps are marked as follows:
- mark the installation points of lamps on the floor;
- transfer the points to the ceiling, directing the beam upward from the marking point.
Using the device as an electronic plumb line, they mark free-standing columns and holes for utility pipes in the ceiling.
Surface leveling
The laser level is capable of leveling the surface.
Leveling determines the position of the surface height at different points in the room.
The device is attached to the wall or floor using a bracket, directing the beam along the plane of the structure.
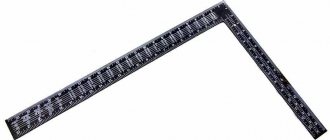
Using a ruler or a construction square differences and irregularities are measured , identifying plane errors or setting beacons for plastering work or screeds.
Methods and materials for measuring floor level
Each owner of an apartment or house independently chooses the scheme according to which the surface of the lower part of the room will be transformed.
The question of how to set the floor level takes on special significance in the case of:
In any of these situations, you can fully determine how to check the floor level to completely transform the premises of an apartment or house. Based on the photo of the future renovation of the space, it is necessary to draw a conclusion how much the level of the lower surface of the room needs to be raised.
There are various options for how to measure the floor level, the main ones are:
Each of these options is suitable for its implementation.
Owners can choose the appropriate one based on:
How to check a laser level for accuracy?
During operation, the device is carried and transported. Measuring equipment used at a construction site is not immune to shocks and falls. From time to time the device is checked for accuracy.
To check horizontal lines you will need:
- a tripod or a flat, solid base for mounting the tool;
- a room with a distance between two opposite walls of about 5 meters.
Important! When checking, you must remember to level the laser level every time you change position manually or automatically.
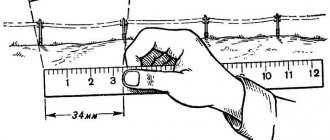
When starting verification, the device is installed at the first wall (A), marking the center of the beam on its surface. Then the level is rotated 180 degrees , fixing the center of the beam on the opposite wall (B).
The instrument is transferred to wall B without turning and adjusted with a tripod or base so that the center of the beam coincides with the point previously marked on wall B. After this, turn the level 180 degrees again .
Mark the center of the beam on wall A. The difference between the resulting points will be the measurement error of the device . At a distance between walls of 5 meters, the error should not exceed 2 mm .
More on the topic: Rating of the best laser levels for the home
We start marking from the first wall
First of all, let's check our first wall for verticality and plane. If we align 2 corners, then this is a wall parallel to the bathtub, if we align 4 corners (the entire area), then it is a wall with an opening. If the wall is blocked, it will need to be leveled first, but take your time, because we have not yet checked the entire area.
To begin with, let’s simply cut a straight line parallel to the first wall, as close as possible to it.
Let's draw the first line parallel to the first wall
Next, between the first wall and the second wall, we will install a square with one edge parallel to the first line, and apply a rule to the second edge of the square. We combine the edge of the rule and the square, thereby “lengthening” our square. Draw a line on the floor to the end of the wall as close as possible to the wall. We adjust and combine our enlarged square so that:
This is how we get the first right angle.
From the first line we will beat off the second one, perpendicular to it
Next, we go to the next corner to which we drew the line, and align the square with one edge parallel to the second line. We repeat the procedure with the rule (combine it with the square) and draw a third line perpendicular to the second, again as close as possible to the wall.
It requires some skill to combine the rule, the square and make a right angle with the lines as close as possible to the wall (this is done so that when plastering you don’t “eat up” the extra space). If the rule is not enough, we draw as far as there is enough, rearrange the rule, combining it with the line, and draw it to the end of the wall.
Draw a third line perpendicular to the second
We draw the fourth line, by analogy. As a result, we should end up with a rectangle
inside our premises. We check it along the first edge - along the wall with the opening, also by applying a square and a rule.
We check the resulting rectangle along the 1st edge
If everything is smooth, you can relax a little. If not, we repeat the procedure and/or look where we made a mistake.
Useful videos
Look at a detailed review of the laser level for a novice master: How to correctly mark a rectangular room for installing a ceiling profile under plasterboard: Installing beacons using a laser level, see: Laying tiles on the floor using a laser level: Quick and accurate installation of beacons for floor screed: How to find the top and bottom point of the floor in an apartment/room in 5 minutes, the same on the ceiling, look: Having learned to work with a laser level, builders simplify many of the tasks of marking and measuring when building a private house (see: types of private houses), they complete the work quickly and with great accuracy.
Is the article useful? Vote below or share the link with your friends!
Misconception 5. The device does not require maintenance
It is better to say that the laser level requires minimal maintenance. After all, there is nothing complicated in its maintenance. It is necessary to periodically clean the case from dirt and promptly replace batteries. It is also important to remember that careful handling of the device is a guarantee of its long service life . Store and carry it in a special bag or case, so you will reduce the risk of damage from accidental impacts. After all, mechanical impact can lead to the laser’s accuracy being lost, and calibration will have to be carried out. If this happens, do not try to fix the problem yourself; it is better to entrust it to professionals. This way you will be sure that everything will be done quickly and efficiently, and the device will again become your reliable assistant.
Alignment
An important point in the construction of formwork is its leveling. Recommendation from builders: there is no need to try to level the upper planes of the frame “to zero.” On the contrary, it is better to make the walls of the formwork several centimeters higher than the planned height of the foundation. And on the inside of the boards, apply marks with a marker, drawing horizontal lines corresponding to the required plane of the foundation to be poured.
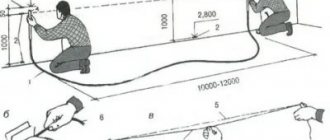
The main difficulty is to draw these lines correctly. It is not difficult to pour and level concrete over them. To complete the task, you can use a water level.
First, find the required height of the foundation at the lowest marking point. Apply a water level flask to it, remember or mark the water level. Then, using the second flask, the corresponding marks are placed on the remaining pegs. Draw lines and, if necessary, duplicate them with thin wire.
There is another point of view on alignment: the walls of the frame should be aligned “to zero”. For these purposes, at the marking stage, the height of the foundation is determined in the manner indicated above and ropes or fishing line are pulled at this level. Shields are mounted based on these devices.
The second way to level the formwork walls is to cut the panels along the lines drawn along the fishing line or rope. When pouring concrete, it is compacted with a reinforcement bar and leveled with a rule, which in this case should rest on the walls of the formwork.
Reinforcement of the first row of aerated block
Aerated concrete blocks, due to their cellular structure, are easily susceptible to physical impact, so in the future, due to changes in humidity and movement of the foundation, cracks may form. To avoid such troubles, reinforcement is used - strengthening the masonry with metal reinforcement. The profile of the latter should be corrugated, the cross-section of the rods should be about 8-10 mm.
It is optimal to use rods A-III for reinforcement. For aerated concrete blocks with a width of over 250 mm, a pair of rods is required, while for partition walls with a similar indicator of 150-200 mm, one metal rod is sufficient.