: Security measures
The most important thing is safety. The manufacturing process involves forging, grinding and immersing the metal in chemicals, so it is important to use the proper equipment to ensure safety.
For the forge welding phase (forge welding), many people who do any forging work know the basic safety gear: gloves, apron, closed boots, etc. However, the conditions are not always met. Everyone knows eye protection is important, but for this type of work you need a special kind of protection. The above and only photo in this section is of neodymium glasses. The reason for this is that such glasses are simply necessary for such work.
Experts often neglect this protection, but do not repeat after them. The heat required for forge welding creates radiation that can cause vision loss over the long term. Neodymium glass, however, blocks most of the radiation and keeps your eyes safe. Please note: Neodymium glasses are not the same as welding helmets or sunglasses. By using them in forge welding, your pupils will dilate and your eyes will receive even more radiation.
Mosaic Damascus
“Mosaic Damascus” is a steel in which sections with different types of patterns are welded together. The possibilities for imagination here are endless. I propose to make a damascus with the Sutton Hoo smoke pattern, after the name of a fossil Scandinavian sword.
Weld a package consisting of 7 layers of three steels - St3 (gives a white metallic color when etched), U8 (black color) and any spring steel (gray color). The alternation can be anything. The finished plate should be wide and thick enough so that 8 square-section rods with a thickness and width of approximately 7-8 mm can be cut from it. You may have to make several plates. The length of the rods should be about 30 cm. After this, mark 4 cm sections on each of the rods. Heating and clamping the rods in a vice, according to the marks obtained, twist half of the rods in one direction (say, clockwise), and half in the other. Twisting will occur in sections, so that twisted sections alternate with untwisted ones. Try to keep the twisted and untwisted areas on all rods in the same places. After this, hammer each rod again, restoring their square cross-section along the entire length.
Now take four rods - two, twisted in each direction. Lay them sideways on the workbench, making sure that the layers of metal in each bar are facing you. The twisted sections will touch and alternate. A rod twisted clockwise next to a rod twisted counterclockwise, and so on. You will end up with a package that resembles folded fingers. Place several thick nails across the bag on each side - they can be removed later - and electric weld, holding the bag together. Also weld the handle rod. Since the thickness of the package is small, fluxing can be done immediately before forge welding. Heat the bag until scarlet, sprinkle thickly with borax on both flat sides, and heat further. Welding is carried out at the highest possible, but excluding burnout, temperature, with very light blows of a hammer (to prevent delamination of the fan-shaped package). They are applied along the side surface of the package, and not along a wide plane. Mastering this art, called end welding, is not easy. First, it makes sense to practice on square steel bars, so as not to spoil the complex layered steel.
As a result, you should have two monolithic plates. Each consists of four sections of bars twisted in opposite directions. By itself, such steel is not very strong, so it should be welded onto the base. The base can be either Damascus or simple (in this case, the best option is a plate made from a tempered and forged spring). It should be the same size as the resulting mosaic plates. The base is collected in a bag with the resulting plates and welded together. The result is a finished piece of steel, the surface of which has a beautiful pattern, similar to smoke from a candle. A product made from such damascus should be forged very carefully, trying to achieve the most approximate shape through forging. When turning with a grinder or on a wheel, the pattern may deteriorate. Proceed with grinding work only when the shape of the future product is indicated in almost all details. Make sure that the metal deforms evenly when forging, so that the core and outer patterned plates do not move relative to each other.
Making mosaic, or any other damask, is fascinating. For the sake of pleasure from the unique beauty and properties of steel, it is worth looking for your own path, and not being afraid to start over again and again. Good luck to you in your endeavors, and may Volund, the ancient patron of Scandinavian blacksmiths, help you!
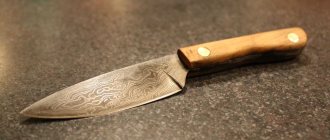
I present to your attention a high-quality stylish knife made of Damascus steel that you can make with your own hands. Damascus steel is a steel that is heterogeneous in its composition. This is achieved through forging, where different grades of steel are mixed. And if such a metal is then immersed in acid, a unique pattern is formed on it, since each steel changes its color differently.
In this instruction we will look at how you can make Damascus steel yourself. More modern technologies will be used here. We will get Damascus by dismounting two or three types of steel. Steel powder and steel balls will be used as a base here. It is thanks to the balls that we will get an interesting pattern. In principle, the forging process is not complicated, but it requires a forge, an anvil, and some experience. Working with hot metal is very dangerous, so you must follow all safety rules. So, let's move on to making a knife!
Materials and tools that were used by the author:
List of materials:
— steel tube (preferably carbon steel); - steel balls; — steel powder; - some sheet metal for plugs; - wood for linings; — brass rods or bushings for pins; — oil for wood impregnation; - epoxy adhesive.
List of tools:
— forge furnace, anvil and hammer; — belt grinder; — acid for steel pickling; - Bulgarian; - drill; - welding machine; - caliper; - hardening oil, electrical tape and more.
Knife making process:
Step one. Forming a blank
First of all, we need to make a blank from balls, steel powder and a piece of pipe, from which the blade will then be made. To do this, pour powder and balls into a steel pipe. You need to fill it in portions, that is, a few balls, then a little powder, and so on. The balls must first be washed well in soapy water so that there are no traces of oil on them. You can also wash them in acetone. We weld the bottom of the pipe using round steel.
As for the metal of the pipe, it is desirable that it is also carbon steel.
Well, then we weld the other end and send the whole thing to the oven. You need to warm it up until it glows yellow and with this heating we perform forging. We crush metal from different sides. It is extremely important for us to mix all the metals together. You will need to heat the workpiece more than once, but forging is never easy. After this we get excellent metal for the knife.
Step two. Checking the metal
When you think the workpiece is ready, you need to check the quality of the metal.
First, take a grinder and cut off the edges of the plate. The metal must be uniform, without holes or other defects. Next, we go through the contour with a belt sander. Similarly, we check whether we have mixed the metal well. If everything is fine, you can move on to the next step - forming the profile of the knife. Step three.
Blade profile The author sets the blade profile by forging. First we form the tip of the knife, and then we can make bevels on the blade. We approach the formation of bevels responsibly; the blade should be smooth, but not too thin. There is no need to rush in this matter; we work with a hammer on both sides.
Finally, you will need to separate the blade from the handle.
To do this, we work with the sharp part of the hammer. If everything looks great, make sure your blade is straight. At this point the forging can be completed. Step four.
Grinding the blade Having formed the primary profile, you can proceed to grinding.
The easiest way to handle such tasks is with a belt sander. We thoroughly polish the entire blade, both the plane and along the contour. Do not sharpen the blade at this step; its thickness should not be less than 1 mm. Otherwise, the blade may become deformed or crack during hardening. Step five.
Heat treatment of metal Perhaps this step is the most important in the manufacture of a high-quality knife. Thanks to heat treatment, we can ensure that the metal from which the knife is made becomes as hard as possible. The temperature regime for each steel grade is individual, but if you don’t know what kind of steel it is, you can follow the basic rules. For example, if a metal is heated to the hardening temperature, a permanent magnet is no longer attracted to it. But this method is not accurate. Also, many craftsmen are able to determine the desired temperature by color; for most steels it should be yellow. The first thing the author does is normalize the metal after forging. To do this, you need to warm it up and let it cool gradually. The author places the blade in a bag of coal and sends it to the oven. Next, the workpiece can be hardened; to do this, we heat the blade again and immerse it in oil. The procedure can be repeated several times, but usually once is enough. If after this the blade cannot be taken with a file, then the steel is hardened. However, there is one pitfall here: if the steel is not released after hardening, it will become brittle. That is, we need to make the metal a little softer so that it springs and does not break. A household oven is quite sufficient for this. It needs to be heated to a temperature of about 200°C and the knife needs to be heated for about 1-1.5 hours, depending on the thickness of the metal. If the tempering was successful, the blade should become straw-colored. Now your knife will be able to withstand enormous bending loads as well as shock loads.
Step six. Grinding and drilling holes
After hardening, there will be a coating on the metal that needs to be cleaned off.
We put a not too large belt on the draw machine and grind it. If desired, the blade can be made as shiny as a mirror. We also need to drill holes for the pins in the handle.
But it is very difficult to do such a procedure with hardened metal. In this regard, we take a gas burner and warm up the handle. Let it cool gradually. After this, the metal will be drilled using ordinary metal drills. That's all, now all that remains is to make the handle. Wrap the blade with electrical tape or masking tape to avoid cutting yourself during subsequent work. Step seven. Let's prepare the pads
Overlays can be made from various materials, it can be plastic, textolite, bones, horns and much more.
In our case, this is the most popular and sought-after material – wood. We select a board from a beautiful type of wood with a beautiful pattern and make two overlays. If desired, you can glue some other material onto the lining so that the handle is combined. Step eight.
Etching the blade Since our steel is Damascus, we need to remember to highlight that very treasured pattern. To do this, we need a reagent that actively reacts with steel. We clean the blade with sandpaper and clean it with acetone, otherwise the fat will not allow the acid to work. Well, then we lower the blade into the acid for some time. But don't forget about the knife, as steel can completely dissolve the blade. We take out the knife and rinse it in water and soda, it neutralizes the acid. That's it, now we have a fancy, unique pattern on the steel.
Famous Damascus steel. What qualities did these amazing blades have? What is the secret of ancient technology? Damascus for its time was a revolutionary breakthrough in the creation of high-strength metal and new technology. The legendary swords that cut the silk scarf had extraordinary sharpness. Isn't this a myth? The twenty-first century forge is the realm of traditional technology. The principle of creation has not changed for centuries. The main elements of this production: open fire, hammer, anvil, blacksmith skill. A sign of new times in the blacksmith profession is the raw materials. In the old days, artisans mined ore themselves, then processed it into metal. Modern blacksmiths, as a rule, operate steel with alloying additives. These impurities give the metal its individual characteristics.
The superiority of Damascus steel over all other alloys is a common myth. Scientists believe that this is a figment of the imagination of writers of the early nineteenth century. In historical novels of that time, Damascus blades had miraculous properties. They cut through like butter. Historians and metal scientists refute these legends. Ancient Damascus would hardly be able to withstand modern steel. However, it was somewhat simpler in chemical composition and the steels that were used in it were not so interesting. The “Damascus” that today’s craftsmen create is, as a rule, the use of initially high-strength steels with good characteristics.
Nevertheless, the “Damascus” of its time was indeed distinguished by its high strength and flexibility. This combination made Damascus steel an excellent weapon. The secret is in a special alloy.
In its pure form, iron is a very soft metal and is not suitable. Therefore, people use alloys - compounds of iron with other chemical elements. An essential component of these compounds is carbon. It gives the alloy hardness. For example, usually in a nail, carbon contains hundredths of a percent (0.06-0.16%) of the total metal. And in railway rails it is from 0.5 to 0.7%. Iron alloys containing less than 2.14% carbon are called steel. After special heat treatment, it acquires another important quality - elasticity.
The main secret of the Damascus production technology is a multi-layer blank, which consists of alloys with different carbon contents. Damascus steel is one of the first composite, that is, composite, materials in history. “Damascus” is a welding technology that involves diffusion bringing together layers of two, three or more steels using pressure. The main part of the package, which consists of carbon-rich steels, gives Damascus special hardness. The source of elasticity of the future product is alloying additives and iron. Thus, alternating layers of metal with very high and very low carbon content gave the new material: hardness, elasticity and impact strength (resistance to impact loads).
Traces of this cocktail can be seen with the naked eye. The characteristic pattern on the Damascus blade is an optical effect of uneven distribution of carbon. “Damascus” has its own unique “face”, its own design, its own beauty in iron. Homogeneous material, even in color, is not so interesting. As a rule, it is painted, or to create some kind of image.
The high qualities of a particular Damascus steel blade are established at the initial stage. There is no perfect recipe for creating a “package”. The selection of source materials, their proportions, the principle of combination, in ancient times, any of the elements of this process, was the secret of the master, the foundation of the superiority of his weapons.
Damascus steel is the pride of any hunter. Thanks to manufacturing technology, such a tool cuts the hardest natural materials and fabrics. It holds an edge well. However, the product of these masters is rarely used for its intended purpose. The main function of their steel works is decorative.
The modern shade of Damascus steel is different from the original Damascus of the past. Historically, Damascus was considered crucible. It had a very high carbon content and had a distinctive surface due to its crystalline structure.
Damascus steel got its name because the Crusaders on their way to the Holy Land acquired new blades from this superior steel (superior to medieval European steel) in the city of Damascus. However, the modern version of steel has little in common with the past and looks more like acid-etched steel.
Damascus, shown here, is one of the more modern options. Cable damascus is perhaps one of the easiest ways to forge damascus with a complex pattern. Unlike other methods, this method does not require folding and essentially has a ready-made shape.
How to sharpen a Damascus steel knife
To sharpen a Damascus knife with your own hands, you need to consider the following nuances:
- part of the blade with nicks and chips needs to be cut down for alignment;
- sharpening the knife is done slowly and carefully so that one layer of the layered structure does not bend onto another - for this, abrasive materials with successively decreasing grain size are used;
- sharpening is carried out diagonally - sharpening the blade lengthwise is ineffective;
- sharpening grooves and stripes spoil the design of the product - they need to be polished with a fine-grained material;
- The sharpened knife must be wiped with a napkin; you can use lemon zest.
Sharpening a knife made of pre-Mas steel.
Blanks for the production of Damascus
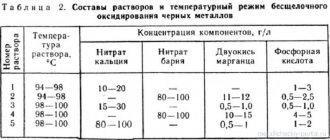
Any craftsman can make Damascus steel at home; alloy kits are used for this. They contain soft and hard inclusions. By combining them with each other, they achieve blades with pronounced structural patterns.
The following combinations are used, shown in the table. Some workshops offer their own options. The proposed schemes give the best performance.
When starting production in your own workshop, it’s easy to find out how much the finished product costs. Many online shopping sites list prices. As you gain experience and improve the quality of the product, you can increase the price of your products.
Video: how to make Damascus steel?
Welding Damascus
Experienced blacksmiths, by combining blanks with different carbon concentrations, were able to obtain a material that has exceptional performance properties.
Advantages and disadvantages
Among the features of welding damascus are:
The main disadvantage of this metal is low corrosion resistance. The almost complete absence of alloying elements in the composition and the high concentration of carbon causes the formation of corrosion on the metal surface.
The metal in question can be recognized by its unusual pattern on the surface. This optical effect is obtained due to the uneven distribution of carbon in the structure. In order to improve the decorative qualities of the product, quite often the surface is subjected to additional polishing and etching. Today, many people use damask for its interesting optical effect, but previously it was more valued for its special performance qualities.
What is real damascus and damask steel
Previously, the technology for making such weapons was kept secret - only craftsmen knew how to make Damascus steel, and the products themselves were highly valued and incredibly expensive. However, even now knives made from these materials are an expensive pleasure, so a considerable percentage of models belong to the category of collectible weapons.
Damascus
The technology for producing Damascus steel involves forging twisted carbon steel rods/plates. Due to forging, the layers are flattened and become very thin - the multilayer structure provides the blade with the necessary strength characteristics.
Bulat
Unlike Damascus, damask blades are made by casting. According to the technology for preparing damask steel, high- and low-carbon steels are used - as a result of melting, the melt with a low carbon content contains partially molten particles of the high-carbon component.
The difference between damask steel and damask
The advantages of damask steel and Damascus steel have divided lovers of such weapons into two camps. So when choosing, buyers rely more on personal preferences. As mentioned above, even by external signs (by drawing), clearly identifying these materials is not a problem.
Damask steel.
Modern Damascus Steel
A pattern snakes across the metal surface. In it you can guess the ancient Arabic script, and the hot waves of sand, and the light ripples of the surf, and the foggy streaks of storm foam... Each blade is unique, and not only experts understand this. After all, the drawing on it is like handwriting - and there is no other like it. The handwriting of a master blacksmith.
Igor Yurievich Pampukha is a third generation blacksmith. His grandfather was a military gunsmith in one of the units of the Red Army, his father worked as a blacksmith for a long time, and now he has his own forge in the Nizhny Novgorod region. Igor Yuryevich was born in Dushanbe, where he first stood up to the hammer. Now he is a famous blacksmith, a member of the creative union “guild of gunsmiths”, a regular participant and winner of international exhibitions “blade”, “weapons and hunting”, “hunting and fishing in Rus'”.
...Through the light weather of the coming autumn, the rays of the still hot summer sun break through. We enter a modern forge: the metal of tools and workpieces gleams coldly everywhere. “Now it will be hot here,” the blacksmith assures, smiling through his mustache. – I’ll show you how to make the simplest one – stamp damask.
Of course, not from “scratch”, but from the moment the multilayer package is already welded, otherwise you would have to spend the whole day in the forge.” With a confident hand, the master pours coke. And now he is already in the oven... Soon heat begins to emanate from the reddened mass. The piece of metal doesn't seem like anything special. We are trying to guess what will happen...
Damascus? Bulat? That is the question!
Damascus and damask steel are often confused. In ancient times, Indian steel was highly valued, which could be bought in Damascus, which became the center of the arms trade in the era of Alexander the Great. However, the origin of steel in the Damascus bazaar was often difficult to find out, so almost all weapons purchased there were called “Damascus.”
Metallurgical historians distinguish between “pure Damascus” - old Indian cast patterned steel, and “welded Damascus” or new “Damascus steel”. “Pure Damascus”, which is better known by the Russian name “bulat”, is an elastic and very hard material. The sharpened blade of a damask blade can remain sharp for a long time.
"Welded Damascus" ( modern Damascus steel
) or, as it is also called, “welded damask steel” is inferior to real cast damask steel in hardness, but the quality of blades from Damascus is higher than from ordinary steel. The method for producing Damascus steel was most likely invented by accident. Previously, the remaining cut-offs, trimmings (metal was in short supply, nothing was thrown away) - everyone collected together and welded steel for knives and tools. One day, someone saw that a beautiful pattern was being created, and the quality of the metal was becoming noticeably better, and they began to specially fold the pieces.
It is known that iron itself does not have sufficient hardness; it appears in its alloys with carbon and alloying additives. In those days there was no carbon steel as such, but depending on the ore at the molecular level, the original metal contained some amount of chromium, molybdenum or other elements. As a result of forging, the steel turned out better or worse, but the carbon content still remained insufficient. To improve the properties of the metal, the layers were repeatedly rearranged, heated over a fire, and hardened, due to which the steel acquired the necessary strength and hardness.
Today, blacksmiths work with finished metal. In modern steel grades, the content of carbon and alloying elements is determined (in the thickness of our package there is approximately 0.8% carbon, and there are also molybdenum, chromium and nickel, which give a good structure). Therefore, there is no need for some labor-intensive operations. But still, if we compare the ancient technology and ours, the principle remains the same, only the materials are different.
Damask steel recipe
only at first glance it is simple: they coat the crucible with clay, put pieces of different metal inside, close it with a lid with a slightly larger diameter, and coat it with clay again. Then another heat-resistant coating is applied on top. The crucible is placed in the furnace for 5.5 hours (it takes four hours to reach the desired temperature and about two hours for melting). The result is an ingot - this is a crystal of a superhard structure. Then they cut off the “head” and the lower part of the ingot and unforge it. In fact, everything is much more complicated. You can cast for a long time, and then it turns out that it comes out with a crack, and all your efforts are in vain.
The production of Damascus steel has its own secrets. When making a stamped Damascus, it takes 1-1.5 hours for forging and about the same amount for the workpiece. In complex Damascus - only 3-4 days to assemble and weld the package. Mosaic Damascus is made from layers of different structures - twisted, layered, laid out in a certain order. Twist in a regular vice while hot. The layers must be carefully stacked. In terms of cutting properties, mosaic and stamp Damascus are practically the same, although their prices are different.
Are there “formulas” for damask steel and Damascus? Knowing them is one thing, but learning to put them into practice is quite another. You must be able to make metal so that it has high cutting properties - it is a working material. And for it to work, it must be forged correctly, cut correctly, hardened correctly, tempered correctly, sharpened correctly. Here, for example, is medical steel: an error of 10°C during heat treatment results in a completely different material - the entire technological process must be strictly followed. And this is difficult to do if you have no experience.
To determine the quality of a blade, you need to put it to work. If you cut something hard all day, a blade from Damascus will shrink around lunchtime, and from damask steel - somewhere in the evening. And it will also have to be sharpened. The sharpening technique has its own secrets: you can sharpen it so that the blade will cut hair on the fly.
: Forge welding
After placing the product in the oven, heat it until it turns bright orange or yellow. Once it reaches the appropriate temperature, let it sit for another minute or so to allow all the metal to absorb the heat and heat evenly.
The cable must be twisted before the shots can be made. It is filled with empty space, which is bad for forge welding. Secure one end of the cable in a vice or similar and use whatever handy tool you find suitable (I used pliers) to twist the sections in the direction the cable is already twisted.
This step may require several reheats. Continue twisting the cable until it stops curling. Make sure the cable does not bend as this will make the whole process much more difficult.
Each time, before putting the cable into the fire, you need to sprinkle it with borax until the metal becomes homogeneous. To ensure that the borax sticks to the metal, pour it in at a time when the product is bright red. An important point: when borax melts, it becomes corrosive and can damage the inside of your forge, so make sure the bricks in your forge are fireproof.
Additionally, hot borax on your skin can be quite painful and may leave scars, so be sure to wear appropriate gear. The last part of forge welding is the weld itself. When the item is hot, you can start hitting it. The idea is to first knock it out into a square block shape. When you hit, you have to watch the cable turn. Personally, I prefer to start in the middle and work my way to the ends.
Impacts will cause the fibers to separate from each other, so it is necessary to reduce the distance from the first impact to the next as much as possible. You will understand that the product has become homogeneous by the changed sound that will be produced when struck. Initially, it will be duller, but as soon as the metal becomes homogeneous, the sound will become bright and ringing. Once it becomes homogeneous, you can begin to shape it into the desired shape.
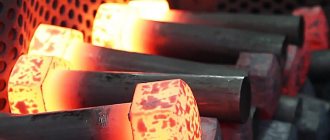
Forging Damascus in a forge
The production of Damascus can occur in several different ways; we produce the so-called ''welded Damascus''. This technology involves the selection and welding of workpieces (hence the name welding) from various grades of steel, soft and hard, which allows achieving the necessary characteristics for good cutting properties of the blade.
In the photo (from left to right): assembling and welding a package of steels, twisting an unforged package, forging a package of steels with a hammer.
Damascus is not a metal found in nature in its pure form, but consists of a package of steels selected by us as a result of a large number of tests. To create it, we use a package of four steel grades (ShKh-15, KhVG, U8A, steel-3), each of which is necessary to impart the necessary cutting properties to the final product.
Let's move on to the technological process itself in more detail. After the workpiece has been prepared from a package of steels, it must be heated to a bright red color, after which you can proceed directly to forging. The forging process is repeated three times, the thickness of the forged strip in the first two stages does not have clear regulation, and in the third final stage it is made as close as possible to the thickness of the butt of the final product, in order to avoid unnecessary consumption of metal and lengthening the processing process.
Next, the workpiece is given a rectangular shape for the next technological process - twisting. The fragment directly with twisting was not included in the video, but there is nothing particularly complicated here, the hot workpiece is twisted in a spiral, for as many revolutions as can be achieved before the metal hardens - as a result of which the shape of the workpiece changes from rectangular to cylindrical ( You can see the unforging of the twist at the 10th minute of the video). The texture of the pattern on the blade depends on the number of twists.
In addition, I would like to draw your attention to such a moment of the technological process as borax sprinkling (white powder), which is used during forging of the workpiece after twisting to draw out slag and scale, which avoids the appearance of fistulas and lack of penetration. After this, a strip of metal is obtained from which the blades themselves will be made. Now we move on to the workshop, where a knife will be made from the strip, and finally, a few more photos from the forge.
Step-by-step technology for making damask steel from bearings
Products from finished ingots or billets are produced in the following sequence.
The inner ring of the bearing is made of ShKh-15 alloy. It is sawed with a grinder cutting disc and sent to the forge for heating. The desired heating temperature is 900…950 ⁰С.
The workpiece is held on the anvil with blacksmith tongs. By beating off the bulges with a hammer, a strip is formed from the ring.
Remove depressions from the strip.
The grinder gives the desired shape.
The workpiece is held in place using a special mandrel. A constant angle allows you to create identical slopes on both sides.
The final shape of the product is obtained by turning.
GOI paste and an auxiliary velvet roller help polish the surface.
After polishing, a finished blade is obtained. All that remains is to make the handle, bolster and sheath. Then the product can be considered finished.
Types of patterns
As a result of the technological process for creating Damascus steel, a unique pattern is formed on the surface - a pattern. There are several types.
Wild Damascus
The most common and easiest to manufacture. It got its name due to its disordered pattern. A package of strips from several grades of steel is welded into a single block. They bend it repeatedly and forge it again. The layers of metal mix randomly. The pattern is formed randomly and looks heterogeneous.
One of the most ancient varieties of Damascus steel. It is highly popular among collectors due to the unique design of each product: knife, saber, dagger.
Stamped
A variation of traditional damask. The pattern is more uniform. Geometric shapes alternate: circles, stripes, rings. Includes two manufacturing methods:
- The metal package is welded in advance. The stamp strikes are applied in a given order. The finished product is polished. Excess metal is removed from the surface in order to more clearly demonstrate the relief and pattern.
- The pattern is applied to the bag using a metalworking method - with a milling cutter or drill. Then the package is forged.
Stamps (stamps are a German word, from which the name is derived) are divided according to the type of drawing:
- reticulate;
- stepped (staircase);
- wavy;
- rhombic;
- ringed
The patterns are similar to wood veneer or circles on water.
The types of patterns are in turn divided into a wide variety of patterns. A master blacksmith can stand out with his specific signature style. In the USA, damask with a peacock eye pattern, products with a pattern in the form of crosses, imitation of barbed wire or mesh are popular. To manufacture the first, uniform drilling of metal is used across the entire width of the workpiece.
Turkish Damascus steel
Refers to the traditional type of patterned steel. The manufacturing method involves forging a bundle of intertwined steel rods. The composition of the rods varies. A complex pattern is formed on the surface - many smooth wavy lines. The size of the lines depends on the chemical composition of the metal of the rods, their diameter, and the method of twisting.
Japanese
It stands out for its fine layered steel structure. The surface is etched. The structure of the alloy appears thanks to unusual polishing. Hardening also has its own characteristics. The handle of the blade is covered with a protective layer of clay mixture. Only the blade itself is hardened. The result is reflected in the properties of the Japanese sword. The blade becomes hard, sharp and brittle. The handle remains elastic.
Mosaic
A modern version of Damascus. It got its name because of the specific manufacturing method. The layered structure gives a beautiful decorative effect. There are two most popular manufacturing methods:
Shell
A metal pipe or container is used to connect mosaic elements. Contrasting steel is placed inside. The container is filled with inert gas or oil. When heated, oxygen binds. A neutral environment is formed inside the shell. The pipe is completely welded. In this state, the shell is sent to the forge. Heats up to welding temperature. Forging often occurs using a hydraulic press. After the formation of a single mass of metal, the shell is removed. A mechanical method is used for removal. The resulting workpiece undergoes further processing.
Technological
Holes are cut in the steel bar in accordance with the specified pattern. Metal inserts of a different chemical composition of equal diameter are placed in the holes. Holes and liners are cut with a plasma cutter. The package is welded using the diffusion method.
The advantage of this method is the ability to create the necessary drawings and various images. Unlike surface engraving, the pattern covers the entire thickness of the blade.
Fibrous
This method is used to make high-quality Japanese knives. The layers of steel are not positioned to the length of the future blade. The rods are finely chopped and laid out at right angles. In this form, the package is forged.
Combined
Combines classical and traditional manufacturing methods. Both methods are applied simultaneously, hence the name. A stamp pattern is applied to the block assembled using the mosaic method. The surface is forged and polished. In the case of applying relief by drilling or milling, the prepared alloy is forged and etched. Grinding is not used in this case.
It is also possible to combine the technique of forging wild Damascus and inserting a metal alloy with contrasting properties. Nickel is used as an alloy that differs in composition. It has a white color, which allows it to stand out against the background of the overall black and gray pattern of the blade.
Industrial
Produced on industrial equipment of metallurgical enterprises. The quality of the blades does not differ from the handmade work of blacksmiths. The scale of production is much larger. The type of patterns can differ into wild, mosaic, combined.
The process of making a knife in a workshop
We have already visited the forge and seen how damascus strips are made, now let's see what happens to them next.
First of all, you need to use a special pattern to trace the outline of the future blade on the workpiece, cut it off from a strip of metal forged in a forge and cut it along the contour.
In the photo (from left to right): marking the workpiece, the workpiece and the pattern, cutting along the contour.
Forging metal using a mechanical hammer allows for slight differences in the thickness of the metal in the forged plate; therefore, it is necessary to align the blade along the plane. After this, the blade is given geometry according to the pattern and drawing, and it is also at this stage that, for example, cutting is done using biconcave lens technology.
In the photo (from left to right): a cut blank, alignment on a plane, giving geometry to the blade.
After the steps described above, we get a blade that is already quite close in appearance to what we are used to seeing on store shelves, but rather rough-looking and without a pattern. The blade must be polished to a mirror finish. Next, the workshop mark is applied (the area for applying the mark is preheated) and holes are made for the rivets if all-metal installation is provided.
In the photo (from left to right): grinding, stamping, drilling holes for rivets.
Not a single blade will have the declared properties if it is not hardened. We move on to the next stage of thermal hardening. The blade is hardened in a thermal furnace at a certain temperature and receives a blade hardness of 62 HRC on the Rockwell scale. After this, the surface is cleaned from scale using a sanding belt and the blade would have become a finished product, if not for one small thing - there is no design. The pattern that makes Damascus - Damascus, manifests itself when the blade is exposed to nitric acid; all the manipulations in the forge with various steels, welding and twisting them, were needed precisely for this moment, to reveal the pattern.
In the photo (from left to right): thermal hardening, descaling, etching of the design.
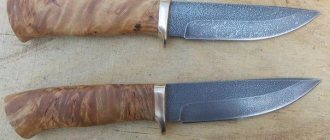
Actually, the blade is almost ready; all that remains is to sharpen the sharpening angle; let’s pay a little attention to the handle. We install the handle in two versions with a shank and all-metal installation. With the all-metal version, I think no questions should arise; holes for the rivets are drilled and the pads are attached to them. All-metal construction is the most reliable type of fastening, but most people prefer the more traditional fastening with a shank. For a material such as birch bark, celmet installation is almost impossible.
In the photo (from left to right): firing of the shank, the handle disassembled, the handle before turning.
For installation, the shank is annealed, the metal is tempered for drilling holes, a pin is attached to the rivet - the guard and handle can be attached. And the last stage is shaping the handle - the knife is ready. All that remains is to give it the required sharpening angle to the cutting edge, depending on its purpose.
I am attaching a number of photographs that were not included in the main description; unfortunately, the originals were large in size, so all the photographs in the article had to be compressed for normal loading on mobile devices and tablets, so I had to abandon enlargement by clicking.
Flaws
The main disadvantage is the low resistance to metal corrosion due to the high carbon content in the composition. Finished products require careful care and storage.
The absence of alloying elements - the necessary components to impart certain physical properties to the metal - leads to the formation of rust on the surface of the blade. As a result, the blade can quickly become unusable.
It is recommended to store Damascus steel products in an oil composition.
High cost of products. Intricate manufacturing, unique patterns, and the metal's superior strength characteristics contribute to the high price tag.
History of appearance
The history of Damascus steel begins in the 400s AD. Although it takes its name from the Syrian capital, the material from which Damascus is made is not from Syria or the Middle East at all. In fact, it was imported from India or Sri Lanka.
Wootz, as it is called, is a crucible steel characterized by a series of stripes (which resemble the relief or waves of water) formed as a result of the presence of:
- ferrite – crystalline form of iron;
- martensite – crystalline form of steel;
- Perlite is a combination of ferrite and cementite (also known as iron carbide).
Due to the impurities, wootz acquires its legendary strength and appearance.
It is believed that there are two reasons why it is referred to as Damascus in the Western world. First, many of the world famous steel swords used by Syrian warriors in ancient times were made in the city of Damascus. Hence the name.
Secondly, Wootz is called Damascus steel because of its resemblance to Damascus fabrics, which, in turn, received their name in honor of the Syrian capital.
Although the material and method of creating Damascus has now become a legend and part of history, the original creation technique was actually lost sometime in the mid-1700s. There are several theories why this happened:
- destruction of trade routes;
- lack of documentation;
- cultural suppression by Western imperialism.
Calculation of average carbon content in Damascus steel
There are a lot of articles written about Damascus steel, but since you're about to make it, it's worth repeating some of the theoretical points. Damascus steel consists of alternating layers of high and low carbon steel.
The average carbon content of Damascus
plays an important role .
It can be calculated as follows:
Suppose you welded a package of 30 grams of St3 and 70 grams of U8. So your Damascus is 30% steel with 0.3% carbon and 70% steel with 0.8% carbon. Using a simple proportion, we calculate that (0.3 x 0.003 + 0.7 x 0.008) x 100 = 0.65. Therefore, the average carbon content in the bag is 0.65%. Not enough. It is also necessary to take into account that when the package is first heated to welding temperature, about 0.3% of the carbon burns out, and with each subsequent heating, about another 0.03%. This means that it is necessary to use higher-carbon steel grades, or to increase the relative content of U8 in the package. Using this formula, you can calculate the average amount of carbon in the package and, accordingly, select the appropriate hardening mode. An operation called carburization can increase the carbon content. It should also be remembered that a contrasting pattern is obtained when using steels whose difference in carbon is equal to or greater than 0.4%. The finished product is etched in one of the above reagents. In this case, the product must already be hardened (hardening increases the contrast of the pattern) and polished. The entire defatted product is placed in the etching solution, and the operation is continued until the pattern is clearly and completely visible.
How to make Damascus steel at home?
Translated by SaorY for mozgochiny.ru
Greetings to all brain crafters ! After almost a year of “communication” with a hammer and an anvil, I finally acquired the necessary experience and tools to create forged crafts , such as the small “Damascus” knife from this brain article .
And I started, by the way, with a small sledgehammer as an anvil, which I hit with a small hammer.
Now we will talk about creating a small, forged, not carved, knife with your own hands using a homemade forge, anvil, hammer and determination. I don’t pretend to be a professional, and this is certainly not the only way to obtain welded Damascus; this is the story of how I managed to make it.
Damascus steel today is called welded Damascus, obtained from welded metal plates of various brainsteels , subsequently forged and twisted. It's like molding different colors of plasticine together and twisting it to create a wavy pattern.
After forging, such a workpiece is subjected to etching, in which the dissimilar metals of the workpiece are eroded unevenly, thereby creating a beautiful contrast.
The original Damascus steel is obtained in a different, very specific way (although it looks similar to modern Damascus), and few people know how to create it; this fact has given Damascus a reputation as a metal supposedly endowed with magical powers.
And the reason for this “power”, similar to samurai swords, is a process that makes it possible to obtain a more homogeneous, and therefore with the desired qualities, steel, which cannot be achieved in other ways, and makes it possible to include low-quality and high/low carbon steel in the workpiece. Which results in a much better quality blade.
!!! ATTENTION!! A knife can be dangerous, please do not give it to people with mental disorders!!!
Step 1: Materials and Tools
- steel plates of two or more grades (preferably high carbon content) that will contrast with each other, I took high carbon 1095 steel and 15n20 steel, with a small nickel content, which will add brightness and contrast after etching - flux (borax, which can be purchase at a hardware store) - a piece of reinforcement, a long rod (will be welded to the workpiece as a handle) - wood of your choice for the knife handle - epoxy resin (hardening in 5 minutes is the best) - brass rivets - composition for processing the wood of the handle, I I used linseed oil - metal hardening oil (vegetable)
- ferric chloride
- an anvil (preferably a real steel anvil, although if you don’t have one, some other durable objects will do: a piece of rail, a sledgehammer, a large metal blank, an old bollard mooring post, or just a large strong, hard and flat surface.
Remember how it all started with hitting a large stone with a stone - a hammer (I used a weight of 1.
3 kg, with a cross striker) - pliers - welding (optional, but desirable for welding the plates to each other and welding the handle, if you do not have welding, you can tightly wrap the plates with wire) - forge (capable of heating the workpiece to the temperatures required for forging , which is very important for high-quality fusion of the plates with each other, more on this later) - a belt sander or file with a lot of patience - an oven or another hardening method - a drill or drilling machine
- vice (very useful thing)
Step 2: Assembling the workpiece
Steel plates are cut to the required brain dimensions , mine, for example, are 7.6x1.2cm; Moreover, the larger the workpiece, the more difficult it is to shape it with a hammer.
Before welding them in a stack, the plates are cleaned from all sides of rust and scale.
Next, the plates are stacked, alternating steel grades, so my workpiece consisted of 7 plates, three of which were grade 15n20, and four of which were grade 1095.
The plates, aligned relative to each other, are welded together (don't pay too much attention to my seam), and then a handle is welded to the stack to make it easier to handle the workpiece during forging. There is nothing wrong, especially after the stack of plates have been welded, in using only pliers. I forged my own anyway.
Step 3: First Forging of the Stack
A little about my forge: I made it with my own hands from an empty (I bought a new one on purpose as a precaution) gas cylinder, lined inside with a 5cm layer of kaolin wool and fireproof cement. It is heated by a Ron-Reil type burner, about which there are many good brainstorming articles . The forge itself is not particularly large and can be heated to the required temperature without any problems.
So, the workpiece from the plates is heated to a cherry-red color; the heat for this does not need to be very strong.
The heated
homemade is sprinkled with borax, which immediately begins to melt and must be allowed to seep between the plates.
This will remove scale and prevent oxidation by preventing oxygen from contacting the metal. This action will ensure the purity of the workpiece metal.
Then the workpiece is heated again in the forge and the procedure is repeated a couple more times, not forgetting to clean the scale if necessary.
And after this, the workpiece is heated to forging temperature, I can’t say exactly how much, but I believe it’s somewhere in the region of 1260-1315 degrees Celsius.
At this temperature, the workpiece will have a very bright yellow-orange color, similar to moderate daylight.
To avoid wasting time, make sure that the anvil and hammer are at hand and there is enough free working space.
Then the workpiece is quickly placed on the anvil and with light, soft blows, evenly over the entire area, the forging of the plates begins. Next, the workpiece is again placed in the forge and heated to forging temperature, and then forged with blows of medium force.
And after this, the workpiece is stretched so that it can be bent.
Step 4: Folding the workpiece
It's time to increase the number of brain layers in the workpiece. To do this, the workpiece is forged to a length twice the original length, but it is important to stretch it evenly and not just stretch it.
In the middle of the stretched workpiece, a transverse recess of 3/4 or 4/5 thickness is made using a notch, chisel or other suitable method, along which the workpiece is then folded in half on the edge of the anvil, turned over and forged along the entire length, making sure that the halves do not moved relative to each other along the lateral edges.
Then the heating/forging process from the previous step is repeated: flux, heat, cool, heat, forge, forge.
The procedure for increasing the number of layers is repeated until the required number of these layers, so I folded it 4 times and got 112 layers. (If you want more layers, please, the pattern will then be smaller.
The formula for calculating layers is: initial quantity * 2 to the power of the number of folds, that is, 7 * 24 = 112).
homemade workpiece, heated to forging temperature, is placed in the groove of the anvil, twisted thoroughly, and then it is again given a rectangular shape.
But before twisting, the workpiece is punched in the corners so that its shape becomes more rounded, because when twisting and reverse forging into a rectangular workpiece, inclusions and impurities can form from the resulting folds if the temperature of the workpiece is lower than the forging temperature.
After this, the brain blank is forged again (I repeated it several times), and cooled, and to make sure that the forging is uniform, I cleaned one of the ends of the blank.
During the forging itself, especially at the first stage, it is important to keep the temperature of the workpiece high and be careful, otherwise you can tear the layers away from each other (this is also called delamination, which is not at all good).
Step 5: Model and Rough Profiling
Now you need to imagine the profile of the future knife and roughly forge it from the blank. The more accurately you can forge the profile and bevel, the less you will have to bother with grinding (on a machine or with a file).
There are many brain articles from more experienced blacksmiths, so I will not go into detail.
The bottom line is that the workpiece behaves approximately like plasticine; when it is heated, it is necessary to punch it in the desired direction.
Step 6: Sanding the Profile
The final shaping of the profile is carried out with a grinder and a file. Stock up on tea, because most likely this will take a lot of time, unless of course you have a brain grinding machine .
Step 8: Finished profile
After the profile of the craft is formed, it still needs to be finalized with a file with a finer grain, I used 400s.
The edge of the blade is sharpened almost, but not completely; it is necessary to leave it slightly unsharpened so that during hardening the edge material does not deform.
After this, holes for rivets are drilled in the knife handle and wooden dies for this handle are prepared.
Step 9: Exciting Moment
Hardening. It will either “make” your blade or destroy it. It is important to concentrate and be careful, otherwise you can deform and destroy the blade. The method I used is not the most thorough brain-hardening , but it was the only one available to me with the tools I had, and the oil was the best I could get.
Before hardening, the blade must be normalized. This will relieve stresses built up during forging and twisting and reduce the likelihood of warping during hardening. This normalization is done by heating the blade above its critical temperature (when it is no longer magnetized, so it is useful to have a magnet on hand) and cooling it in air.
: Final and defense
Damascus steel should look like one solid piece of metal. To get the pattern, you need to etch the steel with acid. There are several options for using acids, but personally I use ferric chloride. If you want a very superficial etching, such as an image on a surface, you only need to dip the metal in acid for about 20 minutes.
I wanted a very deep etching that you could feel, so I immersed my piece for 7 hours. Once you have finished etching, you must clean the metal and neutralize the acid. One of the easiest ways to do this is to simply spray glass cleaner onto the engraved piece after it has been rinsed with water. Be sure to wear gloves and eye protection for all of this. If you want to add some color to the piece, like in the last two photos, just heat it up a little after etching until the desired color is achieved.
Once the etching is complete, the final step is to protect the metal. Steel is strong, but unfortunately, it tends to rust. If the piece you are using needs to be practical, like a knife, you can apply wax to its surface.
If the piece is more decorative, you can apply a clear coat. It all depends on preference. Personally, I decided to try nail polish. I usually use clear polyurethane, but this time I decided to try something new. Once the piece is varnished, all that's left is to enjoy the look.
I’m telling you about my amazing experience in etching Damascus steel: when I was sharpening a knife, I scratched the Damascus pattern on the stone, because... tilted it too far for a sharper angle. I really didn’t like this wear and decided to re-etch the steel to reveal the pattern and hide the scratches. Actually, this is how I started to spoil the knife by trying to sharpen it at an acute angle:
All photos are clickable so you can view them in higher resolution.
There are a lot of tips on the Internet on how to poison Damascus; the most accessible solution turned out to be acetic acid, either malic or citric. Because According to everyone’s stories, everything worked out beautifully and wonderfully; I also diluted the vinegar essence 70% (13 rubles a bottle) to a ratio of approximately 20-30% with water and stuck a knife there. I added acid right up to the handle. The etching time depends on the concentration of the acid; you can put vinegar in 9%, but then you will have to wait a day or more.
The process started:
The result was noticeable after 10-15 minutes, small scratches and the cutting edge began to turn a little black, after about an hour I pulled out the darkened knife and washed it under water, it turns out that varnish was applied to the blade and it dissolved. He stuck it in again, took out the darkened knife a couple of hours later, washed it again, all the “eaten metal” was washed off under running water. The scratches and cutting edge are faded and darkened. I left the knife for another 4 hours, it became completely black:
After that, I scraped off the remains of the “eaten” metal with a sponge and what we see: the scratches have disappeared, the cutting edge is the same as the blade itself, only now it has become pale and there is no contrasting pattern that was there before. (see first photo)
When the sellers asked me how to properly etch Damascus, they answered: you can sand it first. and then etch. Composition and etching mode: 15% ammonium persulfate solution in water – 2 minutes, rinse under running water using a cotton swab. Repeat etching 2-3 times until the required relief appears. Instead of ammonium persulfate, you can use 5% nitric acid solution.
Well, my experiment was not a success, the knife “lost a little weight” by a few microns and became dull, but I photographed everything and showed everyone what happened, now you know what will happen to Damascus if you put it in acetic acid. The next step will be to look for nitric acid, I hope it won’t burn my knife to the thickness of an awl.
My questions: Why did this happen? It turns out that acetic acid is not allowed? What is the best way to etch to restore the contrast of the picture?
I bought the knife for 5,600 rubles here: Zlatoust knives now cost more.
PS I’ll try not to sharpen knives by hand anymore until I make a device like the Edge Pro Apex sharpener where the sharpening angle is strictly maintained and you can get a perfect cutting edge.
Chemical composition of wire
Before making a knife, we try to find out the approximate chemical composition of the wire, this is necessary in order to find out whether it is possible to weld it with forge welding and the approximate amount of carbon - this is necessary to find out whether the finished blade will be hardened. We carry out this complex analysis quite simply - by checking for a spark.
Fig. 8. (checking for spark).
From the spark we see that the metal is not alloyed, which tells us that it can be welded using a forge and that the amount of carbon is 0.8-1%, which allows us to assume that the metal will take a decent hardening. There is also the possibility of carbon burning out during forge welding, but we can only check this after welding.
Knife handle care
Caring for the handle of a knife is no less important than maintaining the blade. Popular wooden and leather handles must be protected from prolonged contact with moisture to avoid deformation, swelling and cracking. If the handle gets wet, it should be dried in a warm and shaded place. If you dry a knife in bright sun or near heating devices, sudden evaporation of moisture and temperature changes can cause cracks, warping, and deformation.
The handle should be serviced along with the blade after each use of the knife and during routine inspection. Special furniture care products and vegetable oils, such as olive, linseed, and clove oils, are suitable for lubricating wood.
Handles made of horn or polymers should be wiped regularly and protected from moisture and direct sunlight.
Care of the scabbard
Knife care should not be one-sided. After cleaning the blade and lubricating the handle, you need to take care of the sheath. The main thing to understand here is that the sheath is a means of transporting a knife, and not a place for storing it. Tannins in the leather negatively affect the steel of the blade, and a wet and dirty knife left in the sheath for a long time can cause swelling and loss of elasticity of the material.
The outer surfaces of the sheath must be regularly cleaned of contaminants and treated with automotive leather conditioner. It is important not to forget to remove lint, grains of sand and other small debris from inside the sheath that may scratch the blade.
Leather easily absorbs stubborn pollutants such as rust. Therefore, if oxide has formed on the knife, you should not allow it to get on the surface of the sheath. It is also important to promptly renew torn seam threads and replace failed rivets.
Cast damask steel
Persian-Indian crucible steel with a high carbon concentration has gained the greatest popularity. Cast damask steel is also distinguished by an unusual pattern, which is manifested due to the formation of a matrix of carbide and ferrite. To do this, the structure is slowly cooled.
To the features of foundry damask steel
The following points can be mentioned:
In conclusion, we note that the type of metal in question appeared many centuries ago. Today it is used in most cases in the manufacture of knives or blades, as well as some interior decorations. Modern alloys outperform Damascus in almost all respects. Interest in Damascus was maintained for a long period due to various myths that weapons made from such metal made a warrior almost invincible.