Steel tempering is a type of heat treatment used for products that have undergone hardening with a polymorphic transformation. What does "tempered steel" mean? This is steel heated below temperatures at which a change in the type of crystal lattice occurs. Next, the metal is kept heated for a certain time, followed by slow cooling, usually in air. The purpose of tempering is to weaken or eliminate internal stresses, increase ductility and toughness, slightly reduce the hardness obtained during hardening, and reduce brittleness. The quality of the hardened part largely depends on the correct execution of heat treatment. Depending on the intended purpose, the optimal process mode is selected.
Types of vacation
This type of heat treatment is characterized by: low heating of the part to 150-250°C, holding at these temperatures and cooling in air. When the supply is low, the following processes occur:
- a “tempered martensite” structure is formed (a product of the decomposition of martensite formed at a temperature below the austenitic-ferritic transformation);
- internal stresses are partially eliminated;
- viscosity increases without a noticeable decrease in hardness.
This tempering is most often carried out for tool steels.
Tempering at low temperatures is called “aging”. Types of “aging”:
- Artificial. The parts are heated to 120-150°C and maintained at these temperatures for 18-35 hours. The process takes place in baths with automatic temperature control.
- Natural. It is carried out at room temperature, tools and products are kept in such conditions for three months or more.
“Aging” of hardened parts and tools serves to stabilize dimensions while maintaining a sufficiently high hardness.
Average tempering temperatures range from 300-500°C. In this case, a fairly significant decrease in hardness and an increase in viscosity occurs. This heat treatment is used for tools that must have significant toughness, strength and elasticity, as well as for springs and leaf springs.
Performed at temperatures of 500-650°C, it leads to the formation of a structure that provides the product with an optimal combination of strength and ductility. Used for parts made of structural steels 35.45, 40X and intended for operation under shock loads.
Definition! The operation of hardening followed by high tempering is called “improvement”.
How to temper hardened steel correctly?
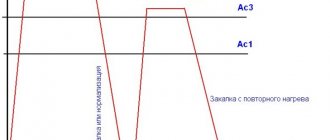
This operation must be performed immediately after hardening, since the part may become cracked due to the presence of high residual stresses. If the tempering regime is violated - insufficient heating or short holding time - “under-tempering” occurs, in which the part remains brittle. To eliminate this drawback, repeated tempering is used.
Approximate hardness of steel (Rockwell) after heat treatment in various modes, including quenching and tempering
Source: metallz.ru
Hardening and tempering of metal at home - technology and tables
In a simplified form, the process of hardening a metal consists of increasing the temperature of the sample to high values, and then cooling it. But it's not that simple. And this is explained by the fact that different types of metals differ in their structure and, accordingly, specific properties. Therefore, certain techniques (and temperatures) are used to harden them. We will talk about them, as well as the specifics of carrying out the relevant operations.
First of all, it is worth noting that heat treatment (hardening) of metal products (or blanks) is carried out in two cases.
Firstly, if necessary, increase the strength of the material (several times). Almost everyone encounters this in everyday life. For example, to “strengthen” the cutting edges of kitchen utensils (knives, hatchets for chopping meat) or tools (chisels, chisels, etc.).
Secondly, to give the metal some plasticity, which greatly facilitates further work with the material (“hot” forging). This is well known to those involved in blacksmithing. Let's consider all stages of the technology of hardening metal products at home.
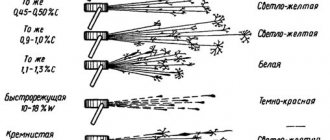
The main condition for high-quality hardening is its uniformity, without dark spots on the sample (blue or black). The metal should not be heated to “white heat”. A sign of optimal heating is that it acquires a bright crimson (red) color. The source of heat can be anything - a blacksmith's forge, a blowtorch, an electric stove, a gas burner, an open fire. Its choice depends on the temperature that needs to be achieved for a given type of steel.
Cooling
There are several methods for carrying out this technological operation. It can be either sharp or gradual, stepwise. The specificity is determined by the type of metal.
Jet hardening
It is used if it is necessary to process not the entire sample, but a separate section of the surface. A stream of cold water is directed at it.
With one "cooler"
It is clear that a suitable container (bucket, barrel, bathtub) is pre-installed. Typically used for alloy or carbon steel workpieces.
Media with different abilities to lower the temperature of the material are used as a “cooler”. Therefore, the process is a two-stage process, which also ensures “tempering” of the metal. For example, cooling is first done in water, and then in oil (for example, machine oil or mineral oil), since it can ignite due to high temperature.
There are other methods, but they are usually used by craftsmen who work at a professional level and are well versed in metals. For example, isothermal hardening. There is no point in dwelling on them in detail, since first we will have to explain what martensitic and austenitic steels are.
Modes of hardening and tempering of steel
What to cool in?
We have already mentioned that this is most often done with cold water and oil. But these are not the only possible “coolers”. The fact is that with such hardening, some types of steel become brittle. Therefore, in practice, other media are used that can intensively lower the temperature of the metal.
For example, liquid wax. It is more suitable for working with flat workpieces, which, after bringing their temperature to the required value, are completely immersed in it, sequentially, several times in a row, until the mass of sealing wax has completely hardened.
Craftsmen also use substances such as alkalis, solutions with a strong concentration of salt and a number of others, even molten lead, as “coolers”.
How to check the quality of hardening? There is a fairly simple way - using an ordinary file.
- If, when processing a workpiece, it literally “bounces” off it, then the result is “glass.” Such metal is overheated and will crumble easily.
- But the “sticking” of the tool indicates that the metal is soft (“plasticine”), not hardened enough, and the strength of the part made from it is highly questionable.
Source: ismith.ru
Step-by-step making of a simple forge
Fireclay bricks are used for production. It differs from ordinary brick in that it contains fireclay clay, which can withstand heating of more than 2500 ⁰C.
It is not difficult to distinguish fireclay bricks from ordinary bricks. On the surface there is an extruded circle with a diameter of 55 mm. The structure itself is noticeably different from the fired product.
To ensure that the bricks maintain a constant shape, they can be held together using a special mortar. But in practice they do things differently. A frame is welded from the corner. It will not allow you to change shape. A cast iron cylinder is installed in the center (used in internal combustion engines). In this case, a cylinder from a V-2M tank engine was used.
To prevent bricks from falling out, support ribs are welded. The load from the main fragments of the forge will be distributed on them.
Having placed the cylinder on the corners, mark the cutouts. They will have to be done using cutting discs and angle grinders.
After marking, the lines left by the scriber are visible.
The necessary cuts have been made. All that remains is to weld the ribs in place.
Holding the parts in place, spot weld the components. After making sure that the parts are located in the right place, the final welding of the forge frame is carried out.
Turning the frame over, they look at how the frame of the forge will look in working position.
Now you need to lay the bricks correctly. It is clear that they have been sampled. A certain ledge is formed, located below the level of the brick surface.
Having laid all the bricks in place, you can see the formation of a recess. Its purpose is to install a grate.
The grate is installed in the center of the forge. It is designed to supply air from below into the combustion zone. Only with air flow can constant combustion of the fuel be guaranteed. But to obtain temperatures above 1300 ⁰C, forced air flow from a fan will be required.
You will need to weld a pipe to the cylinder, which will have:
- centrifugal fan;
- plug for venting combustion products.
The fan is being fitted. To supply it you need an intermediate profile pipe. It is necessary to weld it so that the air flow enters the combustion zone without unnecessary resistance.
A hole is marked in a cylindrical pipe.
After the first cuts, you need to mark the remaining elements.
The parts are ready for assembly. All that remains is to fix the parts and then weld the entire blower structure.
The result was a structure welded to the cylinder. Now we have to install the fan.
The forced air supply system to the forge is ready. It's time to assemble the rest of the small-sized forge structure.
Another view. The quality of welds is checked.
After painting, the forge takes on a professional look. It is mounted on supports. The height is selected according to the height of the master who will work on this forge.
There is a rotary valve on the pipe. It is needed to temporarily block access to the fan. Usually they are closed when there is a need to clean the grates.
There is a lid at the bottom. In the “closed” position it is held by a counterweight. To open the passage for slag and other combustion products, simply turn the counterweight slightly. The hole will open. The slag will leave the furnace.
The bricks take their place. Soon the forge will be ready for use.
To limit heat loss, a screen is installed. This is sheet steel that is installed around the perimeter of the hearth. A handle is mounted on the front. It is needed for hanging auxiliary tools that the blacksmith uses when performing work.
Having laid the fuel (start ignition with ordinary shavings and wood chips), light the fire. Gradually add coal. It is the main fuel for the forge.
After turning on the fan, the combustion intensity increases. The coals begin to burn not red, but white. The flame temperature increases above 1000 ⁰С. Now you can heat up parts on the forge in order to further forge metal or harden workpieces.
In addition to the forge, blacksmiths use anvils. The main work on forming the desired shape is performed on it. They work with heavy and light hammers. Additionally, streams of different shapes are used.
What is steel tempering, types and process technology
Steel tempering is the final stage of heat treatment and is used to reduce excess hardness, reduce brittleness and eliminate internal stresses of the metal. It is most often applied to carbon steels that have been hardened to martensite, that is, heated slightly above 727 ºC and cooled at a high rate in an aqueous environment. Typically, steel products are tempered at temperatures that are several times lower than the quenching temperature, while maintaining the martensitic structure, which ensures the hardness of the metal. Cutting tools and other products made from tool steels are mainly subjected to this heat treatment. However, there are types of tempering with heating close to quenching (on troostite and perlite), after which the metal acquires the required elasticity and its impact strength increases. Alloying additives slow down the process of formation of the required structure, so parts made of alloy steels are tempered at higher temperatures. Traditional tempering technology involves heating the product to a standard value and cooling it in the open air, although some types of steel products are tempered in oil or molten media. You can release the entire product or part of it. For example, only the butt and handle of knives are tempered, while maintaining the full hardening of the blade.
Assembling a homemade knife
Having completed all the above operations and bringing the knife steel to the required hardness, we proceed to assembly. We adjust the shape of the pads to the shank of the knife and cut out two additional leather inserts.
Then we lubricate the parts with glue, install brass inserts on the glue and leave to dry for several hours.
It is better to make the extreme insert not from a rod, but from a tube of the required diameter. This will help attach the finished product to a leather strap during use, which will prevent its loss while hiking, fishing or hunting.
After the glue has dried, carefully sand the handle and blade with sandpaper. To protect the blade from corrosion, it is enough to polish it well after final sharpening and finishing.
We recommend other articles on the topic
Assembling a concrete mixer from scrap materials with your own hands
Making a countertop from liquid stone yourself
Homemade feather removal machine - stationary and mobile options
Making a hand winch with your own hands - design options
What is steel tempering?
Tempering of a metal is one of the types of heat treatment in which its phase state is preserved, but at the same time a number of hardening characteristics are corrected. First of all, during tempering, the stress of the internal structure, which arises as a result of deformations of the crystal lattice during quenching, sharply decreases. In addition, rigidity and brittleness are reduced, which is a consequence of the saturation of the needle-shaped elements of martensite with ferrite and the formation of pearlite grains (see figure below). This structure retains the properties of hardened metal, but at the same time becomes more ductile and tough. In alloyed steels, all these processes occur with some differences, which are associated with the fact that alloying elements under certain conditions become centers of crystallization and thus change the physical and chemical characteristics of the metal.
Steel products are tempered by heating them to a given value, followed by slow cooling in the open air or in a special environment. The phase state and structure of the metal formed after tempering, and, consequently, its physical characteristics, directly depend on the heating temperature. In general, the rule is observed: the higher the temperature, the lower the brittleness and hardness and the higher the flexibility and toughness. Depending on the temperature ranges used, there are three main types of steel tempering: low, medium and high, the heating limits of which are, respectively, 300 ºC, 450 ºC and 650 ºC. The first type is characterized by the highest hardness, and the latter by the highest impact strength. The heating temperatures during tempering of steels directly depend on their chemical composition, since alloying additives have a significant impact on the process of formation of structural elements. This is usually due to a slowdown in the decomposition of martensite, which requires an increase in temperature conditions. In addition, when high-alloy steels are tempered, phenomena such as an increase in rigidity associated with the formation of troostite and the occurrence of temper brittleness may be present.
Order steel hardening at ChZMK
The Cherepovets plant has been working for you for more than 55 years. We manufacture metal structures and also provide various steel processing services. Our qualified specialists perform high-quality work in our own workshops and using modern equipment.
When ordering steel hardening from us, you don’t have to worry about the quality and results. Our clients watch the process of work using an online broadcast, and we have a guarantee for a period of 12 to 24 months for all services.
We deliver orders to all regions of Russia and offer convenient payment methods. You can pay in cash or by bank transfer.
To get a consultation or place an order, call us or leave an online application on the website. Our experienced managers are always happy to help you.
Low Vacation
Low tempering is carried out in the temperature range of 120÷300 ºC. The choice of a specific temperature regime depends on the grade of metal and the desired result. Most often, this method reduces internal stresses and slightly increases the toughness of tool steels, which require increased hardness and wear resistance. At 120÷150 ºC there is no change in hardness, but only residual stresses decrease. To reduce it, the product must be heated to at least 200 ºC and kept under these conditions for at least one hour. In the range from 200 ºC to 300 ºC, the formation of tempered martensite begins and the hardness decreases with a simultaneous increase in the toughness of the steel. In some cases, a significant decrease in viscosity is observed in this temperature range, which is called temper embrittlement. The consequences of this phenomenon are eliminated by additional heat treatment. In addition to tool steel, low tempering with heating up to 250 ºC is also used for structural steels, the surface of which has been subjected to thermochemical treatment.
What defects can occur when hardening metal?
If you do not follow the recommended conditions when hardening, the following defects may appear:
- Cracks. They appear due to internal tension and there is no way to correct them.
- Burnout. It occurs due to the penetration of oxygen into metal products. It is also possible due to heating the metal to a temperature close to the melting point. A burnt product cannot be repaired.
- Overheat. It appears when the steel has been heated to a hot temperature. The result is a large structure. Overheated metal becomes very brittle. Overheating can be corrected by annealing and a new hardening procedure.
- Low hardness. This is possible due to insufficient cooling speed, insufficient holding of the required temperature and low heating temperature. Such a defect is corrected by annealing and new hardening.
- Decarburization and oxidation. This effect is possible when steel interacts with furnace gases and air. This defect cannot be corrected and causes serious harm to the production process. To avoid problems, use ovens with atmospheric protection.
Average holiday
Medium tempering is intended for heat treatment of steel products, which must combine increased strength and elasticity with specified toughness parameters. As a rule, spring and spring steels operating under variable dynamic loads are tempered in this way. The temperature range in this case is from 300 ºC to 450 ºC, and the hardness is reduced to 45÷50 HRC versus 60÷63 with low-temperature tempering. After such heat treatment, the steel acquires a troostite structure. The heating time during an average tempering can be up to several hours, and cooling is carried out naturally in calm air.
High holiday
High tempering is carried out in a temperature range close to the critical point: from 450 ºC to 650 ºC. After such heat treatment, the steel becomes ductile, its relative elongation and contraction, as well as impact strength, increase. This is due to the fact that the metal acquires the structure of tempered sorbitol and its internal stresses are reduced by 95%. In this way, products operating under shock loads are released: shafts, axles, connecting rods, parts of presses and forging hammers. If steel is tempered at 690 ºC, then granular pearlite will prevail in its structure, and it will have maximum ductility and minimum strength. In some vanadium, chrome and tungsten steels, when tempered with heating up to 560 ºC, troostite may form, which leads to an increase in hardness (the so-called secondary hardness).
Increased hardness over open fire
In everyday life, hardening is often carried out over an open fire. This method is only suitable for a one-time process of increasing surface hardness.
All work can be divided into several stages:
- First you need to make a fire;
- at the time of lighting the fire, two large containers are prepared that will correspond to the size of the part;
- In order for the fire to produce more heat, you need to provide a large amount of coals. they give a lot of heat for a long time;
- one container should contain water, the other should contain motor oil;
- special tools should be used to hold the hot part being processed. In the video you can often see blacksmith pliers, which are the most effective;
- After preparing the necessary tools, you should place the object in the very center of the flame. in this case, the part can be buried in the very depths of the coals, which will ensure heating of the metal to a fusible state;
- coals that are bright white are hotter than others. The metal smelting process must be closely monitored. the flame should be crimson, but not white. if the fire is white, then there is a possibility of overheating of the metal. in this case, performance deteriorates significantly and service life is reduced;
- the correct color, uniform over the entire surface, determines the uniform heating of the metal;
- if darkening to a blue color occurs, this indicates a strong softening of the metal, that is, it becomes excessively plastic. this should not be allowed, since the structure is significantly disrupted;
- when the metal is completely heated, it should be removed from the source of high temperature;
- after this, the hot metal should be placed in a container with oil with a frequency of 3 seconds;
- The final stage can be called immersing the part in water. In this case, the water is periodically shaken. This is due to the fact that the water quickly heats up around the product.
When performing work, care should be taken as hot oil can cause damage to the skin. In the video you can pay attention to what color the surface should be when the desired degree of plasticity is achieved. But to harden non-ferrous metals, it is often necessary to be exposed to temperatures in the range of 700 to 900 degrees Celsius. It is practically impossible to heat non-ferrous alloys over an open fire, since it is impossible to achieve such a temperature without special equipment. An example is the use of an electric furnace, which is capable of heating the surface up to 800 degrees Celsius.
Tempering brittleness
For almost all steels, a standard relationship applies: the higher the heating temperature during tempering, the greater the ductility and toughness of the tempered product. However, for some brands, as the temperature increases, these physical characteristics decrease and hardness and brittleness increase. This phenomenon is called temper brittleness and occurs during heat treatment of both carbon and alloy steels. It manifests itself in two temperature ranges: 250÷400 ºC and 500÷550 ºC and, accordingly, is called type I and II temper brittleness (see figure below). The first is typical for carbon steels, and you can get rid of it by heating the part again a little above 400 ºC. As a rule, it does not appear again, but at the same time the metal exhibits a slight decrease in hardness. Type II temper brittleness can occur in alloy steels, which, after heating to the specified range, are subjected to slow cooling. To counteract this problem, the cooling rate is usually increased, but reheating the product may again cause such brittleness to occur. Another way to get rid of this phenomenon is to introduce small amounts of molybdenum or tungsten into the steel composition. It is preferable for tempering large-sized parts, since a high cooling rate can cause their deformation and the occurrence of excessive internal stresses.
Checking metal for heat treatment
Before the hardening procedure, it is necessary to make sure that the steel we purchased has not previously been subjected to heat treatment. You can check this using a regular soldering iron. The tool needs to be heated and passed over the metal product. If it sticks to the metal, then the product has not been heat treated. If the soldering iron passes smoothly over the surface or bounces off it sharply, then the metal object is well or too heavily processed under the influence of high temperatures. If no traces of heat treatment are found, you need to do it yourself.
How to release steel yourself
In order to temper steel at home in order to relieve internal stress, it is not necessary to know its grade - it is enough to heat it to a temperature no higher than 200 ºC and hold it in these conditions for at least an hour. If you plan to temper a steel product to reduce hardness and increase toughness, then knowledge of the steel grade is necessary to determine the tempering temperature conditions. This is actually not as difficult a task as it might seem. In textbooks on heat treatment and on Internet sites there are enough tables with lists of products and the grades of steel from which they are made, and often even with the temperature conditions for their quenching and tempering (see table above). To heat your part, you can use almost any heat source: from the oven to a gas burner or a homemade forge. An important point is the heating temperature. In principle, it can be determined by color tables of tarnish appearing on hot metal, which are also easy to find on the Internet. This is an old proven method, known since ancient times, but it requires some experience, since its main disadvantages are the subjectivity of color perception and its dependence on external lighting. For a beginner, the best solution would be to use a stove thermostat or a regular multimeter with a thermocouple.
Has anyone ever used a multimeter with a thermocouple to measure the tempering temperature? How accurate is this device and how do its readings correspond to the color of the tarnish? If anyone has such experience, please write your opinion in the comments.
Source: wikimetall.ru
Choosing steel for knife hardening
As you know, steel is nothing more than an alloy of carbon and iron. Additives are added to them in small doses. They do not play a big role on the quality of the future blade. The most important element is carbon. Additives can be such as zinc, chromium, molybdenum, calcium, etc.
But the less carbon in steel, it acquires high strength, but wears out faster and corrosion develops faster. For proper hardening, you must know the composition of the future blade. It is best to carbon analyze the steel.
Ideal hardening of a knife blade.
If the future product is, for example, made from a file or a car spring. Hardening in this case is simply necessary, especially since forging such a metal implies its mandatory heating. You can check the quality of hardening at home, but it is quite “cruel”.
You need to tighten the finished blade in a vice and begin to gradually bend it, and if the blade breaks at around 45 degrees. We can safely say that the hardening was carried out correctly. But this should be done after your first independent hardening of the blade, you need to remember the whole process well and repeat it again.
Metal moonshiners! Let's unite! For the benefit of the site and communication!
I'll ask. How to temper hardened steel to the required hardness at home. wimpex273, 24 May 13, 23:42
Thrust wheel of a sewing machine for sewing leather. wimpex273, 25 May 13, 00:30
To sew leather, instead of pressing a rag, use a wheel. So it needs to be made according to all the rules. wimpex273, 25 May 13, 00:44
Last ed. 25 May 13, 01:01 from Benz
I'll ask. How to temper hardened steel to the required hardness at home. wimpex273, 24 May 13, 23:42
As far as I remember from a school course or something, hardness is achieved precisely by hardening, and tempering relieves internal stress and increases strength. Archon, May 25, 13, 00:53
Last ed. 25 May 13, 01:00 from Benz
Well, it’s not like I’m building a spaceship. Therefore, such precision is not needed. It is necessary that the balls from the bearing do not roll into the groove, and that the edges do not break off. The hardness is needed like a wrench, the old wheels were approximately the same. The machine is ancient, the parts have not been sold for a long time, but it works well. There is an old method for hardening. Heat the part until it stops being magnetic. It is determined using a magnet. When it stops magnetizing, put it in oil. Do not keep it in place in oil, but constantly move it. After such an operation, the metal becomes very hard, but also very brittle. This is normal during hardening. Now let's release the part. wimpex273, 25 May 13, 22:23
alekslug Researcher Lobnya 4917 1606
I'll ask. How to temper hardened steel to the required hardness at home. wimpex273, 24 May 13, 23:42
Last ed. 25 May 13, 23:03 from Efim
All posted materials reflect solely the opinions of their authors and may not coincide with the opinion of the Administration of the HomeDistiller forum.
© 2022 HomeDistiller (forum for moonshiners, brewers, winemakers, rectifiers, grain growers) & Simple Machines LLC Full version Simplified version
Source: forum.homedistiller.ru
Determining the quality of work
Having gone through all the stages described above, I would like to know what will come of it. How to check the quality of the work done is quite simple:
- sharpening should last for a long time;
- the blade should not wrinkle or crumble when in contact with dense materials;
- the blade must have plasticity, bending and restoring its previous shape;
- a normal tool, with regular sharpening and constant use, should last at least 10 years.
Don't forget that true mastery comes with experience. And experience, as we know, is the son of difficult mistakes.
If you didn’t succeed the first time, or the second, then be persistent - the tenth time it will turn out no worse than others. Study the material, practice and sculpt true beauty.
Previous
Making knivesHow to make bevels on a knife at home
Next
KnivesHow to choose a knife for your purposes
Steel hardening and tempering technology
Heat treatment of steels is one of the most important operations in mechanical engineering, the correct implementation of which determines the quality of the products. Quenching and tempering of steels are one of the various types of heat treatment of metals.
Thermal effects on metal change its properties and structure. This makes it possible to increase the mechanical properties of the material, the durability and reliability of products, as well as reduce the size and weight of mechanisms and machines. In addition, thanks to heat treatment, cheaper alloys can be used for the manufacture of various parts.
Heat treatment of steel involves applying heat to the metal under certain conditions to change its structure and properties.
Heat treatment operations include:
- annealing;
- normalization;
- aging;
- steel hardening and steel tempering (etc.).
Heat treatment of steel: hardening, tempering - depends on the following factors:
- heating temperatures;
- heating time (speed);
- duration of exposure at a given temperature;
- cooling rate.
Steel hardening is a heat treatment process, the essence of which is to heat the steel to a temperature above the critical temperature, followed by rapid cooling. As a result of this operation, the hardness and strength of steel increase, and ductility decreases.
When steels are heated and cooled, the atomic lattice is rearranged. The critical temperature values for different grades of steel are not the same: they depend on the content of carbon and alloying impurities, as well as on the rate of heating and cooling.
After hardening, the steel becomes brittle and hard. When heated in thermal furnaces, the surface layer of products becomes covered with scale and is decarbonized the more, the higher the heating temperature and the holding time in the furnace. If the parts have a small allowance for further processing, then this defect is irreparable. Hardening modes for hardening steel depend on its composition and technical requirements for the product.
During hardening, parts should be cooled quickly so that austenite does not have time to transform into intermediate structures (sorbitol or troostite). The required cooling rate is ensured by selecting the cooling medium. In this case, excessively rapid cooling leads to cracks or warping of the product. To avoid this, in the temperature range from 300 to 200 degrees, the cooling rate must be slowed down, using combined hardening methods. The method of immersing the part in a cooling medium is of great importance to reduce warping of the product.
Hardness test
The hardness of metals is determined by two methods:
- According to Brinell, a metal ball is pressed into the metal.
- According to Rockwell, it consists of pressing a small cone from a strong pyramid (diamond).
When determining Brinell hardness, the size of the mark left by a ball when pressed with a force is measured, the magnitude of which depends on the expected hardness and the ball used. Balls of different diameters (1,...10 mm) are used in the tests. Recalculation of readings is performed according to the formula:
Where F is the force applied on the device, N; D – diameter of the ball used to test hardness, mm; d – imprint diameter. It is measured under a microscope that has a special ruler. Measurement accuracy up to 0.01 mm.
This method is recommended for determining hardness of no more than 300...320 units. If it is necessary to determine harder objects, then use the Rockwell device. On this scale, information is indicated by HRC and numerical value.
Based on numerous studies, it has been established that for knife steel the HRC 55...63 will be quite high. When designing gears and manufacturing gears, hardening of the tooth surface is also performed. Designers set hardness to HRC 52…58. Metal-cutting tools (cutters, drills, cutters, milling cutters) have a hardness of HRC 60...65.
Heating the metal
All steel hardening methods consist of:
- heating steel;
- subsequent holding to achieve through-heating of the product and completion of structural transformations;
- cooling at a certain speed.
Carbon steel products are heated in chamber furnaces. In this case, preheating is not required, since these steel grades are not subject to cracking or warping.
Complex products (for example, a tool with protruding thin edges or sharp transitions) are preheated:
- in salt baths by immersing two or three times for 2 - 4 seconds;
- in separate ovens up to a temperature of 400 - 500 degrees Celsius.
Heating of all parts of the product should proceed evenly. If this cannot be achieved in one step (large forgings), then two holding times are made for through heating.
If only one part is placed in the oven, the heating time is reduced. For example, one 24 mm thick disk cutter heats up within 13 minutes, and ten such products heat up within 18 minutes.
How to make a chamber for hardening metal
It is clear that when making such a camera, it is better to take the process seriously, since you will not be making it for one day or once. Let's try to briefly describe the manufacturing process of such a chamber; it is also called a muffle furnace.
- The main thing is to correctly manufacture the “body” of such a camera; here they resort to a simple process. The future neck is made from any hard paper material (such as cardboard) and coated with a thick layer of fireproof clay. Don't forget to make a thin layer of paraffin between the form-building paper material and the clay.
- In the second stage, the future chamber is dried for at least a day, and then placed in the oven and calcined at a low temperature of about 90-110 degrees Celsius. After this stage, the paper component can already be removed.
- The final firing of the structure occurs over an open fire at a temperature of about 900 degrees, then it is cooled under natural conditions. You need to wait until the camera cools down completely.
- After the workpiece has cooled, it acquires the properties of stone and becomes very hard, like a brick. Doors that open horizontally are attached to it.
- The final stage can be called wrapping the future furnace with nichrome wire, with a cross-sectional diameter of about 0.75 mm. The entire structure will require about 18 meters. To prevent short circuits during winding, it is better to immediately coat it with raw clay. We make two holes in the housing, one for a thermocouple (to measure temperature), and the second for visual control.
A self-made chamber for hardening a knife.
At this point, we can say that the furnace for heating metal is ready. As you can see, there is nothing difficult in making a muffle furnace for your home.
Product protection from scale and decarburization
For products whose surfaces are not ground after heat treatment, carbon burnout and scale formation are unacceptable. Surfaces are protected from such defects by using protective gases supplied into the cavity of the electric furnace. Of course, this technique is only possible in special sealed ovens. The source of gas supplied to the heating zone is shielding gas generators. They can operate on methane, ammonia and other hydrocarbon gases.
If there is no protective atmosphere, then before heating the products are packaged in containers and covered with used carburizer and cast iron shavings (the heat engineer should know that charcoal does not protect tool steels from decarburization). To prevent air from getting into the container, it is coated with clay.
When heated, salt baths prevent the metal from oxidizing, but do not protect against decarbonization. Therefore, in production they are deoxidized at least twice per shift with brown salt, blood salt or boric acid. Salt baths operating at temperatures of 760 – 1000 degrees Celsius are very effectively deoxidized by charcoal. To do this, a glass with many holes over the entire surface is filled with dried charcoal, closed with a lid (so that the coal does not float up) and, after heating, lowered to the bottom of the salt bath. First, a significant number of flames appear, then it decreases. If you deoxidize the bath three times during a shift in this way, the heated products will be completely protected from decarbonization.
The degree of deoxidation of salt baths is checked very simply: an ordinary blade, heated in a bath for 5 - 7 minutes in a high-quality deoxidized bath and hardened in water, will break, not bend.
Hardening steel at home or cottage
Of course, the best result from hardening will be obtained if it is carried out by professionals with extensive experience and in production conditions. It happens that you purchased a tool, but it turned out to be under-hardened or not hardened. In these cases, they resort to hardening at home. This process is easy to learn. Hardening can be carried out over a simple fire. It is enough to follow the following sequence of actions:
- First, prepare two vessels - with water and oil.
- Then prepare a tool with which you will lower the product into the fire and remove it. You can use simple pliers.
- Next, you need to build a fire and wait for the coals to form. We place a metal product on them, which we will harden.
- Pay close attention to the shade the flame takes on and the color of the coals. Fire should not be white, but hot coals, on the contrary, take on a white color. For the home hardening process, the optimal flame color is crimson. If the flame is white, this indicates a high temperature that will simply burn the part.
- Make sure that no blue or black stains appear on the steel part. They talk about deformation of the product due to strong softening. If the steel has taken on a white tint, it can be thrown away.
- Once the metal has heated to the optimal temperature level, it is necessary to remove it from the fire and lower it into the oil. We do this 3 times. The first time we lower it by 3 seconds. Each time we increase the time by the same amount. We lower it and pull it out sharply.
- Then we lower the instrument into a vessel with water and leave it there until it cools completely.
Elongated products must be placed vertically in the mold. In order to determine the optimal temperature at home, you can use a special color chart. Instead of a fire, you can use a simple stove.
Coolants
The main coolant for steel is water. If you add a small amount of salts or soap to the water, the cooling rate will change. Therefore, under no circumstances should the quenching tank be used for other purposes (for example, washing hands). To achieve the same hardness on the hardened surface, it is necessary to maintain the coolant temperature at 20 - 30 degrees. You should not change the water in the tank frequently. It is absolutely unacceptable to cool the product in running water.
The disadvantage of water hardening is the formation of cracks and warping. Therefore, only products of simple shapes or cemented ones are hardened using this method.
- When hardening products of complex configurations made of structural steel, a fifty percent solution of caustic soda is used (cold or heated to 50 - 60 degrees). Parts heated in a salt bath and hardened in this solution turn out light. The solution temperature should not be allowed to exceed 60 degrees.
Modes
The vapors generated during quenching in a caustic solution are harmful to humans, so the quenching bath must be equipped with exhaust ventilation.
Be careful not to let water get into the oil bath, as this may cause the product to crack. What is interesting: in oil heated to a temperature above 100 degrees, the ingress of water does not lead to the appearance of cracks in the metal.
The disadvantage of an oil bath is:
- release of harmful gases during hardening;
- formation of plaque on the product;
- oil's tendency to flammability;
- gradual deterioration of hardening ability.
- Steels with stable austenite (for example, X12M) can be cooled with air supplied by a compressor or fan. At the same time, it is important to prevent water from entering the air duct: this can lead to the formation of cracks in the product.
- Step hardening is performed in hot oil, molten alkalis, and low-melting salts.
- Intermittent hardening of steels in two cooling environments is used for processing complex parts made of carbon steels. First they are cooled in water to a temperature of 250 - 200 degrees, and then in oil. The product is kept in water for no more than 1 - 2 seconds for every 5 - 6 mm of thickness. If the exposure time in water is increased, cracks will inevitably appear on the product. Transferring the part from water to oil must be done very quickly.
Do you need to cut metal quickly and efficiently? Use a plasma cutter! How to do it correctly, read this article.
If you are interested in how to turn metal products, read the article at https://elsvarkin.ru/obrabotka-metalla/tokarnaya-obrabotka-metalla-obshhie-svedeniya/ link.
How to harden?
When you have a forge, hardening can be done quite simply:
- First the fire is lit. Small-sized wood (chips, small branches, woodworking shavings and paper) is used for ignition.
- Prepare the containers in which the hardening will be carried out. Mineral oil (from internal combustion engines) is the best cooling for parts. The container must allow the part to be loaded completely. Synthetic and semi-synthetic oils can be used, but keep in mind that some may boil. The cooling rate will decrease. Therefore, the use of such oil is used with caution.
- A water container is needed to rinse parts after hardening.
- You will need coal. Brown and black coals are used. In practice, charcoal obtained after processing birch is often used.
- To pick up the workpiece and move it around inside the forge, you will need pliers. Experienced blacksmiths have several types of pliers.
- After obtaining a stable fire on the grates, you can add coal. It burns slowly at first. When the air supply is turned on, intense heating begins. The coals change color to white.
- It's time to lay down the part that they want to harden. She is put into the fire. Watch the warm-up.
- Need a magnet. It will show whether the required heating has occurred or not. Austenite is not magnetic.
- If a dark cherry-colored glow occurs, you can count on heating to similar temperatures.
- Take out the workpiece and try whether it is magnetized or not. If not, then the temperature has been reached.
- Warming up is required for at least 15...20 minutes. The thermal conductivity of heated metal is low, so incomplete heating may occur inside massive objects. In this case, bends are observed during hardening.
- After removing the part from the fire, it is dipped into oil in several stages. Lower and raise with rhythmic movements. This is how high cooling rates are achieved. Raising and lowering stirs the coolant during the hardening process. A fire may occur. It will go out quickly.
- All that remains is to rinse the part.
- You can check whether hardening has occurred or not with a file. If the file “does not take”, it means that hardening has occurred.
Test the quality of tempering on glass. If it is possible to leave a mark on the glass with a tempered part, then an HRC hardness of more than 55 units is obtained.
Video: how to harden metal with your own hands?