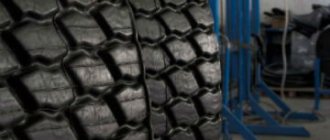
[Artistic metal engraving] can add special value to an item.
Firstly, most often, such work is performed individually, you become the owner of an exclusive item.
Secondly, the artistic engraving looks very beautiful.
Thirdly, you can do it yourself, at home. Engraving is the application (transfer) of a design onto a metal object.
How to make engraving on metal at home, what tool or machine is needed? What is the price of engraving tools? You will learn about this in our article.
Photo:
Do-it-yourself metal engraving at home - instructions and video
It makes no sense to talk about applying inscriptions on metal using special paints or varnishes.
By the way, this is also one of the methods of engraving on metals. But how long will such drawings, symbols, and icons last on the sample? They will be washed off quite quickly with any of the solvents, although due to banal abrasion their service life will be short. There are more efficient metal engraving technologies, which we will talk about. But are they all suitable for independent performance, and even at home? When you just read about them, everything is clear and easy. But practical implementation is another matter.
Laser engraving
This method is considered the most effective, as it allows you to apply a pattern (drawing) of any complexity to metal, “writing” the finest lines and smallest icons on it.
But taking into account the fact that engraving samples using this method will require expensive equipment, it is acceptable only for those who have decided to make this craft their business, that is, to put production on stream. It is unlikely that anyone will want to shell out a tidy sum just to put memorable inscriptions on a couple of teaspoons or on the blade of a hunting knife. The services of professionals in any workshop will cost less.
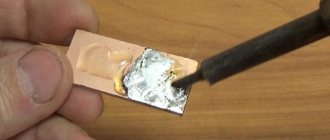
Mechanical engraving
The accessories are much simpler here - you only have to purchase a set of required cutters and the engraver itself. A drill is often used for these purposes (anyone who has ever visited a dentist knows what this is). Another option is to apply images using incisors.
The quality of the inscriptions will be high, but only if you have not just knowledge in this area, but also extensive practical experience. This work requires a “sharp eye” and a steady hand. How many of us can boast of our skills? It turns out that quite a lot of time will pass from what was conceived to actually executed, which is necessary to acquire skills. Who is happy with this prospect? In addition, you also need to be able to sharpen cutters (stiches) correctly if the work is carried out with their help.
Let's consider the technique of electro/chemical etching for the purpose of applying inscriptions. It belongs to the simplest category, and anyone who has chromed metal parts at home will get the gist of it right away.
Review of equipment for laser engraving of metal
Laser engraving is possible either using a fiber optic marker or a CO2 engraver. Let's look at each of these methods.
Fiber optic marker
A laser marker is considered a universal equipment for engraving and marking metal.
It has several advantages over other methods:
- No consumables.
- High quality.
- Easy to operate.
- Low energy costs.
- High speed.
- No special knowledge required for setup.
- Contactless engraving on the product.
- Possibility of installing a rotating device.
- Small dimensions.
- Lack of heat treatment in the cutting area.
- Various materials can be engraved.
What products can be engraved?
A laser marker can be used to engrave both piece items and be used for mass production. Let's list the main ones:
- decorations,
- barcodes,
- application of logos,
- serial numbers,
- nameplates,
- branding of souvenir products,
- signs,
- business cards and more.
What industries are fiber markers used in?
- advertising,
- jewelry production,
- medicine,
- defense production,
- dentistry,
- trade,
- shipbuilding,
- Automotive industry,
- tool production,
- production of electrical equipment.
How to choose a laser marker?
In order to decide on the choice of a laser marker, you first need to consider its main technical characteristics.
Emitter power
The main thing is the emitter, because a laser beam appears in it. Lasercut offers three types of laser emitters - Raycus, Max Photonics, IPG.
Max Photonics is the most budget-friendly, but is only suitable for applying simple images.
In contrast, Raycus holds power better and provides uniform pouring. A marker with a Raycus emitter can be used to engrave complex and three-dimensional designs and geometric shapes. Some may require filling.
And the IPG emitter allows you to make color images on metals. In addition, it can perform tasks at high speeds and has built-in anti-reflection protection.
When choosing an emitter, you need to decide on the tasks.
For example, with Max Photonics it is much more difficult to obtain a black tint on stainless steel than with IPG. But it's possible.
Working field size
The size of the working field of laser markers on average ranges from 75/75 to 300/300 mm. Its choice depends on the size of the product being processed.
There are markers with a lifting table, for example, Wattsan FL LT, with a removable handle and focus stop, such as Wattsan FL HH, with a stationary table - Wattsan FL ST.
Each of them has its own functional features. For example, the FL TT marker is suitable for engraving large items.
Setup and maintenance
Before purchasing a machine, Lasercut can provide commissioning. It includes installation of equipment, configuration of the control system, testing of electronics and mechanics, connecting security systems and much more. Our qualified engineers can provide training to your staff.
In addition, service, diagnostics, adjustment, warranty, post-warranty service and repair are possible.
Price
As standard, fiber optic markers cost on average from 300 to 700 thousand rubles, depending on the emitter power and functionality. But it is also possible to modernize the machine, for example, increasing power or installing a rotary device.
LASER MARKER WATTSAN FL HH
Is the CO2 machine suitable for metal engraving?
CO2 laser machines are designed to engrave many materials other than metal.
It is very difficult to apply high-quality engraving on metal using an engraver, but it is only possible if it is coated with a special spray or paste KTP-8. And not every metal can be worked with on a CO2 machine, but only ferrous ones - steel and ferroalloys, stainless steel.
If you specialize in making metal products, then, of course, you need to focus on a fiber marker.
But if working with metals is not your main focus or you use the machine for amateur purposes, then it is possible to engrave on a CO2 machine.
WATTSAN 0503
Engraving method 1
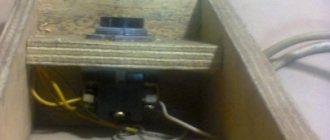
- Glass container (according to the size of the workpiece being processed). Naturally, not a bottle with a narrow neck, but a jar, glass or bath. Constant voltage source (up to 15 V). It should provide a current of 0.5 A, at a minimum. The best option is a battery charger for a personal car. This is exactly what the author used. Although some craftsmen use battery chargers for household tools (screwdrivers, etc.) and even cell phones for these purposes. A couple of wires for connection and clamps (for example, alligator clips). Any metal workpiece (the same spoon) that will play the role of a second electrode. Saline solution. The concentration is determined by eye, so the general recommendation is as follows: per glass of water – 2 teaspoons. Varnish. You will need it to paint the segment of metal on which you plan to engrave. Most articles devoted to the electro/chemical method contain tips on using the nail composition. The author, in order not to “injure” his wife with such extravagance, used the so-called tsapon-varnish, which is well known to radio amateurs and electrical installers. It costs a penny, is not in short supply, and can be easily removed with a solvent.
Engraving technology
Electrolyte is being prepared
Water is poured into the container, salt is added in the required amount (depending on the volume) and thoroughly mixed until completely dissolved. The quality of the engraving largely depends on this.
A part (product, sample) is being prepared for applying something
The dimensions of the inscription or design are known, so it is not difficult to determine the area of metal varnish coverage. After the layer “sets” a little, the required contour is drawn. What - a needle, a thin awl, a toothpick, a sharpened match and the like - is up to you, dear reader. Whatever it is more convenient to do the work with your own hands, do it. The task is to “expose” the base metal along the lines of the pattern to ensure its direct contact with the electrolyte.
You can do it differently. Wait until the varnish is completely dry, and only then “scratch” the lines. But these are already details, and it’s easy to decide on your own what’s best.
Next, the electrodes are placed in the solution
One is designated - any metal blank. It is connected by a wire to the “–” of the current source. The second is the sample on which the engraving is applied (to its “+”). The technology is similar to chrome plating of metal.
Supply voltage
The time of the technological operation is determined visually. If the etching depth suits the master, then you can turn off the charger. Typically, engraving using this method requires no more than 5 minutes.
All that remains is to remove the metal product from the bath, remove the varnish, rinse the sample well under running water and wipe dry. That's it, the engraving is done!
The drawing and inscription can also be made convex.
To do this, you need to apply varnish to previously drawn (felt-tip pen, pencil) lines (stripes). And all the rest, “uncoated” metal will be etched.
Why is laser engraving better?
- High accuracy and detail of the image.
- Aesthetics of the drawing.
- Durability. Engraving made using other methods will wear off over time.
- No risk of item deformation.
- Possibility to fulfill mass orders thanks to production automation.
- Versatility, because laser can engrave not only metal.
How does raster engraving differ from contour engraving?
Contour engraving is suitable for applying printed text and numbers to products at high speed.
The speed of raster engraving is lower, but it gives a better quality drawing when applying images.
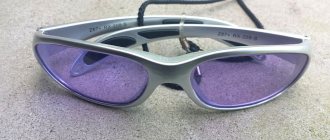
How to make color engraving?
Color engraving has a more complex technological process, and it is only possible on metals prone to oxidation, such as
- titanium,
- stainless steel,
- zirconium,
- aluminum,
- nickel,
- brass,
- silver.
The color appears as a result of tarnish, which occurs due to the interference of light in the oxide film. The hue and color saturation depend on several factors:
- duration of exposure to the laser beam,
- metal thickness,
- thermophysical parameters of the material,
- radiation power,
- thickness of the oxide film.
For example, on a titanium plate with a pulse duration of 80 nanoseconds, a beam speed of 24 mm/s, a pulse frequency of 95-100 kHz and a radiation power of 4.5 W, a purple engraving was obtained.
Features of the method
Preparing a drawing (lettering)
Everything you need can be easily found on the Internet and copied. For those who know computer graphics, this is not a problem at all. The main thing is to have a printer at hand for printing.
- You will have to do a mirror image conversion. For this technology, only a laser printer can be used. Any other type of device is not suitable. You will need not ordinary paper, but thin glossy paper. As an option - self-adhesive film. In this case, you need to refill so that the print falls on the substrate. You can also attach it to standard (office) paper with pieces of this film. The printer “brightness” mode is set to maximum.
After printing, the image is carefully cut out.
Attention! Work should be carried out with gloves to prevent contact of fingers with the pattern.
Metal preparation
It is cleaned of foreign fractions and degreased.
Fixing the stencil on metal
To prevent it from slipping in the future, it is advisable to secure it (at the edges) with adhesive tape.
Heat treatment
It involves ironing the stencil with an iron. The difficulty is that both the heating time and temperature will have to be selected experimentally. The general recommendation is no more than 2 minutes at maximum heating of the iron.
Cooling
After the metal temperature drops to room temperature, the stencil is removed.
Next is metal etching. One variant of this technology is described above.
It only remains to add that there are quite a lot of DIY engraving techniques - both with the help of solutions and without them. After all, the conversation was about metals, without indicating which ones specifically - steel, brass or something else. The above methods are some of the most common and accessible for DIY implementation. Typically, they are used for engraving steel products. Anyone who wants to master literally all technologies practiced at home will easily find the relevant information.
Good luck with your DIY engraving!
Currently reading:
Let's start experiments
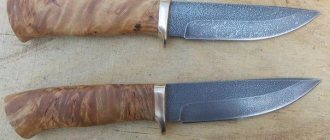
Decorative patterns using the engraving method are applied to plates, knives, pistols, sabers, medals, cups, and apartment numbers. All patterns and inscriptions are preserved almost forever and do not require expensive and rare consumables or special equipment for execution. The design can be applied to steel, aluminum, brass, copper, and metal alloys. The method does not pollute the environment. It is impossible to wash off or erase the drawing using conventional methods and means.
It is recommended to start by applying simple inscriptions on cutlery. Relatives and friends may appreciate such a gift. You need to prepare for work (photo No. 4).
Photo 2. Engraved wedding rings, the wedding date and the initials of the bride and groom are usually written on them.
- Nail polish that my wife doesn't really need.
- Toothpick with sharp tips.
- You may need an ordinary match.
- Salt.
- Charger for car battery. It can be successfully replaced by charging from a mobile phone.
- Glass or porcelain dishes in the form of a glass, mug or jar.
- Nail polish remover.
The work is done in this order:
- Take a spoon and cover it with nail polish. The entire surface must be varnished very carefully, otherwise there will be defects in the work.
- Using a match or toothpick, a pattern, name, or other image is scratched through the layer of varnish.
- Pour 2 tablespoons of salt into a glass glass or jar. Some people add a spoonful of salt and a spoonful of soda.
- Water is poured into the vessel, the salt is thoroughly stirred until completely dissolved.
- We connect a car or other charger with the positive terminal to the product being processed, and the negative terminal to any metal object that will be placed in a vessel with water. This item could be another spoon, a piece of thick wire, or a metal plate.
- The rectifier is connected to the network. Almost immediately, an etching reaction will begin in the glass with darkening of the liquid. It lasts 1-5 minutes. It depends on the magnitude of the current. The product is checked periodically. After reaching the desired etching depth, it is removed from the container.
- The varnish is washed off with nail polish remover. The result should look something like this (photo No. 3).
Photo 3. Personalized engraved spoons and, interestingly, engraving can be done on various metal objects in a simple home environment.
In this way you can process any metal objects at home. If you make an inscription with varnish, it will be convex on the etched background. For better quality work, it is recommended to purchase a special tool - an engraver. It can operate from the electrical network and from built-in batteries. The kit usually comes with drills of different shapes. They can work on glass, plastics and other materials. Engraved wedding rings are an excellent gift for newlyweds (photo No. 2). But you can do this yourself only when you are completely confident in the result of the work.
Metallization of printed circuit board holes at home - step-by-step instructions
yes, perhaps I drilled 2 through holes in the workpiece for the scissors
Of course, this is possible, but it’s not difficult to determine the time; check the workpiece from time to time, and stop etching when the desired depth is reached.
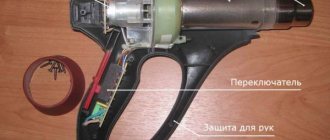
In the second picture with a description of mechanical engraving, the engraving was made not with a drill with cutters, but with a stichel, this must be learned, learned and learned again. And with a drill you can only scribble, although most basement “Jewelers” do just that. A little advice for beginners: there is no need to etch at great depth; it will create uneven edges and your varnish may not hold up in places; as a result, you will end up with an uneven pattern and a bunch of small dots where you don’t need them. If you need to make exactly 0.2 mm deep or more, it is better to use milling (if possible). If you decide to start with a drill, then immediately throw away the entire set of burs that came with it: 1 - they are all crooked, the runout will not allow you to draw lines normally, 2 - they are all thick, there can be no talk of any small inscription. Therefore, you have a direct route to the jewelry store for carbide burs, they cost around 50 - 100 rubles. per piece you need to take the smallest 2 spherical pieces and a pair of a slightly larger 1.mm size.
Maybe not to jewelry stores. Carbide burs of excellent diameters are also available in dental stores. It's cheaper there.
Source
Lesson on chemical etching of brass.
Good afternoon everyone! I decided to share my experience on chemical etching of brass. When etching copper, I use the same technique, the only difference is that copper is etched faster. I perform it using the LUT method - the so-called laser-iron etching method. Many are familiar with it, and those who are not yet, I hope this information will be useful.
Materials used: - sheet brass 0.6mm - ferric chloride hexahydrate, also known as FeCl3*6H2O, also known as ferric chloride hexahydrate - film for laser printing - momentary glue "Moment Gel" from Henkel on a cyanoacrylate base - other (office paper, laser printer , water) - wooden sticks - glass or plastic container
You will also need desire and patience!
Let's start by preparing the design for etching. I use both vector and raster graphics. I always check that the color of the image is “absolutely” black. Next, I print the image to see how it looks on paper. I always display two images (in case the image from the film onto the brass does not transfer well, there will be a backup option).
Then I take the film for laser printing.
Before printing, I set the laser printer settings to either the maximum resolution or remove the toner saving mode (it all depends on the printer model used). Now pay attention - it is imperative to set a MIRROR print, so that after etching you can get the correct image. In the case of symmetrical designs, this is not necessary.
Then I cut out the required fragment. Then I cut out a piece of sheet brass to fit the fragment.
Getting ready to transfer the image to brass. Next, a small moment, but it really saves your nerves. How to fix the film on brass so that it does not move off during ironing? It’s very simple - we place microdroplets of Moment Gel glue in the corners of the plate and place the film on the plate. In this case, I have six droplets - four in the corners and two in the middle. Ready.
We place the brass with the film on a flat surface; I use a piece of chipboard and a thick layer of paper. On top of it I place a regular A4 sheet folded in half.
Next we proceed to shamanism. Here, as they say, until you try it yourself and feel it, it won’t work.
I set the heat on the iron to almost maximum. We begin to warm up the surface - move the iron directly over a sheet of paper evenly in all directions, pressing the iron tightly against the paper for about 20-30 seconds. And so about five times.
The criterion for readiness is the manifestation of the “relief” of the film, i.e. if you look at the surface from a large angle, you can see that the film in places where there is paint, the film has a convex surface.
Then, under water, I carefully peel off the film - everything is transferred perfectly.
If there are small gaps somewhere, then I carefully take the same Moment Gel glue on the tip of the needle and “paint over” these places. Gel precisely because it does not spread and can be spot-painted over. Next, we cut off the excess pieces of brass so as not to waste the etching solution.
Then we protect the back surface. You can use Tsapon-varnish, but I still use the same Moment Gel glue. When working with this glue you need to be careful, because... It is cyanoacrylate based and the vapors may irritate the mucous membranes of the eyes.
Almost everything is ready for etching. All that remains is to make a device to hold our workpiece. I use wooden sticks tied with an elastic band (reminiscent of a large clothespin).
The sticks are varnished so that they do not get wet and do not rot in the etching solution. Next, take a six-aqueous solution of ferric chloride and add it to the water.
(BE careful, if you take an anhydrous solution of ferric chloride, you should always pour the powder into the water, and not vice versa, because a strong exothermic reaction occurs and the entire contents may end up on you). We place our “clothespin” with the workpiece in the solution. The etching process begins.
The image, naturally, should be directed downwards. Then, approximately every 5-15 minutes, it is advisable to take out the workpiece and watch how the etching proceeds, and rinse the workpiece under running water at room temperature.
This is done in order to wash away the deposits that form, which inhibits etching.
If you have a magnetic stirrer, you can place it under the container and turn it on - the etching process will go faster. Next, during the etching process, we look - when the etching depth suits us, we stop etching. We clean everything carefully. It is better to close and pack the container with ferric chloride very well (if it spills, it will be quite problematic to wash off the red stains). We are happy with the result.
Next, remove the protective layer from the back side (easily removed with a regular knife) and then work with the workpiece. I hope this lesson will be useful. Good luck to everyone in their creativity and new works. May the power of STEAM be with us!
The essence of the method
The technology is to protect areas that should remain intact from exposure to the chemical. The protective coating can be applied in different ways - we will describe them in detail below. After this, the acid must act. An iron part is immersed in an electrolyte solution and subjected to a reaction. The longer it is, the thicker the layer will be removed from the surface. An interesting result is shown by multilayer etching, when immersion is carried out in several stages.
Methods used
Despite the fact that the essence of the technique is the same - it is the removal of the top metal layer by exposure to an aggressive substance in pre-prepared, ideal conditions for this, the technology can be divided by type. The classification will be based not on how to etch a design on metal, but on what etching solution to prepare. Depending on the material, there are different methods:
Chemical. It is also called liquid because liquids are used - acids. Despite the fact that the result is quite fast and of high quality, and there is no need to purchase specific or expensive equipment, not everyone uses this method, since during etching, caustic fumes are formed that are harmful to health. It is very important to adhere to safety precautions and ensure protection of the upper respiratory tract.
Making accessories for jewelry with your own hands: etching copper and brass
For work we will need:
copper or brass plate
flat board or anvil
containers for water, citric acid and ferric chloride solution
pliers or other similar tool.
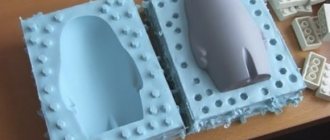
I took plates of both copper and brass. The process is the same for both metals. I poison everything in one container
As you can see in the photo, the metal is initially uneven, bent, dirty and scuffed. Because our metal sellers' trailers are usually no less dirty and shabby. But in our work, the curved surface will interfere with us when gluing pictures. And the etching solution will not be able to spread evenly over the surface of the plates.
Therefore, the plates need to be more or less aligned. The most convenient way, in my opinion, is to use a rubber mallet or a wooden hammer, beating the metal on a flat, hard surface. I use an anvil, but you can take a flat board or stool if you don’t mind.
A metal hammer will not work; it is harder than soft copper and relatively soft brass. Therefore, marks and dents from a regular hammer will remain on the records.
We place relatively even plates in a container with hot water, in which we generously dissolve citric acid.
Or put a container with water and acid on the fire. I like it better, because the purification of metals from oxides occurs almost instantly. Do not bring to a boil. It is believed that citric acid loses its properties in boiling water.
The records became noticeably cleaner. The brass I have is of such a brand that the zinc is easily washed out of its top layer. Therefore, pure copper shows through.
From this moment on, you cannot touch the records with your hands. Only with a clean cloth or tools. A layer of finger oil will create a protective layer on the metal and disrupt the design. In short, your fingerprints will be etched.
Next I seal the inside with tape. Can be painted over with nail polish or acrylic paint. But tape is the most convenient and easiest option.
It is better to leave small margins of tape around the edges. They are convenient for holding records without fear of getting them dirty.
Sometimes you need double-sided elements in decoration that can turn over when moved. Then the design can be applied on both sides. Only the thickness of the metal should be at least 0.6 mm or even 0.7 mm. Otherwise, etch the plate right through where the pattern is applied.
Let's move on to drawing.
There are many ways. I usually use waterproof stickers or iron-on images made on a laser printer. But now my husband is away, and his laser printer is at work. That's why I use stickers. You can draw with a permanent marker, nail polish, bitumen, acrylic paints. But I draw much less carefully than I glue stickers. That's why I used the marker only at first.
We glue it without touching the metal and smooth it with a cloth. If you don't stick the picture tightly enough, there will eventually be gaps in the picture.
I have 2 sources of ferric chloride - a chemical laboratory that sells laboratory glassware and chemicals. They were much cheaper a year and a half ago, when I last ordered hardware from them. And radio stores. They are more expensive, but if you do not plan to set up a trailer of metal, as I often do, then a 250-gram jar is quite suitable for you. It cost 70 rubles last time. But that was 2 years ago.
Don’t be confused by the “boric acid” label, read underneath it.
Top view of ferric chloride.
I dilute 1 part iron to 3 parts water.
I spread it out and put the records down. The brass ones are face down, the copper ones on top of them are face up. It is better to poison at a temperature of 50-60 degrees. In winter, a battery is suitable for this. But now you can at least initially fill it with hot water.
I left to write a master class for 1 hour and 15 minutes.
I came and checked. Ready. The solution can still be used. It’s just that the etching time increases each time. It is considered that the solution has been used up and is no longer suitable if it has acquired a beautiful emerald green color.
My brass is almost always spotted - that’s the brand.
The reverse side remained unchanged under the tape.
Then you cut out the elements, grind the sharp edges, patina and polish. Add to decoration. Ready.
In reality, everything is much faster and easier than in writing. The main thing is to get materials.
How to etch a design on metal at home using the galvanic method
Let's consider this process as the most popular, giving an excellent result, and also not very expensive and accessible at home.
The first pleasant difference from the chemical method is that there are no harmful fumes. The electrolyte solution depends primarily on the etched material: The chemical elements used
Ammonia, ferrous sulfate
Copper alloys (pure copper, bronze, brass)
In order to apply a pattern to metal with your own hands, you will need to prepare the following materials and equipment:
A non-conducting capacitance that matches or slightly exceeds the dimensions of the workpiece.
5 volt electricity source.
Cathode - it must be made of the same steel as the workpiece.
Wire hangers on which the metal element will need to be suspended.
There are two conductor rods that exceed the size of the bathtub.
Now we present the algorithm of actions:
We connect the first rod to a source of electricity (negative charge), attach the cathode.
The second, respectively, to the positive terminal, and it will also serve as a support on which the product (anode) will be suspended.
Then voltage is applied. When it turns on, electrolytic transfer occurs. However, only from those surfaces that were not covered with any protective coating.
Master class on metal engraving
Engraving: where to start
Are you planning to get into engraving? Whether you want to spice up everyday items or give someone something special, engraving is the best choice: the result of decoration is a practical yet unique item. In this beginner's engraving guide, we'll walk you through everything from choosing the right materials to choosing the right Dremel attachments, so you can get started on your engraving project in no time.
Choose the right engraving attachment
There are three main types of engraving bits:
High Speed Attachments – A variety of attachments that are well suited for engraving, machining, grooving and rabbeting. For engraving soft materials such as wood and leather.
Engraving cutters – also suitable for small jobs, especially on soft materials. Processing wood and plastics, as well as soft metals such as brass.
Diamond-coated circular bits are designed specifically for precision work. They are coated with diamond particles, making it easy to engrave hard materials such as glass.
Find the right attachment for your engraving project
Attachments will help your project run more smoothly. The flexible shaft attaches to your Dremel in seconds, and the 127mm cable adds convenience and flexibility to use. The tool is almost weightless - which is very convenient for engraving, for example, on a glass. The next attachment is a comfortable handle that fits any rotary tool with a threaded tip. It transfers the weight of the tool into your palm, improving the tool's balance and control—especially useful for precision work such as engraving, carving, etching, and polishing.
Choosing a material for teaching engraving
If you are just learning engraving, it is better to choose something softer. Why? These materials make Dremel tools easier to control, meaning they are better suited for beginners. Metals like brass and copper are the softest (put away that titanium watch until you get more experience!). Soft materials also include leather, plastics and wood.
When choosing an object to learn how to engrave, it is important to consider more than just the material. Consider not only the softness of the material (such as soft metals, leather or wood) but also the shape of the surface. Best form for beginners? Any flat. In this case, you don't have to think about angles or constantly move the object or tool. You just need to focus on the feel of the tool when engraving - as is usually the case with beginners. Glass coasters, metal plates, and wooden cheese boards are good places to start. Other? Leather phone case. See our step-by-step instructions here.
Follow relevant safety regulations
Now that you've selected your tools and engraving surface, you'll probably want to get started quickly. But before that, you should remember about safety precautions. Protect your hands with leather gloves; Not only will they prevent cuts and scratches, but they will also be more resistant to wear and tear. Goggles and a respirator are also necessary for engraving - you don't want glass or metal chips getting into your lungs or eyes. If your antique serving platter shows signs of rust, remove them with an engraving tool. Rust particles are harmful to health.
When engraving glass, make sure it is dry and clean. All grease and traces of washing fluid must be completely removed so as not to distort the view or encounter any problems during the transfer stage (step 7). Wood engraving? The wood must be untreated. If you decide to engrave, then the already painted wood will need to be first cleaned to its original state and wiped with a damp cloth. Once the surface is clean and dry, you can begin to work.
Transferring the design to the material
Even if you can already engrave by hand, a printed template will be a great help. To transfer the design to a metal surface, use carbon paper. Simply place the paper on the metal, place the template on top and trace it with a pencil. Engraving on glass is made even easier: place the design under the glass and you can use it as a template. In this case, it will be necessary to exclude the possibility of glass displacement during the engraving process.
TIP: Always look straight - looking at an angle increases the likelihood of the drawing being skewed.
Use a pencil grip
When it comes to engraving, a Dremel tool or flexible shaft is easier to grip like a pen or pencil. This is a familiar motion that will give you maximum confidence when using your engraving tools. This brings us to the next important tip: self-confidence. If you're new to engraving, it may take a while for everything to go to plan - that's normal. With a little practice, patience and persistence, your confidence and engraving skills will grow with it. And that's when the real fun begins.
YOU MAY ALSO BE INTERESTED
Step by Step: Engrave Your Phone Case
How to Avoid Mistakes with your Dremel Multitool
Source: www.dremeleurope.com
Artistic metal etching at home
The technique used to decorate metal products can be any of the ones presented above.
It is usually popular for applying patterns on bladed weapons, firearms, kitchen utensils, steel parts of cars and any other steel objects. Most often, hunting scenes, abstractions, and animal silhouettes are used as stencils. Sometimes the etching process is combined with a number of other methods of decorating metal surfaces, for example, bluing. Then the drawing receives an additional yellowish tint. Let's watch a video about etching metal at home:
Typically used for these purposes:
A hot needle is taken for the pasted surface. It scratches the contours of the image or engraving. This way the material is cut through. Take tweezers, use them to carefully lift and remove sections of adhesive tape from those fragments where etching is supposed to be done. And other parts remain protected. To then remove the adhesive layer, you can use a regular solvent. Do not forget about mandatory degreasing before starting the process.
Color engraving
To make the drawing look more clear and beautiful, use a glass pencil or ink.
In order for the effect of using these tools to remain as long as possible, the surface is coated with colorless varnish.
You can make the drawing clearer using a needle and oil paints. This set allows you to scratch auxiliary lines of the pattern, which are subsequently covered with paint.
Artistic color engraving allows you to make the product colorful. To do this, those elements that do not need to be painted are coated with transparent varnish.
Video:
How to blacken a metal object? Special equipment is not used for this, but the following substances are required: sulfur and potash (potassium carbonate) in a ratio of 1:2.
This composition must be put on fire; to do this, it is poured into a tin can. The mixture must be constantly stirred, and the fire should not be high.
The mixture is removed from the heat when it turns black. Before this, it will need to be ground in a mortar; after the fire, it is also placed in a mortar and ground again (cooled).
IMPORTANT TO KNOW: We anodize aluminum at home
Blackening occurs as follows:
- Water is added to the resulting mixture (1:9);
- A brass object is placed in the solution;
- It is heated until the product acquires the desired shade.
You can make the background dark before applying the drawing. In this case, varnish is not needed.
You can make an object brown with your own hands by keeping it in a solution of zinc chloride and copper sulfate with the addition of water (100g, 100g, 200g, respectively).
Hand painting in steel gray color is obtained from 1 liter of water, two grams of ordinary salt and two grams of a mixture of sulfur and potash.
The orange-red color is obtained from a solution of potassium sulphide: 1 gram of the substance per 250 grams of water.
Upon completion of work, the varnish is erased.
The blackening of an object and the blackness we know are two different things. The technique used to create niello is mechanical; it cannot be done with your own hands.
Surface preparation before applying a design to metal for etching
Why clean and degrease? In order to speed up the entire procedure, as well as for an improved result, removal occurs in an even, uniform layer. The first step is to remove any contaminants - these are both mechanical (ordinary dirt) and chemical (oil, for example) elements. For this purpose, you can use a soap solution, classic dishwashing detergent, or powder. Next, let the parts dry under normal climatic conditions. It is better not to rub with those rags that can leave lint, but to soak it, for example, with paper napkins.
The next step is to remove the greasy, oily layer; a degreaser or regular gasoline, solvent, acetone, or alcohol can help with this.
You can use not only chemical cleaning methods, but also mechanical ones - combining them. To do this, you can use polishing and grinding. If polishing compounds and sponges are not available to the master, and only sandpaper is available, then it is important to sand strictly in one direction so that the marks are parallel and not chaotic. This will improve the overall appearance of the finished product.
Glass engraving
Do-it-yourself engraving on the glass surface is done chemically and mechanically. The mechanical method involves the use of a nozzle that is driven by an electric motor. Procedure:
- Using a dark marker, the drawing is transferred to the glass.
- A damp sponge is applied to the image on the glass. This must be done carefully so as not to smudge the drawing.
- When working, you must use safety glasses.
- After completing the drawing, it is washed and examined for gaps. If necessary, missed places are processed again.
Drawing a pattern on metal for etching: how to make a pattern
The general principle is the same: you need to protect one part from the corrosive effects of the etching composition. You can only act using different materials. Below we give examples of such substances.
Nail polish
The availability of this method is very high - the cosmetic product can be purchased at any relevant store. But users note that there are several negative aspects:
Since the liquid is quite viscous, it cannot be applied to very small parts or thin strokes.
Not every person without experience will be able to draw a pattern with a brush without a stencil. Must have some drawing skills as well as a steady hand.
If a mistake was made, it is quite difficult to carefully erase the wrong area of varnish; it will smudge.
Etching a design on stainless steel with a primer or bitumen
The method is quite painstaking. First, the entire surface to be treated is covered with liquid material. After it dries, take a pen or felt-tip pen, pencil, and transfer the pattern with it. Then you need to take a needle, thin wire or other pointed metal element. With its help, you need to scratch all the details of the design that are not etched. At the same time, pay attention to ensure that there are no chips. Primers of types GF 021, XB 062, as well as the most common bitumen varnish are suitable for application. Typically, the technique is used when it is necessary to apply thin lines, as well as images that are highly complex.
Electroforming
Electrotype
This entire article was translated and compiled by snipesp for the resource, and is posted here with his permission. The original article in English is here. Original author: Jake von Slatt
Examples of work with links to the resource Steampunker.ru
In the article about the steampunk stratocaster (original author Jake von Slatt) a link was given to a description of the process of electrolytic etching of brass.
Since this description is quite long, I decided to split it into two parts: 1. Transferring the toner to the brass plate. 2. The etching process itself.
I am often asked about the thickness and type of brass used in my work, as well as where they can get it. I'm lucky because there's a specialty store near me where I buy most of my supplies. I used 0.025 inch (22ga) brass and its alloys (note: 0.025 inch is approximately 0.635 mm). As a last resort, you can buy "door kick plates" from your local store, but you'll have to clean off the varnish. If you can't find a store nearby, you can order online, but this is the most expensive way.
I recently saw Mark Frauenfelder's limited edition notebooks on BoingBoing and immediately thought of using the electrolytic brass etching process that I experimented with when trying to make similar notebooks for gifts this year. As you can see, they turned out quite well and the two-century history of Moleskine gives the project a certain involvement in steampunk.
I adapted this technique to simply print pictures on brass plates. I say "imprint" but I'm actually using electro-chemical etching of the brass. Here's the process: First, we use a laser printer to print the negative of our picture onto a sheet of "inkjet" glossy photo paper. Yes, I wrote “inkjet” paper, this is a special paper used, as they say, in the pharmaceutical business. Next, we clean the entire piece of brass with light-colored Scotch Brigh and then wipe it with alcohol until it is completely clean. Several alcohol cleanings are necessary to remove all dirt.
Next, we use an iron with maximum heat to fuse the toner into the brass plate. You need to press the iron hard and rotate it a little. I used a roller to further press the paper onto the brass. In total, heating and rolling takes about two minutes. Once you are satisfied that the toner has completely melted onto the copper, throw the plates into a tray of hot water. The water is needed to soften the inkjet photo paper so that it can be cleaned of any toner stuck in the brass.
Pickling of non-ferrous metals
There are several different metal alloys and individual substances on the periodic table, so numerous are the mordants used. Their effectiveness is often determined by the atomic weight of the element.
The most commonly used non-ferrous metals are copper, brass and bronze. Such acids as hydrochloric, phosphoric and nitric react equally well with them. Chromium compounds in the composition help accelerate the reaction.
One of the few elements that reacts not to an acidic, but to an alkaline environment is aluminum and, accordingly, aluminum alloys. In addition to it, you can call molybdenum. For them, mix caustic soda and add hydrogen peroxide.
It is very difficult to process titanium; it must be prepared in two baths - first with an alkaline solution, and then with strong acids, such as sulfuric and nitric in high concentrations. Thus, oxides are first removed, and then galvanization is carried out.
If you need to etch rarer metals, such as nickel or tungsten, you should mix hydrogen peroxide with HCOOH.
Tools and materials
For engraving on metal, we need the same thing as for engraving on plexiglass - the same Dremel and attachments, namely: cone-shaped and spherical . In this case, a flexible shaft is necessary, because although metal is harder than plexiglass, working with it requires greater delicacy, and when working with aluminum, you cannot do without it at all. If you want to experiment , then you should take a polish. But take a protective one - no GOI pastes or the like. That seems to be all there is to this point.
Creation of printed circuit boards
A thin sheet of textolite is used as a blank, which is coated on both sides with a layer of copper. The specialist’s task is to make conductive paths in exact accordance with the drawing. This is quite delicate work. You need to attach some protective material to the lines (usually varnish), and remove the remaining copper foil using tweezers. The following materials are used for etching:
Composition of sulfuric acid, hydrogen peroxide and water.
Copper sulfate with sodium chloride.
This is the case if the liquid method is used. After this, all chemical residues must be thoroughly removed. The electrolytic option is also suitable.
How does the process work for other materials?
Glass is often decorated this way, for example, kitchen utensils, windows, mirrors. The only substance that easily and fairly safely dissolves glass is hydrofluoric acid. Wax and rosin are suitable as a protective coating. Otherwise, all the steps are the same - surface preparation, protecting areas, applying liquid chemicals, removing residues.