An indispensable tool in the arsenal of every home craftsman is a wrench. The domestic industry produces them for every taste and budget: from the lightest and smallest (for working with electronics and household appliances) to large and heavy (these are often used when repairing machines and other equipment, as well as during the maintenance of ground transport). As a rule, they are made from high-quality solid metal or an alloy of several metals.
Recently, new models equipped with additional devices that greatly facilitate the work of the home craftsman have become very popular. Tools for tightening nuts, equipped with a so-called ratchet, are in great demand in specialized stores. However, it would be more correct to use the following name: “wrench with built-in ratchet .
Signs and causes of problems with the rear sprocket system
First, let's take a closer look at the ratchet mechanism of a multi-speed bicycle.
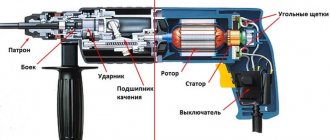
Diagram of a brakeless ratchet mechanism: 1, 9 – cone, 2 – left flange, 3 – body, 4 – axle, 5 – internal compartment of the ratchet with a flange, 6 – sprocket, 7 – lock nut, 8 – hub, 10 – gasket, 12 – bushing, 13 – spring, 13 – pawl.
The pawl provides engagement with the rear wheel ratchet mechanism. The ratchet mechanism itself crackles slightly. This is normal operation of the device. Otherwise, when there is no sound, it pulls the chain forward while idling.
The lack of engagement of the pawl is usually due to the incorrect operation of its spring, which pushes the pawl out. The reasons for malfunction may include the following factors:
- absence or high density of lubricant in the mechanism;
- breakdown of the dog itself;
- the spring is worn out;
- a large amount of dirt;
- part of the pawl is inside the mechanism.
The chip of the dog itself can still be repaired separately, but with its seat the situation is much more complicated. It should be noted that this type of fastening of transmission sprockets is inferior to the cassette in terms of reliability, since breaking the axle in half is far from uncommon. You will have to completely remove the ratchet and install a new one.
Disassembling the ratchet for maintenance
Sometimes people ask me: “Does the ratchet need to be serviced?”
Honestly, I don’t see any point in this, since, most likely, your sprockets will wear out faster than the lubricant inside the ratchet will disappear, plus there are quite a lot of balls in it that treacherously scatter in different directions. I change the ratchet on my bike once a year, and it lasts about 3-5 thousand. During this time I do not lubricate the inner balls even once.
The ratchet will most likely need to be serviced only if it is somewhat sparse or has been exposed to a lot of water.
How I disassembled my ratchet:
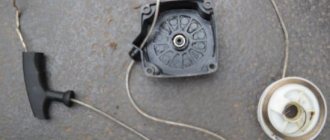
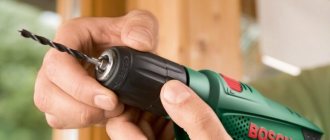
If you have a ratchet, then you can see two holes on it. If there are no such holes, then it is probably a cassette. In the photo, I took a screw and inserted it into one of these holes, these holes are needed to unscrew the cover and get to the bearings. The thread on this cap is reverse, that is, to unscrew it, you need to unscrew it clockwise. I unscrewed the lid using a screw and a hammer. Small blows with a hammer - and the cover is unscrewed, immediately under it you will see the bearings. Here's how small they are:
But that's not all bearings. When you start lifting the sprocket block (the cover we unscrewed held them in place), the lower bearings of the ratchet will fall out, so prepare a reservoir (rag) in advance so that the balls do not scatter across the floor.
Reverse side of ratchet sprockets:
After removing the sprockets you will be left with the second part of the freewheel on the wheel hub. You can see how it looks in the photo above, where I wrote about unscrewing the ratchet.
To actually service the ratchet, you will need to clean the bearings and the tracks they run on and apply new grease (I used lithol 24).
When should you shoot?
In most cases, removal of this transmission element is necessary when the cyclist wishes to perform routine maintenance (usually in the spring or fall). Removal will also be required if the teeth of the sprockets installed in the structure are severely worn. Since the vast majority of ratchets have a non-separable design, replacing new sprockets is impossible - they are riveted to each other.
It is necessary to urgently remove the ratchet from the wheel if there is a situation where, during smooth pedaling, there is a sharp slipping of the pedals. This effect is observed when you select the wrong oil when you prepare the bike for spring after storing it on the balcony in winter.
Necessary tools for removing the ratchet
It is quite simple to carry out the removal procedure yourself. All you need is to acquire the appropriate set of tools. So, before removing the ratchet from the wheel, you must use the following tools:
- special puller;
- a 24 or 27 mm adjustable wrench or wrench, depending on what model of part is installed on your bike;
- a 15 mm open-end wrench, with which you need to remove the hub from the wheel;
- a pin key is also used, but in very rare cases;
- if the design provides for the presence of a “nut”, a center punch with thin edges will be required.
If the purpose of removal is not replacement but routine maintenance, you will also need non-lithium grease.
Removing the ratchet from the bike
It is not always possible to correctly see the malfunction when the ratchet mechanism is on the bicycle itself, so the best solution would be to disassemble it.
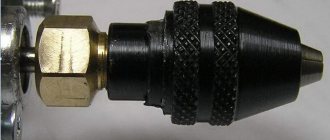
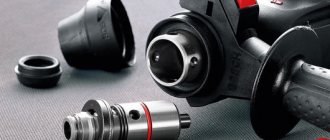
It will not be possible to simply remove the ratchet mechanism, so we will need a special tool - a puller. With the help of this simple device, the ratchet will quickly be removed from its rightful place.
Tool for removing and securing the ratchet
Before you begin repairing the ratchet, you should correctly determine which direction to unscrew the nut. You don't need to press too hard in one direction or the other, otherwise you can twist the thread of the bushing. If the thread is right-handed, you need to screw it counterclockwise and put it on clockwise.
Behind the nut there is a row of balls that can themselves fall out of the mechanism. They must be carefully removed, cleaned of dirt and set aside. The disassembled device is cleaned of excess lubricant and foreign particles with gasoline or solvent.
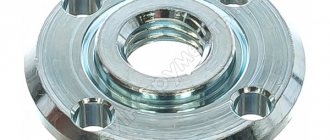
The same applies to transmission sprockets. If the sprockets of the entire system are not worn, and the problem is in the threaded ring, it should be pulled out of the drum and replaced. Along the way, the pawl and the spring are changed.
After the rebuild, the ratchet is put back on the rear wheel hub. To do this, you need to carefully place the bearing balls in their seats, firmly install the mechanism and tighten it with a wrench on the sleeve. If the ratchet does not work and there is chain movement at idle, a new spare part is most likely needed.
Installing a new freewheel on a bicycle:
- Remove the old mechanism. This will not work without a puller; don’t forget the special key.
- Inspect the rear hub axle.
- Mount the new part onto the bushing.
It is recommended to hang a new chain along with the ratcheting device so that there is no imbalance between the new sprockets and the worn chain. It is also useless to put the part on the damaged axis of the bushing itself.
If the transmission mechanism is too worn out, it would be rational to supply a new spare part. In most cases, the problem of malfunctioning ratchets is solved by simple reassembly and cleaning of contaminants. Finally, don’t forget to lubricate the newly assembled parts.
Step-by-step repair instructions
The main points of servicing the rear hub of a bicycle include:
- regular body tightening;
- replacing bearing balls;
- lubrication of parts inside the housing;
- adjusting the brake pads.
This should be done as needed to extend the life of the device and avoid breakdowns. Beginners should first read the detailed instructions. It is easy to find on thematic sites.
Selection of tools and spare parts
To disassemble the rear hub of the bicycle and service it, you will need the following tools:
- whip;
- knob with adapter;
- flat screwdriver;
- mandrel for unscrewing the lock nut;
- cone wrench;
- 17 mm spanner;
- medical tweezers;
- plug for caliper.
You will also need lubricant, rags, and cleaning products. As for replacement parts, they must be completely identical to the original ones
With a wide variety of bushings and their components, it is important not to make mistakes. Therefore, it is necessary to clarify the model, dimensions and other parameters in advance.
For example, the hub parts of a speed bike will not fit a “single speed” bike and vice versa.
Whip Wrench with adapter Flat screwdriver Mandrel for unscrewing the lock nut 17 mm spanner Cone wrench Plug for caliper
Disassembly
Dismantling is carried out on the removed wheel. You can disassemble the rear wheel hub of a bicycle in the following sequence:
- Remove the wheel. Remove the eccentric, and if there is one, then the disc brake rotor.
- Remove the sprocket cassette.
- Use a screwdriver to unscrew the boot, which is located on the left side of the rear hub. There is no dust cover on the right side.
- Fix the lock nut on the right side, and unscrew the same nut on the left.
- After unscrewing the left lock nut, remove the washer, spacer ring, and unscrew the cone nut.
- Carefully pull out the hub axle and set it aside for further cleaning.
- Pull out the seal boot on the left side.
- Using tweezers, remove the bearing balls one at a time from the left side, and then from the right side.
- After dismantling, you can begin cleaning and lubricating the parts.
Cleaning and Lubrication
When disassembling the rear wheel hub of a bicycle, each bearing ball must be wiped with a cloth soaked in kerosene or gasoline. Examine each one carefully. Damaged - replace.
Then remove and inspect the bicycle axle. Wipe it with a dry cloth. In case of severe contamination, try to remove it with a cloth soaked in gasoline and dry it.
Lubricate the bushing only with a special product - chain lube will not work. For bearings, use a buxole. Apply to dry, clean parts. The layer should not be made thick. If you overdo it, then when moving, the lubricant will come out on top of the treated surface, dirt and dust will stick to it, which will lead to wear.
Repair
A common reason rear hubs need service is due to play in the ride or cone tightening. In this case you need:
- loosen the locknut with a wrench;
- check the flare nut, loosen or, conversely, tighten it as needed;
- tighten the locknut back to its original position.
Best articles: Features of setting up the front derailleur on a bicycle
If the reason is the failure of one or another part, then replacement will be required:
- remove the retaining ring;
- remove the bushing;
- remove the parts that are on the side opposite the sprockets;
- carefully inspect, check for serviceability;
- if one is broken, replace it;
- put the removed parts back in reverse order;
- Tighten the locknut and flare nuts.
When the rear hub wobbles, its body rotates, it is necessary to tighten the mounting nuts. If it is difficult to move the rear wheel, loosen it. If the rolling has worsened, or extraneous sounds have appeared while driving, then most likely the problem is in worn bearings or lack of lubrication.
Another common problem is a dirty carriage. In this case, you need to remove the carriage assembly, wash all parts of the system with kerosene or gasoline, and install in the reverse order.
Assembly
After carrying out maintenance and repairs, it is important to correctly assemble the rear hub of the bicycle. This is done in the reverse order of the disassembly process.
Installation diagram: right bearings – wheel axle – cone – left bearings – stopper – washers and rivets – lock nut.
Adjusting and tidying up the rear hub on a bicycle on your own is not particularly difficult. The main thing is to act in strict sequence, and also handle the parts carefully so as not to lose them during dismantling. Following simple recommendations will help even beginners cope with this task.
Removing the ratchet from the bike
It is not always possible to correctly see the malfunction when the ratchet mechanism is on the bicycle itself, so the best solution would be to disassemble it.
It will not be possible to simply remove the ratchet mechanism, so we will need a special tool - a puller. With the help of this simple device, the ratchet will quickly be removed from its rightful place.
Tool for removing and securing the ratchet
Before you begin repairing the ratchet, you should correctly determine which direction to unscrew the nut. You don't need to press too hard in one direction or the other, otherwise you can twist the thread of the bushing. If the thread is right-handed, you need to screw it counterclockwise and put it on clockwise.
Behind the nut there is a row of balls that can themselves fall out of the mechanism. They must be carefully removed, cleaned of dirt and set aside. The disassembled device is cleaned of excess lubricant and foreign particles with gasoline or solvent.
The same applies to transmission sprockets. If the sprockets of the entire system are not worn, and the problem is in the threaded ring, it should be pulled out of the drum and replaced. Along the way, the pawl and the spring are changed.
After the rebuild, the ratchet is put back on the rear wheel hub. To do this, you need to carefully place the bearing balls in their seats, firmly install the mechanism and tighten it with a wrench on the sleeve. If the ratchet does not work and there is chain movement at idle, a new spare part is most likely needed.
Installing a new freewheel on a bicycle:
- Remove the old mechanism. This will not work without a puller; don’t forget the special key.
- Inspect the rear hub axle.
- Mount the new part onto the bushing.
If the transmission mechanism is too worn out, it would be rational to supply a new spare part. In most cases, the problem of malfunctioning ratchets is solved by simple reassembly and cleaning of contaminants. Finally, don’t forget to lubricate the newly assembled parts.
A bicycle ratchet, also popularly known as a nut, is a ratcheting mechanism that allows you to reliably transmit torque through the chain from the pedals and at the same time freely coast without having to pedal continuously. This mechanism is assembled as a single part with the rear wheel hub. It consists, in fact, of the ratchet itself in the form of a toothed drum with two pawls and a non-separable cassette of sprockets.
Simple maintenance of a bicycle transmission comes down to cleaning it of dirt and grass that gets clogged between the sprockets.
You will need to remove the ratchet from the bicycle in the following cases:
- To adjust the tightening of the rear wheel hub bearings. You don’t have to remove anything, but with the sprocket cassette unscrewed, it is much easier to remove the ball bearings, determine the degree of cup wear, and lubricate the assembly.
- If possible, replace broken pawls. Although such small parts are not sold separately, and most often you will need to buy the entire assembly, they can be removed from the old ratchet. Unfortunately, there are cases when, as a result of the premature death of the pawls, the drum with sprockets either jams or it begins to rotate freely in both directions.
- When the teeth of the smallest sprockets wear out to the maximum or if one of them breaks.
- To install a spoke into the rear wheel hub on the right side, to replace a broken one.
Device
Before you disassemble the rear wheel of a bicycle, installing it on a special stand, or any other component of the vehicle, you need to study its structure.
It consists of the following components:
- sleeve;
- rim;
- knitting needles;
- a tire with a tube or tire that must be at the correct pressure.
The design of the rear wheel hub of a bicycle is quite simple: it is attached to the rim with spokes (from 12 to 48 pieces).
Wheel size is determined by the outer diameter, which varies from 14 to 29 inches. Mountain bike models are often equipped with 26-inch wheels, while hybrid or touring bikes have 28-inch wheels.
The rear wheel of a speed bicycle does not have spokes. Instead, a solid disc is used, providing increased rigidity. This design has less resistance to oncoming air flow, but has increased windage, which complicates driving in crosswinds.
Rim
The service life of a wheel depends on the design of the rim, and its strength affects the speed and safety of the ride. Modern bicycles are most often equipped with rims that resemble a box in cross-section. Thanks to this shape, the wheel is protected from damage when hitting a hard obstacle.
The most commonly used material for making rims is steel or aluminum alloys. A steel rim is cheaper, but has more mass and is less resistant to corrosion. Carbon is considered the most modern material, but the price of such models is very high.
Spokes
Quite a vulnerable part of the structure. In addition to the weight of the cyclist that acts on them, the spokes regularly experience stress resulting from uneven road surfaces. The spoke is fixed in the rim with a nipple. The most common materials for production are steel and aluminum.
Important! The materials of the nipple and the spokes must match, otherwise the reaction between different metals will not allow you to freely tighten or change the spokes in the future. Depending on the production process, knitting needles can be:
Depending on the production process, knitting needles can be:
- rolled (the cheapest option);
- stretched (light, but more expensive);
- flat (the most expensive option, superior to others in weight and resistance to oncoming air flows).
Spitsovka
Spoking is the order in which the hub, rim and spokes are secured. It can be radial or cross. Radial provides for the installation of a bushing without the spokes intersecting each other. With a cross stitch, the spokes are crossed.
Top articles: How to stop scrolling on a bikeSleeve
The hub is located in the center of the wheels and is attached to the bicycle frame. Provides wheel rotation, eliminating slipping and turning. The rear hub promotes rolling of the bike - efficient movement without wasting energy.
The bicycle rear hub design provides the following configurations:
- presence of free wheeling, lack of a braking mechanism;
- lack of free wheeling, presence of a brake mechanism;
- the presence of a freewheel and a braking mechanism.
Interesting to know! If there is a hub brake, consisting of a drum with a block, it becomes possible to stop the bicycle using the pedals.
The dimensions of the hub, its weight and quality affect the roll-up and energy consumption of the cyclist while riding. There are three types of this node.
- Ratchet Hub – The modern rear hub involves mounting a cassette with sprockets onto the drum. The bearings are located closer to the middle, which negatively affects the uniformity of load distribution. It is customary to equip teenage and inexpensive bicycle models with similar bushings.
- The cassette bushing is another modern version of the mechanism. In this case, the cassette is fixed using slots located on the sleeve. Such bushings are reliable and can withstand loads of up to 120 kg, since the bearings in them are located closer to the edge.
- A planetary hub for the rear wheel of a bicycle is a design that combines the functions of a hub and a gear shifter. The design of the rear wheel hub of a bicycle of this type is quite complex: the mechanism is closed by a housing, which protects it from dust and moisture. At the same time, the chain will last longer when working with it, since it does not change the position for switching speed.
The 3-speed hub has a simple design, while it is better not to disassemble the 5 or 7-speed mechanisms. The gears of planetary systems are installed in a certain position during assembly. This type of work requires special equipment.
Cassette
The ratchet is located inside the hub drum, and the sprocket set is secured to the drum using splines. This eliminates the possibility of interchanging systems without replacing the bushing. This system has a number of advantages and variations in manufacturing principles. Unlike its competitor, the bearings are at the same distance from the axis and do not exert pressure on it.
Varieties
Bicycle cassettes come in several varieties, based on different ways of connecting the sprockets to each other and to the drum:
- Spacer room. It consists of stars, between which there are plastic spacers (spacers) with a set thickness to maintain the same distance. And where each star is attached with separate slots to the drum. In such a device, the load when riding a bicycle is transferred directly to the drum, which is considered a disadvantage;
- On a spider. It has a common connection in the form of a spider, where on the foot in the form of a ladder there is a corresponding mount for a star of the required diameter. The spider is hollow and usually made of aluminum. Therefore, such a device gains weight and is placed on drums made of aluminum. Since in places of increased load, soft aluminum should not come into contact with stronger steel;
- Block. This variety is distinguished by its design, in which there are spiders on which medium and large stars are worn. Smaller ones are installed separately on the drum slot, as they can quickly become unusable and it was possible to replace each one;
- Solid milled. They are made as a solid block, where the lower star acts as a slot for the drum. The design is durable, lightweight, and has no additional fastenings. But with all the advantages, there is also a significant drawback - compared to other cassettes, it has the highest cost.
Advantages
As mentioned above, bicycle cassettes have a number of advantages over bicycle ratchets:
- By the number of stars. From the most archaic 7i to the most modern 12i;
- The entire device has less weight;
- Less free play when starting to pedal;
- The required force to scroll the cassette is less;
- Does not have a negative impact on the axle while riding a bicycle, due to the symmetrical arrangement of the bearings in the hub;
- Maintenance is much easier and cheaper. Especially if it is necessary to replace one part, and not the entire structure;
- The shelf life is much longer.
What is a ratchet?
If you often repair and maintain your bicycle, you might be wondering what is the difference between a cassette and a freewheel on a bicycle? The second is an integral part of the vehicle transmission, designed to change the effort when pedaling. All modern ratchets are made from steel , since aluminum models tend to wear out, and given the pricing factor, installing this component is unprofitable for the manufacturer.
The cassette is mounted on a bushing, it already contains a drum with “pawls”, which slides along the body when coasting. In other words, inside there is a mechanism consisting of pawls (hooks), which, when pedaling, engage with protrusions on the body. When the cyclist stops pedaling, the force on the pawls is reduced to zero, causing them to slide along the body with teeth. Removing the cassette yourself is much easier.
Difference between cassette and ratchet
What is the difference between a cassette and a freewheel on a bicycle? Many people confuse a freewheel with a bicycle cassette. If you study these parts correctly, they cannot replace each other. These days it is very difficult to find a ratchet. Perhaps if you remove it from an old bicycle. On new and fast bikes, you can only consider a cassette. It is a detail that has been improved.
The disadvantage of the ratchet is that it is not suitable for the axes of a hollow plane whose diameter is 15 millimeters. If we examine the entire mechanism, the ratchet filling consists of pawls. The mechanism of these parts is of a ratcheting nature, on which the external bushing is installed (the sprockets are located there). The nut plays a special role here. This part is the surface for the bearing and also supports all 2 parts. Bearings are installed inside, which consist of identical metal balls.
The internal bushing - part of the ratchet - is installed on the wheel thread, which is located at the rear. To remove this part, you need to select a puller according to size.
If you climb a mountain, there is a large load on the chain and rear wheel. It is with this power that you need to tighten the internal filling of the ratchet. Then, using this mechanism, it is tightened along the thread into the wheel hub itself.
Under no circumstances should the puller be replaced with other tools. They are also not suitable for cassettes. The reason for this is the incompatibility of the splines. The ratchet or cassette on a bicycle most often breaks under heavy loads. Cassette and ratchet - there is no difference in analysis.
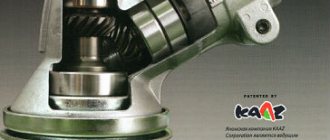
Reliability
On the drive side, the bushing bearing for the ratchet is located in front of the sprockets, close to the center of the bushing axis. And the bearing on the opposite side is located normally, further from the center. Due to this, an uneven load distribution is created in the bushing for the ratchet and the bearing on the drive side always wears out more. This also causes the bushing axis to break. If it is a bushing for an eccentric with a hollow axle, then it will burst; if the axle is for nuts, it will bend. You may be able to avoid this if you weigh up to 70 kg and drive carefully on smooth roads. Manufacturers of cassette bushings were able to eliminate this drawback and placed the bearing on the driving side as far from the center as possible, inside the drum.
Removing the ratchet from the bike
It is not always possible to correctly see the malfunction when the ratchet mechanism is on the bicycle itself, so the best solution would be to disassemble it.
It will not be possible to simply remove the ratchet mechanism, so we will need a special tool - a puller. With the help of this simple device, the ratchet will quickly be removed from its rightful place.
Tool for removing and securing the ratchet
Before you begin repairing the ratchet, you should correctly determine which direction to unscrew the nut. You don't need to press too hard in one direction or the other, otherwise you can twist the thread of the bushing. If the thread is right-handed, you need to screw it counterclockwise and put it on clockwise.
Behind the nut there is a row of balls that can themselves fall out of the mechanism. They must be carefully removed, cleaned of dirt and set aside. The disassembled device is cleaned of excess lubricant and foreign particles with gasoline or solvent.
The same applies to transmission sprockets. If the sprockets of the entire system are not worn, and the problem is in the threaded ring, it should be pulled out of the drum and replaced. Along the way, the pawl and the spring are changed.
After the rebuild, the ratchet is put back on the rear wheel hub. To do this, you need to carefully place the bearing balls in their seats, firmly install the mechanism and tighten it with a wrench on the sleeve. If the ratchet does not work and there is chain movement at idle, a new spare part is most likely needed.
Installing a new freewheel on a bicycle:
- Remove the old mechanism. This will not work without a puller; don’t forget the special key.
- Inspect the rear hub axle.
- Mount the new part onto the bushing.
If the transmission mechanism is too worn out, it would be rational to supply a new spare part. In most cases, the problem of malfunctioning ratchets is solved by simple reassembly and cleaning of contaminants. Finally, don’t forget to lubricate the newly assembled parts.
Manufacturers can install single-speed or multi-speed transmissions on their bicycles. In the case of the last category of units, a ratchet or cassette is installed on the rear wheel. Cassettes have a higher cost, since the ratchet is used mainly in budget class models.
It is quite easy to disassemble them at home. In this article, you will become familiar with the main features of the process and learn how to remove the ratchet from a bicycle wheel quickly and with minimal effort.
Skillful fingers
Today a client came with a phone like this
Sony z5 compact. As clients say in such cases: “it’s already old, but I’m happy with everything, I don’t want to change it.” As the anamnesis showed, the display module in the phone was changed, and after a while the hearing speaker began to act up. You have to press your finger in the area of the speaker, then it works for a while, then stops again. The owner thought that there was nothing complicated here, his hands were straight, and he didn’t want to take it to the service center and wait half a day. I successfully peeled off the back cover myself (fortunately, previous masters put it on 4 drops of the B7000). That's where the success ended. I tore off the head of one screw completely by the roots (I didn’t lick it, but tore it off), while I was tearing it off, I tore off several air conditioners and a coil near the speaker - as a result, the speaker stopped working completely. I can’t give you any photos, since I did everything at once and in front of the client. I fixed everything, started the phone - on the screen (despite the fact that it is IPS) the white color became in the spirit of old Amoleds - “burnt pink”, and even an afterimage appeared in the center of the Sony logo and the clock dial from the main screen (I’ve been repairing for 3 years, the first time I saw this on the ips, maybe it overheated it somehow). I showed it to the owner, who was completely upset. He stated that his hands were growing from the wrong place. But the speaker was fixed. What I wanted to say by this is that everything is clear to the masters, I want to appeal to non-specialists in this field. People, save your money and time wisely. By getting into something where you don’t understand anything, you ruin a normal device with a minimal defect, as a result of which both your wallet and your nerves suffer. Good luck to all.
How to remove the rear ratchet?
Before removing the rear freewheel, you must remove the rear wheel from the frame. To do this, lift it up, shift the rear derailleur to the last speed (remembering that you will need to check and adjust the front derailleur correctly after the replacement procedure is completed), and then loosen the cam or nuts (depending on the design of the hub). Next, carefully pull the wheel out of the frame, which should also be matched to your height.
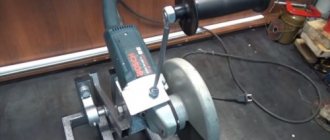
The next step is to remove the axle from the wheel hub. Take two adjustable wrenches - with one, hold the nut in a stationary position, with the second, unscrew the other nut.
Before unwinding the ratchet, we recommend placing the wheel in a vertical position and resting it against the wall. There is no need to remove the tire. Take a puller, made by yourself or bought in a store, and stick it into the edges of the thrust nut. Do not forget that the thrust nut has a right-hand thread, so you must turn the wrench counterclockwise.
Advice! Be sure to place the whip chain on the largest sprocket. Use the wrench to turn the puller with one hand, and hold the whip with the other hand, preventing the ratchet from turning along with the adjustable wrench.
Practice shows that in most cases, a bicycle owner is faced with a problem when the thrust nut is stuck to the freewheel body. To fix this problem, you need to use WD-40 spray. Spray the liquid onto the nut and leave the wheel for five minutes. The liquid will corrode the rust and dirt inside, after which you can safely remove the part from the bushing.
As you can see, removing this part is quite simple. But before you disassemble your bicycle ratchet, we recommend that you get a special tool. Without it, given the design of the fastening elements, it is almost impossible to dismantle the ratchet. After successful removal, you can proceed with further disassembly of the component and begin routine maintenance or replacement.
Diary of budget renovation of a Khrushchev building with your own hands. Part 1. Dismantling
The interior walls were supported by doorways, wiring, and baseboards. Initially I thought it would be more difficult to demolish them. Nothing like that: one hammer would have been enough, but a hammer drill helped me.
The worst thing about demolishing partitions is the amount of garbage (no elevator, 5th floor). At this stage we have produced more than 150 bags (25
40kg on average) and a couple of cubes of bulky waste. I think these are minor things, if you add the dismantling of the floor.
ps think about yourself or the loaders when you fill another bag to capacity with cement plaster.
Lifehack for a voyeur:
The bathroom is clearly visible from the attic.
Let's see what's going on with the wiring:
The apartment includes two aluminum wires
6mm2 (as short as possible), grounding simply hadn’t been invented yet.
After spending a couple of days studying the theory of cable types, their cross-section, circuit breakers, shields, etc., I proceeded to replace them.
ps My parents told me that I shouldn’t skip classes. It turns out there is a difference between current and voltage. And it turns out that if you multiply them you get power. And these numbers can be useful for the optimal wiring plan in the apartment.
But, better late than never?
Not as beautiful as we would like - there are no skills.
I divided it into groups, as I think would be convenient.
I checked all the lines - they work!
Even two-key pass-through switches (I was very surprised that there are such things at all and I can connect them myself