Hands from the right place | 03/31/2017
Today, with the availability of power tools, such simple and reliable devices as a mechanical hand drill are often undeservedly forgotten. Meanwhile, even being inferior in its capabilities to electric models, this tool remains practical, autonomous and extremely economical, and under certain conditions may be a better option for drilling or working with fasteners.
How did the evolution of the brace occur?
The history of the first brace design goes back to Ancient Egypt. An instrument similar in structure to the modern one existed back in the 15th century. His very first models were created by different masters with slight distinctive features from each other.
The samples that have shown in practice to be ineffective and inconvenient to use have not found widespread use, but those that have proven their practical significance have survived to the present day.
For more convenient and easier use of the tool, it was modified and evolved, going through 3 major stages of its improvement:
- brace;
- mechanical drill (manual);
- electric drill.
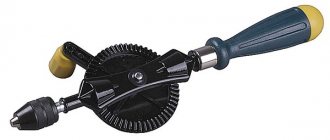
Externally, a modern hand brace is represented by a metal handle bent in the form of a bracket with a chuck designed for fastening and securely fixing the drill. The internal cavity of the cartridge has a square, rectangular or cone-shaped cross-section. The ability to replace the drill and the convenience of its fastening ensures long use. A simpler design did not have a cartridge. The cutting element was placed in a metal recess at the base of the tool and clamped with a bolt screwed through the side socket.
The most simplified model did not contain a drill and served a one-time use. When using it, holes were obtained due to a sharp sharpened end, on one edge of which a thread was applied. Using the tool required great muscle strength and patience. This was the impetus for improving the design to make it easier to use. The instrument was equipped with additional parts.
Components
- fungus. Push handle;
- bearing. Provides immobility of the fungus during rotation;
- crankshaft;
- crankshaft handle. Designed for comfortable grip of the handle by hand when performing rotational movements;
- ratchet. Provides the ability to work in places where the ability to complete a full revolution of the crankshaft is limited;
- cartridge;
- chuck jaws.
The need to increase drilling speed led to the creation of a mechanical drill. Increased drill speed in the resulting model is achieved by equipping the tool with a housing with gears.
A hand drill can be either single-speed or two-speed. The latest design has two speeds, switchable by moving the handle from one shaft to the other. The position of the handle on the upper shaft ensures drilling at maximum speed.
The pinnacle of design improvement was the addition of an electric motor to the tool. By replacing the mechanical movements of the hands to rotate the crankshaft, it increases the number of revolutions produced. The chuck with the cutting element located in it is driven by an electric motor. The electric drill can operate autonomously using rechargeable batteries. Its external form is often that of a pistol.
When working with a drill gun for a long time, your hands get tired very quickly. It is better to opt for an electric drill model with a centered handle.
An electric drill, in addition to performing drilling work, may include additional functions, acting as a screwdriver, mixer, and stirring solutions. The versatility of the tool is welcome for home use.
Drilling wood
To work with wooden surfaces, you need to purchase drills designed specifically for this purpose.
After applying the markings, the drill is placed at the designated point and, with a little effort, the speed is turned on. Ideally, the drill will sink smoothly into the surface of the wood. Sometimes you have to make holes of considerable depth. In this case, the drill must be removed periodically, discarding the chips. Otherwise it may get pinched. Similar rules explain how to properly use a drill when working with wood.
Device and principle of operation
The name of the instrument is a combination of ancient Slavic words - kolo and vrat, which means to rotate in a circle. This is the principle of its operation - circular rotation of the handle around its axis. The purpose of using the tool is ease of use of the drill necessary to create even holes.
Regular brace
The technology for using a brace is simple. A pointed rod is placed at the location marked to create the hole. By pressing on the pressure head, the tool is fixed at the drilling point.
By rotating the crankshaft around its axis and constantly pressing on the head, the cutting element goes deeper into the surface being processed. An increase in shaft rotation speed leads to an increase in drilling speed. During the drilling process, the accuracy of the direction of the drill is important, which does not allow the formed channel to go to the side.
To obtain a through hole in a surface with a large thickness, drilling is done from both sides. The entry and exit points of the cutting tool are pre-marked. When drilling on one side, the pressure on the tool is relieved at the end of the job. This is done to avoid delamination of the edges of the hole when the end of the cutting element comes out. To ensure a smooth edge of the hole being created, a board is placed under the part being drilled. One circle that the shaft handle makes around its axis is called the swing. The diameter of the swing also determines the size of the tool itself. Instruments with different spans are used: from 14.7 cm to 30 cm, most often in demand with a span diameter of 25 cm.
With ratchet
In the case when the existing swing does not allow making a full revolution, a ratchet-type rotary is used. The ratchet is installed in front of the chuck. Its task is to prevent the tip from making a reverse movement when the handle is returned back.
The very principle of operation of a tool with a ratchet is to repeatedly rotate the shaft handle as much as possible and return it again and again to make a revolution again. To ensure reverse motion, there is a ring on the ratchet, with which the direction of movement is switched.
Mechanical drill
In a mechanical drill, the rotation of the tip is ensured using a special mechanism - a gear drive. It consists of two gears meshed with each other. The diameter of the wheels and the number of teeth they have can be either the same or different.
Using a gear, the rotation of the handle of a mechanical drill is transmitted to the chuck. In addition to its widespread use in construction work, it is also used in other industries, including the medical field.
Surgical
Its use in surgery is important when drilling and milling bones during surgical operations, especially for craniotomy. The set of cutters includes the brace itself, a collet chuck, conical and ball cutters, spear and spear drills.
The surgical brace and its components are made of stainless steel, except for the handle and head - they are made of polypropylene. Rotators come with non-replaceable heads or with replaceable cartridges. The chuck itself, used to attach the shank of the cutting element, can be two-jaw or three-jaw. Sometimes a collet is installed as a clamp. A variety of fasteners allows you to fix cylindrical shanks with square, hexagonal, and round sections. Morse taper is used when it is necessary to use tapered shanks.
When choosing a tool with a collet, you should pay attention to its size. Different diameter drill shanks require different collets.
Purposes of use
The main purpose of any drill is to drill holes in various materials, so all calculations by the developers of new models of this practical tool are aimed at improving the quality of drilling . The tool has several speeds; for this, a gearbox is used that connects the electric motor to the working shaft. How a gearbox works: by changing the gear ratio of the gearbox, we increase or decrease the rotation speed of the cutting tool.
Modern drills have 2 operating modes.
- Simple drilling is used when working with wood and tiles.
- Impact drilling is used when drilling particularly durable materials: walls made of stone or brick, concrete structures, thick metal.
For such drilling, special drills are used that have carbide brazing at the end. To make the drilling process faster, a force of up to 15 kg must be applied to the tool body.
Service station mechanics often use simple drills for high-quality polishing of a car or after painting a car, so that the paint looks impressive. Polishing various surfaces with a drill is also performed during home repairs.
Advantages and disadvantages
Each brace model has its own advantages and disadvantages. Knowing them, you can choose the most suitable tool in each specific case to achieve certain goals.
| Advantages | Flaws | |
| Kolovorot | Simplicity of design. High precision of work performance. Possibility of easy change from a simple stroke to a reverse one. Independence from electricity and batteries. Reliability, durability in use. | Expenditure of muscular strength. Slowness of work. |
| Hand drill | Fast drilling speed. Availability of two speeds. Long service life. Full control over the drilling process, the ability to stop at any time. Independence from power sources | |
| Electric drill | Super fast. Ease of use. Multifunctionality of the tool, the ability to combine work performed. | Dependence on battery performance. Ease of breakage of a thin drill. Difficulty stopping in a timely manner when necessary. Inaccurate results when carrying out minor work due to high speed. |
All types of tools in question are very sharp and pose a danger if used incorrectly. There should be no question why the drill and brace cannot be placed on your workbench, but must be stored in a specially designated safe place.
Brick
A drill is much better suited for drilling materials of this class due to the lower hardness of the surface being processed. When working, drills with pobedit tips are also used, and safety glasses are worn over the eyes. The instrument is switched to impact mode and set to medium speed.
Drilling is carried out using a load on the drill. At the same time, you can act more confidently. The surface of the brick is much softer than that of concrete, so drilling occurs with less effort. A drill operating in impact mode can easily cope with this task.
A drill is one of the most necessary helpers in home repairs. There is nothing particularly difficult about using it.
Where is it used?
Carrying out the work of rotating on wood, plastic surfaces, and metal is the main purpose of the tool. It drills holes of the required diameter and depth with millimeter precision.
Additionally, it can be used as a screwdriver; for this, the corresponding bit is inserted into the chuck. To use the brace as a screwdriver, it is additionally equipped with a sting.
With the help of a rotator, depending on the attachment used, the following types of work are performed:
- screwing in and out of nuts, screws, screws;
- as an ice ax for winter fishing;
- cutting internal threads using a tap;
- making external threads using a die on small-diameter parts;
- countersinking (creating holes for a countersunk bolt);
- countersinking (expansion of holes in parts);
- drilling surfaces;
- grinding valves into seats in car engine heads;
- in neurosurgery during craniotomy.
Operating modes
Most modern models of electric drills are designed for two main operating modes. Moreover, the first mode (drilling) is considered standard, and the second mode (impact drilling) is auxiliary. In normal mode, such a drill is capable of performing both plumbing and carpentry work. And the impact drilling mode is used if it is necessary to drill a hole in a concrete or stone surface. These are the main ways to use a drill for its intended purpose.
The mechanism that carries out the impact during impact drilling consists of two ratchets. They are located coaxially. When switching to the impact drilling mode, these elements interact, aimed at creating a translational movement of the working shaft. For this mode, special drills with pobedit tips are used. The impact mechanism is triggered by the force applied to the drill. It should be between 10 and 15 kilograms. Here's how to use the drill with the hammer on.
How is it different from a hand drill?
In terms of the types of work performed, the rotary hammer is no different from a hand drill. The same functions are available to them. The main difference between drills and rotators is their appearance and internal design.
A power drill has a gear train located on a transmission shaft. There are two handles used to rotate the gear and to further maintain the balance of the tool. This significantly distinguishes it from the simple design of a conventional brace.
The second distinctive feature of the models is the presence of speeds: a regular rotator has only one speed, which depends on the strength of muscular work. The drill has one or two high-speed gears, switchable from one speed to another if necessary.
Help me to understand. screwdriver
Dear homemade friends. question ! The gearbox on the screwdriver produces 1 in 55 and 1 in 17 revolutions, two-speed. on the screwdriver it is stated from 0-550 rpm and, accordingly, 0-1250 rpm, therefore, having these data you can calculate the number of revolutions on the engine! it corresponds to 30250 rpm. brains are boiling (if they exist) how can this be? You wouldn’t even dream of such engines even in a nightmare!! or am I wrong? If there are such engines, tell me where to get them with the highest current readings.
What kind of screwdriver do you need? You miscalculated the gearbox, there is a maximum of 6 thousand revolutions
Remaking chargers and more
For example, engines up to 30 thousand and above cost in Dremel: » >
Andrey 234 wrote: 30250 rpm. brains are boiling (if they exist) how can this be? You wouldn’t even dream of such engines even in a nightmare!!
The usual number of revolutions! Die grinders and grinders have approximately the same speed! and other instruments! You just didn't specify the correct gear ratio! at the first speed it turns out 30250 rpm, and at the second 21250!
I counted the gear ratio 10 times! everything is correct! Well, even if so, where can I get something a little more powerful?
by 30%, well, I still can’t wrap my head around such speeds!
Andrey 234 wrote: even in a nightmare you wouldn’t dream of such engines!!
It depends on what the dream is about
. I didn’t go into your calculations, but on a Dremel it’s 33 t.rpm. On motors for radio-controlled models it’s 18-25 t.rpm.
I don't need a screwdriver! I want to remake an underwater tugboat. They use approximately the same gearboxes and motors as on screwdrivers. hence the idea to increase the power of the electric motor. battery allows!!
You don't have to go far. Just look at the characteristics of such engines. Example: . The 30-volt engine produces 6,500 rpm during unloaded operation. Less under load. Somehow, out of curiosity, I measured the speed of free rotation of the shaft on one of the 12-volt engines that we have for sale. The device measured 8 thousand and kopecks.
Andrey 234, you seem to be making a mistake somewhere. What kind of screwdriver do you have? And where do you get the gear ratios?
such an idea! on an underwater tugboat the data is approximately the same as on a screwdriver. need to increase
% by 30 engine power or rpm, the battery allows!! The gearbox is excellent, but the engine speed of 40-45000 is just right!
Shirpotrebovsky two-speed! I've calculated everything! so the output is 32,000 rpm, the gearbox is 1k 55, the output is 550 rpm, I need to increase the speed or power
% by 30, you can add voltage. but not advisable, limited space for batteries, this is an underwater towing vehicle, it has approximately the same engine and gearbox as a screwdriver. The biggest thing I found on the Internet is from a grinding machine at 35,000 rpm, but this is not enough.
With your own hands
Often a moment arises when you need to make a smooth hole on some surface, but you don’t have the necessary tool at hand. Making the simplest brace with your own hands is not difficult. Knowing the principle of its operation, it will take no more than half an hour to create the design.
For manufacturing, a metal rod with a diameter slightly smaller than the size of the required hole is selected. One end of the rod is flattened in a pre-red-hot state and sharpened. For ease of use and to give an external resemblance to a brace, the resulting tool is bent in the form of a bracket. A file handle is placed on the upper end.
A handmade instrument should be heated and cooled in oil or ordinary salted water. This will harden it and protect it from rapid dulling. As a result, the brace will last a long time.
Home crafts
At home, you can make a simple hand drill with your own hands from improvised means, designs and variations. We will provide several links to videos that show in detail how to make original designs.
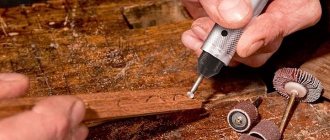
- Drill based on mini motors:
- A mini-machine into which dental burs are inserted to make inscriptions on various surfaces at home:
- Mini-machine for polishing jewelry based on an old drill.
Drills for brace
The modern design of the rotator includes the ability to replace the cutting element. Each rotary drill consists of the required components:
- cutting element;
- rod;
- shank.
Depending on the design and shape of the cutting element of the drill, they are divided into different types.
Center drills
Used when drilling blind holes in the end surface of a part. The cutting element of the center drill is a flat blade with an awl-shaped tip in the center. The lateral arc-shaped incisor is located along the radius. In the process of making a hole, the cutting element is centered using the tip, and the wood is cut around the circumference with a side cutter.
Screw drill
It has a screw-shaped shaft ending at the end with two sharp incisors called road cutters. It is screwed into the surface by means of a cone-shaped screw tip (deepening agent), and the side cutters trim the surface to be processed.
Variable diameter drills
The size of the drilled hole is adjustable within the limits established by the design. It is common to use two types of knives: with sizes ranging from 12 to 38 mm. and from 22 to 75 mm. in diameter.
Countersink drills
The rod has the shape of a cone with longitudinal grooves directed towards the center. With its help, the upper part of existing holes is drilled out, preparing them for the heads of bolts and screws.
Screwdriver
The attachment is a screwdriver inserted into the brace chuck instead of a drill, facilitating the process of tightening and unscrewing large screws, including old ones, without the risk of damaging them.
Preparing for work
The readiness of the drill for operation is determined by the following conditions:
- the device is connected to an outlet (for drills powered by an electrical network);
- the battery is charged and installed in the compartment (for cordless tools);
- a drill is installed in the chuck.
You can press the start button to check the power. If the chuck rotates quickly, then electric current is supplied to the motor and the tool is ready for use. If the cordless drill chuck rotates slowly, the battery is discharged and needs to be charged.
Installing the drill into the brace
The safety and accuracy of the rotary work will be ensured by the use of only high-quality drills that do not have cracks or chips.
In addition to the external defect of the drill, improper fastening into the chuck will also negatively affect the result of the work, which will lead to a different size of the hole formed. To ensure proper installation of the drill bit being replaced in the brace, the ratchet ring switch is placed in the middle (neutral) position. While holding the cartridge, the handle turns clockwise. The cutting element is installed in the extended cams, after which it is clamped by them when the handle is rotated in the opposite direction.
Safety precautions when working
A drill is a source of danger, as a result of which it is necessary:
- Inspect the device for damage.
- Make sure that drilling will not damage the installed communications.
- Do not work in damp areas.
- Do not allow the instrument to get wet.
- Fix the drill tightly in the chuck, remove the key, and secure the workpiece well in a vice.
- Avoid excessive pressure on the tool body, and also ease the pressure when removing the drill from the hole.
- Use goggles, gloves, and a respirator.
- Upon completion of work or to replace the drill, you must wait until the rotation of the chuck has completely stopped and disconnect the tool from the power supply.
- Sweep the chips obtained during drilling only with a brush.
Drill sharpening
Dull or improperly sharpened drill bits will create a ragged, uneven surface around the edges of the hole. Therefore, it is so important to monitor the timely sharpening of tool drills.
Rotary drills
A triangular needle file is used for sharpening screw, center or variable-diameter drills. It only sharpens the inner side of the drill. The cutting side edges of the drill become sharper when the lead screw rests on a hard surface
Twist drills
Twist drills are sharpened using special electric machines into which they are inserted tip first and carefully sharpened on all sides. There are also specially created templates in which the tip is placed at the desired angle and sharpening occurs when the template is moved along the sandpaper.