Since ancient times, wood that was cut down several years ago was used to make wood products. Furniture made from damp or improperly dried boards will warp or dry out and crack. When drying, the material shrinks, raw wooden beams will begin to move over time, and cracks the width of a palm will appear in the walls of the log house. Mold grows in damp wood. But overdried boards are also bad - the material begins to absorb moisture and swells.
Drying is carried out with hot air or steam, the process is long and expensive, but it gives the wood additional strength, prevents changes in shape and size, and the lumber is stored longer.
Technological procedure for drying wood
Important: in order for the wood to become completely dry, it must be dried in special equipment in the laboratory. The humidity remains at 0%.
There are two important stages in the drying process: the process of moisture exchange and moisture transfer. The first implies the evaporation of moisture into the atmosphere, the second - the movement of moisture inside. Wood drying technology involves the interaction of both processes. In other words, moisture moves upward from the inside and then evaporates from there.
Modern technological capabilities make it possible to quickly remove moisture from a material; the only question is which of them are most effective. The following types of drying wood processing are used in industry:
- Aerodynamic heating chambers (or PAP)
- Rotational (based on the laws of centrifugal force) Petrolatum (in liquid, when wet workpieces are placed in an oily environment heated over 100 degrees)
- Chamber (in special drying chambers)
- Contact (for flat materials that are clamped in a press)
- In a high-frequency field (very effective, but expensive method)
- Induction (wood dries due to contact with a heated metal element)
- High-temperature drying of wood in vacuum chambers allows the resulting material to be not only dry, but also very durable
- Natural drying of wood involves a process in the open air under cover
- Microwave drying of wood (it occurs in special generators that provide microwave radiation)
- Infrared wood drying (also called radiation drying, which creates a beam of infrared radiation that heats the surface of the material and promotes the evaporation of moisture).
Important: the wood drying temperature has three categories: from 60 degrees and more. It all depends on the required quality of the process.
Shrinkage problems
The dimensions of the material during drying can change in different ways. After improper drying, an edged board can turn into a completely unusable material. For example, if you dry it too quickly, the natural shrinkage process is disrupted and the board becomes deformed.
Such defects can often be eliminated with a plane, or in difficult cases by exposing the material to steam and repeated drying. Here are the most common cases of curvature:
- warping of the board in the transverse direction;
- bending the board in the lateral direction;
- arcuate bend;
- torsion.
Typical shrinkage deformations
Shrinkage promotes the formation of cracks. In small materials (boards, timber) there are fewer cracks, but such lumber is more susceptible to warping. To reduce the likelihood of cracks forming in logs and beams, longitudinal cuts are made along the entire length of the material. This allows you to reduce the internal tension of the wood.
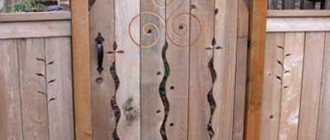
DIY wood dryer
There are a lot of materials for the search engine query “wood dryer”, but they are all related to industrial drying chambers, which are used in large enterprises and cost exorbitant amounts of money for a private craftsman or a person for whom wood crafts are a hobby.
The duration of drying wood under natural conditions can last from one to two years, and for oak it can be longer. The time for drying wood using heating elements for soft wood is from 3 to 7 days to 8% humidity, and for hard wood two to three weeks to 10% humidity.
Naturally, the rate of drying of wood is influenced by factors such as species, initial humidity and temperature at which the drying process occurs.
Due to the fact that infrared film is presented on our website, including high-power Marpe Power 305-200 (400 W/m2) and Marpe Power 305-300 (600 W/m2), please contact us Inquiries are being received regarding the possibility of using it for the manufacture of wood dryers.
Making a wood dryer with your own hands is not as difficult as it might seem to a wood carver, a creative person who does not always have knowledge of electric heating.
All you need to do is stack the boards in stacks with a gap, place heating elements between them and use a thermostat to control the process. But for this to work and be safe, certain rules must be followed.
Make the right choice of heating element.
When drying wood, it is necessary to determine the temperature regime, which directly affects the drying time.
The choice of film also depends on the temperature regime; the higher the temperature is needed, the more powerful the film should be used. For example, Marpe infrared film.
- power 220 W/sq.m. can heat up to 40 degrees,
- power 400 W/sq.m. can heat up to 60 - 70 degrees,
- power 600 W/sq.m. capable of heating from 60 to 80 degrees.
It should be taken into account that the temperature may vary depending on heat losses and ambient temperature. When drying outdoors it will be lower, and when drying in a closed cabinet it will be higher.
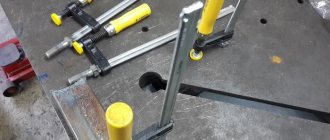
Method of placing the heating element.
If infrared film is chosen as a heating element for drying wood, then it can be placed either in the open state (photo on the left) or placed between protective layers (photo on the right), for example, tin. Let's take a closer look.
Method of placing the heating element
In the first method, the infrared film is attached to a frame or millet is placed between the boards. To measure temperature, thermostats with remote temperature measurement sensors are used. Their number should ideally be equal to the number of heating elements, but in practice 2–3 pieces are used. to the dryer.
In the second case (cassette), the heating film is placed between two sheets of tin. The cassette is sealed around the perimeter with silicone sealant to avoid contact of the infrared heating film with vapor and is equipped with a temperature limiter. The surface of the cassette acts as a radiator for the heating film and protects it from mechanical damage.
Conclusion. The first method is cheaper, the second is safer, but its price is much higher.
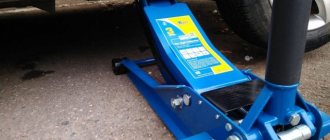
Temperature control.
To control the temperature in industrial installations, special controllers with several sensors are used, which not everyone can afford when drying wood at home.
For small wood dryers, conventional thermostats with an extended temperature range are most often used, for example, thermostat E 51.716 (photo on the left) or bimetallic temperature limiters, for example, KSD (photo on the right), which are inexpensive and are installed on each heating unit to increase reliability and safety. element.
Fire safety.
This is an important point, since choosing a location for a wood dryer, equipping it with automatic fire extinguishers, following the rules for operating electrical installations and fire safety equipment will allow you to get dried wood ready to create masterpieces of architecture and wood products.
Design Features
According to research by the authors of the concept, the dimensions of such a dryer should be calculated as follows: the total surface area of all boards in the stack should be no more than 10 times the area of the glazed roof slope. For example, we wanted to build a dryer that could accommodate about 200 three-meter boards at a time (there is no point in drying more than required), so the roof glazing area should be about 10 m2. Another important pointer: for maximum efficiency and year-round use of the dryer, the glazed roof slope is positioned at an angle in accordance with the latitude of the place where you live (the further north you are, the steeper this angle should be). In addition, you need to do the following.
Vents located on the north wall of the dryer provide air inflow and outlet. The wide, insulated door makes it easy to stack and remove boards.
- For all parts of the building frame, use only pressure-treated wood.
- For cladding inside and outside, use only moisture-resistant construction plywood.
- It is necessary to insulate the floor well using rigid foam boards, and the walls and door with mineral wool without vapor barrier.
- Carefully treat all internal surfaces of the dryer with antiseptics to protect against dampness, apply a primer with aluminum powder, and then paint with matte black paint for maximum solar heating. (To raise the temperature in the dryer even more, you can paint the outside of it darker, too.)
- Fans in the dryer should not have plastic parts, as the temperature inside can reach 70°C.
- We have added our own conditions to these requirements.
- The design should be simple and, if possible, maintenance-free.
- Since the main function - drying boards - will occur occasionally, it is desirable that this building can be used for other purposes, for example, as a shed for storing equipment, a greenhouse or a dryer for fruits and herbs.
- To save money and reduce waste, sheet materials of standard sizes should be used.
- The internal dimensions of the room should allow one person to cope with the stacking and unloading of three-meter boards, and to ensure air circulation, there should be a free space of at least 30 cm on all sides of the stack.
We also found that the boards can be dried in the winter by attaching additional sheets of clear plastic to the bottom of the rafters to create an air gap that retains heat.
When we went in to check the humidity, the thermometer inside the solar dryer read 35°C, and this was at the end of November! The dryer is complete and we have just placed a stack of fresh lumber into it. A film canopy hangs from above to reflect the air flows created by the fans.
Why dry wood?
Since ancient times, wood has been used by artisans only in a dry state, when it was left in the sun for a few minutes after cutting. It is very important that excess moisture from the wood completely evaporates. Especially in the production of wooden furniture. If the workpieces were wet, over time the furniture will dry out, begin to bend and deteriorate.
At the same time, the natural level of moisture in the wood must be maintained, otherwise, under the influence of the external environment, it will begin to absorb moisture and swell. If wood pieces are dried in the kiln too quickly, intermittent moisture zones may appear in the wood structure. Because of this, the finished product may crack. Very often the shape of long boards changes; they can bend and take the shape of an arc.
Optional equipment
As additional equipment, you can install automation in the drying chamber. Its properties:
Gas dryer diagram.
- the system is able to work with chambers of different sizes and with different heat sources;
- is relatively cheap;
- does not require special knowledge to maintain it;
- is easy to install;
- measures temperature and humidity in the chamber;
- provides fully automatic or semi-automatic operation of the drying chamber;
- automatically controls the operation of valves, dampers and fans.
To operate the system, it is enough to set the thickness and type of lumber and the desired final moisture content. The system helps dry various types of wood: pine, spruce, oak, birch, beech, linden, ash, maple, alder, hornbeam, poplar, aspen, sycamore. Every 2 hours, the automation takes readings of humidity and temperature and makes the necessary adjustments to the operation of all air heating and ventilation systems. The approximate cost of such a system ranges from $400-450.
Building a dryer with your own hands is quite troublesome and expensive.
But the result covers all costs. This is especially important for those who make wooden products such as furniture and wood carvings. Dry wood costs several times more than raw wood. In addition, in your own dryer you can achieve a certain moisture content of the workpieces. Everything can be done independently if you have a strong desire and the availability of a suitable place.
How to build a vacuum dryer with your own hands?
In most cases, novice businessmen do not have enough money to purchase a factory installation using the vacuum drying method, so we will take a closer look at such an option as do-it-yourself vacuum drying of wood.
To set up homemade vacuum dryers for wood, you must have a suitable room, as well as some kind of container.
It is necessary to arrange its hermetically sealed closure. Or you can build this dryer using reinforced concrete structures: in this option, one of the walls is made of wood.
The chamber itself should be thermally insulated - for this you can use various types of mineral wool, or use regular polystyrene foam. You should also cover the insulation with a special film, which will help reflect heat flows into the chamber.
Radiators should be used as heating elements - in this case, these radiators should heat the water to seventy degrees. It will be necessary to install a fan of sufficient power: this element promotes a more correct flow of air masses inside the chamber.
Homemade vacuum dryer
To heat the water mass, a boiler is used, from which, using a water pump, water will be supplied to the heating elements. In addition, it will be necessary to install a device to create a vacuum environment. Sensors to monitor humidity conditions will also be needed.
The system that controls this equipment is moved outside the chamber itself - usually some kind of separate vestibule is made. Material can be loaded and unloaded for drying either manually or using a forklift.
The temperature regime should be adjusted so that changes in this parameter occur at a smooth pace.
Features of a homemade chamber for the vacuum drying method
When building this equipment on your own, it is necessary to create special technological parameters inside the chamber. When drying in a homemade chamber, the drying time can take more than two weeks.
Materials loaded into the chamber should be treated with special solutions, including chalk and drying oil.
When building a homemade vacuum installation, fire safety parameters must be carefully observed, otherwise you may face irreparable consequences.
Drying modes
During the drying process, the oven can operate in low temperature, normal or high temperature mode.
Low temperature and normal mode
Low-temperature wood processing is carried out at 45°. This is the softest method, it preserves all the original properties of the wood down to the smallest nuances and is considered a high-quality technology. At the end of the process, the moisture content of the wood is about 20%, that is, such drying can be considered preliminary.
As for the normal mode, it occurs at temperatures up to 90°. After drying, the material does not change shape and size, the brightness of color and strength are slightly reduced. This is the most common technology used for various types of wood.
High temperature mode
In this mode, drying occurs due to the action of superheated steam (temperature more than 100°) or hot air. The high-temperature drying process reduces the strength of the wood and gives it a darker shade, so the material is used to create minor construction and furniture components. In this case, drying with superheated steam will be more gentle than using air.
Low or high temperature for drying?
It is worth understanding that the answer will directly depend on the type of wood that you want to use for drying. Some building materials are best treated gradually at low temperatures, while others are treated as quickly as possible. Also, do not forget that low-temperature regimes can be divided into the following categories:
- forced - the material becomes brittle, the color darkens significantly;
- normal – the strength of the wood decreases slightly, the color changes;
- soft - the wood completely retains its properties and does not change color.
Each of these categories fits a specific case. For example, to decorate walls it is not at all necessary to use wood with good strength, but its color is of great importance. But for load-bearing beams it is best to use wood that has gone through the stage of soft processing, otherwise the entire structure will simply collapse.
But high-temperature processing is characterized by two drying stages. The first stage is characterized by a decrease in the moisture content of the feedstock to 20%, after which the wood cools down properly and is subjected to heat treatment again, but to a level from zero to five percent. This technology is most often used in the construction of secondary structures that are not of particular importance on the farm.
DIY drying chamber
For the quality of any type of structure, it is important that the materials used are also of high quality and durable. And when it comes to wood, it must be dry, durable and resistant to rot.
To give the tree such properties, it needs to be dried. But purchasing equipment for heat treatment of wood is very expensive, so many craftsmen are trying to build their own.
A DIY lumber drying kiln may be good value for money, but it is far from perfect. Indicators such as 6% humidity in a couple of days with less than 1% defects in it are clearly unattainable, since assembly is usually carried out from improvised means without the use of sensors and various smart systems for monitoring various parameters of wood, and most importantly, with virtually no experience in creating drying chambers.
Features of self-made drying chambers
A homemade drying chamber is a room in which a heater is installed. Now it’s worth thinking about, if for drying 1 cubic meter. m will require at least 16 kW of energy, which is how much is needed for 3-4 weeks (this is usually the standard drying time in such chambers. Costs can be many times higher than the prices of the materials themselves. Plus, if temperature conditions are not observed, poor-quality heating length and without controlling the percentage of humidity, the boards are deformed in almost 100% of cases, which makes them very difficult to work with.
Basic drying methods
It is quite difficult to determine how to dry wood correctly and which method is the most correct. All methods are used taking into account specific requests and requirements for the finished material. The most common methods for drying wood are:
Natural
One of the simplest and most accessible ways. All that is needed for high-quality natural drying of lumber is a dry, warm room in which there is a constant flow of fresh air. During the process of natural drying, the harvested raw materials are placed in stacks on elevated surfaces ( at least 50 centimeters from the ground ). The material cannot be laid tightly; air must freely enter the gaps between the workpieces; also, to prevent cracking of the ends, they must be treated with oil or resin. The main disadvantage of drying wood in natural conditions, despite its simplicity and accessibility, is that for a good result it will take at least two years.
Chamber
Quite a popular and fast method of industrial drying of lumber. The harvested wood is placed in special drying chambers, in which excess moisture evaporates. It is possible to determine how long it takes to dry the wood depending on the specific requirements for the final result. At what temperature is wood dried in such chambers? Typically the temperature ranges from 40 to 100 degrees . The low humidity of chamber-drying timber is a huge advantage when choosing materials for building a house, since the drier the timber is, the less shrinkage of the house will be in the future. Kiln-dried timber is not inferior in properties to laminated veneer lumber.
Rotary
This method is based on the use of centrifugal force to influence lumber. Stacks of wood are stacked on a special moving platform in a well-ventilated and heated room. The platform rotates, due to centrifugal force, the moisture accumulated in the wood appears on the surface. At the same time, heated air moves intensively inside the stack, and the processed material dries very quickly and evenly.
Contact
Suitable only for thin sheet materials - plywood and veneer . When contact drying, sheets are placed in a special press, clamped and heated on both sides due to direct contact with heated surfaces. The most fire hazardous of all methods, therefore it requires serious control of the process and compliance with fire safety rules.
Atmospheric
One of the most common and cheapest methods, it justifies itself in the presence of large areas for drying wood and large-scale volumes of processed material. Wood for drying is stacked in piles, which are located on a foundation of reinforced concrete supports. The height of the foundation is calculated taking into account the surface (open ground or asphalt) and the average height of snow cover for this region. The main disadvantage of atmospheric drying of lumber is the state of the air, the main drying agent, depends on the weather, time of year and time of day. The atmospheric drying process cannot be controlled with the same ease as when using the chamber or rotation method. A prerequisite for a high-quality final result is the treatment of lumber with an antiseptic at the initial stage of drying.
Drying wood in natural conditions
With this method of removing moisture, a drying chamber for lumber is not used; the liquid evaporates under the influence of atmospheric air. Dry the material under a canopy located in a draft. The sun's rays unevenly heat the outer and inner layers of wood, which leads to the appearance of deformations and cracks.
If the site does not have a drying chamber for lumber, an attic, a ventilated shed, or an equipped shed are well suited for drying. The material is stored in a stack; the first layer must be placed on stands with a height of at least 50 cm made of any durable material. Rows of lumber are laid with dried slats, all subsequent boards and logs are placed above the previous blanks to create vertical air wells.
Logs sawn lengthwise and finished boards are laid with the inside facing up to reduce the size of the deformation. For the same purpose, a stack of wood is pressed from above with a heavy load. Due to the formation of cracking at the ends of the workpiece when drying the material, select the length of the workpiece to be 20-25 cm longer than the intended part.
The ends of the lumber are carefully treated with oil-based paint, drying oil or hot bitumen to prevent cracks. Before stacking, the log trunks are cleared of bark to reduce the likelihood of wood beetles breeding. Removing moisture from wood naturally is considered an economical method.
- Aerodynamic
- Microwave drying chambers
- Convective
- Condensation
Now let’s look at the parameters of drying quality in the context of the presented types of drying chambers.
The process of drying wood in a chamber
Aerodynamic drying chamber
The cost of an aerodynamic drying chamber is relatively low. But energy costs are high. It is a heat-insulated chamber with a fan. The air is heated by friction against the fan blades. When the board is placed in the chamber, its humidity is distributed evenly.
Next, the drying process begins.
Circulating hot air around the board dries out the board. After drying, when measuring the moisture meter, which measures the moisture content of only the top layer, we will see the humidity indicator that we wanted to achieve. About 8-10%. But if you take a good needle moisture meter, you will see the real moisture content of the board under the surface layer, 25-35%. Because the board remained damp inside. This board cannot be used. There is enormous tension in it due to the difference in humidity (the board will warp, then it will crack).
Therefore, we continue drying. Again, hot air circulates at high speed around the board.
By the way, the flow speed in an aerodynamic drying chamber is almost impossible to regulate.
As you continue to dry the board, its outer layer continues to dry out and becomes dry. When dry, the top layer becomes brittle. 1-3% humidity remains. The dry layer becomes denser and narrows. Moisture leaves the inner layer more slowly. Accordingly, the inner layer narrows more slowly than the outer one. And when the inner layer becomes wider than the outer layer of the board, the board bursts.
From the above, the conclusion suggests itself: it is unlikely that it will be possible to dry wood efficiently in an aerodynamic chamber.
Microwave drying chamber
Quite an interesting piece of engineering soap.
It works on the same principle as a regular household microwave.
- Under the influence of high frequency electromagnetic radiation, wood molecules increase their vibration speed and the wood heats up.
- Drying in a microwave chamber significantly reduces drying time.
But that's where the advantages end. Because such a chamber is expensive, it consumes the same amount of electricity, if not more, than an aerodynamic chamber. Also, during the practical use of microwave cameras, it turned out that microwave wave emitters quickly fail.
To conclude the sentence with which the review of microwave drying chambers began, it is an interesting engineering idea, but it has not been used in practice.
Convection drying chamber
This type of drying chamber can be called the most common type.
The operating principle of the convection drying chamber is as follows:
- Heat is transferred through the air that passes through the heat exchangers.
- Hot water and/or superheated steam passes through heat exchangers.
- You can change air parameters, increase or decrease humidity.
- Humidity is increased using moisture-processing nozzles in the chamber. Reduce by replacing air with dry air.
- The settings of the inverter motors allow you to change the direction and speed of the air flow.
The drying process in the convection chamber occurs as follows:
- The board is heated strongly, in a moisture-saturated environment, with increased air circulation. This is necessary to ensure that the water particles are always warm. Water is easily removed from wood as it heats up to 75-80 degrees Celsius.
- Depending on the thickness of the board, from one to three heat and moisture treatments are done during the drying process. The last heat and moisture treatment is carried out to completely relieve tension in the wood, just before the end of drying. At this point, the board has already reached the required humidity.
Of the options presented, the convective drying chamber is the most suitable for high-quality drying of wood.
Condensation drying chamber
From the very beginning of drying, warm air removes moisture from the outer layers of the wood by circulating around the board. Then the air goes into the condenser, heats up and warm, dry air is sent to the board.
Drying wood yourself
If you need to prepare wood at home, it is recommended to proceed in this order:
- choose a place for drying. It is best to provide not a canopy with a roof, but a building with dense walls that prevent the penetration of precipitation;
- equip a base for future installation, under which air will flow freely;
- lay the lumber crosswise in several rows, as shown in the figure;
- close the resulting stacks in the upper part from random drops of water, dust and debris;
- fasten wooden boards or beams together. It is best to use polymer materials for this - rubber puffs or nylon cords;
- keep the stacks for the time recommended for a specific climate zone (usually several months).
You can prepare lumber yourself if you have time and the need to prepare a large amount of wood. The resulting material is suitable for use for construction purposes, but is poorly suited for the manufacture of furniture. To obtain dry wood for finishing and decorative work, a set of wood preparation methods should be used, such as gluing, cleaning and painting, and brushing.
DIY wood dryer:
Mini dryer made of thick metal
Ideal for drying small boards or firewood for sale. The undoubted advantage is that the design takes up virtually no space, but for its manufacture it will be necessary to use very expensive materials. The frame must be made of thick steel, since it will have to withstand loads of several tons.
Metal sheets with a thickness of at least 0.5 millimeters are attached to the outside. There is no need to insulate such a structure, and this can be very dangerous. It is best to place it in a garage or shed so that it is not exposed to precipitation and winds. As for the heat source, in this case you can use almost any option. For example, since we decided to make a compact structure, we can place several steam generators inside. In this case, the equipment can also be used for drying clothes. In general, if you decide to make your own wood or clothes dryer, then you should definitely take a closer look at this option.