Wiring type and its parameters
At home, you most often have to deal with alternating current, much less often with direct current.
Typically, direct current is measured in batteries and batteries; house wiring always runs on alternating current. Even if the electrical network is powered by batteries (a backup power source, the main one in the absence of a centralized power supply), it must contain an “adapter” - a device that converts direct current into alternating current. When figuring out how to measure current with a multimeter, you need to clearly understand: to work with direct current, use the DCA (A-) segment of the multimeter, for measuring alternating current, use the ACA (A~) sector. The designations are associated with abbreviations of English terms: direct current amperage (DCA) and alternating current amperage (ACA) is the designation of alternating current on a multimeter.
Typically, multimeters allow you to measure microcurrents - up to 200 mA - and stronger ones (up to 10A). Devices that allow measurements in more powerful electrical networks have an additional socket for a plug (probe) marked 20A. Typically, in models with four connectors, two are designed to measure current in different ranges, one is for other measurements (voltage, resistance).
The COM (COMMON) connector, common (universal) for all types of measurements, is intended for the negative (black) probe of the multimeter.
Thus, to measure current with a multimeter, you need to connect the black probe to the COM connector, and the red probe to the socket for checking microcurrents or ordinary currents. For sockets and switches, the device regulator is set to the alternating voltage sector, for batteries and batteries - constant. If the level is unknown in advance, the highest value allowed by the device is selected.
Important: if no energy-consuming device is connected to the outlet (on the switch), the electrical circuit is open and there is no current in it!!! Measuring the current directly in the socket or on the contacts of the switch is useless and dangerous! This causes a short circuit.
Preparing for work
First, you need to turn the switch handle to the marks of the sector indicated by the symbol “A”. To measure DC and AC values, different sectors are provided. They can be indicated by the symbols:
- three dots under a straight horizontal line - for direct current;
- wavy line - for variable.
The letter designations look like this:
- "DCV" - for permanent;
- "ACV" - for alternating current.
Care and compliance with the instructions when taking measurements will help you avoid mistakes and not break the multimeter.
Next you need to insert the cables into their sockets. Black - with the designation “COM” or “−”. Red with the designation “VΩmA”. There are contacts at the other ends of the cables. They will connect to the measured network.
Why do you need to measure current?
The voltage and resistance of the electrical circuit, which are measured in units such as volts (V) and ohms, respectively, have a significant impact on the amount of current. In this case, an increase in voltage with a constant resistance of the electrical circuit causes an increase in current strength, and an increase in the resistance of the circuit with a constant voltage value leads to its decrease. Current (I), voltage (U) and resistance (R) depend on each other and are related by empirical formulas:
- I = U/R
- U = I*R
- R = U/I
In this case, it is simplified to assume that a current of 1 A appears in a conductor with a resistance of 1 Ohm if a voltage of 1 V is applied to it.
Current measurement
By measuring the CT with a multimeter, you can:
- clarify the actual power consumption of a particular electrical appliance;
- find defects in an electrical appliance if its actual power does not correspond to the value stated in the documentation;
- find out the electrical capacity of autonomous power sources (batteries, etc.);
- identify the existence of current leakage in electrical circuits and, if necessary, localize the defective area;
- check the battery charger to ensure that the charging current corresponds to the specified value, etc.
Such measurements are carried out using special instruments - ammeters. There are enough varieties of them on the domestic market to satisfy the needs of all buyers.
The most popular, especially at the household level, are small multifunctional (ammeter + ohmmeter + voltmeter) multimeters, with which you can measure almost all the necessary parameters of an electrical circuit.
How to check amps in different devices?
There are several types of verification.
Cars and tablets charge differently
In the charger
The charger must be checked if there is a need to determine the reason why it is faulty. The current strength is different for each specific device. For example, it is the same on phone and tablet devices, but much more on car devices.
For your information. The permissible limit is indicated on the product label or applied to the body as a marking.
The principle of operation is exactly the same. The difference is that with small pin sizes on the connector, it is difficult to connect probes.
The terminals must be connected correctly
How to measure amperes with a multimeter in a charger if the connector does not include probes:
- Steel sewing needles are inserted into the contacts.
- To do this, use pliers and put gloves on your hands.
- The probes must be connected to the tips of the needle through a load.
- If this is not possible, then you need to disassemble the unit housing. This way you can connect the probes to the output of the charger in the place where each tip of the electrical wire is soldered.
It is necessary to correctly follow safety precautions and pay attention to the recommendations from the manufacturer. In some products it is forbidden to open the lid, while others are completely disposable, that is, they cannot be repaired.
You need to be careful with your car
In battery
You can check the lithium-ion battery in your car by doing the following:
- The multimeter is set to voltmeter mode, which tests the voltage.
- Set the range to 0-20V.
- It is advisable to measure the battery only when the vehicle is disconnected from the power supply.
- The red probe is applied to the positive socket.
- The black probe is placed on the negative socket across the load.
- The readings obtained must be recorded.
A bad battery will not start the car
Now you need to evaluate the result:
- Voltage = 12.6 volts. The device is suitable for use. There is no need to charge.
- The voltage is less than 12 V. The car battery needs to be charged. She was discharged.
- Readings are more than 15 V. Such a device is prohibited from being used. This will damage the generator. You need to purchase a new battery.
For your information. To get accurate data, you need to measure them 6 hours after disconnecting from the car.
There are large currents in the power supply
In the power supply
It is quite possible to check the amperes with a multimeter on the power supply. The procedure is performed at break and a load is necessarily applied. The principle of operation is the same as when working with other equipment. It is only necessary to note that the power supply has high power. Accordingly, measurements are taken as quickly as possible, before the probe wires heat up.
As an example, it is worth considering the situation of studying the power supplies of a cash register, camera, cell phone, etc. In this case, a multimeter is needed to measure the current. This is necessary in order to understand whether the device is operational. In some cases, the output voltage may not always guarantee operation.
Measurements are taken sequentially
The study is done in discontinuity with the load:
- The tester mode switch must be set to the maximum value of 10 amperes.
- Measuring a power supply with a power of more than 10 amperes is prohibited with a conventional multimeter.
- Next you need to break the chain. If it is not possible to open the case, one core of the supply wires is cut.
- To complete the circuit, one wire is connected to the tester probe, and the second is connected to the supply circuit - the wire coming from the power supply. This is how the circuit is closed on the device using a multimeter.
- The battery acts as an energy consumer. It's completely discharged. The current strength will be twice the operating current.
- Gradually, with an increase in the charge level, you can observe a decrease in the current strength, tending to 0.
Even if the arrow does not move from the 0 mark, do not be alarmed. This does not mean that the device is broken.
Attention! A couple of seconds are enough to measure. If the voltage is 12 volts and the current is at least 3-5 amperes, then the wires can heat up to the point where they become charred. This can damage all units connected to the circuit.
A car can have many electrical problems
In the car
To determine the suitability of a vehicle's generator for use, you need to check its charge level. The rules for using the device are the same as with a battery. If the data is incorrect, you need to check each component of the device:
- brushes;
- rings;
- diode bridge;
- voltage regulator;
- stator device;
- rotor.
Work with gloves
Digital multimeter
The most convenient is a multimeter, in which it is enough to simply set a specific measuring mode. There is no need to additionally specify the tolerance range, since the device itself adapts to the circuit parameters, takes measurements and produces the required result.
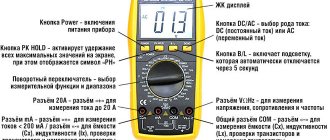
The image below shows the first position of the handle, which has several positions demonstrating AC and DC voltage. The first is indicated by V AC (~ symbol), the last DC (—), in the range of volts and millivolts. The current strength A is similar, not being divided into current types, but having a gradation in amperes and milliamps.
In addition, the function of measuring resistance and chain ringing is mandatory.
At the bottom there are several sockets used to activate the measurement wires. The socket marked with the second position COM is used for the main black wire. The third position shows the socket for making basic measurements using the red cord. The permissible limits for voltage and current measurements are shown below. The fourth socket, indicated by position 4 in the image, is used to measure current in amperes, with a maximum limit of no more than 10 A. All readings appear on the display with digital graphics, which is indicated by position 5.
A multitester with an indication of the measurement range is more common, primarily because it costs much less.
When using a multimeter, it is necessary to indicate both the operating mode and the alternating and constant currents. In the same sector, a switch is installed in the required measuring range, expressed in mA, µA and A. The example shown shows 4 socket connections. Two of them are for red wires, measuring up to 200 mA and up to 10 A. Voltage, resistance, capacitance and other indicators are measured using a separate socket.
Design Features
Regardless of the number of sockets in the multimeter, any of these devices has two types of outputs, which are indicated by different colors. The common output (ground) is colored black and is designated either “com” or “–”. The output intended for measurements (potential) is red. Any of the measured parameters of the electrical circuit can have its own socket.
There is no need to be afraid of confusing it with others, since each of these slots is designated by the corresponding unit.
Another external element of the device is a handle for setting the measurement limit, which can rotate in a circle. On digital multimeters these limits are greater than on analogue ones, in addition, they may include additional options, for example, a sound signal and others. Since we are talking about how to measure current using a tester, we will talk about a scale with amperes.
Each multimeter has its own maximum current limit, and when choosing an electrical network for testing, the current strength being tested in it should be compared with the limit for which the device is designed. So, if the current flowing inside the electrical circuit is 180 A, it is not recommended to carry out measurements using a multimeter rated at 20 A, since the only result obtained will be the device burning out immediately after testing begins. The maximum limit is always indicated in the multimeter data sheet or on the device body.
Measurement order
A multimeter for measuring current is connected to an open circuit. This is the main difference from the voltage measurement procedure, in which the tester is connected to the circuit in parallel. The indicator of the amount of current that passes through the device is displayed by an arrow on the scale (if we are talking about an analog device) or is displayed on the liquid crystal (LED) display.
There are different ways to break the circuit under test to connect the device to it. For example, by disconnecting one of the terminals of the radio element using a soldering iron. Sometimes you have to cut the wire with wire cutters or pliers. When determining the current value of a battery or accumulator, such a problem does not exist, since a circuit is simply assembled, one of the elements of which is a multimeter.
Amps and multimeter: what is it
Ampere is the SI unit that measures the force present in an electric current. Meters for determining it are called multimeters, which can be digital and analog or pointer.
There are differences between them. In the first case, the information is displayed on a liquid crystal screen, in the second there is a dial scale. An analog device has too high a measurement error. When working with it, you need to eliminate the slightest vibrations. Otherwise, the result may not be accurate. Digital more:
- comfortable;
- reliable;
- functional;
- practical;
- universal.
Basic principles of current measurement
The main condition that must be met when measuring current in an electrical circuit is to connect the tester to a wire break in this circuit, that is, to become its component during the measurement. Before measuring the current strength with a multimeter, it is equally important to correctly set the following on the device:
- measurement mode (DC or AC);
- upper measurement limit.
Incorrectly set parameters will certainly lead to breakdown of the measuring device.
When the user does not know the magnitude of the current in the circuit, it is necessary to set the maximum measurement limit. If the set range turns out to be too high, it is gradually reduced using the tester operating mode switch.
A device for measuring current is connected in an electrical circuit in series with the load. When measuring large currents, the multimeter is connected to the circuit through a current transformer, shunt or magnetic amplifier. If measurements need to be carried out in electrical circuits with a voltage of more than 1 kV, use a current transformer (alternating current) or a magnetic amplifier (direct current).
Features of working with a multimeter
When working with electricity, it becomes necessary to measure various parameters: voltage, current, resistance and others. Being a universal device, the tester allows you to make all these measurements without resorting to a variety of devices with a narrow focus. This is quite economical and convenient , but it requires some knowledge about how to use a multimeter, in what cases and situations it is appropriate and where it is not, what settings to make and how to take measurements correctly. And given that testers can differ not only in size, but also in functionality, you need to understand what a particular device is capable of.
How to correctly check the current in a socket with a multimeter
You cannot insert probes into the socket to the phase and zero contacts; to perform the test, you must connect a “load,” that is, any electrical appliance.
Below is a diagram for measuring the current of a transformer; a regular incandescent lamp is connected to its contacts as a load. As can be seen from the display readings, the current is 1.14 A. It is important to understand that in the home electrical network the indicators are higher, so you should not take risks by directly “shorting” phase and zero with multimeter probes.
In fact, the following sequence of actions is performed to check:
- the current in the socket selected for measurements is turned off (automatically on the panel). You can check whether the outlet is connected or not by measuring the voltage with a multimeter. This procedure is safe even under load;
- The front (protective part) is removed from the socket so that there is direct access to the contacts. After this, a contact is connected to one of them, for example, a phase one, through a terminal block from the plug (wire) of any low-power electrical appliance - a table lamp, for example;
- further, as shown in the illustration, also through the terminal blocks, the free pin of the plug (lamp wire) to one of the probes, the free contact of the socket to the other. In most modern multimeters, the polarity of the connection (where to connect the positive probe, where the negative probe) is not important, the readings on the display will be the same. If the polarity is reversed, a “-” sign will appear next to the numbers;
- After the connections have been made, the socket will be automatically plugged back into the general house circuit. After turning the lamp switch to the “ON” position, measurements can be taken. The current will vary for different consumer devices. So, when connecting a regular incandescent lamp, the current will be about half an ampere.
Tips for connecting and using a multimeter
Analog
The first copies of this type of tester appeared at the beginning of the 20th century. Today, most ordinary users and specialists prefer digital meters to analog ones due to a number of disadvantages of the latter. It is only partially possible to check amperes with a multimeter of this type, since many models do not have AC meters. In addition, pointer testers do not provide updated data.
It can measure the following characteristics:
- DC current up to 250 mA (milliamps);
- direct and alternating voltage up to 300 V (volts);
- resistance force up to 2.5 MΩ (mega ohm)
Measuring the correct electric current with a multimeter will not be difficult with a tuned instrument. First, prepare the device. Scroll the selector to sector A and select the desired range. The kit includes two cables that are inserted into the corresponding sockets on the tester. Next, we begin the measurement procedure itself. Having touched the plus and minus points of the device being tested with the probes, we monitor the deflection of the arrow on the dial and read the value. The whole procedure takes no more than 5 minutes.
Despite the above-mentioned disadvantages of the device, it also has undoubted advantages. It is relatively easy to use, necessary for home use, and is inexpensive compared to a digital multimeter.
Digital
Multimeters of this type have replaced analog ones, and the main advantage over the latter is the high accuracy of the outgoing data. As in the previous case, prepare a multimeter before carrying out tests. We connect the cable to the connector marked ADC. A tester for determining current strength is connected to an open circuit.
It is necessary to cut the wire in two places and strip both ends. Then we connect them to the probes. It is important to remember that they do not touch each other. Then, the circuit can be turned on and measurements can begin.
The advantages of digital multimeters also include automation of many processes. So, some models are capable of independently setting the desired range, and will display a corresponding notification on the screen. On expensive models there are no switches between AC and DC. Again, it automatically determines the nature of the conducted flow of electricity. The wide functionality also includes a thermometer, light and frequency meters.
How to measure current with a multimeter on a battery
Any machine has its own minimum amount of current leakage, which varies, in amperes, from 0.01 to 0.08. First, it’s worth understanding the causes of current leakage in the car. One of them may be that the owner simply forgot to turn off the lights, for example.
There are cars that have a bad factory design built into them. This can be considered a glass heating system, which conducts its power chain bypassing the ignition switch. Let’s not forget about children who love to sit in the driver’s seat, turning various instrument levers.
The second global reason may be an incorrect connection. Thus, during the period of global interest among car enthusiasts in music and radios, the battery charge was melting before our eyes. This happened because the installers did not know how to connect the devices correctly. One ignition wire passed through the ignition switch did the job. If you have an anti-theft system installed, and the next morning you find an empty battery, then there is no need to guess.
We also advise you not to leave recorders, radars and other devices in cigarette lighters and sockets. Not all cars provide them when the ignition is not working.
In order to determine current leakage, you need to perform some steps. So, with the hood open, unscrew the negative terminal from the battery. Next, after removing it, set the multimeter to amperage mode. Place a probe into the gap between the terminal and the battery contact. Numbers appear on the display that reflect the amount of leakage. If you see the readings in mA, then you can rest assured. If the measurements are presented in amperes, then hurry to take certain measures.
How to measure DC voltage with a multimeter
Let's take a battery like this. As we can see, it says a current of 550 mAh, which it can supply to the load for an hour, that is, milliamps per hour, as well as the voltage that our battery has - 1.2 Volts. Voltage is understandable, but what is “current for an hour”? Let's say our load, a light bulb, consumes a current of 550 mA. This means the light bulb will shine for one hour. Or let's take a light bulb that shines weaker, and let it consume 55 mA, which means it can work for 10 hours.
We divide the 550 mA value that is written on the battery by the value that is written on the load and get the time during which all this will work until the battery runs out. In short, anyone who is good at mathematics will not have any difficulty understanding this miracle.


