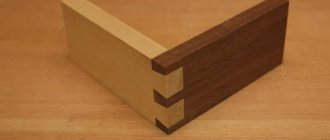
Application of dovetail joint
As a rule, this method of fastening is used if there is a need to obtain securely interlocked parts or a solid product at the output.
Here are the most common applications:
- Mechanical engineering production. Dovetails are used to connect elements of compressor devices together. It can also be found in metal cutting equipment and optical instruments.
- Construction works. This method is used to join timber during the construction of wooden cottages. It is also used in carpentry to create window and door blocks, arched structures, partitions and niches.
- Furniture industry. This type of tenon joint is often chosen for fastening frame parts, doors, and drawers. For greater reliability, the joints are additionally glued.
When installing various wooden containers, dovetails are also often used.
Tenon-groove connection: tenoning device and cutters for a hand router
Knowing how to make a tenon and groove with a hand router, you can even at home make not only beautiful but also reliable furniture, but also various wood structures characterized by excellent load-bearing capacity. The tongue-and-groove system connects not only elements of various furniture (tables, chairs and shelves), but also frames of low-rise buildings that experience significant loads during operation.
A tongue-and-groove joint made by hand
In order to make a tenon on a wooden beam using a hand router, several conditions must be met:
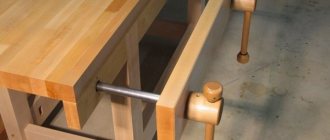
Even using the simplest tenoning device for a router when performing such processing, you can not only increase its productivity and quality of the result, but also make the technological process safer. It is especially important to use such a device, which can be made with your own hands, in cases where furniture is produced not in single copies, but in series (in this case, the craftsman has to perform a large number of similar operations both with the same type and with wooden pieces of different shapes and sizes details).
The use of devices will speed up the process of making joinery joints using a router
Types of dovetail joints
Today, many different types of fastenings have been developed. To determine the variety of swallowtail, a view from above is necessary. Possible options will be discussed below.
- A rough connection is distinguished by good visibility of the connecting parts. In the hidden version, the body of one part masks the teeth of the second. The through type of fastening involves the tenon covering the entire width of the second element. When choosing a one-sided tenon, only part of it is removed, and the other side is not touched.
- Dovetails can vary not only in appearance, but also in the size of the grooves and teeth. The technical documentation contains information on a scale that combines key dimensions of individual coupling parts.
For the rough variety, a scale of 1 to 5 is used. It is recommended for soft wood and allows you to reliably connect even large parts. If hard wood is used, then it is better to choose the 1 to 8 option. In this case, the joints will look more attractive.
What should you consider when designing a connection?
When designing a dovetail, there are a number of considerations that will affect both its strength and appearance.
Interval between spikes . The distance between the tenons and their size determine the strength of the connection.
At equal intervals (ratio 1:1), the mechanical strength is the highest. But this configuration is rarely used. Because due to the larger number of elements, manufacturing the part takes corresponding time. The likelihood of making mistakes that will cause a loose fit is also higher. Typically a ratio of 2:1 or 3:1 is used. In these cases, the strength of the connection remains just as high.
When joining wide parts, additional tenons are made at the edges at small intervals. This solution helps to effectively combat wood warping.
The dovetail angle is an important parameter that determines the mechanical characteristics of the joint. If the angle is too small, the lock will not lock and the fastening will turn into a regular tenon joint. If the angle is too large, the tapered part of the dovetail may split during assembly and the tenon will fall off.
For soft wood, the dovetail angle is made steeper, since it is more susceptible to crushing and deformation under loads. The optimal ratio is 1:6. For hardwood, the angle is made less steep - 1:8.
The design principle of the dovetail shape is shown in the drawing.
Algorithm for making a connection
A dovetail is quite easy to create if you do all the necessary preparatory work in advance. Mechanical experience will also not be superfluous, because the product must be strong and beautiful.
Areas of application
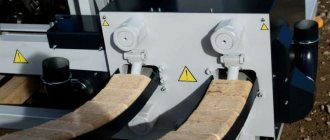
Such devices are very widely used for profiled timber. Therefore, it is extremely difficult to do without them in private housing construction. Most often this means a connection with manual cup-cutting machines. This best meets the requirements of the geometry of finished products and the main characteristics of the cutters themselves. Without any particular difficulties, it will be possible to make T-shaped connections between walls of different thicknesses.
This use of a cutter for making grooves is necessary, in particular, when cutting partitions, as well as when making extensions to the main structure. It is customary to prepare grooves in the main logs of the structure, and connecting parts - in secondary nodes. This is exactly the case when a cup cutting device is needed. The wood cutter for the groove is equipped with knives made of hard alloys.
With its help (subject to further improvement) it is possible to obtain a cutting end edge.
The knives are secured with screws inside the housing. Each of the knives has a pair of working edges. It is possible to reduce energy consumption when cutting thanks to two varying angles relative to the torsion axis. Dovetail connections are actively used:
in the construction industry;
in furniture production;
in some units of metal-cutting equipment;
in individual optical devices.
Tools
To make a corner connection, you should prepare:
- board;
- Beam;
- Wood glue.
If you need to join the outer corners of the house, then experts advise purchasing also a sealant for additional processing of the gaps.
To make tenons and grooves, you need:
- Square;
- Knife;
- Set of chisels;
- Crafting table;
- A saw suitable for the desired type of fastening;
- Hammer;
- Sander.
If you plan to use a connection on large elements, for example, when constructing a building, then it is recommended to make a series of calculations, select the appropriate type, determine the number of tenons, the angle of inclination, etc.
Work progress (step by step)
Before you begin, you need to mark all the blanks with a pencil.
The order of steps to create a dovetail is:
- Mark the tenons using a square. It is recommended to mark the parts that will need to be removed with a saw in color.
- Carefully cut out the thorns.
- Remove waste. You can use a jigsaw or a chisel.
- Mark the dovetails. It is recommended to place the element with tenons on a prepared piece of wood so that its end part coincides with the line of the shoulders. Only then can you begin to apply markings.
- Carry out sawing work. Remove waste, trim allowances and clean up.
- Join the parts to check the tightness of the fit. If necessary, remove excess with a chisel.
- Glue the connected elements together and clamp them with a clamp, having previously placed wooden strips so that the load is distributed evenly.
It is more convenient to make a dovetail using a manually driven framer. In this case, the quality of the finished product will be much higher, and it will take much less time to manufacture.
Instructions for working with the ds5 (dw3) template
Instructions for making an open dovetail joint on a ds5 (dw3) template.
Let's consider manufacturing using the ds5 template. The production of this connection is quite labor-intensive, because When working, you need to use both sides of the template, and to do this you will have to remove and reinstall it.
First, let's look at the template itself and the information that is depicted on it:
- The tapered side of the template (bottom protrusions in the picture). On the conical side of the template you need to work with a straight (cylindrical) groove cutter f12mm and a copy sleeve f17mm. Inscriptions on the template (bottom of the picture, left):
L=30 – template step,
D=17 – diameter of the copy sleeve that must be used with this template,
f=12 – diameter of the groove cutter.
- The straight part of the template (the upper protrusions in the picture). On this side you need to work with a cone cutter with parameters similar to those of the cutter with article number 9317 from the ENCOR company. The parameters of cutters used with box templates are presented in the table:
Inscriptions on the template (top right):
L=30 – template step,
D=17 – diameter of the copy sleeve that must be used with this template,
f=9317 – article number of the cutter from the table.
Let's first consider working with a cone cutter art. 9317 on the straight side of the template. This is what you should get:
- We install the 17mm copy sleeve and the cutter into the base of the router:
In the example, we will use the maximum possible thickness of the workpiece – 22mm. This thickness is determined by the parameters of the cutter:
The height of the working part of the cutter art.9317 is 22mm, the thickness of the ds5 template (like any other) is 4mm, therefore, to obtain a tenon of the maximum size, it is necessary to set the cutter relative to the base of the router at 26mm.
We put the configured router aside.
2. Install the workpiece into the fixture.
The workpiece must be positioned above the plane of the fixture by at least 30mm, so as not to damage the cutter on the iron base of the fixture.
We clamp the workpiece and move the side support tightly. We also fix it.
3. Install the ds5 template. It is attached to the sides of the frame with M4x12(16) screws and nuts, which are included in the kit. The template must be shifted relative to the edge of the workpiece by an amount that is a multiple of half the step. Those. The template pitch is 30mm, the distance between the mark on the template and the edge of the workpiece should be a multiple of 15mm, in our case – 45mm.
We take the prepared router and make the first tenon:
Next, rolling the template with a sleeve, we make the remaining tenons:
Similarly we make the other side of the workpiece, we get:
Without changing the side settings, we make the required number of blanks.
We proceed to the tapered side of the template and the cylindrical cutter.
This is what you should get:
As you can see, the dimensions of the tenons/grooves of the drawer sidewall blanks and the front/back wall are slightly different. This is done to create a obviously tighter connection.
1. Set up the router and cutter. We set the cutter so that it protrudes beyond the plane of the router sole by 26mm. We do not change the bushing, it remains 17mm.
2. We fix the workpiece similarly to step 2 when working with the straight side of the template and a cone cutter.
We rotate the template in a horizontal plane by 180° and install it so that the line drawn across the tenons of the template coincides with the edge of the workpiece.
When this match has been achieved, it is necessary to move the template left/right, so that the distance between the line marked on the template along the tenons and the edge of the workpiece is a multiple of the template pitch, in our case 60mm.
We fix the template, you can start working
We make the following grooves and, turning the workpiece over, repeat the procedure on all walls of the future box. We get:
Assembling the box:
Example No. 2
We try a workpiece 12mm thick. Short review. Let's just focus on setting the cutter overhang. This is what happens if you leave the cutter overhang at 26mm.
The overhang of the cutter should be equal to the thickness of the workpiece + 4mm (thickness of the template). In our case 12+4=16mm
We work on the tapered side of the template with a groove cutter. We get:
We rearrange the template, work on the straight side of the template with a cone cutter.
We collect:
The dw3 template is completely identical to the ds5 template (only longer).
When working with the ds6 (dw4) template, it is worth considering that the copy sleeve must be used with diameter 19mm.
The connection tension is regulated by replaceable copy bushings, i.e. By installing a 17mm bushing instead of a 16.9mm bushing, we get a less tight connection, and by installing a 17.1mm bushing, a tighter connection.
When working with a router, do not forget about safety precautions.
Good luck with the templates. If you have questions, suggestions, ideas for modernizing templates or devices, write to e-mail: [email protected]
Pros and cons of dovetail joints
pros
This joining method for cladding and thermal insulation of the walls of a wooden building has the following advantages:
- Less wood waste;
- Significant expansion of the interior space of the house;
- The evenness of the corners makes it possible to cover the walls with siding, clapboard or gypsum board;
- Maximum adhesion reliability among all types of connections;
- No need to use hardware products;
- Low cost of construction work.
In addition, the dovetail serves as an excellent protection against moisture penetration into the home. It is also worth noting a number of other advantages:
- Preservation of wood structure;
- No natural deformation of the material;
- Possibility of adjusting the fastening power;
- Increasing the strength properties of the product.
Minuses
The connection has only two disadvantages:
- Closed corners negatively affect resistance to temperature changes, which means there is a high probability that mold will grow on the surface of the wood. The solution is to lay waterproofing or treat it with special compounds.
- Making fastenings requires the master to have skills, which makes it impossible for a beginner to build a house with his own hands.
Dovetail is practically the most effective way of attaching wooden elements to each other. The spikes and teeth cannot be separated from each other even without glue. In addition, such a connection looks very decorative.
Thanks to these advantages, this joining method is used in many areas, from construction to mechanical engineering. It is also used in applied arts.
DIY accessories for a wood router
The machine itself is a very ancient invention of mankind, descriptions of the principles of milling appeared in the 16th century, and the prototype of the machine was the invention of Leonardo da Vinci, who proposed rotating a round file to increase the processing of the product, which can be considered the first analogue of a milling cutter.
And already the American inventor Eli Whitney, over the years of his life from 1765 to 1825, brought to fruition all the scattered attempts to create a full-fledged machine, for which he is rightfully considered the creator of the first milling machine, although not all scientists agree with this statement. And since the machine has such ancient roots, there are a great many adaptations for the manufacture of various parts, it is not possible to describe them all in the light of this material, and therefore we will consider only some of them, in my opinion, the most important and useful.