Almost no one works with gas cutters anymore; more and more specialists and amateurs use manual plasma cutting, which is convenient and productive. There are plenty of positive factors that speak in favor of manual plasma cutting, but you need to have sufficient knowledge to choose this equipment wisely.
If you have a high-quality and functional plasma cutting machine at hand, you don’t have to graduate from a technical school to learn how to use it correctly, you just need to know some operating rules.
Operating principle of plasma cutting
Plasma cutting is a separation treatment of metal using a thermal process. The role of the cutting tool here is played by a jet of low-temperature plasma.
Operating principle of the plasma device:
- An electric arc with a temperature of 5000C is created between the metal being cut and the electrode or nozzle of the plasma torch.
- Gas enters the nozzle under pressure, due to which the temperature of the electric arc rises to 20,000C.
- The gas is ionized and converted into high temperature gas or low temperature plasma.
- Ionization increases from the heated arc, and the temperature of the gas jet rises to 30,000C. During this process, the plasma stream has high thermal conductivity and glows brightly.
- Plasma flows from the nozzle at a speed of 500–1500 m/s, hits the prepared metal, heats it up and melts it at the cut site.
The process of cutting metal using a plasma torch can be seen more clearly in the video.
How to choose a band saw for wood?
A good woodworking machine is not cheap; purchasing such a tool must be approached responsibly. When thinking about which wood band saw to choose, you need to weigh and correlate the parameters of the tool and your own needs. According to the characteristics, band-type sawmills are divided into several types; you should choose a saw for yourself, taking into account the important characteristics:
- Capacity based on estimated production volumes.
- Characteristics of the working surface.
- Manufacturer of the machine.
Hand band saw for wood
Small-sized tools are not inferior in their properties to professional machines for large-scale production. A mini band saw for wood will serve faithfully a caring craftsman, and will definitely come in handy on the farm; with its help you can easily and simply perform various actions:
- cut down dry branches on trees;
- get rid of old seedlings in the garden;
- prepare firewood for the winter.
Types of plasma cutting
Plasma cutting of metal comes in several types:
- Simple . This method uses electric current and air. The length of the electric arc during such a process is limited, therefore, with a sheet thickness of several millimeters, surface treatment is compared to laser cutting. The simple method is used for processing only mild or low-alloy steel. When cutting the material, burrs are not formed, the edge remains smooth. Sometimes nitrogen can be used instead of air.
- Using water . During cutting, water is used to cool the plasma torch and protect the cut from the negative influence of the environment. In addition, all harmful fumes are absorbed by water.
- Using protective plasma gas . The cut during such cutting is protected from the environment, so the quality of metal cutting increases.
You can also cut metal using an arc or a jet. In the first case, the material being processed is part of the circuit, in the second, an arc is formed between the electrodes.
Types of band saws for wood
A carpentry workshop cannot do without a high-quality band saw from a trusted manufacturer. When choosing a sawmill, you need to understand the differences between the best band saws for wood. By type, sawmills are divided depending on the location of the blade, they are:
- vertical;
- horizontal.
Vertical band saw for wood
Machines for sawing wood of the vertical type are distinguished by the fact that the blade, which is in contact with the surface being cut, is located vertically. This type of wood table saw can be used in small woodworking shops, as well as in home workshops for household needs. Such a tool easily copes with materials of various widths and can work in any trajectory. The sizes of wood band saws of this type may vary. When choosing a vertical band saw, you need to remember the following characteristics:
- moving speed of the web;
- blade length;
- number of speeds;
- possibility of adjusting the angle of the table;
- depth of cut;
- machine weight.
Horizontal band saw for wood
Saws in which the cutting blade is positioned horizontally are widely used by professionals and novice craftsmen for cutting a variety of wooden materials. A horizontal wood band saw works well with both cross-cuts and miter cuts. Machines for industrial use can operate autonomously; electronic control systems in such devices calculate the size of cut surfaces down to the millimeter. The horizontal band saw for wood has the following characteristics:
- possibility of cutting at an angle;
- the ability to save a program for reuse (in electronically controlled machines);
- engine power;
- web speed;
- desktop size.
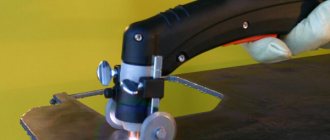
Device for plasma cutting of metals
The main element of the equipment is a plasma cutter, which is called a plasma torch. Its main components:
- Electrode , which is located at the back of the chamber. It forms an electric arc.
- The nozzle is responsible for the shape of the plasma flow and its speed.
- A heat-resistant insulator is located between the nozzle and the electrode.
In addition to the plasmatron, the metal cutting device is equipped with:
- compressor or gas cylinder;
- power supply;
- a set of hoses or cables designed to connect the plasmatron to the compressor and power source.
Since you have to work with the device in weight, the cut may turn out uneven. Therefore, to improve the quality of cutting, it is recommended to use stands or special stops that are placed on the nozzle.
In the video you can see how material is cut using a plasma torch.
Design and assembly of a tape machine
You can make a unit for sawing various materials yourself; band saws work great in workshops. You can assemble a saw with your own hands at the lowest cost and provide for all the details of the work.
Joinery units for sawing wood of the strip type have a work table at the base, working and additional elements are located on it, and the cutting blade is fed in a circular motion, resting on two wheels. To design and install full-fledged equipment, sufficient space is required, since the equipment, together with the supply line, is large.
You can make your own portable tabletop installation for manual sawing, but in a small workshop space you cannot cut logs into boards.
Frame structure
Solid wood is chosen for the bed to avoid vibration. The surface of the desktop can be made of thick plywood, and the side ribs can be edged with slats or metal. The supporting rod is made in the form of a beam. A schematic drawing is first made, the dimensions of the parts on which depend on the horizontal dimensions and height of the workshop. The pre-designed height of the frame, the diameter of the pulleys and the length of the rods are indicated. Accurate detail drawing can be made, which is more convenient for assembly.
The height of the table for work is provided at a comfortable size, while providing space for placing the drive and lower pulley, waste chips and the engine itself. The table can be of any shape, but often the frame is made in the form of a cabinet with closed sides, which at the same time serves to accumulate chips. Easy to open for easy cleaning.
The tabletop is located directly on the frame. Sometimes the height of the lower bed is not enough, in which case a strong extension is made to raise the surface of the desktop to the required height.
Installing the rod and pulleys
The support rod is made of a timber profile with a cross-section of at least 8×8 centimeters. Two supports are attached to it from the side taken as the conventionally rear surface, on which the pulleys (wheels) will be located. The supports are made of strong material; plywood with a durable frame is acceptable. The distance between the wheels is chosen so that the sawn log passes with a margin on the sides.
The diameter of the pulleys is chosen arbitrarily; an increase in the indicator leads to better work. For selection, there is an unspoken rule according to which the ratio of the cutting blade to the pulley diameter is 1/1000. For example, for a 4 mm wide belt, the wheel diameter should be 400 mm.
The diameter of the wheel for tensioning the belt drive is selected depending on the length of the cutting belt, the diameter of the main pulleys and the engine speed.
The edge of the belt pulleys is made slightly convex, about 5-10˚, which promotes self-centering of the belt, which is why it does not go to the side and does not fall off. A shallow groove is provided on the drive pulley to accommodate the belt. Typically, inner tubes are used to cover the pulley, the rubber of which prevents the tape from slipping off.
The upper pulley is placed on a horizontally moving block to select the belt tension. To do this, you need a lifting mechanism, a simple version of which is a beam connected by a spring to a lever and located under the block. The lever is secured with several bolts at different levels, and the spring provides the required pressure.
The lower pulley is made up of two wheels (driver and driven) located on an axle. It is important to balance the lower and upper pulleys in plane, minimizing the appearance of “eights”. The upper pulley is conveniently secured with self-aligning bearings firmly attached to the wheels. After completing the assembly of this stage, a test run of the unit is carried out for a short time.
Installation of guides for canvases
To ensure that the saw cuts the material smoothly and the tape is not pressed through, guides are installed on a narrow beam along the blunt saw end. A common version of the device consists of three bearings located on the beam, one of which rests the flat side of the canvas, the other two support it from the sides. Sometimes wooden stops are placed on the sides instead of bearings.
The guides are aligned at the reference point so that there is no vertical deviation at the opposite end; for convenience, the position of the beam is noted with the canvas stretched.
Cutting band soldering process
Soldering in the workshop occurs as follows:
- the places at the junction of the canvas are ground at both ends, and a brass strip is placed between the surfaces;
- to make a strip, cut a piece of brass (0.3−0.4 mm) to the width of the saw blade, moisten it and sprinkle it with borax powder on both sides;
- The mite sponges are heated in an accessible way (gas burner or forge) until they are bright red, applied to the site of adhesion and pressed;
- the strip is heated by hot sponges, the brass melts and spreads, and borax works in the form of a flux, which prevents oxidation of the solder when heated;
- The pliers are not removed until the joint has completely cooled and the solder has hardened; after removing them, the joint is moistened with a wet sponge for hardening;
- inspect the joint, its hardness should correspond to the fabric;
- if the joint is hard, then the heating procedure with pliers is repeated until the joint becomes straw-colored, and gradually cooled;
- soft soldering requires another hot heating with tongs and more rapid cooling;
- to prevent the pliers' jaws from being soldered to the saw strip during the process, a chalk solution with liquid glass is applied to their contact surfaces;
- to install and tension the lower and upper pulleys, use a handle, check the correct placement of the stop on the disks and rollers by rotating, and adjust the correct passage;
- turn on the unit for a short time and further adjust it if necessary.
Installing additional guides
The ideal position for the guides is considered to be a distance of 30-40 mm from the log; it is not recommended to do more. If the band saw will cut wood of different widths, it is better to provide the possibility of adjusting the guide elements.
After these assembly steps, the band saw is ready for use, but safety precautions require the manufacture of a protective casing for installation on the upper pulley. This is done in case the rapidly rotating belt slips off the pulley - this way it will be held up by the casing.
The container for collecting chips is made easy to remove and clean. Since waste collection is usually carried out in the lower part of the frame, the belt drive is placed in the side space so that it does not become clogged with chips. The engine is also covered with a casing to prevent dust and processing waste.
To prevent the wood of the machine from deteriorating over a long period of time, it is treated with varnish, after using antiseptic preparations.
Advantages and disadvantages of plasma cutting
Compared to laser cutting, metal cutting using plasma has many advantages:
- The material can be cut accurately and quickly no matter how thick it is.
- Using plasma, any metal can be cut: refractory, ferrous, non-ferrous.
- A plasma cutting machine can process not only metal, but also other materials.
- The plasma torch easily cuts materials of various widths and at angles.
- During work, virtually no pollutants are released into the air.
- Products are obtained with virtually no contamination and with the least number of defects.
- A plasma torch can be used to perform artistic work. With its help, artistic cutting of parts and complex figured cutting are available.
- Since the metal does not need to be heated before work, the burning time is reduced.
All the advantages of plasma cutting can be seen in the video below.
Like any device, along with its advantages, the plasma torch has its disadvantages:
- the need to comply with service rules;
- a lot of noise created by the device during its operation;
- the thickness of the metal being cut should not be more than 10 centimeters;
- high cost of the plasma torch.
What is a wood band saw used for?
When choosing a tool for smooth sawing of wood, special attention should be paid to household wood band saws. Adjusting the cutting blade speed and direction allows you to use the sawmill for a variety of jobs. The ability to select the tooth size to work with a specific type of material expands the range of capabilities of the saw. A blade with large teeth is suitable for soft wood, and fine teeth for hard wood. Other features of the band saw make it an indispensable assistant for the home craftsman:
- Many band sawing machines have the ability to be precisely adjusted to suit the specific needs of the worker.
- Thin blades can be used to cut out shaped products and various decorative elements.
- A household wood band saw can work in any direction – both along and across the grain.
- Using a saw, you can create identical and mirror parts for furniture.
- The productivity of a band saw is higher than that of other types of tools.
- Band-based sawmills are safe.
Plasma cutting technology
Before using the plasma torch for the first time, it is recommended to watch the video and learn how the whole process goes .
- The plasma torch is placed close to the edge of the workpiece.
- The Start button turns on. After this, the pilot arc will light first, and then the cutting arc.
- The burner should be moved slowly over the material being processed, with an inclination of 90 degrees.
- The cutting speed is controlled by spatter control. If there are no splashes on the other side of the metal, then the material could not be completely cut. The reasons may be: incorrect burner angle, low current, high speed of the device.
- After completing the process, the burner must be tilted, as air will continue to flow for some time.
If during operation the plasma arc goes out for some reason, the gas supply must be stopped, then the device must be turned on again and processing must begin.
Band saw for wood - rating
This tool is widely used in carpentry shops. It is better to choose a band saw for wood based on the rating of the best time-saving, high-performance and reliable units presented below.
- JET JBS-12
. The wood band saw is designed to work with wide boards and beams, copes well with bulky workpieces, is powerful and productive, and has a stable metal frame that does not vibrate during operation. - Way Train UE-330
V. The horizontal type machine copes well with wood of any size, works at an angle, is equipped with a powerful motor and a large work table. - Corvette-35 Enkor
. A wood band saw has high power and blade speed. The high stand on adjustable legs adapts to any worker, and the beveled frame allows you to cut shaped workpieces of any shape.
How to use a band saw on wood?
This device helps to quickly and accurately make any cuts on wooden products. Practice and care are required when working with this type of tool, knowing how to use wood band saws will make the results worth the effort.
- Choose the right type of band saw, paying attention to power, speed, blade length, parameters of the working surface of the table, and electrical characteristics.
- The saw blade must be selected individually for each project, taking into account its width, thickness and tooth spread.
- Before work, you should check the movement of the working blade and adjust the guides.
- The working surface must be adjusted to the desired angle of inclination.
- Before work, markings must be made on wooden blanks.
- You can turn on the saw and wait until it picks up speed.
- Guide the workpiece along the guides and make a cut.
Setting up a wood band saw
Any power tool requires daily maintenance. It is necessary to spend a few minutes before work setting up and adjusting the band saw for wood. By performing simple manipulations, you can significantly increase the service life of the tool.
- The saw must be disconnected from the power supply and the working blade removed.
- Clean the guides from debris.
- Remove any dirt from the pulleys and vacuum the inside of the casings.
- Place the canvas in place, adjust the degree of its tension.
- Align the pulleys, they should be parallel and coplanar.
- Check the operation of the working blade and make final adjustments if necessary.
- Check the position of the bearings.
- Make sure that the working surface of the table is installed at the desired angle to the canvas.
DIY wood band saw
Making your own band saw is difficult. The wooden frame for the machine is assembled from scrap materials; any craftsman will have the necessary tools for assembly. The process of working on a homemade wood band saw can be divided into the main stages:
- The frame for the machine can be assembled from old furniture; a preliminary drawing will make the work easier and will allow you to assemble the saw to the required dimensions.
- The simplest homemade belt machine rests on a frame assembled from a rod and two supports. The distance between the supports should be thought out in advance; it should not be less than the size of the logs being processed; it is better to make it a little larger.
- You can use an old desk for the work surface; its cabinets can serve as containers in which sawdust will be collected.
- Depending on the engine parameters, it is necessary to calculate the diameter of the pulleys for the belt drive.
- For the lifting mechanism to which the cutting blade is attached, a massive spring is suitable, with the help of which the necessary pressure of the machine will be ensured.
- Guides are necessary to ensure that the cut is carried out along a straight line.
- In order for the machine to be safe, it is better to cover the pulley with a special casing.
- Treating the machine with wood varnish or painting will increase its service life.