Installing a plow on a walk-behind tractor
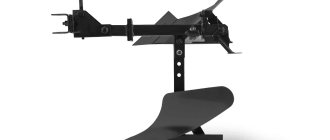
Regardless of the design features of the plow, its size and shape, it is attached to the walk-behind tractor with a special hitch. It can be universal or stationary. The first option is optimal due to the great possibilities for customizing the device.
The type of hitch does not affect the features of mounting the structure on motor vehicles.
You can attach a plow to a walk-behind tractor by following a simple diagram:
- The unit is installed on an elevated position. You can use bricks or logs;
- The plow hitch is attached to the towbar. Both holes on the devices must match completely;
- The clutch on the towbar must be secured with a bolt.
Do not forcefully tighten the bolt when attaching attachments. A connection that is too rigid will negatively affect the quality of plowing the soil. When creating resistance during operation of the plow, it will be thrown a little to the sides. To avoid this, it is necessary to leave a horizontal gap of approximately 50.
Characteristics
A mounted plow for a walk-behind tractor is a universal farming tool, without which high-quality cultivation of the land is simply impossible. Since its invention, it has been used by man to prepare the ground for further work. The process of working with a plow is called plowing.
During plowing, the top layer of soil turns, it becomes softer, weeds go into the lower layer of soil, and the top layer becomes prepared for sowing crops.
The Kaluga manufacturer of motor vehicles, JSC Kadvi, offers manufacturers not only walk-behind tractors and cultivators, but also attachments for them. For example, for the popular Oka walk-behind tractor and its modifications, the manufacturer recommends using a plow with a hitch.
| General characteristics | |
| Weight: | 7.8 kg. |
| Dimensions: | 535 mm/310 mm/410 mm. |
| Working width: | 190 mm. |
It is recommended to use a plow for the Oka walk-behind tractor for plowing or fertilizing the soil. The device is designed to work on soils whose area does not exceed 0.4 hectares.
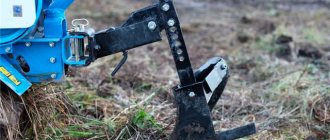
How to properly adjust the plow on a walk-behind tractor?
It is important to configure the plow on the unit correctly, since this will directly affect the quality and ease of soil cultivation.
The canopy adjustment is carried out in three stages, which are accompanied by the following actions:
- Plowing depth is adjusted;
- The tilt level of the field board is adjustable;
- The blade angle is adjusted.
Plowing depth determines how much the plow will be buried in the ground. Often this figure is equal to the height of the spade bayonet. If the depth is insufficient, many weeds will not be uprooted. If the soil is plowed too deeply, the fertile layer will mix with the lower layer of soil. This will lead to loss of nutrients necessary for normal plant growth.
The depth of plowing is adjusted by three bolts that connect the lock to the plow stand. The immersion level is adjusted when the plow is lowered down or raised up.
The level of inclination of the plow board or “angle of attack” indicates how inclined the tillage plane is in relation to the soil being cultivated.
The adjustment is made using a screw handle according to the following principle:
- The walk-behind tractor is placed on a hill;
- The handles are turned until the field board is positioned on the ground;
- The handle is twisted in the other direction until the board is positioned at a height of two to three centimeters above the ground.
If the “attack level” is too high, the plow will cling to the soil, causing the unit to slip. If the parameter is small, the plow will not be able to process the required soil layer.
To adjust the blade angle, follow these steps:
- The walk-behind tractor is installed on the edge of the cultivated area and the first furrow is passed to determine the optimal plowing depth;
- You need to walk along the most even path possible. You can pre-tension the thread;
- The walk-behind tractor wheel is placed in the furrow, the plow must be positioned perpendicular to the surface being processed. A square will make the task much easier.
Thanks to these steps, you can quickly and competently configure the plow on the unit.
Reviews
Andrey, Omsk:
“In the spring, we work with a plow on the Oka River, which is already 4 years old. Before that I only used cutters and didn’t do much plowing. The first time I walked around the site - the mini tractor pulls the plow well, the soil is loose. After the second pass, I really liked the quality of the soil - I didn’t even need a rake. I don’t recommend repeating my mistake - don’t use a plow where turf grows. The blade will not cut small branches, and the straps may break, as happened to me. Otherwise, I recommend using a plow, it makes the work much easier!”
Valentin, Kazan:
“Of course, I had to get used to working with the plow. Firstly, plowing turned out to be the hardest type of work, which is why I would not use a plow for a cultivator at all. But if the tractor is heavy, then it’s fine. “Oka” has enough weight, and sometimes it goes hard. I advise you to add additional load to the wheels, then the center of gravity will drop lower and the load on the axle bearings will decrease.”
Dmitry, Tula:
“Maybe someone will find my experience of working with a plow on the Oka useful. I always make adjustments so that the ploughshare and plow heel are in contact with the ground, while the stand should be in a vertical position. Then I go through the first rows, again adjust the stand to full vertical, and change the amount of recess into the ground with the screw on the hitch. IMPORTANT: the rear edge of the share is placed at the same level with the lug, with its internal dimension, when we pass the third and subsequent furrows!
Types of plows for walk-behind tractors
The following types of plows for tillage are distinguished:
- Single-hull . They are characterized by ease of operation, minimal weight and simple design;
- Reversible: reversible or rotary. The top of the structure has a curved feather that turns the ground when plowing it. This type of plow is best suited for cultivating heavy soils;
- Rotary. They are distinguished by the most complex structure. Manufacturers offer two-body and three-body models depending on the number of shares;
- Disk. They are most suitable for processing wet soil, but the depth of plowing of the soil is much less compared to other types of canopies of this type.
It is quite possible to make any plow yourself, taking into account its design features and following simple diagrams.
Plowing procedure
Now to the question of how to properly plow a plow on your walk-behind tractor, and what needs to be taken into account.
Before processing the entire area, a test plowing must be carried out. It makes it clear whether everything is set up correctly, and whether a person with such a plow and walk-behind tractor will be able to plow the entire garden efficiently. You need to clarify in advance the calculated depth to which the plow can go and normally perform its functions. Does the walk-behind tractor have enough power and weight to work with such an element?
Moving along the furrow, it is necessary to control the operation of the plow. If any problems are observed, then it is better to adjust the setting in the ground itself. Give an objective assessment of the load on the walk-behind tractor. If it constantly slips, gets stuck, or moves too easily, lifting a small amount of earth, then the adjustment is not done correctly.
Usually people start plowing in the fall, after the harvest. But winter is not the most favorable period. Even if you have acquired a powerful walk-behind tractor. When the ground is frozen, plowing with a light walk-behind tractor is unlikely to be successful.
But when plowing is carried out in a timely manner, a reliable walk-behind tractor and a plow correctly selected for it are used, then the procedure itself does not take much time and effort.
When plowing, you must adhere to the following recommendations and instructions:
- Place the equipment at the boundary of the site. Now engage first gear and hold the clutch handle. It is important that the steering wheel is parallel to the ground. This way the unit will move smoothly along the ground and not dig into it.
- The operator does not have to make any special efforts. The walk-behind tractor takes on the entire main load. If the setting is correct, the equipment should move on its own. A person’s task is only to correctly guide the walk-behind tractor.
- After cutting the first furrow, measure its depth using a tape measure or ruler. If the parameters match those that you initially specified during the settings, everything was done correctly, and you can confidently continue the procedure.
The plowing itself is not as difficult as the preparation process. Therefore, you need to treat the settings as responsibly as possible.
How to make a plow on a walk-behind tractor with your own hands?
Before you begin manufacturing attachments, you need to review the drawings. They indicate ways to attach the elements of the device to each other.
Scheme of steps for creating a plow with your own hands:
- Ploughshare. You will need a steel sheet of five millimeters thick, which is given the desired shape. The part for cutting needs to be beaten and sharpened (according to the principle of a hand scythe);
- Homemade dump. Take a pipe with a diameter of 50 centimeters and walls of 5 millimeters in thickness. The workpiece is cut with a cutter. To obtain the required shape, you should use an anvil and a sharpening machine;
- Collection of a single structure. You will need a steel sheet, its dimensions are 50*50 centimeters and a thickness of 3 millimeters. You need to step back 4 centimeters from the edges of the sheet and level it until you get a zero angle;
- A ploughshare is applied to the sheet, double-sided welding is done at an angle of 250;
- The upper part of the blade and the blade of the ploughshare are connected as tightly as possible at an angle of 80;
- The key elements of the ploughshare, side shield and rear part of the blade are welded together.
You can learn more about the specifics of making a plow from the video instructions.
It is necessary to re-measure all angles of the structure before final welding of all plow parts. After the attachment has completely cooled down, the weld seams are cleaned.
Dimensions
The dimensions of different types of plows may vary. You can consider the parameters of parts using the example of a rotary specimen. It is taken into account that the rotary type of such a device is assembled from the following bases:
- side vertical part of the runner;
- horizontal plane below the skid;
- front dump part.
The most productive is considered to be a plow in which the cutting edge at the bottom of the fixed share is 20 mm below the bottom of the horizontal skid. Another correctly aligned part of the plow is the matching of the cutting edge on the side of the fixed share with the cutting edge on the side of the moldboard. The share and blade should not protrude more than 10 mm beyond the boundaries of the vertical plane on the side of the skid.
There is one more important nuance - fastening the front plane of the blade share without visible cracks and gaps, and in the same plane. If we look at these parts in more detail, they should be well polished and, like a mirror, reflect any surface. There should be no protruding fasteners under any circumstances. As soon as the plow returns from earthworks, it is advisable to clean it of settled soil and foreign particles. Elements that have been polished should be poured with oil or coated with grease. Next, the mechanisms need to be rubbed using a rag. In this way, it will be possible to protect the structure from aggressive external influences, which can lead to the formation of corrosion on the surface of the plow.
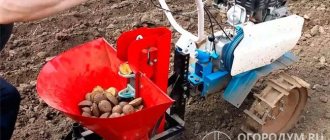
READ Do-It-Yourself Potato Planter for Motoblock
As for the 4th correctly constructed structure, it includes the flat front surface of the ploughshare, which makes an angle of 20 degrees with the flat part of the plow structure. It will be equal to the angle located at the rear of the exposed share. The cutting sidewalls-edges of the plowshare and blade will also have 20-degree angles with their bases on the side of the furrow. Moreover, the edge located on the side of the blade may be slightly rounded.
Disc plow: algorithm of actions
A disc plow-hiller is used to prepare even furrows for planting vegetables. Using the drawings, you can control the progress of the assembly and avoid shortcomings.
The manufacture of a disc plow is carried out according to the described scheme:
- Support corner as a basis. It is made from a corner with equal sides, its shelves after cooling should converge at an angle of 700;
- The sock is welded to the corner. The heel is welded to the thrust bar;
- The cheeks are secured to the support corner with loops. The end sides of the cheeks should not rest against each other when opened;
- The rotating mechanism is welded to the stop angle at a right angle.
Finally, you need to adjust the plow cheeks. They are fixed with a vice and adjusted until they are directed in different directions.
Rotary plow: algorithm of actions
A rotary plow for a walk-behind tractor with a support wheel is considered a complex type of canopy due to its design. It is necessary to work on it with special care so that mistakes do not negatively affect the quality of tillage.
The rotary plow is manufactured according to a certain algorithm:
- The cutter is a working part. For manufacturing, you need to prepare a steel tube and metal plates. The latter are welded to the pipe for subsequent grinding of the soil and throwing it to the side;
- Manufacturing the frame for the gearbox. It can be of any shape, the main nuance is that the frame must protect the gearbox from moisture, debris, and external damage;
- You will have to buy a gearbox. It is connected to the gearbox of the unit;
- The rotary plow is quite large in size, so you need to install wheels. Old motorcycle wheels will do just fine.
This design will last a long time. It is important to promptly change the oil that lubricates the gearbox to prevent breakdowns.
Features of work
Attachments make it possible to expand the scope of application of the Salyut walk-behind tractor. You can effectively carry out absolutely all the work typical of rural areas. Undoubtedly, before starting work you will have to thoroughly understand the instructions, because the effectiveness of the equipment is, first of all, the correct settings and adjustments.
Rotary plow
Using a rotary plow, which has left and right multi-directional plows in its design, you can plow in forward and reverse directions. For the most effective work, it is better to choose a model with a plow adjustment, that is, the ability to adjust the cutting depth and tilt angle.
Plow installation:
- depress the pedal;
- fix the stand;
- after that the entire structure is rotated 90°.
Zykov's plow
Zykov's plow is significantly different in appearance from other models. The video review clearly shows that its main differences are carefully selected angles and a completely different profile of the plow-mold surface, which makes it possible to better paint the soil and turn over the layer. Such plowing almost completely eliminates weeds.
Here is a review of plowing with a Zykov reverse plow on a Salyut walk-behind tractor
Double sided plow
A double-sided plow (hiller) is used for hilling agricultural crops and destroying weeds. This device is used to cultivate the soil and cut a furrow for planting plants. Subsequent backfilling is done by turning on the walk-behind tractor in reverse. The units are distinguished with variable and constant working width.
A device with a non-adjustable width works in conjunction with a lightweight walk-behind tractor; 12 mm racks reliably protect it from overload. The most widespread are hillers with variable widths that can be adjusted. Such plows work perfectly in combination with Salyut 5DK walk-behind tractors. However, they have one drawback - the soil crumbles after passing.
Dutch hiller
Less known is the Dutch hiller, which forms narrow wedge-shaped furrows due to the movement of its wings not only to the sides, but also upwards. The formed bed ensures better contact of the planting material with the soil. Structurally simple, easy to manufacture, cheaper in cost.
Disc dipper
The disc hiller is much more productive, but its price is 3-4 times higher than usual. However, according to reviews, owners do not return to their previous devices after working with a disk hiller.
Important! All hillers work better in first lower gear. Since the forward speed decreases, which is comfortable for the operator, the traction of the walk-behind tractor increases.
The Salyut walk-behind tractor with a Japanese engine is the most successful choice of agricultural equipment in terms of a combination of proven quality and reasonable price.
By purchasing all kinds of attachments and attachments, you can further significantly expand the capabilities of the walk-behind tractor, successfully cultivating more than one hundred square meters of land.
How to make a plow for a walk-behind tractor with your own hands from a horse-drawn one?
A horse plow, compared to other types of attachments, can be made entirely of wood. The only metal element can be the ploughshare.
Step-by-step instructions for making your own horse plow for plowing the land are given below:
- The handles are made of two wooden beams, the thickness of which is about 10 centimeters. The upper part of the handles is complemented by rubberized pads;
- The handles are connected at right angles, so it will be more convenient to hold them with both hands;
- The lower parts of the elements are connected with self-tapping screws;
- A beam 20 centimeters thick must be bent so that its ends are parallel;
- The lower end of the beam is attached to the ploughshare;
- At the upper end, the plow is attached to the walk-behind tractor. For manufacturing, you can use small wooden blocks;
- A double handle is installed in the middle of the mount.
The structure of a horse plow is very simple, but highly efficient.
It cannot be used when processing wet soil, so as not to break the wooden parts. The method of making a plow for a walk-behind tractor can be chosen to suit you. Each homemade canopy can be used with units of the popular brands Neva, MB-1 and MB-2, MTZ, Krot, Salyut.
Start of the season. We plow the land.
To begin with, I note that if you are going to plow the land with a plow, then for these purposes you will need a fairly heavy walk-behind tractor, weighing at least 70 kg. Its lighter brothers simply will not be able to cope with the resistance of the plow.
Before you start plowing the land, it is necessary to carry out preparatory procedures:
- Install ground hooks (metal wheels with a diameter of 50 and a width of 18 centimeters). We install our walk-behind tractor on a flat surface, unscrew the rubber wheels, and put ground hooks in their place.
- Hang up and adjust the plow. The plow is attached to the walk-behind tractor using a hitch: first we attach the hitch to the walk-behind tractor, then we attach the plow to the hitch. There are a couple of nuances here. The hitch is attached to the walk-behind tractor with a slight play to compensate for unevenness and varying densities of the earth being dug up. And do not immediately tighten the nuts completely when connecting the hitch and the plow, so that later it will be easier to adjust the installed plow.
- Check the oil level, as a lack of oil will inevitably lead to engine failure.
- Check fuel. The best Russian walk-behind tractors are equipped with gasoline and diesel engines. Two-stroke engines run on a mixture of gasoline and oil (the proportion must be indicated in the operating instructions). Diesel engines run on diesel fuel, and it can be used in both summer and winter.
- Check that all connections in the control systems are not loose and move with light force.
Now you can proceed to starting the walk-behind tractor.
How to plow properly.
For convenience, before starting plowing, use a stretched rope to mark the first furrow. Turn the handles in the direction convenient for you so that you can follow the walk-behind tractor on virgin soil while working. At low speed, plow the first furrow along your “landmark”, trying to maintain a plowing depth of at least 15 cm. Then turn around, place the walk-behind tractor with one wheel in the paved furrow and begin plowing the second furrow. And so on.
In principle, nothing complicated. The walk-behind tractor should move smoothly, without jolts, without your additional help. Just make sure that the guide wheel does not jump out of the furrow. As you gain skill, you can increase your movement speed. If the depth of the plowed soil is not sufficient, adjust the plow. And make sure that the engine does not overheat, giving it periodic “breaks”.
When cultivating small plots of land, many make do with just cultivators. Your walk-behind tractor, in combination with the included cutters, can easily replace such a cultivator. The only precaution is that the cutters break quite quickly, and you have to repair them or buy new ones.
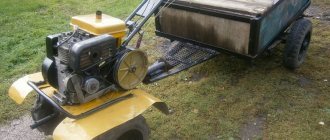
It is also possible to use a walk-behind tractor with a special adapter in the form of a trailer. Your unit will already be approaching the capabilities of a mini-tractor, and with its help it will already be possible to develop virgin soil. Here a heavier unit is needed, weighing more than a hundredweight; You may even need to make the wheels heavier. The process is slower; you will have to do this several times, gradually increasing the depth of plowing.